
Creating a Filtered List of Customers on a Mobile Device
0/5 (0 vote)
Creating a list of customers is very common task when creating business applications. Article demonstrates how simple it is to create a mobile application using Resco MobileForms Toolkit that shows a list of customers with search capabilities and professional look.
This is a showcase review for our sponsors at The Code Project. These reviews are intended to provide you with information on products and services that we consider useful and of value to developers.
Introduction
Creating a list of customers is very common task. When creating applications in a Windows Mobile environment, a programmer has the difficult task of coping with a device that has a small memory, a small display and a slow processor. Therefore, designing an application for a mobile device can be a lot more tricky compared to desktop designing a desktop application. In this article I will demonstrate how easy it is to design and program Resco AdvancedList control on Microsoft .NET Compact Framework platform, in an application that displays a list of customers. The main features of this application will be:
- Short loading time (display the list as soon as possible)
- Ability to search for a particular customer in the list
- Ability to use the hardware keys in the application
- Highlighting the search results in the list
- Ability to choose the level of details in the list
- All this in several tens of lines of code
Designing AdvancedList
Resco MobileForms Toolkit, which contains the AdvancedList control, can be downloaded here. After succesful installation, AdvancedList control should be present in the Visual Studio’s Toolbox. Drag it on the form together with one TextBox and design the main menu so that it looks like on the picture below:

Now we will use AdvancedList’s strong support for Visual Studio’s designer and thus have the most of the code generated. Go to the properties of AdvancedList control and edit its Templates property.
In the Row Template collection editor add a Row Template to AdvancedList. Set its height to 16 and name it 'Simple'. From now on I will refer to this Row Template as to simple Row Template. Edit the CellTemplates property. Add one TextCell to this simple Row Template. Set its CellSource and Name properties to 'ContactName' and change the TextFont so it is bold. This simple Row Template will only display the name of our customer.
Once the user selects a row, we want additional information to be displayed about the customer. Besides his name, we want to display the Address, City and Country. We need to create a new Row Template that will be used to display this data from a row. Go back to Row Template collection editor and add one more Row Template. Name it 'Selected'. Change ForeColor to 'HighlightText' and BackColor to 'HighLight'. Change its Height to 48. Add four TextCells to this Row Template. Name them:
- ContactName
- Address
- City
- Country
The size of the used font is 8 points by default. Having one row 16 pixels high is adequate to display text using an 8 point sized font. We will therefore make 4 TextCells 16 pixels high. It is now up to you to set their Bounds property so that they do not overlay (although they may) and that every TextCell's Text is readable. I used these values for Bounds:
- 0; 0; -1; 16
- 0; 16; 100; 16
- 100; 16; -1; 16
- 0; 32; -1; 16
In this sample, we will display data from a SqlCe database file called Northwind.sdf which you can download here. Then add it to your solution as a content.
You can now inspect the Northwind.sdf database in the Server Explorer tool of Visual Studio. You will find out that it contains a 'customers' table which contains the same column names as we gave to the TextCells in the Selected Row Template. The CellSource property defines the name of the columns which will be used to take the data from for the TextCells. Assign the CellSource properties of the TextCells in Selected Row Template accordingly. Also change their TextFont property to bold style. Confirm the changes.
We now need to let AdvancedList know that we want to use the simple Row Template to display unselected rows and the selected Row Template to display the selected rows. Set AdvancedList's TemplateIndex property to 0 and SelectedTemplateIndex property to 1. Those are indices of our Row Templates in their RowTemplate collection.
AdvancedList is now ready to load the data.
Loading the Data
To load the data from SQL CE databse, create the SqlCeConnection object and aSqlCeCommand object. Use this SQL command:
SELECT
ContactName, Address, City, Country FROM customers
Here is the code to make AdvancedList load the data. You can put it into the constructor of your form just below the InitializeComponent() call:
Me.AdvancedList1.DbConnector.Command = m_Command
Me.AdvancedList1.LoadData()
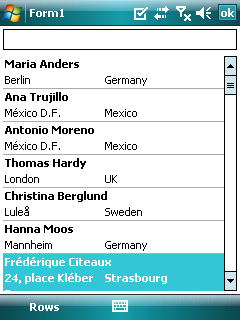
m_Command is the name of your SqlCeCommand object. The result can be seen on the following screenshot:

These two lines of code(except of those that you used to create the SqlCeConnection and SqlCeCommand objects) allowed us to display the list of customers. Now we want to shorten the loading time.
Me.AdvancedList1.DbConnector.Command = m_Command
Me.AdvancedList1.LoadData()
DelayLoad
What we created so far is just a simple list that allows the user to scroll it and select the customers to view further information about them. Let's make the list more sophisticated by using AdvancedList's DelayLoad functionality. Simply go to the designer of you form and on the properties pane of AdvancedList, turn the DelayLoad property on. Re-run the application and observe the results. The list gets loaded much faster, because it only loads ascreenful of records. As soon as the user scrolls down, AdvancedList loads additional records and displays them.
Adding Filter
The TextBox at the top of the form will serve as afilter input textbox. As soon as user types any string into the textbox, the filter will display only those records, which contain the typed string. The filter will use the SQL CE database to get the results. We will now handle the TextChanged event of the TextBox. Following code will do the trick:
Me.AdvancedList1.DataRows.Clear()
m_Command.CommandText = "SELECT ContactName, Address, City,
    Country FROM customers WHERE ContactName LIKE '%" +
Me.TextBox1.Text + "%'"
Me.AdvancedList1.DbConnector.Command = m_Command
Me.AdvancedList1.LoadData()
CType(Me.AdvancedList1.Templates(0)(0),TextCell).SelectedText = Me.TextBox1.Text
CType(Me.AdvancedList1.Templates(1)(0),TextCell).SelectedText = Me.TextBox1.Text


Refining the Application
To increase the user’s comfort and make the application usable on Smartphone platform, we will add support for hardware keys. To make AdvancedList support the hardware keys, simply use Visual Studio’s designer to turn on the KeyNavigation property. Since we want the user to be able to use the hardware keys also if the TextBox has focus, we will use this code in TextBox’s KeyDown event handler:
Select Case e.KeyCode
    Case Keys.Down
        If (Me.AdvancedList1.DataRows.Count - 1 >
            Me.AdvancedList1.ActiveRowIndex) Then
                Me.AdvancedList1.ActiveRowIndex += 1
        End If
        e.Handled = True
    Case Keys.Up
        If (Me.AdvancedList1.ActiveRowIndex > 0) Then
            Me.AdvancedList1.ActiveRowIndex -= 1
        End If

        e.Handled = True
End Select
We will add one final feature to the application. We do not know the size of display of the device the application will run on. If it is going to be a large display, then user could use it to display some additional information about every record and he would not care that the rows are a bit higher. On the other hand, if it is going to be a small display, he would probably appreciate, if the records were as brief as possible, so that many would fit on the display. We are now going to handle the events that occur if the user clicks the Show simple rows and Show detailed rows menu items, so that the user can choose the level of details displayed in each record. The first handler’s code will be:
Me.AdvancedList1.LoadXml(m_sPath + "\SimpleRows.xml")
The second handler’s code will be:
Me.AdvancedList1.LoadXml(m_sPath + "\DetailedRows.xml")
The XML files define AdvancedList’s settings (values of all its properties). You can save AdvancedList’s setting into an XML file any time in Visual Studio’s designer by right clicking it and choosing Save.

To make the whole application look more attractive, you can use the ability of AdvancedList to gradient fill the background of the Row Template objects:


Conclusion
The application that we created now fulfills all the requirements that we specified in the beginning. It implements a customer list that:
- displays fast no matter how many records your database contains
- provides a filtering capability which is as fast as the mobile SqlCe server
- visualizes the filtered output
- responds to the pressed keys
- level of displayed details can be chosen
About Resco .NET
Resco is adominant provider of developer components and tools for mobile devices running Microsoft Windows Mobile operating system. Started with development of end-user applications which are currently the best selling, Resco moved on to creating developer components, libraries and tools providing developer companies in designing aprofessional looking, yet easy and comfortable to use interface. To find out more about Resco developer tools, click here. To find out more about Resco, click here. You can download evaluation version of Resco MobileForms Toolkit here.