
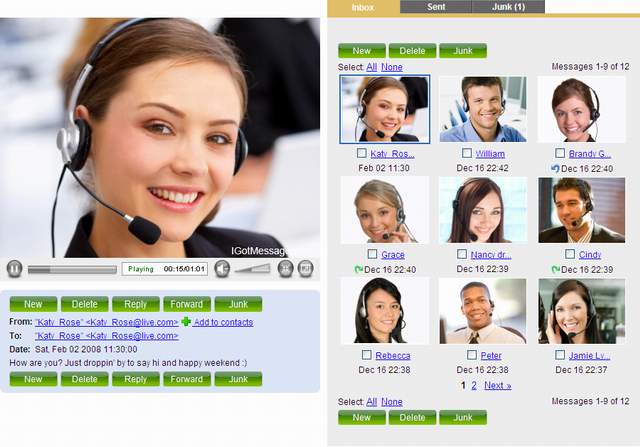
IGotMessage - Send a Video Message
IGotMesasge is an open source Web-based application that allows individuals to easily record and send video messages to others. The software is free to download, install and use, and is easy to integrate with any website.
- Download database - 316.78 KB
- Download doc_record - 48.12 KB
- Download demo (IGMHousekeeping) - 3.64 KB
- Download source (IGMHousekeeping) - 10.53 KB
- Download demo (IGotMessage) - 3.83 MB
- Download source (IGotMessage) - 591.05 KB
- Download Src_Bin.zip - 3.54 MB
All screenshots are modified for security purposes.

What is IGotMessage?
IGotMessage is an open source Web-based application that allows individuals to easily record and send video messages to others.
Hardware Requirements
- Pentium III or above
- 512 MB or more
- At least 30 gigabytes (GB) of available space on the hard disk
- Keyboard and mouse
- Video adapter and monitor with Super VGA (800 x 600) or higher resolution
- Sound card
- Webcam
- Speakers or headphones
Software Requirements
- Windows XP or 2003
- IIS 6.0 with SMTP service (The SMTP service is a relay agent only. E-mail messages are forwarded to an SMTP server for delivery.)
- Microsoft .NET Framework 2.0
- Microsoft SQL Server 2005
- ASP.NET AJAX Extension 1.0 (You can download it from here for free. It is recommended that you use the default setting.)
- Flash Media Server 3.0 (You can download a free developer edition from here. It is recommended that you use the default setting.)
- SMTP server (You can use your domain's mail server or your ISP as your SMTP server for your outgoing email.)
- Visual Studio 2005 (This is for developer only.)
Installation Instructions
Do-it-yourself installation is NOT recommended for novices. To Install IGotMessage v1.0, perform the following steps.
Step 1: Downloading and Unzipping Files
- Download the
database,doc_record,IGMHousekeeping_binandIGotMessage_binto your machine. - Unzip these files into a temporary directory on your hard disk.
Step 2: Enabling Audio & Video Streaming with Flash Media Server
Copy the folder doc_record under the FMS application folder. The full path might look something like this: C:\Program Files\ Adobe\Flash Media Server 3\applications\doc_record.
Step 3: Installing IGMHousekeeping Window Service
IGotMessage Housekeeping Window Service is responsible for deleting temporary files created by IGotMessage.
- Copy the folder IGMHousekeeping_bin to your C drive.
- To install the service, you need to use the InstallUtil program, which is a .NET utility to install Windows services. You can find it in C:\WINDOWS\Microsoft.NET\Framework\v2.0.50727. Alternatively, you could run a .NET Command Window by selecting Start -> Programs -> Microsoft Visual Studio .NET -> Visual Studio .NET Tools -> Visual Studio .NET Command Prompt, which sets all of the required paths for you.
Type the following command in the command window:
InstallUtil "C:\IGMHousekeeping_bin\IGMHousekeeping.exe"
- To start the service, open Control Panel -> Administrative Tools. Now click Services, locate IGotMessage Housekeeping Service, right click on it and select Start to start it:

Step 4: Configuring IGotMessage to Work with Microsoft SQL Server 2005
|
|
Microsoft SQL Server supports two different authentication mechanisms: SQL Server Authentication and Windows Authentication. In general, it's recommended to use Windows authentication. Scenario 1 - Using SQL Server Authentication
|


Scenario 2 - Using Windows Authentication with IIS and the Database on the Same Machine
- Expand the Security node and then click Logins. If MachineName\ASPNET doesn't exist, where
MachineNameis the name of your Windows machine, right-click Logins and choose New Login. Type MachineName\ASPNET in the Login name box. Make sure that Windows authentication is selected and then click OK.
- Go back to the database you attached previously, expand the database, then expand Security, and finally expand Users.
- Right-click the Users node and choose New User.
- In the Username box, type ASPNET and in the Login name type MachineName\ASPNET. Alternatively, click the button with the ellipses, then Browse to select the account from the Matching objects list.
- At the bottom half of the screen, you see a box labelled Database role membership. In this box, you can choose a number of roles that you want to grant to your new user. The rule here is: give users as few permissions as possible. A good choice is
db_datareaderanddb_datawriterthat allows the account to both read from and write to tables in the database.
- Click Securables in the left hand pane and click the Add button. In the dialog that follows, choose All objects of the types and then click OK. Then check Stored Procedures and click OK. The list with Securables will be filled with a number of stored procedures.
- Click the stored procedure,
sp_DeleteContactAndGroups, and then make sure at least Execute is selected in the Grant column of the Explicit permissions box.
- Repeat the above step for every stored procedure that starts with
sp_followed by a capital letter and the Schema isdboin the database. - Finally, when all permissions have been set, click the OK button to apply all the changes to the new user account.
- Open the Web.config in the folder in the C:\IGotMessage_bin and modify the connection string from:
<add key="connectionString" value="Data Source=WILLIAM-HOME;
    Initial Catalog=vMessageCenter;Integrated Security=True"/>
to:
<add key="connectionString" value="Data Source=YourMachineName;
    Initial Catalog=vMessageCenter;Integrated Security=True"/>
Notes for developers: You should consider encrypting connection string in Web.config to reduce the possibility of disclosing server names and database names.
Scenario 3 - Using Windows Authentication with IIS and the Database on Different Machines.
This document does not cover this scenario. However, the actions you need to perform are very similar to those of scenario 2. It's the exact user account that is different.
Step 5: Configuring Internet Information Services and SMTP Server
- From the Start menu, select Settings -> Control Panel -> Administrative Tools, and then open Internet Information Services (IIS) Manager.
- In IIS Manager snap-in, expand the Web Sites folder. Right-click the Default Web Site or folder within which you wish to create the virtual directory, select New, and then click Virtual Directory. The Virtual Directory Creation Wizard appears. Click Next. In the Alias box, type igotmessage for the virtual directory. Click Next. In the Directory box, type c:\igotmessage_bin. Click Next. Under Allow the following permissions, click Next and then click Finish.
- In IIS Manager snap-in, right-click the igotmessage folder you just created, select Properties. In the site's properties, click the Home directory tab and click the Configuration button. You'll get a form like this:

- Click Edit, and copy the path in the executable field. This is the aspnet_isapi.dll for the current version of the .NET Framework of your virtual site. Click Cancel to cancel out of that dialog and click Add. Paste the path into the executable, use the extension FLV and set your verbs limited to
GET,POST,HEAD,DEBUGlike this:
- In IIS Manager snap-in, right-click Default SMTP Virtual Server and select Properties. Click Access tab. Click Relayhttp://www.igotmessage.com. button and specify that only the host with 127.0.0.1 IP addresses may relay through this SMTP server.

- Click OK button to save your changes and close the dialog. Click the OK button again to save SMTP service properties and close the dialog.
- If you want to connect to remote SMTP servers that require authentication from the local SMTP Service, you must know a user name and password valid on the remote system. With this information, select the Delivery tab. Click on the Outbound Security button. On this dialog box, type the user name and password that should be used when connecting to a remote SMTP server. You can configure Integrated Windows Authentication to prevent clear text authentication. In some cases, you can only depend on Basic Authentication. Of course, to secure the communication, you can apply TLS encryption with SSL certificate. Check with your SMTP server administrator to identify these settings.
Finally, open your Web browser and type the following address: http://localhost/igotmessage/.
History
- 21st February, 2008: v1.0 Beta - First beta release