Consuming Amazon Web Services (SQS, S3) using C#.NET
Step by step overview of consuming Amazon Web Services (SQS, S3) using C#.NET
Introduction
In my recent assignment, I got an opportunity to consume Amazon Web Services (SQS, S3) using C#.NET. I thought let's write an article which will elaborate how to consume these services.
Background
Amazon Web Services[AWS]
Amazon provides various Web Services for Web based applications for their cloud based users. In this article, we will see how to consume “Amazon SQS” and “Amazon S3” Services using C#.NET.
Amazon SQS
What is Amazon SQS?
SQS is an acronym for “Simple Queue Service”. This is an alternate for many other Message Queuing Services like Microsoft’s MSMQ, IBM's MQSeries, etc. SQS can be used for Message oriented architecture based applications.
Reference for more details on Amazon SQS: Amazon SQS Details.
Consuming Amazon SQS Service with C#
Let’s go step by step for different operations for consuming SQS using C#.
Add Reference of “AWSSDK.dll” in your Project. [This you can copy from “Assemblies” folder of attached code.]
Add references of below namespaces in your Class.
using Amazon.SQS;
using Amazon.SQS.Model;
Declare object of “AmazonSQSClient” Class. Provide your “Amazon Cloud AWS Access Key Id” and “Amazon Cloud AWS Secret Key” in constructor parameters.
AmazonSQSClient objClient = new AmazonSQSClient
	("YourAmazonCloudAwsAccessKeyId", " YourAmazonCloudAwsSecretAccessKey");
Create New SQS Queue
Two lines of below code and our new SQS Queue will be created.
CreateQueueResponse queueResponse = new CreateQueueResponse();

queueResponse = objClient.CreateQueue(new CreateQueueRequest()
	{ QueueName = “SampleQueueName” });
Get list of Existing SQS Queues
The below code will return a List of all the Queues available for account specified above with “Amazon Cloud AWS Access Key Id” and “Amazon Cloud AWS Secret Key”.
ListQueuesResponse objqueuesResponseList = new ListQueuesResponse();

objqueuesResponseList = objClient.ListQueues(new ListQueuesRequest());

ListQueuesResult Result = objqueuesResponseList.ListQueuesResult;
Send Message to SQS Queue
[Please refer “btnSendMessage_Click” event of “SQSSample.aspx.cs” in the attached code for better understanding of the below code.]
//Full Url of Queue
string selectedQueue = this.QueuesList.SelectedItem.Value.ToString();

objClient.SendMessage(new SendMessageRequest()
	{ MessageBody = this.txtMessage.Text, QueueUrl = selectedQueue });
Isn’t it simple and easy till now? Let’s move ahead.
Receive Message from SQS Queue
While working with “receiving message” from SQS Queue, I found sometimes SQS does not return you a message. So that in the below code, I have specified “MaxNumberOfMessages” Property of “ReceiveMessageRequest” class to 10.
[Please refer “btnReceiveMessage_Click” event of “SQSSample.aspx.cs” in the attached code for better understanding of the below code.]
string message = string.Empty;
//Full Url of Queue
string selectedQueue = this.QueuesList.SelectedItem.Value.ToString();

ReceiveMessageResponse queueReceiveMessageResponse = new ReceiveMessageResponse();

queueReceiveMessageResponse = objClient.ReceiveMessage(new ReceiveMessageRequest() {
QueueUrl = selectedQueue, MaxNumberOfMessages = 10 });

ReceiveMessageResult objReceiveMessageResult = new ReceiveMessageResult();

objReceiveMessageResult = queueReceiveMessageResponse.ReceiveMessageResult;

List<Message> messagesList = new List<Message>();
messagesList = objReceiveMessageResult.Message;

foreach (Message objMessage in messagesList)
{
  message += objMessage.Body;
  receiptHandle = objMessage.ReceiptHandle;
}

Session["MessageReceiptHandle"] = receiptHandle;
txtReceivedMessage.Text = message;
You might have noticed that I am storing “ReceiptHandle“ Property value of “Message” Class object in Session["MessageReceiptHandle"] object. This will require us below, while Deleting this Message from SQS.
Delete SQS Message
[Please refer to “btnDeleteMessage_Click” event of “SQSSample.aspx.cs” in the attached code for better understanding of the below code.]
//Full Url of Queue
string selectedQueue = this.QueuesList.SelectedItem.Value.ToString();

DeleteMessageResponse objDeleteMessageResponse = new DeleteMessageResponse();
objDeleteMessageResponse = objClient.DeleteMessage(new DeleteMessageRequest()
{ QueueUrl = selectedQueue, ReceiptHandle = Session["MessageReceiptHandle"].ToString() });
Delete SQS Queue
Not always, but you may require to delete your SQS Queue.
[Please refer to “btnDeleteQueue_Click” event of “SQSSample.aspx.cs” in the attached code for better understanding of the below code.]
string selectedQueue = this.QueuesList.SelectedItem.Value.ToString();

DeleteQueueResponse queueDeleteResponse = new DeleteQueueResponse();
queueDeleteResponse = objClient.DeleteQueue(new DeleteQueueRequest()
			{ QueueUrl = selectedQueue });
Amazon S3
Amazon S3 is a Web based Storage Service of Amazon. Users can use this service for storing their files of their application. These files can be accessed / consumed as REST [HTTP] or via SOAP based Web Service. You can create multiple S3 “Buckets” to store your files. Bucket is a file storage location just like Folders of our disk.
Reference for more details on Amazon S3: Amazon S3 Details.
How to Create New Bucket on S3?
Login to your “AWS Management Console”.

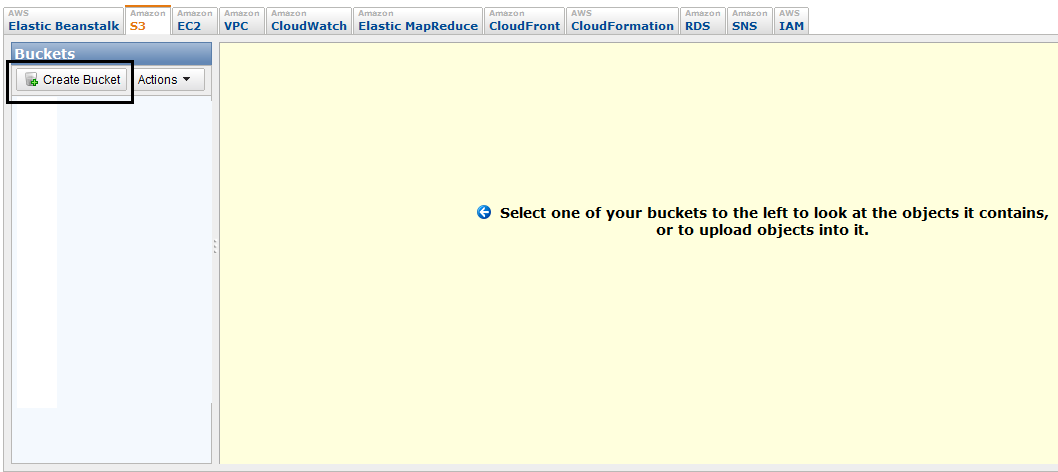
Select “S3” Tab and Click on “Create Bucket” button.

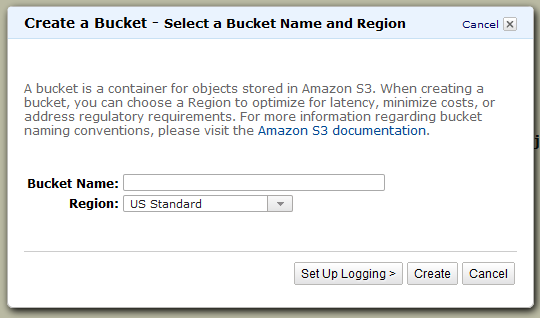
This will open up below window. Specify your “Bucket Name” and “Region” and click on “Create” button.

Your New S3 bucket is now ready!!!
Please select “Region” based on the region in which your Application Server will be hosted. This will make S3 operations of your Application faster.
Consuming S3 with C#
Add reference of “AWSSDK.dll” in your Project. Then add reference of below namespaces in your Class.
using Amazon.S3.Model;
using Amazon.S3;
Declare object of “AmazonS3Client“ Class and provide your “Amazon Cloud AWS Access Key Id” and “Amazon Cloud AWS Secret Key” in constructor parameters.
AmazonS3Client s3Client = new AmazonS3Client
	("YourAmazonCloudAwsAccessKeyId", "YourAmazonCloudAwsSecretAccessKey");
Uploading New File to Amazon S3
[Please refer “btnUpload_Click” event of “S3Sample.aspx.cs” in the attached code for better understanding of the below code.]
//Saving File to local disk folder.
string filePath = Server.MapPath("S3FilesUpload") + "\\" + fileUpload.FileName;
string fileExtension = fileUpload.FileName.Substring
			(fileUpload.FileName.LastIndexOf(".") + 1);

fileUpload.SaveAs(filePath);

string contentType=GetContentType(fileExtension);
//Push the given object into S3 Bucket
PutObjectRequest objReq = new PutObjectRequest
{
  Key = fileUpload.FileName,
  FilePath = filePath,
  ContentType = contentType,
  BucketName = "YourBucketName",
  CannedACL = S3CannedACL.Private,
};

PutObjectResponse response = s3Client.PutObject(objReq);
if (response.ETag != null)
{
  string etag = response.ETag;
  string versionID = response.VersionId;
}

//Deleting Locally Saved File
if (File.Exists(filePath))
{
  File.Delete(filePath);
}
Implementation of method “GetContentType” as below:
private string GetContentType(string fileExtension)
{
  string contentType = string.Empty;
  switch (fileExtension)
  {
    case "bmp": contentType = "image/bmp"; break;
    case "jpeg": contentType = "image/jpeg"; break;
    case "jpg": contentType = "image/jpg"; break;
    case "gif": contentType = "image/gif"; break;
    case "tiff": contentType = "image/tiff"; break;
    case "png": contentType = "image/png"; break;
    case "plain": contentType = "text/plain"; break;
    case "rtf": contentType = "text/rtf"; break;
    case "msword": contentType = "application/msword"; break;
    case "zip": contentType = "application/zip"; break;
    case "mpeg": contentType = "audio/mpeg"; break;
    case "pdf": contentType = "application/pdf"; break;
    case "xgzip": contentType = "application/x-gzip"; break;
    case "xcompressed": contentType = "application/x-compressed"; break;
  }
  return contentType;
}
We have specified “CannedACL” Property of “PutObjectRequest” class to “S3CannedACL.Private”. This is because we want to keep this File as Private so that unauthorized users should not get access to this file. To understand more modes of “CannedACL”, you can refer below URL.
Once we upload a new File to S3, its gets assigned with the below details:
- Bucket: YourBucketName
- Name: ImageName.jpg
- Size: 352.3 KB
- Last Modified: Fri Apr 08 11:14:40 GMT+530 2011
- Owner:Me
- ETag: d645cec635h79869a8ppfc16d909d51m
- Url: https://s3.amazonaws.com/YourBucketName/ImageName.jpg
“Etag” is an unique identifier of your uploaded S3 File.
Downloading File from S3
We can Access/Download File from S3 as a REST/HTTP URL.
For example - https://s3.amazonaws.com/YourBucketName/ImageName.jpg.
In case we have put restrictions by specifying “CannedACL” Property of “PutObjectRequest” Class while uploading File, then we can access/download this file by consuming Amazon Web Service as below.
We just need "ImageKey" (image Name) and "ETag" of the File to download it from S3.
[Please refer “btnDownload_Click” event of “S3Sample.aspx.cs” in the attached code for better understanding of the below code.]
string imageKey = txtFileName.Text;
string eTagToMatch = txtEtag.Text;
string extension = imageKey.Substring(imageKey.LastIndexOf("."));
string imagePath = Server.MapPath("S3FilesDownload") + "\\" + imageKey;

Stream imageStream = new MemoryStream();

GetObjectRequest request = new GetObjectRequest
	{ BucketName = "YourBucketName", Key = imageKey, ETagToMatch = eTagToMatch };
using (GetObjectResponse response = s3Client.GetObject(request))
{
  response.ResponseStream.CopyTo(imageStream);
}

imageStream.Position = 0;

SaveStreamToFile(imagePath, imageStream);
Implementation of method “SaveStreamToFile” as below:
private void SaveStreamToFile(string fileFullPath, Stream stream)
{
  using (stream)
  {
   using (FileStream fs = new FileStream(fileFullPath, FileMode.Create,
			 FileAccess.Write))
    {
      byte[] data = new byte[32768];
                    int bytesRead = 0;
                    do
                    {
                        bytesRead = stream.Read(data, 0, data.Length);
                        fs.Write(data, 0, bytesRead);
                    }
                    while (bytesRead > 0);
                    fs.Flush();
          }
       }
}
Alright, in this article we saw how to consume Amazon Web Services (SQS, S3). Hope you have enjoyed this.
