
Using CodeProject - A Day In the Life of an Application - Part 3 of 5
The right way to code using CodeProject for occasional support
Part 3 of 5 - Introduction
Links to Other Parts of the Series
- Part 1 - Building the basic application and adding the grid
- Part 2 - Adding a splitter window and swappable views
- Part 4 - Put the views into an extension DLL
- Part 5 - Modify the system menu, add XML profile support, and cleanup.
The following text is identical to Part 1. If you haven't already read that article, this article will be useless to you, so by all means, catch up. We'll wait here. If you have read the Part 1 article, you can skip these intro sections.
This article series is another in my series of "code we really use" articles. There is no unnecessary discussion about theory, no expounding on technique, and no chest-thumping because I thought it all up myself. It's just a bunch of stuff I did to stand one of our applications up. MOST of the stuff in this article is based on other code that I got from CodeProject, and what follows describes the basis for a project I am actively developing and how I integrated articles and help I got from CodeProject.
Rant
I've been a member on CodeProject for over six years (as of this writing), and I've come to discover some disturbing trends regarding articles. First, article authors tend to post an article and as time goes by, the author essentially abandons the article and people posting questions are greeted with either silence from the author, or a response that says something like "I don't code in this/that language any more". Let's face it, you can't blame them. Many of the articles I use are three or four years old, and I understand that programmers need to move on and that often means completely abandoning older code.
On the other side of the fence are the people that download the source code and samples associated with a given article. Many times, someone will post a question in an article that has absolutely nothing to do with the article itself, but the subject will be related to a certain aspect of the article. As an example, I posted an article about dynamically building a menu. Recently, someone posted a message in that article that asked about adding winhelp to their dynamically built menu. Then there's the people that encounter an issue (real or imagined) with an article, and expect someone else to fix it for them. These people really annoy me. After all, we're all supposed to be programmers here.
So, What's the Point of This Article?
The entire point of this article is to illustrate real-world use of code-snippets, classes and techniques I gleaned from CodeProject over the last six years, including work-arounds to fit code into my sometimes bizarre requirements. Many times, I'll use the VC++ forum to ask a question that will help me understand an article, or massage the article's code for my own use.
Assumptions
The original version of this article started out as a kind of detailed tutorial describing how to use the IDE, and other inane items like that. After a while, I realized this created a huge amount of overhead as far as the article's weight was concerned. Beyond that, I was starting to become bored with the whole thing and I could plainly see that the quality of my writing was beginning to suffer as a result.
The only solution was to start over and make the assumption that you, the user, have a working knowledge of the VS2005 IDE, especially as it relates to creating VC++/MFC applications. This way, we can talk more about the important stuff than suffer through stuff you should already know. I also assume that you have a decent working knowledge of MFC. I'm not saying you have to be an expert, but I assume you can move around in a MFC project without bumping your head on the intricacies of CMainFrame.
Other Stuff
Sprinkled throughout the article, you'll find "Coding Notes". These simply describe the way I do things when coding, and why I do them. They are certainly not requirements by any stretch of the imagination, but they often concern code readability and maintainability. I'm sure that many of you have your own ways of doing things, but please keep comments regarding these issues to a minimum. After all, this article is not about style.
The total process of coding the complete demo application requires just an hour or so (if you know all the steps ahead of time). Writing this article series has taken me DAYS, so don't be put off by it's length.
The html and images for this article is included in the project download, but doesn't include the pretty CodeProject formatting. If you can mentally handle that, you can simply refer to this .HTML file and get on with your programming.
Finally, I know there are folks out there that vote my stuff a 1 simply because it's, well, something I wrote. I request that you be mature and professional and restrict your politics to the soapbox when voting. Remember, you're voting on the article, not on the author.
What We've Already Done
In Part 1 of this article series, we went through the steps of creating a MFC SDI application and making the view a little more interesting by adding the MFC Grid Control to it. In Part 2, we added a splitter window and the ability to swap views within one of the splitter panes. In Part 3, we'll be adding a custom status bar class and some simple multi-threading capabilities that will update the contents of the status bar panes.
More Real-World Requirements
One set of requirements for my real-world application was to be able to request periodic updates from a database, update an elapsed time from a given starting point, maintain a clock in the status bar, and show countdowns in minutes and seconds to the afore mentioned database updates. The elapsed time was displayed in the grid, and the other three items were displayed in the status bar.
Before anyone points and laughs, let me remind you - programmers are not often asked for their opinions on certain features. In my case, I strongly objected to the display of the clock in the status bar because a) there was already one displayed in the task bar, and b) it stole precious CPU cycles. I seem to recall the words "stupid idea" flowing quite easily out of my mouth. No matter - the customer gets what the customer wants (and let that be a lesson to ALL of you). On with our story...
Of the four timers, only two triggered time-consuming database access, and thankfully, they occurred in different parts of the data access layer. My approach was to create a single timer thread that fired events at specified intervals. All of these events would be posted to and filtered by the CMainFrame class, which would then post messages to the necessary windows (or start other worker threads for database work).
A Couple Of Words About Part 3 Article Content
Due to the nature of the stuff we'll be adding in Part 3, I won't be talking about where to put stuff, but more about what I did and why. If you want to see the whole kit-n-caboodle, you can unzip the code over the Part 1 or Part 2 code.
A Custom Status Bar
Before I could start on the thread code, I had to have a mechanism for easily updating the status bar. I found this article -
- Downloading the class, and extract the following files into the
CodeProjectfolder (in our solution folder of course).
- StatusStatic.h
- StatusStatic.cpp
- ExtStatusControlBar.h
- ExtStatusControlBar.cpp
- Add the files to the project.
- Open MainFrm.h and add the following lines of code:
#include "StatusStatic.h"
#include "ExtStatusControlBar.h"

class CMainFrame : public CFrameWnd
{
private:
    CExtStatusControlBar m_wndStatusBar;
    CStatusStatic*       m_pLongStatus;
    CStatusStatic*       m_pShortStatus;
    CStatusStatic*       m_pSysTimeStatus;
- We'll be adding some helper functions as well, to keep the code neat and tidy, so let's add the function prototypes while we're here.
private:
    BOOL AddOnePane(CStatusStatic* pPane, UINT nPaneID,
                    CString sDefaultText);
    BOOL AddStatusPanes();
In MainFrm.cpp, we need to make some modifications to the code provided by the application wizard.
- Optional step - I didn't need the default indicators for my real-world application, so I commented them out like so:
static UINT indicators[] =
{
    ID_SEPARATOR,           // status line indicator
/*
    ID_INDICATOR_CAPS,
    ID_INDICATOR_NUM,
    ID_INDICATOR_SCRL,
*/
};
- Next, we have to add some code to
OnCreate()to modify the status bar. It seems that the default height of the status bar is too short to display lowercase versions of letters with descender, like "y", "g", and others. For this reason, we have to massage the statusbar immediately after it's created.if (!m_wndStatusBar.Create(this) || !m_wndStatusBar.SetIndicators(indicators, sizeof(indicators)/sizeof(UINT))) { TRACE0("Failed to create status bar\n"); return -1; // fail to create } //add these lines m_wndStatusBar.SendMessage(SB_SETMINHEIGHT, 20, 0); m_wndStatusBar.UpdateWindow();
After the call to
UpdateWindow(), we need to add another line that actually adds our custom statusbar panes.// now, let's add our new statusbar panes AddStatusPanes();
- Next, we add our helper functions that duplicate the functionality of the ExtStatusBarCtrl. I did this to keep the OnCreate function short and clean. Another thing I changed from the original code was to get the status bar's font (in
AddOnePane()and set the panes to that font instead of getting theGUI_DEFAULT_FONTwhich was a different font AND a little taller than the font used by the statusbar. Also, take notice of the comment regarding the requirement to set each pane's font to avoid undesirable default settings.//---------------------------------------------------------------------- //---------------------------------------------------------------------- BOOL CMainFrame::AddOnePane(CStatusStatic* pPane, UINT nPaneID, CString sDefaultText, int nPaneWidth) { ASSERT(pPane); ASSERT(nPaneID > 0); DWORD dwFlags = WS_CHILD|WS_VISIBLE|SS_CENTER|SS_CENTERIMAGE| SS_NOPREFIX; CRect ctrlRect(0,0,0,0); BOOL bReturn = FALSE; int nIndex = -1; if (!pPane->Create(sDefaultText, dwFlags, ctrlRect, &m_wndStatusBar, 0)) { return FALSE; } // We MUST set the font for each pane. If we don't, the pane will be // set to 12-point MS Shell Dlg. This should actually be set within // the ExtStatusBarControl class, but I wanted to illustrate the need // to do this. pPane->SetFont(m_wndStatusBar.GetFont()); bReturn = m_wndStatusBar.AddPane(nPaneID, 1); if (!bReturn) { AfxMessageBox(_T("Pane index out of range\nor pane with same ID " + "already exists in the status bar"), MB_ICONERROR); return FALSE; } nIndex = m_wndStatusBar.CommandToIndex(nPaneID); if (nIndex == -1) { return FALSE; } m_wndStatusBar.SetPaneWidth(nIndex, nPaneWidth); m_wndStatusBar.AddPaneControl(pPane, nPaneID, true); return TRUE; } //------------------------------------------------------------------------ //------------------------------------------------------------------------ BOOL CMainFrame::AddStatusPanes() { m_pSysTimeStatus = new CStatusStatic; if (m_pSysTimeStatus) { if (!AddOnePane(m_pSysTimeStatus, ID_STATUSPANE_TIME, " 00/00/0000 00:00 ", 110)) { if (m_pSysTimeStatus) { delete m_pSysTimeStatus; m_pSysTimeStatus = NULL; } return FALSE; } } else { return FALSE; } m_pLongStatus = new CStatusStatic; if (m_pLongStatus) { if (!AddOnePane(m_pLongStatus, ID_STATUSPANE_LONGUPDATE, " Nextg Long Update - 00:00 ", 150)) { delete m_pLongStatus; m_pLongStatus = NULL; return FALSE; } } else { return FALSE; } m_pShortStatus = new CStatusStatic; if (m_pShortStatus) { if (!AddOnePane(m_pShortStatus, ID_STATUSPANE_SHORTUPDATE, " Next Short Update - 00:00 ", 150)) { delete m_pShortStatus; m_pShortStatus = NULL; return FALSE; } } else { return FALSE; } m_pLongRunning = new CStatusStatic; if (m_pLongRunning) { if (!AddOnePane(m_pLongRunning, ID_STATUSPANE_LONGRUNNING, "", 90)) { delete m_pLongRunning; m_pLongRunning = NULL; return FALSE; } } else { return FALSE; } m_pShortRunning = new CStatusStatic; if (m_pShortRunning) { if (!AddOnePane(m_pShortRunning, ID_STATUSPANE_SHORTRUNNING, "", 90)) { delete m_pShortRunning; m_pShortRunning = NULL; return FALSE; } } else { return FALSE; } return TRUE; }
- Finally, we need to add our statusbar pane IDs to the
Constants.hfile:#define ID_STATUSPANE_TIME 49100 #define ID_STATUSPANE_LONGUPDATE 49101 #define ID_STATUSPANE_SHORTUPDATE 49102 #define ID_STATUSPANE_LONGRUNNING 49103 #define ID_STATUSPANE_SHORTRUNNING 49104
At this point The application should look like this when you run it.
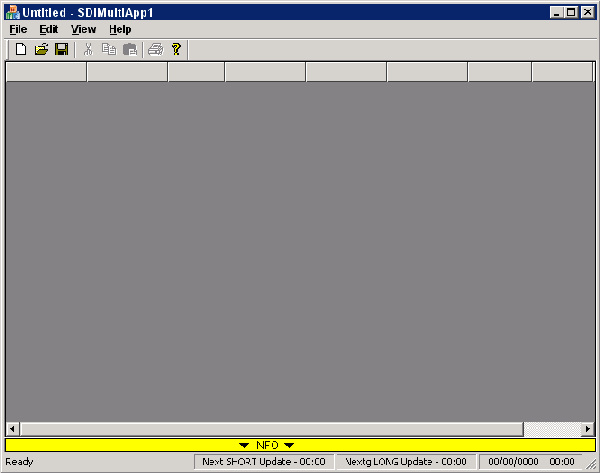
If you resize the application's window to be smaller, you will notice that the status bar loses the resize gripper on the bottom-right corner, and the custom panes start to become clipped on the right side. See the image below.
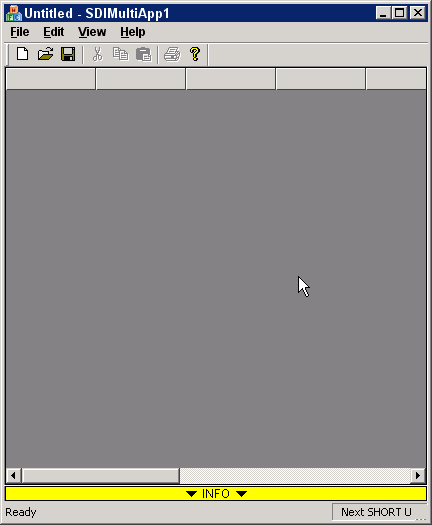
This is because the status bar's prompt pane (where t says "Ready"), has reached it's minimum size. In my real-world application, the user will probably never do this, so it's not a big deal for me. If it is for you, I leave it as an exercise for the programmer to remedy the situation.
If The Application Doesn't Compile
When you compile the application, you might get an error stating that the compiler can't find afximpl.h. To fix this, add the following line to the end of your VC++ Include Directories (under Tools | Options...):
$(VCInstallDir)atlmfc\src\mfc
The Timer Thread (CTimerThread)
My real-world application needed timers to periodically access a database, as well as updating various parts of the display. I decided a threaded timer would be the best option for a couple of reasons.
- The
WM_TIMERmessages are not guaranteed to be sent to your application because they are the lowest priority windows message.
- A timer thread allows more control over what you can do without interrupting the user.
- You can shove a thread off onto another CPU if it's available.
For my base class, I chose the CThread class, by Dominik Filipp. This is a very well documented class and fairly simple to add to your project. You should refer to the CThread article on CodeProject to become more familiar with the way the class works, and to become familiar with the terms I'll be using in this article.
- Download the
CThreadsource code, and extract theThread.CPPandThread.hfiles to your project folder. Again, I chose to put the files into theCodeProjectfolder. - Add the files to your project.
Because the CThread class is an abstract class, you have to create a new class derived from it. For our timer thread, we needed it to be a "notifiable" thread because it runs from the time the program starts, to the time the program ends.
We are going to be supporting multiple timers, so I implemented a CTypedPtrArray in the thread class that contains information necessary to allow the thread to do the right thing at specified intervals. The idea is to create the thread, pass information about each timer to the thread, and then start the thread running.
| Coding Notes |
| Many folks have a problem with using the MFC collection classes. Personally, I prefer using them because they provide a much cleaner interface than does STL. Besides, this *is* a MFC article, and I'd much rather use part of the framework. |
Most of our work will be in CMainFrame. First, I created a helper function that actually creates and sets up the timer thread.
BOOL CMainFrame::CreateTimerThread()
{
    // In my application, the settings are held in a XML file.  For
    // purposes of example, we'll just hard code the intervals to
    // expedite the article.
    int nLongInterval      = 300000; // 5 minutes
    int nShortInterval     = 15000;
    bool bAllowLongUpdate  = true;
    bool bAllowShortUpdate = true;

    if (!bAllowLongUpdate)
    {
        nLongInterval = 0;
    }
    if (!bAllowShortUpdate)
    {
        nShortInterval = 0;
    }

    // create the thread - all timer messages will be sent to this
    // object, and if necessary, reflected to the current view(s).
    m_pTimersThread = new CTimersThread((void*)this, 0);
    if (m_pTimersThread)
    {
        m_pTimersThread->SetInterval(1000);
        // having these two timers seems redundant since they both fire
        // at the same time - see about combining them
        m_pTimersThread->SetTimer(TIMER_DATETIME, 0,
                    1000, "Current Date/Time",
                    " %m/%d/%Y  %H:%M ",
                    m_pSysTimeStatus );
        m_pTimersThread->SetTimer(TIMER_ELAPSED,  UDM_TIMER_ELAPSED,
                    1000, "Patient's Elapsed Time",
                    "", NULL );
        m_pTimersThread->SetTimer(TIMER_LONG,     UDM_TIMER_LONG,
                    nLongInterval,  "Long Update",
                    " Next Long Update - %02d:%02d ",
                    m_pLongStatus);
        m_pTimersThread->SetTimer(TIMER_SHORT,    UDM_TIMER_SHORT,
                    nShortInterval, "Short Update",
                    " Next Short Update - %02d:%02d ",
                    m_pShortStatus);
        // sanity checks - if we don't want automatic updates, or if
        // something went wrong when ewe retrieved the intervals, the
        // timers need to be turned off to avoid unexpected/undesireable
        // events.
        if (!bAllowLongUpdate || nLongInterval == 0)
        {
            m_pTimersThread->EnableTimer(TIMER_LONG, false);
        }
        if (!bAllowShortUpdate || nShortInterval == 0)
        {
            m_pTimersThread->EnableTimer(TIMER_SHORT, false);
        }
    }

    return (m_pTimersThread != NULL);
}
Even though the timers thread was specifically engineered to update statusbar panes, you can still set a timer that doesn't do anything more than post a message back to the parent window. A good example of that is the TIMER_ELAPSED timer. Notice that the call to SetTimer for that timer has a status pane value of NULL (the last parameter in the function call).
You can also create timers that update a statusbar pane, but that does not send a message back to the parent window. An example of this kind of timer is the TIMER_DATETIME. Notice that the 2nd parameter in the function call is 0.
The first step to using the timers thread is to call this function from the InitInstance() function in the application class. If the create function returns TRUE, we can then start the thread. This is what the code looks like.
BOOL CSDIMultiApp1App::InitInstance()
{
    ...
    // all of our programmer-added code will be going at the end of this
    // function put this AFTER the call to PrepareViews()
    if (((CMainFrame*)m_pMainWnd)->CreateTimerThread())
    {
        ((CMainFrame*)m_pMainWnd)->StartTimerThread();
    }
}
The timer thread can even be paused and continued. The sample application allows you to test this from the menu. If you click Sample Stuff | Dialog One (pauses the timers), the timers thread will be paused and a dialog box will be displayed. For comparison's sake, there's also a Dialog Two menu item that allows the timers thread to keep running while the dialog box is displayed.
Here's the CTimersThread key function - CheckInterval(). This function is called everytime the timer "ticks". Typically, this is once every second, but the tick interval can be changed via CTimersThread::SetInterval() function.
void CTimersThread::CheckInterval()
{
    EDTIMER* pTimer = NULL;
    for (int i = 0; i < m_nTimerCount; i++)
    {
        pTimer = m_tpaTimers.GetAt(i);
        if (!pTimer)
        {
            continue;
        }
        // see if the timer is enabled
        if (!pTimer->bEnabled)
        {
            pTimer->nElapsed = 0;
            continue;
        }
        // update the elapsed time
        pTimer->nElapsed += m_nTimerInterval;
        // see if we need to update the status bar
        if (pTimer->pStatusPane)
        {
            CString sText = "";
            if (!pTimer->sFormat.IsEmpty())
            {
                switch (pTimer->nTimerID)
                {
                    case TIMER_LONG    :
                    case TIMER_SHORT   :
                        sText = GetTimeLeft(pTimer);
                        break;
                    case TIMER_DATETIME:
                        sText =
                      COleDateTime::GetCurrentTime().Format(pTimer->sFormat);
                        break;
                    case TIMER_ELAPSED :
                        break;
                }
            }
            if (pTimer->pStatusPane && m_bCanContinue)
            {
                pTimer->pStatusPane->SetWindowText(sText);
            }
        }

        if (pTimer->nElapsed < pTimer->nInterval)
        {
            continue;
        }
        pTimer->nElapsed = 0;
        if (pTimer->nMsgID <= 0)
        {
            continue;
        }

        switch (pTimer->nTimerID)
        {
            case TIMER_LONG     :
                ::SendMessage(m_pParentWnd->GetSafeHwnd(),
                              pTimer->nMsgID, 0, 0);
                break;
            case TIMER_SHORT    :
                ::PostMessage(m_pParentWnd->GetSafeHwnd(),
                              pTimer->nMsgID, 0, 0);
                break;
            case TIMER_ELAPSED  :
                ::SendMessage(m_pParentWnd->GetSafeHwnd(),
                              pTimer->nMsgID, 0, 0);
                break;
            case TIMER_DATETIME :
                // no message to process
                break;
        }
    }
}
The function above calls GetTimeLeft() function performs some math on the elapsed time and returns a formatted string that represents the amount of time left before the timers thread will fire the specified message.
CString CTimersThread::GetTimeLeft(EDTIMER* pTimer)
{
    CString sResult    = "";
    int     nMins      = 0;
    int     nSecs      = 0;
    if (pTimer->bEnabled)
    {
        div_t dt;
        int   nRemaining = pTimer->nInterval - pTimer->nElapsed;
        dt         = div(nRemaining, 1000);
        nRemaining = dt.quot;
        dt         = div(nRemaining, 60);
        nMins      = dt.quot;
        nSecs      = dt.rem;
        sResult.Format(pTimer->sFormat, nMins, nSecs);
    }
    else
    {
        sResult = "ERR";
    }
    return sResult;
}
It should be a simple matter to massage this class to your own needs.
The Action Threads
The action threads were implemented so that I could perform lengthy operations without inhibiting the user's ability to use the program. These action threads are started as a result of receiving the timer thread messages specified in the CreateTimersThread() function.
Once again, I used Dominik Filipp's CThread class as a basis. Since the action threads were all going to perform the same way, I first created a base class called CThreadActionBase which contained the following version of the thread handler function:
DWORD CThreadActionBase::ThreadHandler()
{
    BOOL bCanContinue = TRUE;
    int nIncomingCommand;
    do
    {
        WaitForNotification(nIncomingCommand);
        switch (nIncomingCommand)
        {
            case CThread::CMD_INITIALIZE:
                HandleCommandImmediately(CThread::CMD_RUN);
                break;
            case CThread::CMD_RUN:
                PerformTask();
                bCanContinue = FALSE;
                break;
            case CThread::CMD_PAUSE:
                SetActivityStatus(CThread::THREAD_PAUSED);
                break;
            case CThread::CMD_STOP:
                bCanContinue = FALSE;
                break;
            default:
                break;
        };

    } while (bCanContinue);
    // when the thread is done, send this message (if specified)
    if (m_pOwnerWnd && m_nMsgID > 0)
    {
        ::PostMessage(m_pOwnerWnd->GetSafeHwnd(), m_nMsgID, 0, 0);
    }
    return 0;    // ... if Thread task completion OK
}
I made the thread "notifiable" so that I could create the thread without it starting right away. This decision also reduced the overhead of deleting when the thread was finished and recreating the thread when it was needed again. In this application, these threads are run in response to the timers thread messages, so this was a major cpu cycle saver (say that 10 times fast :) ).
Next, I added a pure virtual function named PerformTask(). The base class calls this function when the thread is started, and because this is a pure virtual function, our base class is an abstract class, meaning you cannot instantiate an object of the class, but must instead derive a new class from it. In our case, I created two classes - CThreadActionLong and CThreadActionShort. These two classes contain nothing more than the overridden PerformTask function.
To illustrate the functionality, each action thread is set to sleep for a different number of seconds. Two extra status bar panes were added to the code to give this the user visual feedback.
Running The Program
When you run the program, you'll notice that the statusbar now updates the status bar panes. When the action threads are started, the initially empty status panes will indicate that the action thread is running. You will also notice that the timers thread goes back to counting down, even while an action thread is running.
What's Next?
In Part 4, we'll be moving all of the view code into an extension DLL and creating two new applications that use this extension DLL.
End of Part 3
Due to the length of this article, I've decided to break it up into several parts. If the site editors did what I asked, all of the subsequent parts should be in the same code section of the site. Each part has it's own source code, so as you read the subsequent parts, make sure you download the source code for that part (unless you're doing manually all the stuff I'm outlining in the article in question).
In the interest of maintaining some cohesiveness (and sanity), please vote on all of the parts, and vote the same way. This helps keep the articles together in the section. Thanks for understanding.
CExtStatusControlBar, by Dmitriy Yakovlev. This article features a very nice extended status bar class, but I only needed a small part of what it provides. Here are the steps needed to include it in our sample project.