
Using CodeProject - A Day In the Life of an Application - Part 1 of 5
The right way to code using CodeProject for occasional support
Part 1 of 5 - Introduction
Links to Other Parts of the Series
- Part 2 - Adding a splitter window and swappable views
- Part 3 - Adding a custom statusbar and multi-threading
- Part 4 - Put the views into an extension DLL
- Part 5 - Modify the system menu, add XML profile support, and cleanup.
Late note: I don't know if it matters, but I'm using VS2005 with ServicePack 1 installed.
This article series is another in my series of "code we really use" articles. There is no unnecessary discussion about theory, no expounding on technique, and no chest-thumping because I thought it all up myself. It's just a bunch of stuff I did to stand one of our applications up. MOST of the stuff in this article is based on other code that I got from CodeProject, and what follows describes the basis for a project I am actively developing and how I integrated articles and help I got from CodeProject.
Rant
I've been a member on CodeProject for over six years (as of this writing), and I've come to discover some disturbing trends regarding articles. First, article authors tend to post an article and as time goes by, the author essentially abandons the article and people posting questions are greeted with either silence from the author, or a response that says something like "I don't code in this/that language any more". Let's face it, you can't blame them. Many of the articles I use are three or four years old, and I understand that programmers need to move on and that often means completely abandoning older code.
On the other side of the fence are the people that download the source code and samples associated with a given article. Many times, someone will post a question in an article that has absolutely nothing to do with the article itself, but the subject will be related to a certain aspect of the article. As an example, I posted an article about dynamically building a menu. Recently, someone posted a message in that article that asked about adding winhelp to their dynamically built menu. Then there's the people that encounter an issue (real or imagined) with an article, and expect someone else to fix it for them. These people really annoy me. After all, we're all supposed to be programmers here.
So, What's the Point of This Article?
The entire point of this article is to illustrate real-world use of code-snippets, classes and techniques I gleaned from CodeProject over the last six years, including work-arounds to fit code into my sometimes bizarre requirements. Many times, I'll use the VC++ forum to ask a question that will help me understand an article, or massage the article's code for my own use.
Assumptions
The original version of this article started out as a kind of detailed tutorial describing how to use the IDE, and other inane items like that. After a while, I realized this created a huge amount of overhead as far as the article's weight was concerned. Beyond that, I was starting to become bored with the whole thing and I could plainly see that the quality of my writing was beginning to suffer as a result.
The only solution was to start over and make the assumption that you, the user, have a working knowledge of the VS2005 IDE, especially as it relates to creating VC++/MFC applications. This way, we can talk more about the important stuff than suffer through stuff you should already know. I also assume that you have a decent working knowledge of MFC. I'm not saying you have to be an expert, but I assume you can move around in a MFC project without bumping your head on the intricacies of CMainFrame.
Other Stuff
Sprinkled throughout the article, you'll find "Coding Notes". These simply describe the way I do things when coding, and why I do them. They are certainly not requirements by any stretch of the imagination, but they often concern code readability and maintainability. I'm sure that many of you have your own ways of doing things, but please keep comments regarding these issues to a minimum. After all, this article is not about style.
The total process of coding the complete demo application requires just an hour or so (if you know all the steps ahead of time). Writing this article series has taken me DAYS, so don't be put off by it's length.
The html and images for this article is included in the project download, but doesn't include the pretty CodeProject formatting. If you can mentally handle that, you can simply refer to this .HTML file and get on with your programming.
Finally, I know there are folks out there that vote my stuff a 1 simply because it's, well, something I wrote. I request that you be mature and professional and restrict your politics to the soapbox when voting. Remember, you're voting on the article, not on the author.
My Real-World Application
The application allows a hospital emergency department to monitor the status of patients and beds in the Emergency Room. This application is broken into four components:
- A "big board" application that allows little user interaction (there's no menu, but several accelerator keys are available) and is displayed on a 50-inch plasma screen suspended from the ceiling.
- A "client" application that allows multiple users to manipulate the data on their own screens. Changes made in the client application are eventually updated to the "big board".
- A data access MFC extension DLL This DLL holds the entire database access capabilities.
- A view manager MFC extension DLL. This is where all of the dialog boxes and views are contained.
- The whole thing is tied to an Oracle database.
Here are some screen shots of the actual application we created. Keep in mind that a lot of the visual elements you might notice are dictated by requirements, and may not necessarily be the way I would have preferred to accomplish certain aspects of the code. Knowing this, resist the urge to critique perceived design aspects.
Here's the client terminal module:
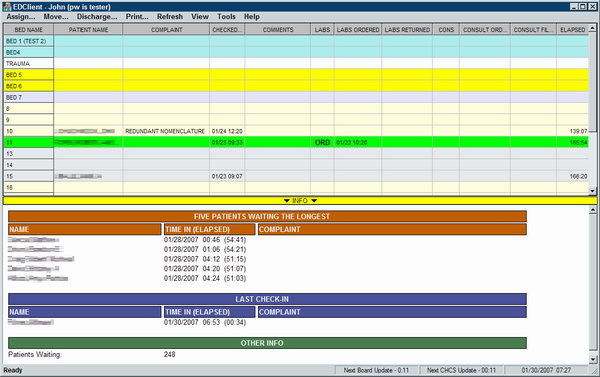
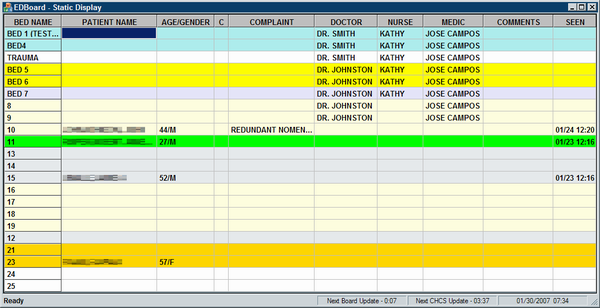
And here's the static display module (this module is displayed on a 50-inch plasma TV suspended from the ceiling):
Our Sample Application
Building our sample application provided me with an opportunity to re-factor much of the application, omitting code that is no longer used in the application and to re-organize the code so that it's easier to maintain. The sample applications will illustrate the following design elements:- A multi-project solution.
- MFC application using shared MFC DLLs
- SDI application using the MFC document/view architecture
- A horizontal custom flat-bar splitter window.
- View-switching in one of the splitter panes.
- Gives example of using the views in the application itself AND using the views from an extension DLL.
- The switchable views include a grid view, and a GDI drawing view
- Removing menus from an application
- Creating a timer thread that controls one or more timers
- Creating worker threads that respond to timer events posted by the timer thread
- Setting up a custom statusbar
- Modifying the system menu
- Loading/saving program settings in a XML file
- Multiple-inheritance
Gathering The Components
The sample doesn't include all of the code associated with the articles I used, but instead only includes the parts of the code that I implemented in my own project.
includes all of the code I downloaded from CodeProject, but for those who want to follow the same steps I did, or if you just want to organize your source code folders differently than I did, here's a list of the articles used to create the project:- MFC Grid Control, by Chris Maunder.
- CPPToolTip, by Eugene Pustovoyt.
- A Flat Splitter Window, by Marc Richarme.
- Unlimited number of switchable views within a Splitter window, by Dan Clark.
- CThread - a Worker Thread wrapper class, by Dominik Filipp.
- CExtStatusControlBar, by Dmitriy Yakovlev.
- CXMLProfile - Easy XML Profiles for applications, by Emilio Guijarro.
- The Code Project Visual C++ Forum FAQ, by Michael Dunn.
- Modifying the System Menu, by John Simmons.
- XML Application Profile Class, by John Simmons.
- String Parsing Class (supports quoted strings), by John Simmons
Generally, I put code from CodeProject into a root-level project folder called "CodeProject" (as I've done in these articles) so that it's easy to a) see what code I'm using that's not mine, and b) update that code if the author releases new stuff. I realize that most of you probably have your own ways to do things, so it should be fairly easy to rearrange things to your liking.
I'm a firm believer in using the "Additional include directories" setting in the project's properties, so if you move things within the sample, remember to remove and re-add the files in the project, and then change both the debug and release "Addition include directories" property before re-compiling. If I derive new classes from CodeProject stuff, I generally just put the derived class files into the project's folder.
Getting Started - Creating A Solution
First, we need to create a new solution. Why? Because we will be creating a number of projects that are related to each other and it's simply more convenient to have them all bundled inside a solution than to have to deal with several separate projects. Use "SDIMultiSplit" for the solution name.
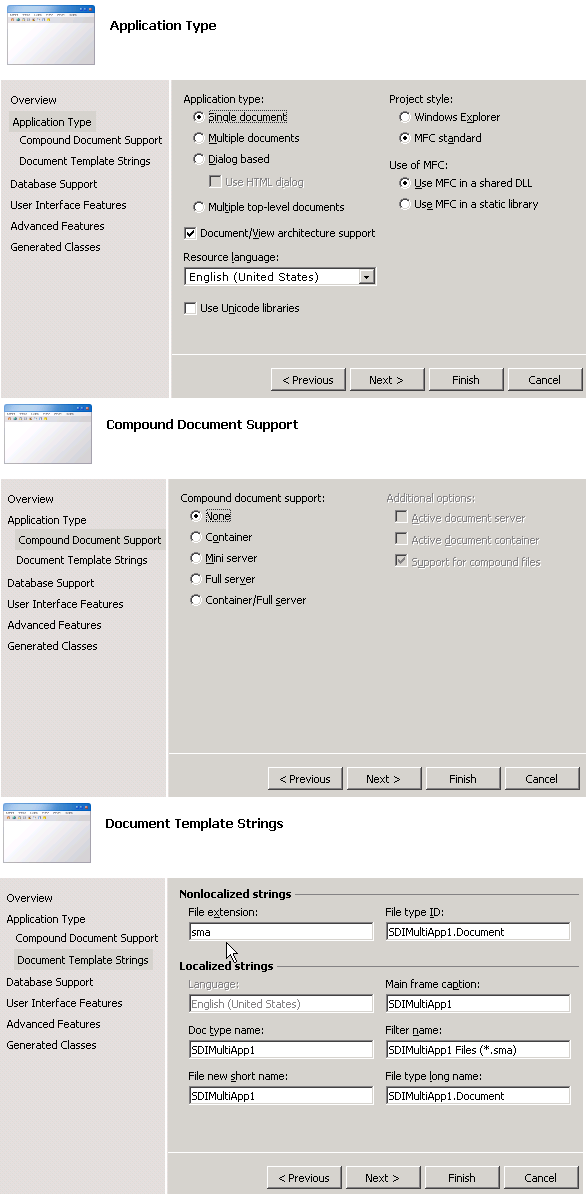
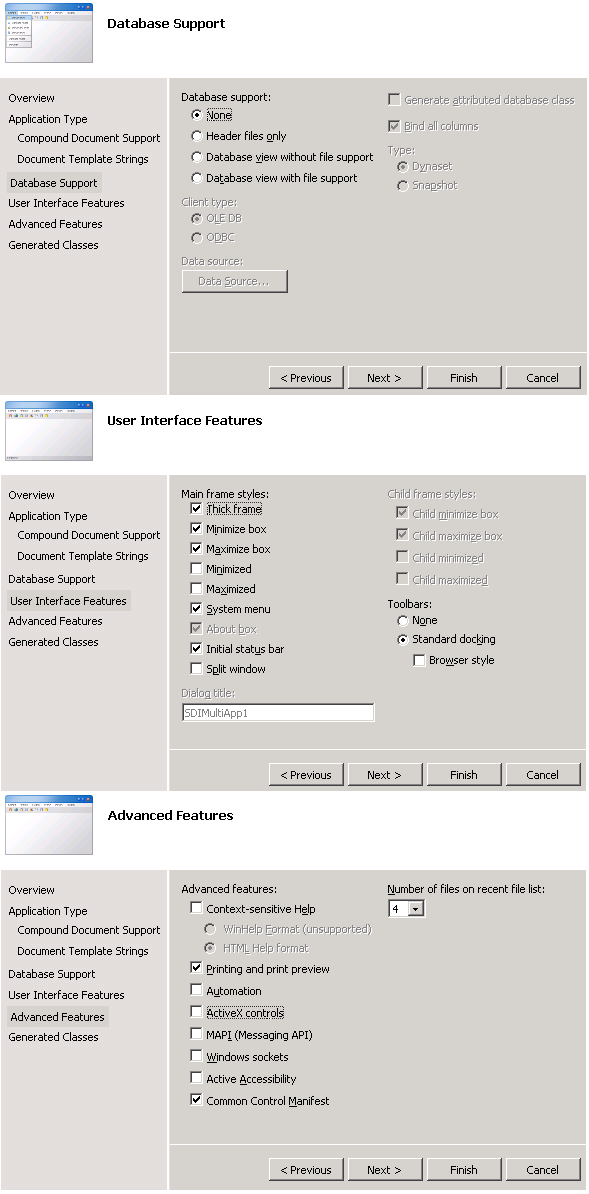
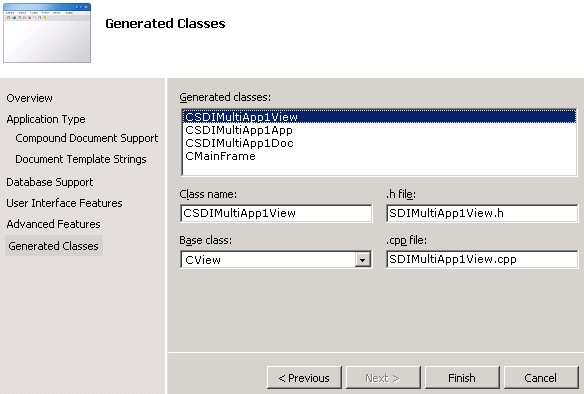
Next, we add a new project to the solution. Since we're talking about VC++ and MFC here, that's the kind of project we need to add. Here's a series of screen shots showing the settings you need to use when creating the project.
Kinda boring, but we're about to fix that. We're ready to start adding the fun stuff.
Making The View Interesting
Since we already have a view graciously provided by the application wizard, we'll make it do something more interesting than just show up as a big white box. Follow these steps.
Adding The MFC Grid Control To The Project
- If you don't already have it, go download the MFC Grid Control. You only need the "source" (99k download). I'm using version 2.25, but v2.26 beta is also available. While you're there, you might want to browse the article for helpful hints on how to "make it go". The article is a little sparse on examples, but a sample project has been provided that illustrates some of the more interesting features. It's one of the most highly voted articles (790 votes and counting as of this writing) and it's got a 4.81 rating.
- Due to it's file-count and complexity, we're going to put the grid control source into its own folder. Create a new folder in your solution folder called
MFCGridControl_2-25. Another reason to do this is so that you can easily replace the 2.25 code with the newer 2.26 code without jeopardizing a working code base. Un-ZIP the file to this new folder.
- Before we do anything else, there's a small bug that needs to be fixed. While trying to have my parent view class respond to notification messages from the grid control, I found that
GVN_ENDLABELEDITwas not always being passed up to the parent view. The problem was that if you started to edit a cell, and didn't change anything, and then stopped editing, the grid control wouldn't send theGVN_ENDLABELEDITmessage because the contents of the cell didn't change. I fixed it by replacing theOnEndEditCellfunction inGridCtrl.cppwith this a slightly modified one. You're going to need this fix, so here's the new version of the function:void CGridCtrl::OnEndEditCell(int nRow, int nCol, CString str) { /* // this is the original version of the function CString strCurrentText = GetItemText(nRow, nCol); if (strCurrentText != str) { SetItemText(nRow, nCol, str); if (ValidateEdit(nRow, nCol, str) && SendMessageToParent(nRow, nCol, GVN_ENDLABELEDIT) >= 0) { SetModified(TRUE, nRow, nCol); RedrawCell(nRow, nCol); } else { SetItemText(nRow, nCol, strCurrentText); } } CGridCellBase* pCell = GetCell(nRow, nCol); if (pCell) pCell->OnEndEdit(); */ CString strCurrentText = GetItemText(nRow, nCol); if (ValidateEdit(nRow, nCol, str)) { if (strCurrentText != str) { strCurrentText = str; SetItemText(nRow, nCol, strCurrentText); SetModified(TRUE, nRow, nCol); RedrawCell(nRow, nCol); } else { SetItemText(nRow, nCol, strCurrentText); } } CGridCellBase* pCell = GetCell(nRow, nCol); if (pCell) { pCell->OnEndEdit(); } SendMessageToParent(nRow, nCol, GVN_ENDLABELEDIT); }
- Next, we have to add all of these files to our project. Open your Solution Explorer pane, right click on the SDIMultiApp1 item in the tree, click Add | Existing Item..., and browse to the
MFCGridControl_2-25folder (or whatever you named it), select ALL of the files, and click the ADD button. You can safely ignore the files in the Experimental Upgrades folder for now.If you're curious, you can open the Solution Explorer pane and see the new files listed in the project.
- The final preparation step for using the grid control is adding the folder to your project settings. Right-click on the SDIMultiApp1 item in the tree, and click Properties at the bottom of the subsequent context menu.
In the Properties dialog box, expand the Configuration Properties tree item, and then the C++ tree item, and add the following text to the Additional Include Directories setting (pointed at by the mouse cursor in the image above):
.,../MFCGridControl_2-25PLEASE NOTICE that the first folder that shows up in this string is the "." (single dot). This tells the compiler to look in the project's folder BEFORE looking anywhere else for an include file. In fact, you should add folders to this setting in the PRECISE order in which you want them searched. This is an important aspect of including files in a project and should not be overlooked.
Finally, make sure you add the same string to ALL required project configurations (debug AND release).
Hooking The Grid Control Up
"Making it go" is fairly simple and straightforward, especially since we're just making the grid show up for purposes of example.- Open up the SDIMultiApp1View.h file and add the following code:
#include "GridCtrl.h"

class CSDIMultiApp1View : public CView
{
private:
    CGridCtrl* m_pGridCtrl;

public:
    // give other parts of the program a method for retrieving the grid
    // control. You may not need this right away, but it sure will be
    // convenient when it's there because that's one less file you have
    // to check out of source control to change later.
    /// Retrieves the current gridcontrol pointer
    CGridCtrl* GetGridControl() { return m_pGridCtrl; };
Coding Notes When I add stuff manually to a class, I generally add it at the top of the class definition because VS2005 likes to add message handlers at the bottom, and it just plain looks ugly after a while. Good code readability means good code maintainability - always consider those who follow you. I also provide extensive comments AT THE TIME I WRITE THE CODE because I often forget why I do stuff, even as soon as an hour after I wrote the code.
Also notice that the final comment starts with 3 slashes. This is a trigger for Intellisense to provide the text as a comment when you use a function. This is quite handy for people new to the code. I recommend that you try to do this as well.
- Now, open up your SDIMultiApp1View.cpp file, and add the following line to the constructor:
m_pGridCtrl = NULL;
And then add the following code to the destructor:
    if (m_pGridCtrl)
    {
        delete m_pGridCtrl;
    }
    m_pGridCtrl = NULL;
Coding Notes I know, I don't *have* to set the pointer to NULL, but I'm old and IMHO, the old ways are the best ways.
The next few steps concern adding message handlers to the view class. Microsoft has made it difficult for MFC programmers to make effective use the IDE. Adding message handlers is one of the most annoying of these limitations via the IDE.
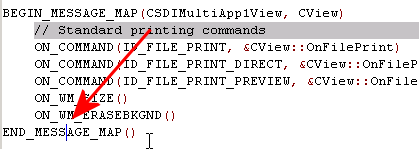
To add a message handler (other than manually) to a CCmdTarget-derived class (CView being one of them), you must put your edit cursor on either the opening or closing line of the message map macro, like so:
After you've done this, you can open the Properties pane and you'll see this toolbar:
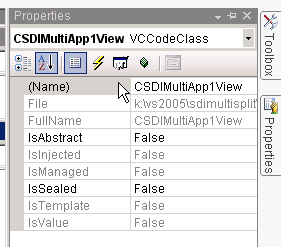
Well, *sometimes* you'll see that toolbar. VS2005 (yes, even with SP1 applied) sometimes refuses to show the toolbar in the Properties pane. If this happens to you, try shutting down the IDE and opening it back up again (I offer no guarantees that this will work every time).
In any case, there are three buttons you're interested in. Clicking the lightning bolt button (tooltip says "Events") will show you message IDs that are defined in the resource file. The button to the immediate right of the Events button is the Message button. Clicking this button presents you with all of the appropriate *Windows* messages for the class you're working on. The last button in the series is the Overrides button which allows you to activate override functions, such as OnExitInstance, OnInitialUpdate, etc.
We're interested in the Messages button, so let's continue.
- Open the Properties pane, and click the Messages button in the Properties toolbar. You'll be presented with a list of Windows messages. Scroll down the list until you find
WM_SIZE. Click in the blank field next to the message ID, and selectOnSizein the dropdown list. The IDE will add all the necessary code to handle the message, but we have to change it, so make the function look like this (just copy/paste the contents of the function):void CSDIMultiApp1View::OnSize(UINT nType, int cx, int cy) { CView::OnSize(nType, cx, cy); if (m_pGridCtrl->GetSafeHwnd()) { CRect rect; GetClientRect(rect); m_pGridCtrl->MoveWindow(rect); } }
- Add a message handler for
WM_ERASEBACKGROUND, using the method described above for theWM_SIZEmessage, and change the IDE-generated code to look like this:BOOL CSDIMultiApp1View::OnEraseBkgnd(CDC* pDC) { return TRUE; }
- Add an *override* handler for
OnCmdMsg. Remember, you have to use the Overrides button (the icon looks like a little box) to add an override. Change the IDE-generated code to look like this:BOOL CSDIMultiApp1View::OnCmdMsg(UINT nID, int nCode, void* pExtra, AFX_CMDHANDLERINFO* pHandlerInfo) { if (m_pGridCtrl && IsWindow(m_pGridCtrl->m_hWnd)) { if (m_pGridCtrl->OnCmdMsg(nID, nCode, pExtra, pHandlerInfo)) { return TRUE; } } return CView::OnCmdMsg(nID, nCode, pExtra, pHandlerInfo); }
- Add an *override* handler for
OnInitialUpdate. Remember, you have to use the Overrides button (the icon looks like a little box) to add an override. Change the IDE-generated code to look like this:void CSDIMultiApp1View::OnInitialUpdate() { CView::OnInitialUpdate(); CRect rect; GetClientRect(rect); m_pGridCtrl = new CGridCtrl(0, 0, 10, 1, 1); m_pGridCtrl->Create(rect, this, IDC_GRID_CTRL); UpdateWindow(); }
| Coding Notes |
| You can alternately try using the Class View t add message handlers, but for some reason, I never got into the habit of doing that. |
- Create a new folder in your solution directory called
Includes.
- Create a new file called Constants.h in your project folder, and insert the following code:
#pragma once

#define IDC_GRID_CTRL            49000
We'll be coming back to this file in Part 2 and Part 3 of this series of articles as we add more features to the program.
- Add the following line to the bottom of the project's stdafx.h file:
#include "Constants.h"
Coding Notes I know, every time we change this file, it will cause a complete program rebuild, but I have a couple of reasons for doing this; a) our application is so small that it won't matter in terms of compilation time, and b) it's just plain convenient because all CPP files in the project have to
#include stdafx.h, and this include is performed by default when you create new classes in a MFC project (saving me typing time in this article series).
- Add the new Includes folder to your "Additional Include Directories" project setting. Your new entry should look like this:
.,../Includes,../MFCGridControl_2-25
- Optional step - Since we don't need the
OnDrawfunction in our view, I chose to minimize it's appearance in the code.CViewis an abstract class, and thus forces us to overrideOnDraw. However, the grid control takes care of it's own drawing, and there's really no reason to keep OnDraw around. All you really have to do is delete the function from your view's CPP file and change the function declaration in the view's header file to the following:virtual void OnDraw(CDC* pDC) {};
This helps to keep the CPP file uncluttered.
Now, compile the code. You may notice a stream of warnings go by as the code compiles. This is because the version of the grid control I'm using has not been modified for use with VS2005. This will not impact the reliability of the application, but if this bothers you, download version 2.26 beta, create a new folder within the solution folder (I'd use MFCGridControl_2-26). If you do put it into it's own folder, make sure you go back into the project properties and change the include directory setting to the new folder (make sure you do it for both the debug AND release configurations. After compiling, run the application. You should see something like this:

Congratulations. You've reached the end of Stage 1 - creating an interesting basic application.
| Coding Notes |
| At this point in the development process, I usually take time to add comments and start organizing code into sections, separating the overrides from the windows message handlers, and stuff like that. The sample code provided in this article illustrates that process. Again, it's just something I do to help keep the code readable and is not a requirement on your part. |
Feel free to play around with the grid control (add rows, use images, and stuff like that. The grid control's demo source should help you figure out how to do use some of the more interesting features. And while you're at it, make sure you go vote on the Grid Control's page. Also, if you have any questions regarding the use of the grid control, please post those questions on the grid control's article page.
End of Part 1
Due to the length of this article, I've decided to break it up into several parts. If the site editors did what I asked, all of the subsequent parts should be in the same code section of the site. Each part has it's own source code, so as you read the subsequent parts, make sure you download the source code for that part (unless you're doing manually all the stuff I'm outlining in the article in question).
In the interest of maintaining some cohesiveness (and sanity), please vote on all of the parts, and vote the same way. This helps keep the articles together in the section. Thanks for understanding.
History
04/15/2008: Fixed all the links in the article