
Deploying ASP.NET Core Microservices in AWS ECS using Fargate
4.33/5 (4 votes)
In this article, we will learn how to deploy ASP.NET Core Microservices in AWS ECS using Fargate with Cloudformation template and AWS Console.
Introduction

In recent years, Microservices gained a lot of popularity and most of the systems are adopting this new architecture to develop Line of business applications. However, Microservices might not be a single solution for everyone or every problem. Let’s say if you got an independent team to build and manage independent modules in your system, then it might be an ideal approach. Having said that, it could be a better architecture even for single team projects to develop complex distributed applications and deploy it in any cloud environment.
You can find good resources to learn more about Microservices here.
In this series, I am going to take you on a ride, how to deploy dotnet core Microservices in AWS using ECS Fargate.
Why ECS Fargate?
I love serverless frameworks like AWS lambda and Azure functions. However, they got few limitations around memory, timeout and framework versions. Let's say you got a component which requires more than 3 GB Memory to process its work and/or it might take more than 10 mins and/or it uses an older .NET Core Framework or Node js framework. AWS fargate is a serverless framework to deploy apps on ECS containers, without requiring us to maintain Host machine. We have the freedom to choose framework and memory allocation for these containers.
Prerequisites
- I am assuming you have already worked with ASP.NET Core apps.
- You need to have some basic understanding of AWS services such as EC2, ECS, ELB, ECR, IAM and AWS configuration.
- Dotnet core SDK, AWS CLI, Docker and Visual Studio code or any IDE should be installed in the development machine.
Application Architecture

- I created one application for Vehicle insurance use case. Any client can make REST calls to Metadata service to create/update customer, vehicles information and requests for vehicle insurance quotations. Quote will be generated on server and sent back to clients. Once you pick a quote, the client should call policy service to process and create policy.
- I created two simple ASP.NET Core webapi projects for these services, one to manage basic information like customer, vehicle and quotes. And the other one to manage policies.
- Each service will interact with its own database to make these services purely independent.
- Data between these databases can be synced or changed using Event patterns, which will be out of scope for this demo.
AWS Infrastructure Architecture
We will deploy this simple micro-services to AWS ECS cluster using Fargate.

- Every request from clients can come to a single Application load balancer and then the request will be forwarded to respective target groups by matching URL pattern.
- The idea is to create a unique Target group for each service, so that they will forward the requests to service Containers, that are launched in ECS cluster using Fargate.
- APIs running in ECS containers should be able to communicate with database services such as SQL Server RDS, Elasticache and DynamoDB in the same VPC.
Readiness of ASP.NET Core WebAPI
Let's first understand the necessary parts in ASP.NET Core webapi services to be able to deploy in ECS cluster.
- All lookup data and session related data should be stored in a single instance redis cache or some common database, so that all service instances should be able to access data from single repository.
services.AddStackExchangeRedisCache(options => { options.Configuration = Configuration["Cache:AWSRedisEndPoint"]; }); - Every service should have a health check route configured, to check service is running in container from ELB. I used built in middleware to configure this.
//this line in ConfigureServices method of Startup.cs
services.AddHealthChecks();
//this line in Configure method of Startup.cs
app.UseHealthChecks(“/health”);
- All routes in a service should have a common base route path, so that requests from ELB should be able to send to this service target group by matching the base route path.
[Route(“metadataapi/[controller]”)]
public class CustomersController : ControllerBase
[Route(“metadataapi/[controller]”)]
public class VehiclesController : ControllerBase
- I used swagger for API discovery documentation. This swagger configuration should also consider using base route path.
app.UseSwagger(c =>
{
 c.RouteTemplate=”policyapi/swagger/{documentName}/swagger.json”;\
});
app.UseSwaggerUI(c =>
{
 c.SwaggerEndpoint(“/policyapi/swagger/v1/swagger.json”,”APIdoc”);
 c.RoutePrefix = “policyapi/swagger”;
});
Docker Image to Run Container on ECS
- Docker is a platform to create and deploy application containers on Host machine. If you have not worked on Docker earlier, please consider going through some basics. I loved this pluralsight course.
- I created docker file for each service with basic instructions to build API image.
- I also created a docker-compose file to build and run these containers in local host machine.
- You will require to create a .env file setup environment variables to service
- Build and run images in containers by using this command in terminal:
docker-compose up -d --build
- Make sure the API services are running fine in container by navigating to swagger URLs http://localhost:8080/metadataapi/swagger
- Create image Repositories for each service using this command:
aws ecr create-repository --repository-name metadata-api
- You can also create repository by logging into AWS ECR console.

- Tag running service images with ECR repository URIs with:
docker tag metadataapi:latest
875373411184.dkr.ecr.us-west1.amazonaws.com/insurancemetadata:latest
- Login to ECR to push this image to cloud. We need to run this command to generate login command.
aws ecr get-login --no-include-email --region us-west-2
- Copy and paste the output from the above command in the terminal to perform actual login.
- Once you login successfully, push these service images to Cloud.
docker push
875373411184.dkr.ecr.us-west-1.amazonaws.com/insurancemetadata
Deploy Service Images in ECS Cluster using Cloudformation
Once docker images are pushed to ECR repository, then we can deploy the services using the following two cloud-formation templates.
- First one to create common resources like Load balancer, securitygroups and Cluster.
- Second one to configure service in containers using Fargate and also creates necessary IAM roles, target groups, Task definition and ECS Service.
We need to create one stack for each service in our application by passing the necessary parameters.
- You can use either AWS console to create stacks for these cloudformation templates or execute them from the command line.

aws cloudformation deploy
   --template-file /path_to_template/microservice-cluster-elb.yaml
--stack-name my-new-stack
--parameter-overrides EnvironmentName=mycluster vpcid=<vpcid> ...
- Once the first stack completed successfully, we need to create stack for each service. This time, we need to find output from first stack to pass to the service stack like
elbruleid,securitygroupnameandclustername. - Before creating service, make sure all necessary environment variables are defined in the template.
- Once the second stack is created, you can find the ELB load balancer DNS entry in AWS console.
- Browse each service swagger URL to make sure APIs are deployed successfully.

- These cloud-formation templates are reusable for CI/CD tool integration as well.
- Other option to deploy these microservices is to use AWS Web console.
Deploy Service Images in ECS Cluster using AWS Console
We learned how to deploy dotnet microservices in AWS ECS Fargate using cloudformation. In this section, we will deploy the same application using AWS Console to understand each AWS service.
Step 1: Application Load Balancer -ELB
-
We use ELB to distribute http requests to all ECS containers equally. ELB is fully manager load balancer in AWS
-
Once the API images are pushed to AWS ECR Repository, just verify they exist in AWS console.
-
Navigate to EC2 Service, click on Load balancers, Select Create Load Balancer and select Application Load Balancer.

- Enter basic information an select VPC and subnets:


- Configure Securitygroup, with required IP address to allow access ELB.

- Enter Default Target-group name and settings. Also:


- Review and click Create and navigate to the ELB Dashboard.
- Navigate to Listeners tab and click on View/edit rules link .

- Navigate to Edit tab and edit default rule to return fixed response 503.

- Click on Update button and Find the DNS Name of ELB and browse.
Step 2: ECS Cluster
- ECS is an AWS custom orchestration for containers in Cloud.
- Navigate to ECS, select Cluster and click on Create Cluster.

- Select Network Only option as Cluster Template. This tells ECS to use Fargate.

- Enter name and click Create.

Step 3: ECS TaskDefinition and ECS Service
- TaskDefinition: Is set of instructions like image, environment varibles and memory size, ports to use while creating a container in this cluster.
- Navigate to Task Definitions menu under ECS and click on Create New Task definition button.

- In the next step, select Fargate as Launch type.

- Enter name and other details like Task role - if task execution role does not exist , please create one going to IAM console.


- Add containers to this task by clicking Add Container button at the bottom.
- Fill the information like name, image url of this service and ports in the Container popup. You can leave the remaining settings to default, unless you have specific requirements.

- Fill the information like name, image url of this service and ports in the Container popup. You can leave the remaining settings to default, unless you have specific requirements.
- After adding containers , just click on Create button and navigate to Task details page to confirm.
-
ECS Service is a mechanism in ECS to execute the task definitions with desired number of containers in one environment. And also, you can configure the ELB target group for these containers to be available to Load balancer.
- Navigate to Clusters dashboard and select the cluster we created.

- Click on Create button under Services tab in the cluster detailed page.

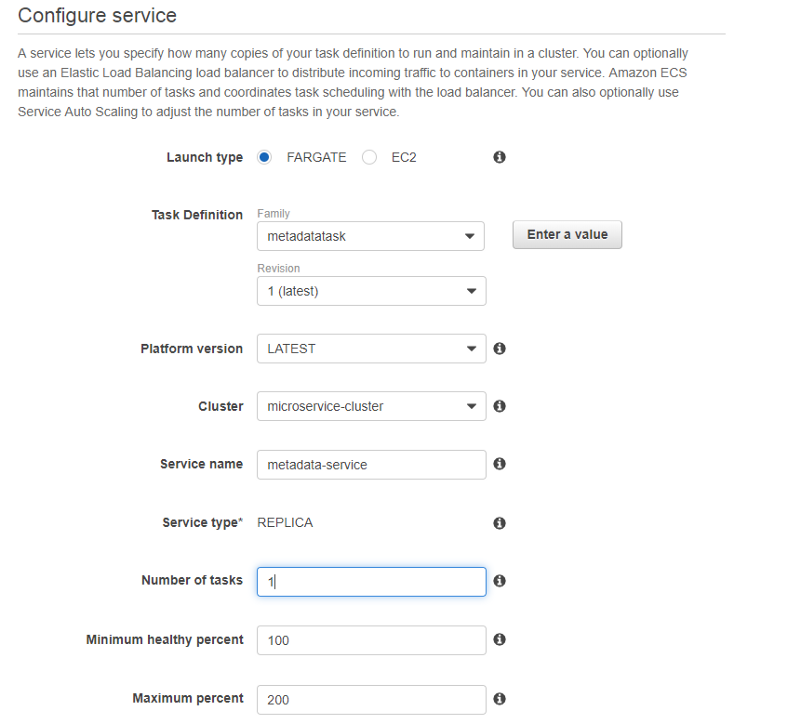
- Enter all basic info like lauch type, name, task definition and number of tasks.
- Select VPC and at least two subnets (private proffered) and Security group.

- Select the Application load balancer, that we created in Step 1.

- Click on Add Load balancer button and and fill the information to create a separate Target group for this service. Also, make sure you enter the path pattern same as your API base root path- /metadataapi* and health route.

- Unselect Route 53, unless you have requirement to setup route 53 DNS and click Next.

- Review and click Create Service.
- Wait for few minutes to run this task and verify the task status by going to Task tab in the Cluster Details page.

- If you see any errors or if task never returns the Running status, just navigate to executing task page by clicking first link in the above page. You should be able to see details error and logs.
- Now browse the ELB DNS name along with swagger route to verify service is running successfully.

Conclusion
Repeat Step 3 for all other services in your micro service application and they should be available on the same ELB DNS URL with different routes.
With this approach, you can deploy micro services without affecting other services. Obviously, this UI approach is just to understand the various services. Mostly, we should use some type of infrastructure as code technology like Cloud-formation or Terraform or AWS Code Deploy to integrate with our CI/CD tools.
References
- Break a Monolithic Application into Microservices with AWS Copilot, Amazon ECS, Docker, and AWS Fargate
- Hosting ASP.NET Core applications in Amazon ECS using AWS Fargate
History
- 18th April, 2019: Initial version