
Learning Azure Functions: Mastering Blob Triggers and Queue Storage Triggers
4.77/5 (19 votes)
How to master Blob Triggers and queue Storage Triggers
Table of Contents
- Preface
- Learning Serverless Azure Functions
- Prerequisites
- Introduction
- Azure Storage
- Azure Storage Emulator
- Adding Azure Queue Storage
- Create Storage Account in Azure Portal
- Queue Trigger Azure Functions
- Compile and test the Queue Trigger function
- Blob Trigger Azure Functions
- Publish and Test Blob Trigger function
- Conclusion
- Source Code on Github
Preface
This article is the submission against CodeProject’s Serverless Challenge. The contest officially began on March 11th, 2019, and ends on April 30th, 2019.
This article of getting accustomed to serverless functions will help a developer to learn what Azure functions are, how to create an Azure function from Visual Studio, publish and test the function on Azure. This article will focus on getting familiar with Blob and Queue storage that Azure provides.
Learning Serverless Azure Functions
Following are the two articles to completely cover HTTP triggered Azure Functions, Queue triggered Azure Functions and Blob triggered Azure Functions.
- Creating Azure Functions in Visual Studio 2017
- Mastering Blob Triggers and Queue Storage Triggers
Prerequisites
The readers of this article should first go through the article of learning Azure Functions, i.e., Creating Azure Functions in Visual Studio 2017. We’ll start exactly where we left in that article.
Introduction
In the last article of learning Azure Functions, we learned about creating an Azure account, setting up a development environment to write Http triggered Azure Functions. We tested the functions locally in Visual Studio 2017 and then published the function to Azure and tested the published function via Postman. We also explored how to debug the Azure function in a local development environment and not only this, we also explored how to debug a pre-compiled deployed Azure Function on the Azure portal I Visual Studio. The case study that we took was an end user making a credit card application and our function acknowledging it by just returning a dummy text with applicant’s name saying “Hi XYZ, your application is accepted”. In this article which is the continuation of the last article, we’ll learn how to take that credit card application request and put that into a Queue function and then into the Blob storage. We’ll create a few more Azure functions to take care of this functionality. We’ll introduce a business logic which decides the application in the queue should be accepted or rejected and accordingly put the application result in Blob storage. So, we'll learn how to create Queue triggers, how to create Blob output bindings, and Blob storage triggers.
Azure Storage
The Azure Storage services consist of various property. First one is Blob storage. Blobs are basically like individual files. Blob storage can store log files, images and word documents as well for e.g., and blobs are stored inside blob containers. Blob containers could be imagined like file folders. The stored blobs could be accessed via URL as a REST endpoint and could also be accessed from code. Another storage service is Azure Queue storage. An Azure Queue can be created to send and receive messages. The maximum allowed size of an individual queue item is 64 KB, so the item in the queue should be less than this size. Azure Queues could be used to create processing pipelines.
Azure also provides Azure table Storage that is a structured NoSQL data store which means it has a schema-less design. Azure Table Storage is much more flexible than other traditional relational data models. The schema-less design can store information like device information, metadata or address books. Another one is Azure Cosmos DB which offers several additional features over and above Azure Table storage, for example, it was designed from the ground up to support global distribution of data. Azure Storage also includes disk storage and file storage.
Azure Storage Emulator
The Azure Storage Emulator offers local development machine emulation for Azure blob services, Azure Queue services, and Azure Table services. This means that we can develop and test our functions that use Azure Storage locally without needing a network connection. When we're using the local emulator, we're not reading or writing anything to Azure Storage in the cloud, which means we're not incurring any transaction costs during development. There’re several ways to install the Azure Storage Emulator. First off is as part of the Azure SDK installer, and there's also a standalone installer that you can find on Microsoft's website.
Adding Azure Queue Storage
We’ll use the same application that we developed in the last article and start from there. We’ll try to write the received credit card application to queue storage. So, open Visual Studio and the solution that we developed in the last tutorial. Make sure the Azure Storage Emulator installed on your machine is running as described in the following steps.
- Open the Azure Storage Emulator.

- Once successfully launched, it means it is running.

- Now in the existing
Runmethod ofApplyForCC, add aQueueattribute named “ccApplication” or the name of your choice. In the method-body, read theCCApplicationfrom the request body and add the same to theccApplicationQueueand return the response back. So, here we are fetching theCCApplicationfrom the body of the request and adding it to our newly defined queue.using System.Linq; using System.Net; using System.Net.Http; using System.Threading.Tasks; using Microsoft.Azure.WebJobs; using Microsoft.Azure.WebJobs.Extensions.Http; using Microsoft.Azure.WebJobs.Host; namespace LearnAzureFunctions { public static class ApplyForCC { [FunctionName("ApplyForCC")] public static async Task<HttpResponseMessage> Run( [HttpTrigger(AuthorizationLevel.Function, "post", Route = null)]HttpRequestMessage req, [Queue("ccApplication")] IAsyncCollector<CCApplication> applicationQueue, TraceWriter log) { log.Info("C# HTTP trigger function processed a request."); CCApplication ccApplication = await req.Content.ReadAsAsync<CCApplication>(); log.Info($"Received Credit Card Application from : {ccApplication.Name }"); await applicationQueue.AddAsync(ccApplication); return req.CreateResponse(HttpStatusCode.OK, $"Application received and submitted for {ccApplication.Name}"); } } } - Make sure in your local.settings.json file, following should be the setting.

- Run the application. The console window will be launched.

- Now, head back to Postman and make the request to the local URL for the function with the JSON in
bodytag as shown in the last article.
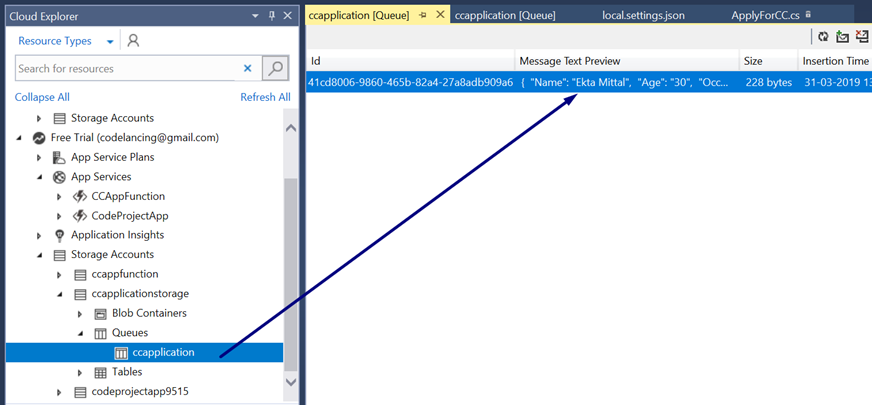
- Once the response is received, open the cloud explorer in Visual Studio and under Local-> Storage Accounts-> Development->Queues, you’ll find one new queue created with the name of “
ccapplication”, i.e., the name we provided to thequeueattribute inRunmethod.
- Double click the queue and we see the details that were passed as a JSON object in the request. The queue is created, and the details are logged as a message in the queue.

Create Storage Account in Azure Portal
We have seen how to use the Azure Storage Emulator when we're working with functions. Let's see how we can set up a test storage account in the cloud rather than relying on the emulator. The first thing we're going to do is head over to the portal and create a new storage account for development and test purposes.
- Head back to the Azure portal, click on Create Resource and select Storage Account.

- Provide the Storage account name, location, account kind. I chose the general purpose v2 kind. Just review and create the account.

- Once the validation passes, hit the Create button to create the account.

- After which, the deployment would be completed and you’ll see your storage account created.

- Go back to cloud explorer in Visual Studio and under the Azure account (not the local development one), check Storage Account and you see the storage account name showing there. This storage account lists the Blob containers, Queues and Table storage as the type of storage containers.

- In the Azure portal, in your storage account, click on Access keys to see the access keys of your account.

- Copy the access key shown in
key1. We’ll use this key to access the storage account from the local environment and write messages to the queue created in storage account now and not in the local environment.
- Paste the copied key in the “
AzureWebJobsStorage” field as shown in the following image in the local.settings.json file.
- Now again, make a request to the
ApplyForCCfunction. We are expecting here the queue to be created on the storage account and not in the local and the message written to that queue.
- Once you get the response for the applicant named “
Ekta” as shown in the last step, go to cloud explorer and refresh the storage account created on the Azure portal.
- We see how the queue has been created under this storage account and the request is logged as a message in this queue.
Queue Trigger Azure Functions
Time to process the messages received in the queue. To achieve that, we’ll create a queue trigger, where if the message comes in a queue, the function will be triggered to further process the message. We’ll again create an Azure Function, but this time not HTTP trigger, but a Queue trigger function.
- In the Visual Studio, right click your project and add a new Azure Function named
ProcessCCApplication.
- Select function type as
Queuetriggers and provide the name of the queue in thePathfield as shown below:
- Once the function is created, you’ll see the following class generated in Visual Studio defining function name attribute at the top and
QueueTriggerin theRunmethod.
- Add some business logic to accept or reject the application. In the
Runmethod ofProcessCCApplicationfunction, define two variables as a parameter to the function, i.e.,acceptedCCApplicationandrejectedCCApplicationdecorated withBlobattribute, one for accepted and one for rejected. Now the business logic defined here says that application will only be accepted if the applicant’s Annual income is more than100000and age is greater than23years, else the application would be rejected. We are setting the parameter variables to the JSON serialized an object ofCCApplicationfor both accepted and rejected as shown below:
Code
using System;
using Microsoft.Azure.WebJobs;
using Microsoft.Azure.WebJobs.Host;
using Newtonsoft.Json;

namespace LearnAzureFunctions
{
  public static class ProcessCCApplication
  {
    [FunctionName("ProcessCCApplication")]
    public static void Run([QueueTrigger("ccapplication", Connection = "")]CCApplication ccApplication,
      [Blob("accepted-application/{rand-guid}")] out string acceptedCCApplication,
      [Blob("rejected-application/{rand-guid}")] out string rejectedCCApplication,
      TraceWriter log)
    {
      log.Info($"C# Queue trigger function processed: {ccApplication.Name}");

      bool isApplicationAccepted = ccApplication.YearlyIncome > 100000 && ccApplication.Age > 23;

      if (isApplicationAccepted)
      {
        acceptedCCApplication = JsonConvert.SerializeObject(ccApplication);
        rejectedCCApplication = null;
      }
      else
      {
        rejectedCCApplication = JsonConvert.SerializeObject(ccApplication);
        acceptedCCApplication = null;
      }
    }
  }
}
Compile and Test the Queue Trigger Function
- Compile the solution and run the application. Once the console is launched, you can see the newly added Azure Function shown there.

- Remember, we already had a message in the queue for an applicant named “
Ekta Mittal”. As soon as the application is launched, our queue trigger function is active and keeps looking into the queue that we defined in Azure storage for the new messages. Since we already had a message, this trigger processes that message, you can see the same in the console as it says “Executing ‘ProcessCCApplication’ ….”. Once processing is done, it says “Executed...”.
- Head back to Blob container in the cloud explorer and we see the Blob containers have three containers, two of which are those that we defined in our
Runfunction forQueueTrigger.
- Double click on the
accepted-applicationcontainer, and we see the container has a blob, if you double click that blob in the right-hand side screen, it will download the blob and try to open it. Open the blob using Notepad.
- We see the blob contains the message for “
Ekta Mittal” request. Since the yearly income of the applicant was greater than100000and age was greater than23, the application is accepted and put in anaccepted-applicationcontainer.
- Similarly, make one more request with a new applicant having yearly income
50000and age17, i.e., violating the business logic. You’ll see that the application will be processed, and the blob containerrejected-applicationwill now have the blob of that rejected application. You can open the blob again by downloading it.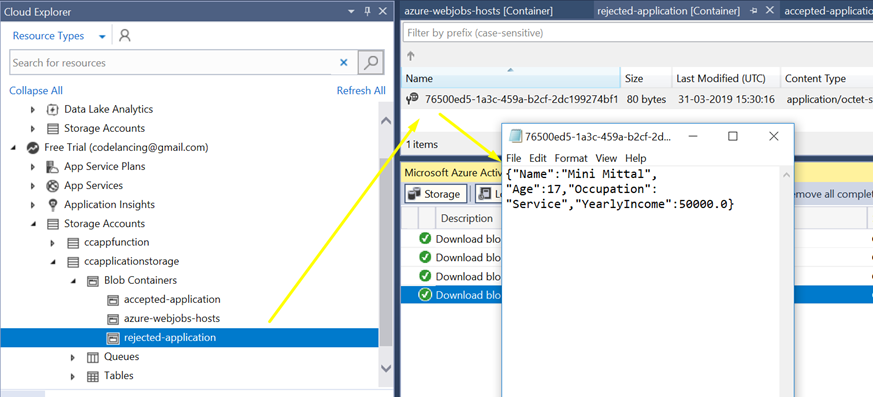
Blob Trigger Azure Functions
Blob trigger function as the name says would be the function which will get executed when the blobs are written. So, if we recap, we created an HTTP trigger function first to take the HTTP requests from the credit card applicant, then we put all the applications in a queue for further processing whenever we receive the application. Again, we created a queue trigger function that gets triggered whenever there is a message in accepted or rejected queue and put the processed applications in their respective blobs that are stored on Azure storage and could be downloaded and opened as a text file. Now we are going to write a blob trigger function that will trigger when the blobs are written by the queue trigger function, to further process the accepted and rejected applications.
- Right click on the project in Visual Studio and add a new Azure Function.

- Name the function as “
ProcessCCApplication”. This blob trigger function will be for accepted applications and we’ll in a similar way, create a new function for rejected applications.
- Choose the function type as Blob trigger and prove the path as the name of the accepted blob trigger we defined as a parameter in the queue trigger function, i.e., “accepted-application”.

- Once the Azure Function is added, you’ll see the following code as shown in the image below:

- Replace the
myBlobparameter of typeStreamwith astringvariable namedccApplicationJsonas we are expecting a JSON from the blob. Add aNewtonsoft.Json namespaceinusingsand in the function body, get theCCApplicationmodel by deserializing the serialized json that we got from blob that was written for accepted applications. Log the name of the applicant at the end. This will ensure that our blob trigger was hit, and we got the applicant’s named logged.
- Similarly, add another blob trigger function for the rejected application.

- Following should be the code when the function is added.

Replace the
Streamparameter and function body as shown in the following code:using System.IO; using Microsoft.Azure.WebJobs; using Microsoft.Azure.WebJobs.Host; using Newtonsoft.Json; namespace LearnAzureFunctions { public static class ProcessRejectedCCApplication { [FunctionName("ProcessRejectedCCApplication")] public static void Run([BlobTrigger("rejected-application/{name}", Connection = "")]string ccApplicationJson, string name, TraceWriter log) { CCApplication ccApplication = JsonConvert.DeserializeObject<CCApplication>(ccApplicationJson); log.Info($"ProcessRejectedCCApplication Blob Trigger for \n Name:{ccApplication.Name}"); } } }
Now we are done writing the functions. Time to test the Blob trigger function.
Publish and Test Blob Trigger Function
- Compile and run the application, we see the two newly added functions being recognized by our standalone server in the console. Now, remember that we already have two requests lying in the blob storage, one is for the accepted application of “
Ekta Mittal” and another for rejected application of “Mini Mittal”. So as soon as the application is run, the blob trigger function for both the accepted and rejected application triggers and executes the existing blobs by reading information from those blobs in a deserialized JSON and logging the name of the applicant.
- These functions are still at our local environment and not on the Azure portal like our queue. So, just publish the functions to Azure. Right-click the project and click on Publish.

- You’ll see the existing Publish profile that was created when we first published our HTTP trigger function in the last article. Hit the Publish button.

- Once published, go back to the Azure portal and under your
CCAppFunction, you can see all the four functions that we created till now, i.e., on HTTP trigger function, oneQueuetrigger function and two Blob trigger functions.
- Now since the functions are published as a precompiled serverless function on Azure, we can test those. Now switch back to Postman and make a request for the
ApplyForCCfunction’s URL that you can get in the details section when you click onApplyForCCfunction in Azure portal. It is also explained in the last article. Make a request with the name “Rocky” having age35and yearly income as500000.
- Make another request with the applicant’s name “
Docky” having age16and yearly income as30000.
- Now if we go to the cloud explorer in Visual Studio for the Azure account, we see the queue as “
ccApplication” underccappfunctionstorage account.
- We see the
accepted-applicationandrejected-applicationblob containers under the Blob Containers section.
- Double click on the accepted-application blob to download and see the blob. We see the request for Rocky logged here as blob storage as an accepted application.

- Double click on accepted-application blob to download and see the blob. We see the request for Dockey logged here as blob storage as a rejected application as it did not qualify the minimum criteria of age and yearly income to be accepted.

This shows that all our functions are working very smoothly and doing their job in a pipelined way.

Conclusion
In this article, we covered the Azure Queue trigger and Azure Blob trigger functions. We walked through the case study in a gradual way to cover the entire topic. Serverless functions are fun to develop and play around.