
Making sure your Android game is ready for 64-bit
1.00/5 (1 vote)
In this article, we touch on common situations where you must work to update a 32-bit app, like: Having an older Android project that needs to be updated to a higher API-Level, working in a game engine like Unity, and working in an Android project that uses native libraries like Cocos2d-x
If you’ve been around Android development, then you most likely have heard about Google’s App Store policy changes regarding 64-bit applications.
If you haven’t been following Android development then you’re probably wondering, "what am I talking about?" Google has announced in a blog post that they are now requiring all new native mobile apps to be include 64-bit support. The blog post mentioned specific timelines for when you must have a 64-bit version of your app:
Starting in August 2019:
- All new apps and app updates that include native code are required to provide 64-bit versions in addition to 32-bit versions when publishing to Google Play.
- Extension: Google Play will continue to accept 32-bit only updates to existing games that use Unity 5.6 or older until August 2021.
Starting in August 2021:
- Google Play will stop serving apps without 64-bit versions on 64-bit capable devices, meaning they will no longer be available in the Play Store on those devices.
- This will include games built with Unity 5.6 or older.
In December 2017, Google made a blog post with their roll-out plan to support 64-bit apps, so this shouldn’t be a complete surprise for developers that have been following the Android blog. Regardless, if you’re not prepared for it, don’t worry, it’s not as bad as you’d expect!
Benefits of 64-Bit Apps
The first thing you might wonder is why must we update our app to support 64-bit? The short answer is that Google says so, and if you’d like your app to be available in their store, you must comply with their rules.
If you’re wondering why Google says so, it’s because of improvements in the capability of our phone’s hardware. As a result, Google is starting to demand developers build apps that take advantage of the new 64-bit hardware.
Some benefit from moving to a 64-bit architecture is that the phone:
- Can support more RAM. 32-bit phones are limited to a maximum of 4 Gigabyte of RAM (2^32) where theoretically a 64-bit phone can support 16 Exabytes of RAM (2^64)
- Arm’s 64-bit architecture increases the number of registers from 16 to 32. That means more loop unrolling and less spilling to the stack, which can provide a nice performance increase.
- With 64-bit pointers Arm has been able to add features that improve the security of your mobile phones – read more here if you’re interested.
By updating your app to utilize 64-bit phones, Google is encouraging better performance and security optimization in their ecosystem.
What Does It Mean to be 64-Bit Ready?
Now let’s say you’re like me and you didn’t really do anything until Google’s latest warning. What should you do? First of all, don’t panic! There’s a good chance that your app is already 64-bit ready!
64-bit support was officially added in Android 5.0 Lollipop, released on November 12, 2014. Android 5.0 is the equivalent of API level 21.
For Android apps, there are 2 settings that you can set to specify your API levels:
- Minimum SDK Level - The lowest API level that your app supports. Any phone that has a lower API version can’t run your app. This setting also limits the features that are available to your app to the ones that are available for your minimum SDK Level
- Target SDK Level - The API level that your app is intended for. Anything below that will run Android’s compatibility code to provide a similar experience for phones that don’t support the Target SDK Level.
From the perspective of having a 64-Bit ready app, we would need to ensure that our Target SDK Level must be at least 21 to allow Android Studio to support a 64-bit architecture. Going forward, though, this won’t be enough.
As mentioned, if you are adding a new app to the Play Store, or updating an existing app, you must target API level 26 (Android 8.0) or higher. And as Google outlined in a recent blog post, new applications will be required to have a target API level of 28 (Android 9.0) beginning in August 2019.
If you’re making updates to an existing application, you’ll have to target API level 28 beginning in November 2019. Google has compiled a list of important changes you should be aware of when upgrading.
In the past, whenever Android has released a new API level, it is recommended for developers to change their Target SDK Level to match the newest ones and keep the minimum SDK level the same.
Where are we now? If we look at Android’s distribution dashboard:

You can see that at the time of writing, we’ll only be missing 11.1% of the total Android market if we choose to use API Level 21 as our minimum. In other worlds, 88.9% of Android devices in use today are running a 64-bit capable version of Android.
If your app is written purely in Java and you are targeting an API level of 21 or higher, your app is almost already 64-bit ready! Keep in mind that it can be difficult to keep supporting an old API level while still making use of new Android capabilities.
In reality, you’ll want to target as high a minimum API level as you can get away with. Although a fair number of people are still using older Android versions, the users in your app’s target audience may not be.
Who Will Have the Most Problems?
Now what if you’re not one of the lucky people mentioned above? What if you use a game engine like Unity to develop your app or your app was developed for a lower API version?
You’ll likely need to perform some upgrades to your app if it:
- Uses Target SDK Level 25 or below
- Uses a game engine like Unity to build mobile games
- Uses native C/C++ code
Luckily, even if you’re on this list, it’s not too hard to create a 64-bit app.
Android Target SDK Level 27 or below
If your current project has a Target API Level of 27 or below, then it’s time that you updated your app to Target API Level 28, since this will be the minimum API target for new apps beginning in August 2019 which, as we’ve seen, is the same time the 64-bit requirement will be added.
I won’t go into too much detail for this, but there are 2 things that need to be done to support API Level 28:
- Update the targetSdkVersion and compileSdkVersion in your module’s build.gradle to be at least 28. CompileSdkVersion is the API Level version used to build our application. This number is usually the same as the targetSdkversion.

- Update and fix any compiler and runtime errors you’ll encounter when you update your API Level. Once again here are Google’s instructions when it comes to upgrading to a newer API Level.
With these changes, your app will be 64-bit ready.
64-bit in Game Engines Like Unity
Another popular platform to develop mobile Android games is through game engines, like Unity and Unreal Engine. The ability to create a 64-bit app depends on the version in which the development team decided to add support for it.
If you have an older version of the game engine you have no choice but to upgrade your project to a 64-bit supported version and refactor any code that have been deprecated or changed.
The only exception is if your app is built with Unity 5.6 or older. The rule there is that "Google Play will continue to accept 32-bit only updates to existing games that use Unity 5.6 or older until August 2021."
Not updating your Unity version will only delay the inevitable, luckily for us, updating doesn’t have to be a slow and confusing process. The Unity documentation provides extensive information to upgrading to a specific version of Unity which can be found here.
Native code in your project
Now to the main topic of the day! What if we have an Android project that uses Native C/C++ libraries? Just like the two cases mentioned above, we’ll have to update the libraries to a version that supports 64-bit.
Along with upgrading your native dependencies to support 64-bit, we also need to make a configuration to our Android NDK settings project to build a 64-bit supported APK.
Android NDK is a set of tools that allows your Android Java app to work with native code. Specifically C and C++.
Specifically, in our gradle file, we’ll need to set an option for abiFilters to include the specific CPU architectures we wish to build for our native code. Specifically, the big 4 are:
- armeabi-v7a
- arm64-v8a
- x86
- x86_64
The architecture we need to build a-64-Bit app are arm64-v8a and/or x86_64. More on this later in our example.
Setting up an example with a Cocos2d-x project
To demonstrate what it takes to build a 64-bit Android App using native code, I’ll be building a sample project with a native cross-platform game engine called Cocos2d-x.
I originally intended to download Cocos2d-x 2.2.6, which didn’t support 64-bit, and show what it would take to convert it to a 64-bit app. I wanted to show how we could either update the dependencies in Cocos2d-x to be 64-bit so that we could build a 64-bit app, or migrate an existing Cocos2d-x 2.x app to the latest version.
In both cases, the amount of work required would be far beyond the scope of this article. Older versions of Cocos2d-x have 64-bit-incompatible assembly language sections included in the engine. Newer versions of Cocos2d-x have changed substantially, requiring a significant amount of work to port existing code to the new version of the engine.
This underscores an important point. Although making your game 64-bit compatible is easy if all of your dependencies have 64-bit versions ready and available, this won’t always be the case. You may need to create custom 64-bit compatible builds of the libraries you depend on. Or, you may have to alter your game’s code to work with newer versions of the libraries and game engine you depend on. Either way, you might be facing a lot of work. That’s why now is the time to start working to ensure your game if 64-bit ready if you haven’t started already.
After attempting both updating Cocos2d-x 2.x and porting to 3.x, and discovering both would require at least an entire article each, I decided to skip that step and instead start with a new sample project using Cocos2d-x 3.17.1 which already support creating 64-bit applications and show how we can start with a 32-bit application, and add 64-bit support.
Installing and setting up a Cocos2d-x project
There is quite a bit of work involved to get Cocos2d-x working, but let’s get started. I’m going to assume we already have a working Android Studio installed for some prerequisite files. Although the screenshots were taken on Windows, the instructions should work without a problem on MacOS and Linux.
- Download the Cocos2d-x 3.17.1 zip from the site and unzip the file.
- Download and install python 2.7.x, make sure you select the option to add the python to your PATH so we can reference it in our Command Prompt.
- Open your Command Prompt/terminal and navigate to the directory where you extracted the Cocos2d-x and run the command python setup.py. This will install all the dependencies you need to use Cocos2d-x.
- When running the setup, you’ll be prompted to add your NDK_ROOT (C:\Users\<Username >\AppData\Local\Android\sdk\ndk-bundle on Windows) and ANDROID_SDK_ROOT (C:\Users\<Username>\AppData\Local\Android\sdk on Windows).
- Once the setup is complete, it’s time to create a new project. Do that by running: cocos new MyCppGame -l cpp this will create a game called MyCppGame that supports C++. Here’s what the directory looks like:

The two folders that are important to us are the Android project, located at proj.android and the C++ code located at Classes
- With Android Studio, we can open the generated project by choosing to Open an Existing Android Studio project in the Android Studio Welcome page and choosing our proj.android folder

Build and generate an Android APK of our demo project
At this point, we will encounter problems with gradle and our project will fail to build properly.
It turns out, this is a Cocos2d-x specific problem. Before we can use Android Studio to edit our project, we need to compile our project!
Before we can fix our project, we need to install three tools from the SDK Manager (which we can access from Tools > SDK Manager in Android Studio) to help build our project:
- LLDB – A debugger for Android Studio to debug our native code. LLDB isn’t necessary for this example, but it’s always good to have a debugging tool available!
- CMake – A build tool that is used in Gradle to build our native library.
- NDK – The Android Native Development Kit is a toolset that allows Android to build and compile native code in our project
After this, we need to install the build system that Cocos2d-x uses to compile our projects. The project is called Ninja.
- Download Ninja
- Ninja comes in a zip. Unzip it and put it somewhere in a folder on your system.
- Finally, we need to add the folder Ninja is in to our PATH in our environment variables. On Windows, you can edit Environment Variables by right-clicking My Computer > Properties > Advanced system settings > Advanced > Environment Variables. Adding a directory to your path on Linux or MacOS will depend on which shell you’re using.
- Close your command prompt/terminal, then reopen it so the changes we added will be applied
Now that we all the necessary requirements, we can finally compile our Android project!
- In your Command Prompt/Terminal, navigate back to wherever the MyCppGame folder was saved to.
- It’s time to compile our Android project! Run: cocos compile -p android. This command will build and compile our Android project while also generating a debug APK for our Android device. It’s important to note that whenever we make a change, we must run the same command to re-build your project.
- Looking back at our MyCppGame folder, we’ll see that there’s a new bin folder. If you open all the folders, you’ll see that Cocos2d-x built us an APK for debug mode!

How to tell if your app is 64-bit
Awesome! We finally have an APK of our game that we can submit to the Google Play Store!
However, before we do that, how can we confirm our app is really a 64-bit app? There are a couple of ways to do this, as outlined by Google. I’m going to validate our app by using Android Studio’s APK Analyzer tool.
- In Android Studio go to Build > Analyze APK… and select the APK we created with Cocos2d-x.

You’ll see something like this:

You can tell if your app supports 32-bit or 64-bit by looking in the lib folder.
The lib folder contains the CPU architecture our app uses. As you can see our app uses armeabi-v7a. Google provides us a table showing us what architecture supports what bit:

As you can see, our current app is a 32-bit app. That’s not good, Google won’t accept our app into the Play Store!
Convert our Android app to 64-bit
As we discovered, our app doesn’t support 64-bit! Fortunately, this can be resolved fairly easily:
- Open our project in Android Studio
- Change our project to the Project view

There are several ways we can add support for 64-bit for our app depending on how we’re building our project.
- If we are using CMake, we would simply run the command cmake -DANDROID_ABI=arm64-v8a to build a 64-bit app.
- If we’re using NDK we would open our makefile: Application.mk and change our APP_ABI to be APP_ABI := armeabi-v7a:arm64-v8a, so that it compiles with both the 32-bit armeabi-v7a architecture, and the 64-bit arm64-v8a architecture.
- If we’re using gradle (which we are) inside our build.gradle file, under android > defaultConfig, we would set our ndk.abiFilters to use 'armeabi-v7a' 'arm64-v8a'
In the case of Cocos2d-x, we’re set up a little differently.
In our build.gradle, we have this:

As you can see, we get our ndk.abiFilters from PROP_APP_ABI, which is located in our gradle.properties:

I added arm64-v8a to PROP_APP_ABI, which will make our app support 64-bit!
- Build the changes that you made in gradle.properties and make sure we don’t run into build problems
- Go back to our Command Prompt and run cocos compile -p android and wait for our app to finish compiling and generate our new APK
Note: An interesting thing you could do is change the PROP_COMPILE_SDK_VERSION and PROP_TARGET_SDK_VERSION to be 19 and try rebuilding in Android Studio and you’ll get this message saying that the 64-Bit architecture isn’t supported

Validating that our app now supports 64-bits
Like what we’ve done previously, let’s open our new APK with the APK Analyzer.
Here’s what we’ll see:

Success! Our APK now supports arm64-v8a, which is a 64-bit CPU architecture for libMyGame.so! With this, our app now supports both 32-bit and 64-bit mobile devices and we’re ready to submit it to the Google Play Store!
Building a Release APK
So far when we build our APK with Coco2d-x we build a debug APK. While this is good as it allows us to add in specific debugging code that will help us test our code in production, we don’t need the extra overhead for the release version.
When you are ready to install to create and publish your app on the Play Store, you need to create your APK to distribute.
To do this go to Android Studio:
- Go to Build > Generate Signed Bundle / APK…
- In the wizard that shows up, select APK and click Next
- Click Create New… to create a new KeyStore
- Fill out your information and save your .jks file in a location where you will remember it and hit OK. This file will be important later when you wish to submit your app so keep it safe!

- Hit Next to move to the final step in the wizard

- Finally in the last step in the wizard, choose where you want to save your APK,create a release apk, choose the V2 Signature Version and hit Finish to create your release APK!
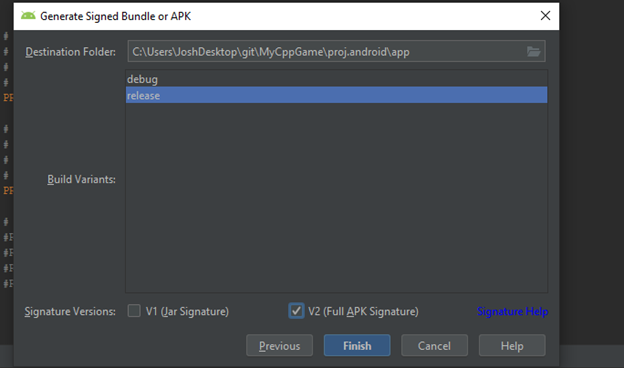
The APK will be put in a release folder in the directory where you set the APK to be.
Now to prove that this new release APK supports 64-Bit, I opened up the APK with the APK Analyzer again and here’s what we have:

As you can see we have arm64-v8a which means we support 64-Bit!
With this we finally have a 64-Bit APK that has been optimized for release that we can submit to the Google PlayStore! Congratulations!
Conclusion
Google’s August deadline might still be 6 months away, but if you wish to ensure your app makes it into the Google Play Store, you’ll have to ensure that your app is able to support the ever-increasing number of 64-bit supported mobile devices. It’s also better to update your application earlier, so you have time to find and solve compatibility issues that may arise.
In this article, we touched upon common situations where you must work to update a 32-bit app, including, but not limited to:
- Having an older Android project that needs to be updated to a higher API-Level
- Working in a game engine like Unity
- Working in an Android project that uses native libraries like Cocos2d-x.
Hopefully, after going through this article and converting a sample project to a 64-bit app with Cocos2d-x, you are now armed with the knowledge needed to configure your Android project to build a 64-bit application.
If you want to have a deeper look into making your app support 64-bit devices, Google provides great documentation on the topic. I recommend reading their guide on Ensuring that your app supports 64-bit devices and how to Add C and C++ code to your project.