
Inference Engine Samples
This topic demonstrates how to run the Image Classification sample application, which does inference using image classification networks like AlexNet and GoogLeNet.
Image Classification Sample
Description
This topic demonstrates how to run the Image Classification sample application, which does inference using image classification networks like AlexNet* and GoogLeNet*.
How It Works
Upon the start-up, the sample application reads command-line parameters and loads a network and an image to the Inference Engine plugin. When inference is done, the application creates an output image and outputs data to the standard output stream.
Running
Running the application with the -h option yields the following usage message:
./classification_sample -h
InferenceEngine:
    API version ............ <version>
    Build .................. <number>

classification_sample [OPTION]
Options:

    -h                        Print a usage message.
    -i "<path1>" "<path2>"    Required. Path to a folder with images or path to an image files: a .ubyte file for LeNet
                              and a .bmp file for the other networks.
    -m "<path>"               Required. Path to an .xml file with a trained model.
        -l "<absolute_path>"  Optional. Absolute path to library with MKL-DNN (CPU) custom layers (*.so).
        Or
        -c "<absolute_path>"  Optional. Absolute path to clDNN (GPU) custom layers config (*.xml).
    -pp "<path>"              Path to a plugin folder.
    -d "<device>"             Specify the target device to infer on; CPU, GPU, FPGA or MYRIAD is acceptable. Sample will look for a suitable plugin for device specified
    -nt "<integer>"           Number of top results (default 10)
    -ni "<integer>"           Number of iterations (default 1)
    -pc                       Enables per-layer performance report
    -p_msg                    Enables messages from a plugin
Running the application with the empty list of options yields the usage message given above and an error message.
To run the sample you can use AlexNet and GoogLeNet models that can be downloaded with the Intel® Distribution of OpenVINO™ toolkit Model Downloader or other image classification models.
NOTE: Before running the sample with a trained model, make sure the model is converted to the Inference Engine format (*.xml + *.bin) using the Model Optimizer tool.
For example, to perform inference of an AlexNet model (previously converted to the Inference Engine format) on CPU, use the following command:
./classification_sample -i <path_to_image>/cat.bmp -m <path_to_model>/alexnet_fp32.xml
Sample Output
By default, the application outputs top-10 inference results. Add the -nt option to the previous command to modify the number of top output results.
For example, to get the top-5 results on Intel® HD Graphics, use the following command:
./classification_sample -i <path_to_image>/cat.bmp -m <path_to_model>/alexnet_fp32.xml -nt 5 -d GPU
Image Classification Sample Async
Description
This sample demonstrates how to build and execute inference in pipelined mode on example of classifications networks.
The pipelined mode might increase the throughput of the pictures. The latency of one inference will be the same as for syncronous execution. The throughput is increased due to follow reasons:
- Some plugins have heterogenity inside themselves. Transferring of data, execution on remote device, pre-processing and post-processing on the host
- Using of explicit heterogenious plugin with execution of different parts of network on differnet devices
When two or more devices are involved in the inference process of one picture, creating several infer requests and starting asynchronous inference provides the most efficient way to utilize devices. If two devices are involved in execution, the number 2 is the optimal value for the -nireq option. To be effecient, the Image Classification Sample Async uses a round-robin algorithm for infer requests. The sample starts execution for the current infer request and switches to waiting for the results of the previous inference. After the wait time completes, the machine switches infer requests and repeats the procedure.
Another required aspect of good throughput is a number of iterations. Only with a big number of iterations you can emulate the real application work and see performance
Batch mode is an independent attribute on the pipelined mode. The pipelined mode works efficiently with any batch size.
How It Works
Upon the start-up, the sample application reads command-line parameters and loads a network and an image to the Inference Engine plugin. Then application creates several infer requests pointed in -nireq parameter and loads pictures for inference.
Then in the loop it starts inference for the current infer request and switch for waiting of another one. When results are ready, infer requests will be swapped.
When inference is done, the application outputs data to the standard output stream.
Running
Running the application with the -h option results in the message:
./classification_sample_async -h
InferenceEngine:
    API version ............ <version>
    Build .................. <number>

classification_sample_async [OPTION]
Options:

    -h
                            Print a usage message.
    -i "<path1>" "<path2>"
                            Required. Path to a folder with images or path to an image files: a .ubyte file for LeNet
                            and a .bmp file for the other networks.
    -m "<path>"
                            Required. Path to an .xml file with a trained model.
        -l "<absolute_path>"
                            Optional. Absolute path to library with MKL-DNN (CPU) custom layers (*.so).
        Or
        -c "<absolute_path>"
                            Optional. Absolute path to clDNN (GPU) custom layers config (*.xml).
    -pp "<path>"
                            Path to a plugin folder.
    -d "<device>"
                            Specify the target device to infer on; CPU, GPU, FPGA or MYRIAD is acceptable. Sample will look for a suitable plugin for device specified
    -nt "<integer>"
                            Number of top results (default 10)
    -ni "<integer>"
                            Number of iterations (default 1)
    -pc
                            Enables per-layer performance report
    -nireq "<integer>"
                            Number of infer request for pipelined mode (default 1)
    -p_msg
                            Enables messages from a plugin
Running the application with the empty list of options yields the usage message given above and an error message.
You can do inference on an image using a trained AlexNet* network on FPGA with fallback to Intel® Processors using the following command:
./classification_sample_async -i <path_to_image>/cat.bmp -m <path_to_model>/alexnet_fp32.xml -nt 5 -d HETERO:FPGA,CPU -nireq 2 -ni 200
NOTE: Before running the sample with a trained model, make sure the model is converted to the Inference Engine format (*.xml + *.bin) using the Model Optimizer tool.
Sample Output
By default, the application outputs top-10 inference results for each infer request. In addition to this information, it will provide throughput value measured in frames per seconds.
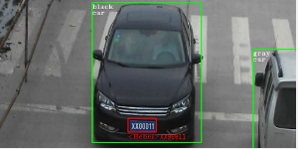
Security Barrier Camera Demo
Description
This demo showcases Vehicle and License Plate Detection network followed by the Vehicle Attributes and License Plate Recognition applied on top of Vehicle Detection results. The corresponding topologies are shipped with the product:
vehicle-license-plate-detection-barrier-0106, which is a primary detection network to find the vehicles and license platesvehicle-attributes-recognition-barrier-0039, which is executed on top of the results from the first network and reports general vehicle attributes, for example, vehicle type (car/van/bus/track) and colorlicense-plate-recognition-barrier-0001, which is executed on top of the results from the first network and reports a string per recognized license plate
For more details on the topologies, please refer to their descriptions in the deployment_tools/intel_models folder of the Intel® Distribution of the OpenVINO™ toolkit installation directory.
Other demo objectives are:
- Video/Camera as inputs, via OpenCV*
- Example of a simple asynchronous networks pipelining: Vehicle Attributes and License Plate Recognition networks are executed on top of the Vehicle Detection results
- Visualization of Vehicle Attributes and License Plate information for each detected object
How It Works
On the start-up, the application reads command line parameters and loads the specified networks. The Vehicle and License-Plate Detection network is required, and the other two are optional.
Upon getting a frame from the OpenCV VideoCapture, the application performs inference of Vehicles and License-Plates Detection network, then performs another two inferences using Vehicle Attributes Detection and License Plate Recognition networks (if those specified in command line) and displays the results.
Running
Running the application with the -h option yields the following usage message:
./security_barrier_camera_demo -h
InferenceEngine:
    API version ............ <version>
    Build .................. <number>

interactive_vehicle_detection [OPTION]
Options:

    -h                         Print a usage message.
    -i "<path1>" "<path2>"     Required. Path to video or image files. Default value is "cam" to work with cameras.
    -m "<path>"                Required. Path to the Vehicle and License Plate Detection model .xml file.
    -m_va "<path>"             Optional. Path to the Vehicle Attributes model .xml file.
    -m_lpr "<path>"            Optional. Path to the License Plate Recognition model .xml file.
      -l "<absolute_path>"     Optional. For CPU custom layers, if any. Absolute path to a shared library with the kernels implementation.
          Or
      -c "<absolute_path>"     Optional. For GPU custom kernels, if any. Absolute path to an .xml file with the kernels description.
    -d "<device>"              Optional. Specify the target device for Vehicle Detection (CPU, GPU, FPGA, MYRIAD, or HETERO).
    -d_va "<device>"           Optional. Specify the target device for Vehicle Attributes (CPU, GPU, FPGA, MYRIAD, or HETERO).
    -d_lpr "<device>"          Optional. Specify the target device for License Plate Recognition (CPU, GPU, FPGA, MYRIAD, or HETERO).
    -pc                        Optional. Enable per-layer performance statistics.
    -r                         Optional. Output inference results as raw values.
    -t                         Optional. Probability threshold for vehicle and license plate detections.
    -no_show                   Optional. Do not show processed video.
    -auto_resize               Optional. Enable resizable input with support of ROI crop and auto resize.
    -nireq                     Optional. Number of infer request for pipelined mode (default value is 1)
    -nc                        Optional. Number of processed cameras (default value is 1) if the input (-i) is specified as camera.
Running the application with an empty list of options yields the usage message given above and an error message.
To run the demo, you can use public models or a set of pre-trained and optimized models delivered with the package:
- <INSTALL_DIR>/deployment_tools/intel_models/vehicle-license-plate-detection-barrier-0106
- <INSTALL_DIR>/deployment_tools/intel_models/vehicle-attributes-recognition-barrier-0039
- <INSTALL_DIR>/deployment_tools/intel_models/license-plate-recognition-barrier-0001
For example, to do inference on a GPU with the Intel Distribution of OpenVINO toolkit pre-trained models, run the following command:
./security_barrier_camera_demo -i <path_to_video>/inputVideo.mp4 -m vehicle-license-plate-detection-barrier-0106.xml -m_va vehicle-attributes-recognition-barrier-0039.xml -m_lpr license-plate-recognition-barrier-0001.xml -d GPU
To do inference for two video inputs using two asynchronous infer request on FPGA with the Intel Distribution of OpenVINO toolkit pre-trained models, run the following command:
./security_barrier_camera_demo -i <path_to_video>/inputVideo_0.mp4 <path_to_video>/inputVideo_1.mp4 -m vehicle-license-plate-detection-barrier-0106.xml -m_va vehicle-attributes-recognition-barrier-0039.xml -m_lpr license-plate-recognition-barrier-0001.xml -d HETERO:FPGA,CPU -d_va HETERO:FPGA,CPU -d_lpr HETERO:FPGA,CPU -nireq 2
NOTE: Before running the demo with a trained model, make sure the model is converted to the Inference Engine format (*.xml + *.bin) using the Model Optimizer tool.
Optimization Hints for Heterogeneous Scenarios with FPGA
OMP_NUM_THREADS: Specifies number of threads to use. For heterogeneous scenarios with FPGA, when several inference requests are used asynchronously, limiting the number of CPU threads withOMP_NUM_THREADSallows to avoid competing for resources between threads. For the Security Barrier Camera Demo, recommended value isOMP_NUM_THREADS=1.KMP_BLOCKTIME: Sets the time, in milliseconds, that a thread should wait, after completing the execution of a parallel region, before sleeping. The default value is 200ms, which is not optimal for the demo. Recommended value isKMP_BLOCKTIME=1.
Demo Output
The demo uses OpenCV to display the resulting frame with detections rendered as bounding boxes and text:
Object Detection for Faster R-CNN Demo
Description
This topic demonstrates how to run the Object Detection demo application, which does inference using object detection networks like Faster R-CNN on Intel® Processors and Intel® HD Graphics.
How It Works
Upon the start-up, the demo application reads command line parameters and loads a network and an image to the Inference Engine plugin. When inference is done, the application creates an output image and outputs data to the standard output stream.
Downloading and Converting a Caffe* Model
VGG16-Faster-RCNN is a public CNN that can be easily obtained from GitHub:
- Download test.prototxt from https://raw.githubusercontent.com/rbgirshick/py-faster-rcnn/master/models/pascal_voc/VGG16/faster_rcnn_end2end/test.prototxt
- Download the pretrained models from https://dl.dropboxusercontent.com/s/o6ii098bu51d139/faster_rcnn_models.tgz?dl=0
- Unzip the archive. You will need VGG16_faster_rcnn_final.caffemodel file.
For correctly converting the source model, run the Model Optimizer. You can use the following command to convert the source model:
python3 ${MO_ROOT_PATH}/mo_caffe.py --input_model <path_to_model>/VGG16_faster_rcnn_final.caffemodel --input_proto <path_to_model>/deploy.prototxt
For documentation on how to convert Caffe models, refer to Using the Model Optimizer to Convert Caffe* Models
Running
Running the application with the -h option yields the following usage message:
./object_detection_demo -h
InferenceEngine:
    API version ............ <version>
    Build .................. <number>

object_detection_demo [OPTION]
Options:

    -h                        Print a usage message.
    -i "<path>"               Required. Path to an .bmp image.
    -m "<path>"               Required. Path to an .xml file with a trained model.
      -l "<absolute_path>"    Required for MKLDNN (CPU)-targeted custom layers. Absolute path to a shared library with the kernels impl.
      -c "<absolute_path>"    Required for clDNN (GPU)-targeted custom kernels. Absolute path to the xml file with the kernels desc.
    -pp "<path>"              Path to a plugin folder.
    -d "<device>"             Specify the target device to infer on; CPU, GPU, FPGA or MYRIAD is acceptable. The demo will look for a suitable plugin for a specified device.
    -pc                       Enables per-layer performance report
    -ni "<integer>"           Number of iterations (default 1)
    -bbox_name "<string>"     The name of output box prediction layer (default: bbox_pred)
    -proposal_name "<string>" The name of output proposal layer (default: proposal)
    -prob_name "<string>"     The name of output probability layer (default: cls_prob)
    -p_msg                    Enables messages from a plugin
Running the application with the empty list of options yields the usage message given above and an error message.
Use the following command to do inference on Intel® Processors on an image using a trained Faster R-CNN network:
$ ./object_detection_demo -i <path_to_image>/inputImage.bmp -m <path_to_model>/faster-rcnn.xml -d CPU
NOTE: Before running the demo with a trained model, make sure the model is converted to the Inference Engine format (*.xml + *.bin) using the Model Optimizer tool.
Demo Output
The application outputs an image named out_0.bmp with detected objects enclosed in rectangles. It outputs the list of classes of the detected objects along with the respective confidence values and the coordinates of the rectangles to the standard output stream.
Object Detection SSD Demo, Async API Performance Showcase
Description
This demonstration showcases Object Detection with SSD and new Async API. Async API usage can improve overall frame-rate of the application, because rather than wait for inference to complete, the app can continue doing things on the host, while accelerator is busy. Specifically, this demonstration keeps two parallel infer requests and while the current is processed, the input frame for the next is being captured. This essentially hides the latency of capturing, so that the overall framerate is rather determined by the MAXIMUM(detection time, input capturing time) and not the SUM(detection time, input capturing time).
The technique can be generalized to any available parallel slack, such as doing inference while simultaneously encoding the resulting (previous) frames, or running further inference, like emotion detection on top of the face detection results.
Be aware of performance caveats though. When running tasks in parallel, avoid over-using shared compute resources. For example, if performing inference on the FPGA with a mostly idle CPU, perform parallel tasks on the CPU. When doing inference on Intel® Integrated Graphics, you have little gain in tasks like having resulting video encoding on the same GPU in parallel because the device is already busy.
For more performance implications and tips for the Async API, see the Optimization Guide
Other demonstration objectives:
- Video as input support via OpenCV*
- Visualization of the resulting bounding boxes and text labels (from the
.labelsfile) or class number (if no file is provided) - OpenCV* provides resulting bounding boxes, labels, and other information. You can copy and paste this code without pulling Inference Engine samples helpers into your application.
- Demonstrate the Async API in action. For this, the demonstration features two modes with a Tab key toggle.
- Old-style "Sync" way - The frame capturing with OpenCV* executes back-to-back with Detection
- "Truly Async" way - The Detection is performed on the current frame, while the OpenCV* captures the next frame.
How It Works
On the start-up, the application reads command-line parameters and loads a network to the Inference Engine. Upon getting a frame from the OpenCV VideoCapture it, performs inference and displays the results.
New "Async API" operates with new notion of the "Infer Request" that encapsulates the inputs/outputs and separates scheduling and waiting for result. The difference between performance is as follows:
- In the default "Sync" mode, the frame is captured and then immediately processed. In pseudo-code, it looks the following way:
while(true) {
    capture frame
    populate CURRENT InferRequest
    start CURRENT InferRequest //this call is async and returns immediately
    wait for the CURRENT InferRequest
    display CURRENT result
}
This is a reference implementation in which the new Async API is used in a serialized/synch fashion.
- In true "Async" mode, the frame is captured and then immediately processed:
while(true) {
        capture frame
        populate NEXT InferRequest
        start NEXT InferRequest //this call is async and returns immediately
            wait for the CURRENT InferRequest (processed in a dedicated thread)
            display CURRENT result
        swap CURRENT and NEXT InferRequests
    }
In this case, the NEXT request is populated in the main (application) thread, while the CURRENT request is processed. This is handled in the dedicated thread, internal to the Inference Engine runtime.
Async API
In this release, the Inference Engine offers a new API based on the notion of Infer Requests. With this API, requests encapsulate input and output allocation. You access the blob with the GetBlob method.
You can execute a request asynchronously in the background and wait until you need the result. In the meantime your application can continue:
// load plugin for the device as usual
  auto enginePtr = PluginDispatcher({"../../../lib/intel64", ""}).getSuitablePlugin(
                getDeviceFromStr("GPU"));
// load network
CNNNetReader network_reader;
network_reader.ReadNetwork("Model.xml");
network_reader.ReadWeights("Model.bin");
// populate inputs etc
auto input = async_infer_request.GetBlob(input_name);
...
// start the async infer request (puts the request to the queue and immediately returns)
async_infer_request->StartAsync();
// Continue execution on the host until you need the request results
//...
async_infer_request.Wait(IInferRequest::WaitMode::RESULT_READY);
auto output = async_infer_request.GetBlob(output_name);
NOTE: You have no direct way to measure execution time of the infer request that is running asynchronously, unless you measure the Wait executed immediately after the StartAsync. But this essentially would mean the serialization and synchronous execution.
This is what the odem does for the default "Sync" mode and reports as a Detection time/fps message on the screen. In the truly asynchronous ("Async") mode the host continues execution in the master thread, in parallel to the infer request. If the request is completed before than the Wait is called in the main thread (earlier than OpenCV decoded a new frame), that reporting the time between StartAsync and Wait would be obviously incorrect. That is why in the "Async" mode the inference speed is not reported.
For more information on the new requests-based Inference Engine API, including Async execution, refer to How to Integrate the Inference Engine in Your Application.
Running
Running the application with the -h optionyields the following usage message:
./object_detection_demo_ssd_async -h
InferenceEngine:
    API version ............ <version>
    Build .................. <number>

object_detection_demo_ssd_async [OPTION]
Options:

    -h                        Print a usage message.
    -i "<path>"               Required. Path to a video file (specify "cam" to work with camera).
    -m "<path>"               Required. Path to an .xml file with a trained model.
      -l "<absolute_path>"    Optional. Required for MKLDNN (CPU)-targeted custom layers. Absolute path to a shared library with the kernels impl.
          Or
      -c "<absolute_path>"    Optional. Required for clDNN (GPU)-targeted custom kernels. Absolute path to the xml file with the kernels desc.
    -d "<device>"             Optional. Specify the target device to infer on (CPU, GPU, FPGA, or MYRIAD). The demo will look for a suitable plugin for a specified device.
    -pc                       Optional. Enables per-layer performance report.
    -r                        Optional. Inference results as raw values.
    -t                        Optional. Probability threshold for detections.
    -auto_resize              Optional. Enables resizable input with support of ROI crop & auto resize.
Running the application with an empty list of options results in an error message and the usage list above.
You can use the following command to do inference on GPU with a pre-trained object detection model:
./object_detection_demo_ssd_async -i <path_to_video>/inputVideo.mp4 -m <path_to_model>/ssd.xml -d GPU
NOTE: Before running the demo with a trained model, make sure the model is converted to the Inference Engine format (*.xml + *.bin) using the Model Optimizer tool.
The only GUI knob is using 'Tab' to switch between the synchronized execution and the true Async mode.
Demo Output
The output uses OpenCV* to display the resulting frame with detections rendered as bounding boxes and labels, if provided. In default mode, the demo reports:
- OpenCV* time: Frame decoding + time to render the bounding boxes, labels, and display of the results.
- Detection time: Inference time for the objection network. This is reported in the Sync mode.
- Wallclock time: The combined application-level performance.
Object Detection with SSD-VGG Sample
Description
This topic demonstrates how to run the Object Detection sample application, which does inference using object detection networks like SSD-VGG on Intel® Processors and Intel® HD Graphics.
How It Works
Upon the start-up, the sample application reads command line parameters and loads a network and an image to the Inference Engine plugin. When inference is done, the application creates an output image and outputs data to the standard output stream.
Running
Running the application with the -h option yields the following usage message:
./object_detection_sample_ssd -h
InferenceEngine:
    API version ............ <version>
    Build .................. <number>

object_detection_sample_ssd [OPTION]
Options:

    -h                      Print a usage message.
    -i "<path>"             Required. Path to an .bmp image.
    -m "<path>"             Required. Path to an .xml file with a trained model.
      -l "<absolute_path>"    Required for MKLDNN (CPU)-targeted custom layers. Absolute path to a shared library with the kernels impl.
          Or
      -c "<absolute_path>"    Required for clDNN (GPU)-targeted custom kernels. Absolute path to the xml file with the kernels desc.
    -pp "<path>"            Path to a plugin folder.
    -d "<device>"           Specify the target device to infer on; CPU, GPU, FPGA or MYRIAD is acceptable. Sample will look for a suitable plugin for device specified
    -pc                     Enables per-layer performance report
    -ni "<integer>"         Number of iterations (default 1)
    -p_msg                  Enables messages from a plugin
Running the application with the empty list of options yields the usage message given above and an error message.
To run the sample, you can use a set of pre-trained and optimized models delivered with the package or a Caffe* public model.
For example, to do inference on a CPU with the Intel Distribution of OpenVINO toolkit person detection SSD models, run the following command
./object_detection_sample_ssd -i <path_to_image>/inputImage.bmp -m <INSTAL_DIR>/deployment_tools/intel_models/person-detection-retail-0013/FP32/person-detection-retail-0013.xml -d CPU
or
./object_detection_sample_ssd -i <path_to_image>/inputImage.jpg -m <INSTALL_DIR>/deployment_tools/intel_models/person-detection-retail-0002/FP32/person-detection-retail-0002.xml -d CPU
NOTE: Before running the sample with a trained model, make sure the model is converted to the Inference Engine format (*.xml + *.bin) using the Model Optimizer tool.
Sample Output
The application outputs an image named out_0.bmp with detected objects enclosed in rectangles. It outputs the list of classes of the detected objects along with the respective confidence values and the coordinates of the rectangles to the standard output stream.
TensorFlow* Object Detection Mask R-CNNs Segmentation Demo
Description
This topic demonstrates how to run the Segmentation demo application, which does inference using image segmentation networks created with Object Detection API. Note that batch size equal to 1 is supported only.
The demo has a post-processing part that gathers masks arrays corresponding to bounding boxes with high probability taken from the Detection Output layer. Then the demo produces picture with identified masks.
How It Works
Upon the start-up, the demo application reads command line parameters and loads a network and an image to the Inference Engine plugin. When inference is done, the application creates an output image.
Running
Running the application with the -h option yields the following usage message:
./mask_rcnn_demo -h
InferenceEngine:
    API version ............ <version>
    Build .................. <number>

mask_rcnn_demo [OPTION]
Options:

    -h                      Print a usage message.
    -i "<path>"             Required. Path to an .bmp image.
    -m "<path>"             Required. Path to an .xml file with a trained model.
      -l "<absolute_path>"    Required for MKLDNN (CPU)-targeted custom layers.Absolute path to a shared library with the kernels impl.
          Or
      -c "<absolute_path>"    Required for clDNN (GPU)-targeted custom kernels.Absolute path to the xml file with the kernels desc.
    -pp "<path>"            Path to a plugin folder.
    -d "<device>"           Specify the target device to infer on; CPU, GPU, FPGA or MYRIAD is acceptable. The demo will look for a suitable plugin for a specified device (CPU by default)
    -ni "<integer>"         Number of iterations (default 1)
    -detection_output_name "<string>" The name of detection output layer (default: detection_output)
    -masks_name "<string>" The name of masks layer (default: masks)
    -pc                     Enables per-layer performance report
Running the application with an empty list of options yields the usage message given above and an error message.
You can use the following command to do inference on Intel® Processors on an image using a trained network:
./mask_rcnn_demo -i <path_to_image>/inputImage.bmp -m <path_to_model>/faster_rcnn.xml
Demo Output
The application output is a segmented image (out.png).
Automatic Speech Recognition Sample
This topic shows how to run the speech sample application, which demonstrates acoustic model inference based on Kaldi* neural networks and speech feature vectors.
How It Works
Upon the start-up the application reads command line parameters and loads a Kaldi-trained neural network along with Kaldi ARK speech feature vector file to the Inference Engine plugin. It then performs inference on all speech utterances stored in the input ARK file. Context-windowed speech frames are processed in batches of 1-8 frames according to the -bs parameter. Batching across utterances is not supported by this sample. When inference is done, the application creates an output ARK file. If the -r option is given, error statistics are provided for each speech utterance as shown above.
GNA-Specific Details
Quantization
If the GNA device is selected (for example, using the -d GNA_AUTO flag), the GNA Inference Engine plugin quantizes the model and input feature vector sequence to integer representation before performing inference. Several parameters control neural network quantization:
- The
-qflag determines the quantization mode. Three modes are supported:- Static - In the static quantization mode, the first utterance in the input ARK file is scanned for dynamic range. The scale factor (floating point scalar multiplier) required to scale the maximum input value of the first utterance to 16384 (15 bits) is used for all subsequent inputs. The neural network is quantized to accommodate the scaled input dynamic range.
- Dynamic - In the dynamic quantization mode, the scale factor for each input batch is computed just before inference on that batch. The input and network are (re)quantized on-the-fly using an efficient procedure.
- User-defined - In the user-defined quantization mode, the user may specify a scale factor via the
-sfflag that will be used for static quantization.
- The
-qbflag provides a hint to the GNA plugin regarding the preferred target weight resolution for all layers. For example, when-qb 8is specified, the plugin will use 8-bit weights wherever possible in the network. Note that it is not always possible to use 8-bit weights due to GNA hardware limitations. For example, convolutional layers always use 16-bit weights (GNA harware verison 1 and 2). This limitation will be removed in GNA hardware version 3 and higher.
Execution Modes
Several execution modes are supported via the -d flag:
- If the device is set to
CPUand the GNA plugin is selected, the GNA device is emulated in fast-but-not-bit-exact mode. - If the device is set to
GNA_AUTO, the GNA hardware is used if available and the driver is installed. Otherwise, the GNA device is emulated in fast-but-not-bit-exact mode. - If the device is set to
GNA_HW, the GNA hardware is used if available and the driver is installed. Otherwise, an error will occur. - If the device is set to
GNA_SW, the GNA device is emulated in fast-but-not-bit-exact mode. - If the device is set to
GNA_SW_EXACT, the GNA device is emulated in bit-exact mode.
Loading and Saving Models
The GNA plugin supports loading and saving the GNA-optimized model (non-IR) via the -rg and -wg flags. Thereby, it is possible to avoid the cost of full model quantization at run time. The GNA plugin also supports export of firmware-compatible embedded model images for the Intel® Speech Enabling Developer Kit and Amazon Alexa* Premium Far-Field Voice Development Kit via the -we flag (save only).
In addition to performing inference directly from a GNA model file, these options make it possible to:
- Convert from IR format to GNA format model file (
-m,-wg) - Convert from IR format to embedded format model file (
-m,-we) - Convert from GNA format to embedded format model file (
-rg,-we)
Running
Running the application with the -h option yields the following usage message:
$ ./speech_sample -h
InferenceEngine:
    API version ............ <version>
    Build .................. <number>

speech_sample [OPTION]
Options:

    -h                      Print a usage message.
    -i "<path>"             Required. Path to an .ark file.
    -m "<path>"             Required. Path to an .xml file with a trained model (required if -rg is missing).
    -o "<path>"             Output file name (default name is scores.ark).
    -l "<absolute_path>"    Required for MKLDNN (CPU)-targeted custom layers.Absolute path to a shared library with the kernels impl.
    -d "<device>"           Specify the target device to infer on; CPU, GPU, GNA_AUTO, GNA_HW, GNA_SW, GNA_SW_EXACT is acceptable. Sample will look for a suitable plugin for device specified
    -p                      Plugin name. For example MKLDNNPlugin. If this parameter is pointed, the sample will look for this plugin only
    -pp                     Path to a plugin folder.
    -pc                     Enables performance report
    -q "<mode>"             Input quantization mode:  static (default), dynamic, or user (use with -sf).
    -qb "<integer>"         Weight bits for quantization:  8 or 16 (default)
    -sf "<double>"          Optional user-specified input scale factor for quantization (use with -q user).
    -bs "<integer>"         Batch size 1-8 (default 1)
    -r "<path>"             Read reference score .ark file and compare scores.
    -rg "<path>"            Read GNA model from file using path/filename provided (required if -m is missing).
    -wg "<path>"            Write GNA model to file using path/filename provided.
    -we "<path>"            Write GNA embedded model to file using path/filename provided.
    -nthreads "<integer>"   Optional. Number of threads to use for concurrent async inference requests on the GNA
Running the application with an empty list of options yields the usage message given above and an error message.
Model Preparation
NOTE: Before running the sample with a trained model, make sure the model is converted to the Inference Engine format (*.xml + *.bin) using the Model Optimizer tool.
The following pretrained models are available:
- wsj_dnn5b_smbr
- rm_lstm4f
- rm_cnn4a_smbr
You can download them from https://download.01.org/openvinotoolkit/2018_R3/models_contrib/GNA/.
You can use the following Model Optimizer command to convert a Kaldi nnet1 or nnet2 neural network to Intel IR format:
python3 mo.py --framework kaldi --input_model wsj_dnn5b_smbr.nnet --counts wsj_dnn5b_smbr.counts --remove_output_softmax
Assuming that the Model Optimizer (mo.py), Kaldi-trained neural network (wsj_dnn5b_smbr.nnet), and Kaldi class counts file (wsj_dnn5b_smbr.counts) are in the working directory, this command produces the IR network consisting of wsj_dnn5b_smbr.xml and wsj_dnn5b_smbr.bin.
Speech Inference
Once the IR is created, you can use the following command to do inference on Intel® Processors with the GNA co-processor (or emulation library):
./speech_sample -d GNA_AUTO -bs 2 -i wsj_dnn5b_smbr_dev93_10.ark -m wsj_dnn5b_smbr_fp32.xml -o scores.ark -r wsj_dnn5b_smbr_dev93_scores_10.ark
Here, the floating point Kaldi-generated reference neural network scores (wsj_dnn5b_smbr_dev93_scores_10.ark) corresponding to the input feature file (wsj_dnn5b_smbr_dev93_10.ark) are assumed to be available for comparison.
Use of Sample in Kaldi* Speech Recognition Pipeline
The Wall Street Journal DNN model used in this example was prepared using the Kaldi s5 recipe and the Kaldi Nnet (nnet1) framework. It is possible to recognize speech by substituting the speech_sample for Kaldi nnet-forward command. Since the speech_sample does not yet use pipes, it is necessary to use temporary files for speaker- transformed feature vectors and scores when running the Kaldi speech recognition pipeline. The following operations assume that feature extraction was already performed according to the s5 recipe and that the working directory within the Kaldi source tree is egs/wsj/s5.
- Prepare a speaker-transformed feature set given the feature transform specified in
final.feature_transformand the feature files specified infeats.scp:nnet-forward --use-gpu=no final.feature_transform "ark,s,cs:copy-feats scp:feats.scp ark:- |" ark:feat.ark
- Score the feature set using the
speech_sample:./speech_sample -d GNA_AUTO -bs 8 -i feat.ark -m wsj_dnn5b_smbr_fp32.xml -o scores.ark
- Run the Kaldi decoder to produce n-best text hypotheses and select most likely text given the WFST (HCLG.fst), vocabulary (words.txt), and TID/PID mapping (final.mdl):
latgen-faster-mapped --max-active=7000 --max-mem=50000000 --beam=13.0 --lattice-beam=6.0 --acoustic-scale=0.0833 --allow-partial=true --word-symbol-table=words.txt final.mdl HCLG.fst ark:scores.ark ark:-| lattice-scale --inv-acoustic-scale=13 ark:- ark:- | lattice-best-path --word-symbol-table=words.txt ark:- ark,t:- > out.txt &
- Run the word error rate tool to check accuracy given the vocabulary (words.txt) and reference transcript (test_filt.txt):
cat out.txt | utils/int2sym.pl -f 2- words.txt | sed s:\<UNK\>::g | compute-wer --text --mode=present ark:test_filt.txt ark,p:-
Sample Output
The acoustic log likelihood sequences for all utterances are stored in the Kaldi ARK file, scores.ark. If the -r option is used, a report on the statistical score error is generated for each utterance such as the following:
Utterance 0: 4k0c0301
   Average inference time per frame: 6.26867 ms
         max error: 0.0667191
         avg error: 0.00473641
     avg rms error: 0.00602212
       stdev error: 0.00393488
Neural Style Transfer Sample
Description
This topic demonstrates how to build and run the Neural Style Transfer sample (NST sample) application, which does inference using models of style transfer topology.
Running
Running the application with the -h option yields the following usage message:
./style_transfer_sample --help
InferenceEngine:
    API version ............ <version>
    Build .................. <number>

style_transfer_sample [OPTION]
Options:

    -h                      Print a usage message.
    -i "<path>"             Required. Path to an .bmp image.
    -m "<path>"             Required. Path to an .xml file with a trained model.
    -pp "<path>"            Path to a plugin folder.
    -d "<device>"           Specify the target device to infer on; CPU, GPU, FPGA or MYRIAD is acceptable. Sample will look for a suitable plugin for device specified
    -ni "<integer>"         Number of iterations (default 1)
    -pc                     Enables per-layer performance report
    -mean_val_r,
    -mean_val_g,
    -mean_val_b             Mean values. Required if the model needs mean values for preprocessing and postprocessing
Running the application with the empty list of options yields the usage message given above and an error message.
You can do inference on an image using a trained model of NST network on Intel® Processors using the following command:
./style_transfer_sample -i <path_to_image>/cat.bmp -m <path_to_model>/1_decoder_FP32.xml
NOTE: Before running the sample with a trained model, make sure the model is converted to the Inference Engine format (*.xml + *.bin) using the Model Optimizer tool.
Sample Output
The application outputs one or more styled image, starting with name out(1).bmp, which were redrawn in style of model which used for inference. Style of output images depend on models which use for sample.
Hello Infer Request Classification Sample
Description
This topic describes how to run the Hello Infer Classification sample application. The sample is a simplified version of the Image Classification Sample. It demonstrates how to use the new Infer Request API of the Inference Engine in applications. See How to Integrate the Inference Engine in Your Application for details.
Running
To do inference on an image using a trained AlexNet* network on Intel® Processors:
./hello_request_classification <path_to_model>/alexnet_fp32.xml <path_to_image>/cat.bmp CPU
Sample Output
The application outputs top-10 inference results.
Interactive Face Detection Demo
This demo showcases Object Detection task applied for face recognition using sequence of neural networks. Async API can improve overall frame-rate of the application, because rather than wait for inference to complete, the application can continue operating on the host while accelerator is busy. This demo executes four parallel infer requests for the Age/Gender Recognition, Head Pose Estimation, Emotions Recognition, and Facial Landmarks Detection networks that run simultaneously. The corresponding pre-trained models are delivered with the product:
face-detection-adas-0001, which is a primary detection network for finding facesage-gender-recognition-retail-0013, which is executed on top of the results of the first model and reports estimated age and gender for each detected facehead-pose-estimation-adas-0001, which is executed on top of the results of the first model and reports estimated head pose in Tait-Bryan anglesemotions-recognition-retail-0003, which is executed on top of the results of the first model and reports an emotion for each detected facefacial-landmarks-35-adas-0001, which is executed on top of the results of the first model and reports normed coordinates of estimated facial landmarks
Other demo objectives are:
- Video as input support via OpenCV*
- Visualization of the resulting face bounding boxes from Face Detection network
- Visualization of age/gender, head pose, emotion information, and facial landmarks positions for each detected face
OpenCV is used to draw resulting bounding boxes, labels, and other information. You can copy and paste this code without pulling Inference Engine demo helpers into your application.
How It Works
- The application reads command-line parameters and loads up to five networks depending on
-m...options family to the Inference Engine. - The application gets a frame from the OpenCV VideoCapture.
- The application performs inference on the Face Detection network.
- The application performs four simultaneous inferences, using the Age/Gender Recognition, Head Pose Estimation, Emotions Recognition, and Facial Landmarks Estimation networks if those are specified in command line.
- The application displays the results.
The new Async API operates with new notion of the Infer Request that encapsulates the inputs/outputs and separates scheduling and waiting for result. For more information about Async API and the difference between Sync and Async modes performance, refer to Object Detection SSD, Async API Performance Showcase Demo.
Running
Running the application with the -h option yields the following usage message:
./interactive_face_detection_demo -h
InferenceEngine:
    API version ............ <version>
    Build .................. <number>

interactive_face_detection_demo [OPTION]
Options:

  -h                         Print a usage message
  -i "<path>"                Required. Path to a video file. Default value is "cam" to work with camera.
  -m "<path>"                Required. Path to an .xml file with a trained Face Detection model.
  -m_ag "<path>"             Optional. Path to an .xml file with a trained Age/Gender Recognition model.
  -m_hp "<path>"             Optional. Path to an .xml file with a trained Head Pose Estimation model.
  -m_em "<path>"             Optional. Path to an .xml file with a trained Emotions Recognition model.
  -m_lm "<path>"             Optional. Path to an .xml file with a trained Facial Landmarks Estimation model.
    -l "<absolute_path>"     Required for CPU custom layers. Absolute path to a shared library with the kernels implementation.
        Or
    -c "<absolute_path>"     Required for GPU custom kernels. Absolute path to an .xml file with the kernels description.
  -d "<device>"              Target device for Face Detection network (CPU, GPU, FPGA, or MYRIAD). The demo will look for a suitable plugin for a specified device.
  -d_ag "<device>"           Target device for Age/Gender Recognition network (CPU, GPU, FPGA, or MYRIAD). The demo will look for a suitable plugin for a specified device.
  -d_hp "<device>"           Target device for Head Pose Estimation network (CPU, GPU, FPGA, or MYRIAD). The demo will look for a suitable plugin for a specified device.
  -d_em "<device>"           Target device for Emotions Recognition network (CPU, GPU, FPGA, or MYRIAD). The demo will look for a suitable plugin for a specified device.
  -d_lm "<device>"           Target device for Facial Landmarks Estimation network (CPU, GPU, FPGA, or MYRIAD). Demo will look for a suitable plugin for device specified.
  -n_ag "<num>"              Number of maximum simultaneously processed faces for Age/Gender Recognition network (default is 16)
  -n_hp "<num>"              Number of maximum simultaneously processed faces for Head Pose Estimation network (default is 16)
  -n_em "<num>"              Number of maximum simultaneously processed faces for Emotions Recognition network (default is 16)
  -n_lm "<num>"              Number of maximum simultaneously processed faces for Facial Landmarks Estimation network (default is 16)
  -dyn_ag                    Enable dynamic batch size for Age/Gender Recognition network
  -dyn_hp                    Enable dynamic batch size for Head Pose Estimation network
  -dyn_em                    Enable dynamic batch size for Emotions Recognition network
  -dyn_lm                    Enable dynamic batch size for Facial Landmarks Estimation network
  -async                     Enable asynchronous mode
  -no_wait                   Do not wait for key press in the end
  -no_show                   Do not show processed video
  -pc                        Enable per-layer performance report
  -r                         Output inference results as raw values
  -t                         Probability threshold for detections
Running the application with an empty list of options yields the usage message given above and an error message.
To run the demo, you can use public models or a set of pre-trained and optimized models delivered with the package:
- <INSTALL_DIR>/deployment_tools/intel_models/face-detection-adas-0001
- <INSTALL_DIR>/deployment_tools/intel_models/age-gender-recognition-retail-0013
- <INSTALL_DIR>/deployment_tools/intel_models/head-pose-estimation-adas-0001
- <INSTALL_DIR>/deployment_tools/intel_models/emotions-recognition-retail-0003
- <INSTALL_DIR>/deployment_tools/intel_models/facial-landmarks-35-adas-0001
NOTE: Before running the demo with a trained model, make sure the model is converted to the Inference Engine format (*.xml + *.bin) using the Model Optimizer tool.
For example, to do inference on a GPU with the Intel Distribution of OpenVINO toolkit pre-trained models, run the following command:
./interactive_face_detection_demo -i <path_to_video>/inputVideo.mp4 -m <path_to_model>/face-detection-adas-0001.xml -m_ag <path_to_model>/age-gender-recognition-retail-0013.xml -m_hp <path_to_model>/head-pose-estimation-adas-0001.xml -m_em <path_to_model>/emotions-recognition-retail-0003.xml -m_lm <path_to_model>/facial-landmarks-35-adas-0001.xml -d GPU
Demo Output
The demo uses OpenCV to display the resulting frame with detections rendered as bounding boxes with labels if provided. In the default mode, the demo reports:
- OpenCV time: frame decoding + time to render the bounding boxes, labels, and displaying the results
- Face Detection time: inference time for the face Detection network
If Age/Gender Recognition, Head Pose Estimation, Emotions Recognition, or Facial Landmarks Estimation are enabled, the additional information is reported:
- Face Analysis Networks time: combined inference time of simultaneously executed Age/Gender Recognition, Head Pose Estimation, Emotions Recognition, or Facial Landmarks Estimation networks.
Image Segmentation Demo
Description
This topic demonstrates how to run the Image Segmentation demo application, which does inference using image segmentation networks like FCN8.
How It Works
Upon the start-up, the demo application reads command-line parameters and loads a network and an image to the Inference Engine plugin. When inference is done, the application creates an output image.
Running
Running the application with the -h option yields the following usage message:
./segmentation_demo -h
InferenceEngine:
    API version ............ <version>
    Build .................. <number>

segmentation_demo [OPTION]
Options:

    -h                        Print a usage message.
    -i "<path>"               Required. Path to an .bmp image.
    -m "<path>"               Required. Path to an .xml file with a trained model.
      -l "<absolute_path>"    Required for MKLDNN (CPU)-targeted custom layers. Absolute path to a shared library with the kernels impl.
          Or
      -c "<absolute_path>"    Required for clDNN (GPU)-targeted custom kernels. Absolute path to the xml file with the kernels desc.
    -pp "<path>"              Path to a plugin folder.
    -d "<device>"             Specify the target device to infer on: CPU, GPU, FPGA or MYRIAD is acceptable. The demo will look for a suitable plugin for a specified device (CPU by default).
    -ni "<integer>"           Number of iterations (default 1)
    -pc                       Enables per-layer performance report
Running the application with the empty list of options yields the usage message given above and an error message.
You can use the following command to do inference on Intel® Processors on an image using a trained FCN8 network:
./segmentation_demo -i <path_to_image>/inputImage.bmp -m <path_to_model>/fcn8.xml
NOTE: Before running the demo with a trained model, make sure the model is converted to the Inference Engine format (*.xml + *.bin) using the Model Optimizer tool.
Demo Output
The application outputs are a segmented image named out.bmp.
Crossroad Camera Demo
This demo provides an inference pipeline for person detection, recognition and reidentification. The demo uses Person Detection network followed by the Person Attributes Recognition and Person Reidentification Retail networks applied on top of the detection results. The corresponding pre-trained models are delivered with the product:
person-vehicle-bike-detection-crossroad-0078, which is a primary detection network for finding the persons (and other objects if needed)person-attributes-recognition-crossroad-0200, which is executed on top of the results from the first network and reports person attributes like gender, has hat, has long-sleeved clothesperson-reidentification-retail-0079, which is executed on top of the results from the first network and prints a vector of features for each detected person. This vector is used to conclude if it is already detected person or not.
For details on the models, please refer to the descriptions in the deployment_tools/intel_models folder of the Intel Distribution of OpenVINO toolkit installation directory.
Other demo objectives are:
- Images/Video/Camera as inputs, via OpenCV*
- Example of a simple networks pipelining: Person Attributes Recognition and Person Reidentification networks are executed on top of the Person Detection results
- Visualization of Person Attributes and Person Reidentification (REID) information for each detected person
How It Works
On the start-up, the application reads command-line parameters and loads the specified networks. The Person Detection network is required, the other two are optional.
Upon getting a frame from the OpenCV VideoCapture, the application performs inference of Person Detection network, then performs another two inferences of Person Attributes Recognition and Person Reidentification Retail networks if they were specified in the command line, and displays the results.
In case of the Person Reidentification Retail network, the resulting vector is generated for each detected person. This vector is compared one-by-one with all previously detected persons vectors using cosine similarity algorithm. If comparison result is greater than the specified (or default) threshold value, it is concluded that the person was already detected and a known REID value is assigned. Otherwise, the vector is added to a global list, and a new REID value is assigned.
Running
Running the application with the -h option yields the following usage message:
./crossroad_camera_demo -h
InferenceEngine:
    API version ............ <version>
    Build .................. <number>

crossroad_camera_demo [OPTION]
Options:

    -h                           Print a usage message.
    -i "<path>"                  Required. Path to a video or image file. Default value is "cam" to work with camera.
    -m "<path>"                  Required. Path to the Person/Vehicle/Bike Detection Crossroad model (.xml) file.
    -m_pa "<path>"               Optional. Path to the Person Attributes Recognition Crossroad model (.xml) file.
    -m_reid "<path>"             Optional. Path to the Person Reidentification Retail model (.xml) file.
      -l "<absolute_path>"       Optional. For MKLDNN (CPU)-targeted custom layers, if any. Absolute path to a shared library with the kernels impl.
          Or
      -c "<absolute_path>"       Optional. For clDNN (GPU)-targeted custom kernels, if any. Absolute path to the xml file with the kernels desc.
    -d "<device>"                Optional. Specify the target device for Person/Vehicle/Bike Detection (CPU, GPU, FPGA, MYRIAD, or HETERO).
    -d_pa "<device>"             Optional. Specify the target device for Person Attributes Recognition (CPU, GPU, FPGA, MYRIAD, or HETERO).
    -d_reid "<device>"           Optional. Specify the target device for Person Reidentification Retail (CPU, GPU, FPGA, MYRIAD, or HETERO).
    -pc                          Optional. Enables per-layer performance statistics.
    -r                           Optional. Output Inference results as raw values.
    -t                           Optional. Probability threshold for person/vehicle/bike crossroad detections.
    -t_reid                      Optional. Cosine similarity threshold between two vectors for person reidentification.
    -no_show                     Optional. No show processed video.
    -auto_resize                 Optional. Enables resizable input with support of ROI crop & auto resize.
Running the application with an empty list of options yields the usage message given above and an error message.
To run the demo, you can use public models or a set of pre-trained and optimized models delivered with the package:
- <INSTALL_DIR>/deployment_tools/intel_models/person-vehicle-bike-detection-crossroad-0078
- <INSTALL_DIR>/deployment_tools/intel_models/person-attributes-recognition-crossroad-0200
- <INSTALL_DIR>/deployment_tools/intel_models/person-reidentification-retail-0079
For example, to do inference on a GPU with the Intel Distribution of OpenVINO toolkit pre-trained models, run the following command:
./crossroad_camera_demo -i <path_to_video>/inputVideo.mp4 -m person-vehicle-bike-detection-crossroad-0078.xml -m_pa person-attributes-recognition-crossroad-0200.xml -m_reid person-reidentification-retail-0079.xml -d GPU
NOTE: Before running the demo with a trained model, make sure the model is converted to the Inference Engine format (*.xml + *.bin) using the Model Optimizer tool.
Demo Output
The demo uses OpenCV to display the resulting frame with detections rendered as bounding boxes and text. In the default mode, the demo reports Person Detection time - inference time for the Person/Vehicle/Bike Detection network.
If Person Attributes Recognition or Person Reidentification Retail are enabled, the additional info below is reported also:
- Person Attributes Recognition time - Inference time of Person Attributes Recognition averaged by the number of detected persons.
- Person Reidentification time - Inference time of Person Reidentification averaged by the number of detected persons.
Multi-Channel Face Detection Demo
This demo provides an inference pipeline for multi-channel face detection. The demo uses Face Detection network. The corresponding pre-trained model delivered with the product is face-detection-retail-0004, which is a primary detection network for finding faces.
For details on the models, please refer to the descriptions in the deployment_tools/intel_models folder of the Intel Distribution of OpenVINO toolkit installation directory.
Other demo objectives are:
- Up to 16 Cameras as inputs, via OpenCV*
- Visualization of detected faces from all channels on single screen
How It Works
NOTE: Running the demo requires using at least one web camera attached to your machine.
On the start-up, the application reads command line parameters and loads the specified networks. The Face Detection network is required.
Running
Running the application with the -h option yields the following usage message:
./multi-channel-demo -h

multichannel_face_detection [OPTION]
Options:

    -h                           Print a usage message.
    -m "<path>"                  Required. Path to an .xml file with a trained face detection model.
      -l "<absolute_path>"       Required for MKLDNN (CPU)-targeted custom layers. Absolute path to a shared library with the kernels impl.
          Or
      -c "<absolute_path>"       Required for clDNN (GPU)-targeted custom kernels. Absolute path to the xml file with the kernels desc.
    -d "<device>"                Specify the target device for Face Detection (CPU, GPU, FPGA, or MYRIAD). The demo will look for a suitable plugin for a specified device.
    -nc                          Maximum number of processed camera inputs (web cams)
    -bs                          Processing batch size, number of frames processed per infer request
    -n_ir                        Number of infer requests
    -n_iqs                       Frame queue size for input channels
    -fps_sp                      FPS measurement sampling period. Duration between timepoints, msec
    -n_sp                        Number of sampling periods
    -pc                          Enables per-layer performance report.
    -t                           Probability threshold for detections.
    -no_show                     No show processed video.
    -show_stats                  Enable statictics output
    -duplicate_num               Enable and specify number of channel additionally copied from real sources
    -real_input_fps              Disable input frames caching, for maximum throughput pipeline
    -i                           Specify full path to input video files
For example, to run the demo with the pre-trained face detection model on FPGA with fallback on CPU, with one single camera, use the following command:
./multi-channel-demo -m <INSTALL_DIR>/deployment_tools/intel_models/face-detection-retail-0004/FP32/face-detection-retail-0004.xml
-l <demos_build_folder>/intel64/Release/lib/libcpu_extension.so -d HETERO:FPGA,CPU -nc 1
To run with a single camera but several channels, specify additional parameter: -duplicate_num 3. You will see four channels: one real and three duplicated.
./multi-channel-sample -m <INSTALL_DIR>/deployment_tools/intel_models/face-detection-retail-0004/FP32/face-detection-retail-0004.xml
-l <samples_build_folder>/intel64/Release/lib/libcpu_extension.so -d HETERO:FPGA,CPU -i /path/to/file1 /path/to/file2
Video files will be processed repeatedly.
You can also run the demo on web cameras and video files simultaneously by specifying both parameters: -nc <number_of_cams> -i <video files_sequentially_separated_by_space>. To run the demo with a single input source(a web camera or a video file), but several channels, specify an additional parameter: -duplicate_num 3. You will see four channels: one real and three duplicated. With several input sources, the -duplicate_num parameter will duplicate each of them.
NOTE: Before running the demo with a trained model, make sure the model is converted to the Inference Engine format (*.xml + *.bin) using the Model Optimizer tool.
Demo Output
The demo uses OpenCV to display the resulting bunch of frames with detections rendered as bounding boxes. On the top of the screen, the demo reports throughput (in frames per second). If needed, it also reports more detailed statistics (use -show_stats option while running the demo to enable it).
Hello Autoresize Classification Sample
This topic describes how to run the Hello Autoresize Classification sample application. The sample is simplified version of Image Classification Sample. It demonstrates how to use the new input autoresize API of Inference Engine in applications. Refer to How to Integrate the Inference Engine in Your Application for details.
There is also a new API introduced to crop a ROI object and set it as input without additional memory re-allocation. To properly demonstrate this new API, it is required to run several networks in pipeline, bur it is out of scope of this sample. Please refer to Object Detection SSD Demo, Async API Performance Showcase, Security Barrier Camera Demo, or Crossroad Camera Demo with an example of new crop ROI API.
Running
You can do inference on an image using a trained AlexNet network on Intel® Processors using the following command:
./hello_autoresize_classification <path_to_model>/alexnet_fp32.xml <path_to_image>/cat.bmp CPU
NOTE: Before running the sample with a trained model, make sure the model is converted to the Inference Engine format (*.xml + *.bin) using the Model Optimizer tool.
Sample Output
The application outputs top-10 inference results.
Hello Shape Infer Sample
This topic demonstrates how to run the Hello Shape Infer SSD application, which does inference using object detection networks like SSD-VGG. The sample shows how to use Shape Inference feature.
Running
You can use the following command to do inference on Intel® Processors on an image using a trained SSD network:
./hello_shape_infer_ssd <path_to_model>/ssd_300.xml <path_to_image>/500x500.bmp CPU 3
NOTE: Before running the sample with a trained model, make sure the model is converted to the Inference Engine format (*.xml + *.bin) using the Model Optimizer tool.
Sample Output
The application renders an image with detected objects enclosed in rectangles. It outputs a list of classes of the detected objects along with the respective confidence values and the coordinates of the rectangles to the standard output stream.
Human Pose Estimation Demo
This demo showcases the work of multi-person 2D pose estimation algorithm. The task is to predict a pose: body skeleton, which consists of keypoints and connections between them, for every person in an input video. The pose may contain up to 18 keypoints: ears, eyes, nose, neck, shoulders, elbows, wrists, hips, knees, and ankles. Some of potential use cases of the algorithm are action recognition and behavior understanding. The following pre-trained model is delivered with the product:
human-pose-estimation-0001, which is a human pose estimation network, that produces two feature vectors. The algorithm uses these feature vectors to predict human poses.
The input frame height is scaled to model height, frame width is scaled to preserve initial aspect ratio and padded to multiple of 8.
Other demo objectives are:
- Video/Camera as inputs, via OpenCV*
- Visualization of all estimated poses
How It Works
On the start-up, the application reads command line parameters and loads human pose estimation model. Upon getting a frame from the OpenCV VideoCapture, the application executes human pose estimation algorithm and displays the results.
Running
Running the application with the -h option yields the following usage message:
./human_pose_estimation_demo -h
InferenceEngine:
    API version ............ <version>
    Build .................. <number>

human_pose_estimation_demo [OPTION]
Options:

    -h                         Print a usage message.
    -i "<path>"                Required. Path to a video. Default value is "cam" to work with camera.
    -m "<path>"                Required. Path to the Human Pose Estimation model (.xml) file.
    -d "<device>"              Optional. Specify the target device for Human Pose Estimation (CPU, GPU, FPGA or MYRIAD is acceptable). Default value is "CPU".
    -pc                        Optional. Enable per-layer performance report.
    -no_show                   Optional. Do not show processed video.
    -r                         Optional. Output inference results as raw values.
Running the application with an empty list of options yields an error message.
To run the demo, use the pre-trained and optimized human-pose-estimation-0001 model delivered with the product. The model is located at <INSTALL_DIR>/deployment_tools/intel_models/.
For example, to do inference on a CPU, run the following command:
./human_pose_estimation_demo -i <path_to_video>/input_video.mp4 -m <path_to_model>/human-pose-estimation-0001.xml -d CPU
NOTE: Before running the demo with a trained model, make sure the model is converted to the Inference Engine format (*.xml + *.bin) using the Model Optimizer tool.
Demo Output
The demo uses OpenCV to display the resulting frame with estimated poses and text report of FPS - frames per second performance for the human pose estimation demo.
Object Detection YOLO* V3 Demo, Async API Performance Showcase
This demo showcases Object Detection with YOLO* V3 and Async API.
To learn more about Async API features, please refer to Object Detection for SSD Demo, Async API Performance Showcase.
Other demo objectives are:
- Video as input support via OpenCV*
- Visualization of the resulting bounding boxes and text labels (from the
.labelsfile) or class number (if no file is provided) - OpenCV provides resulting bounding boxes, labels, and other information. You can copy and paste this code without pulling Inference Engine samples helpers into your application
- Demonstration of the Async API in action. For this, the demo features two modes toggled by the Tab key:
- Old-style "Sync" way, where the frame captured with OpenCV executes back-to-back with the Detection
- Truly "Async" way, where the detection is performed on a current frame, while OpenCV captures the next frame
How It Works
On the start-up, the application reads command-line parameters and loads a network to the Inference Engine. Upon getting a frame from the OpenCV VideoCapture, it performs inference and displays the results.
Running
Running the application with the -h option yields the following usage message:
./object_detection_demo_yolov3_async -h
InferenceEngine:
    API version ............ <version>
    Build .................. <number>

object_detection_demo_yolov3_async [OPTION]
Options:

    -h                        Print a usage message.
    -i "<path>"               Required. Path to a video file (specify "cam" to work with camera).
    -m "<path>"               Required. Path to an .xml file with a trained model.
      -l "<absolute_path>"    Optional. Required for CPU custom layers.Absolute path to a shared library with the layers implementation.
          Or
      -c "<absolute_path>"    Optional. Required for GPU custom kernels.Absolute path to the .xml file with the kernels description.
    -d "<device>"             Optional. Specify a target device to infer on (CPU, GPU). The demo will look for a suitable plugin for the specified device
    -pc                       Optional. Enable per-layer performance report.
    -r                        Optional. Output inference results raw values showing.
    -t                        Optional. Probability threshold for detections.
    -iou_t                    Optional. Filtering intersection over union threshold for overlapping boxes.
    -auto_resize              Optional. Enable resizable input with support of ROI crop and auto resize.
Running the application with the empty list of options yields the usage message given above and an error message. You can use the following command to do inference on GPU with a pre-trained object detection model:
./object_detection_demo_yolov3_async -i <path_to_video>/inputVideo.mp4 -m <path_to_model>/yolo_v3.xml -d GPU
NOTE: Before running the demo with a trained model, make sure the model is converted to the Inference Engine format (*.xml + *.bin) using the Model Optimizer tool.
The only GUI knob is to use Tab to switch between the synchronized execution and the true Async mode.
Demo Output
The demo uses OpenCV to display the resulting frame with detections (rendered as bounding boxes and labels, if provided). In the default mode, the demo reports:
- OpenCV time: frame decoding + time to render the bounding boxes, labels, and to display the results
- Detection time: inference time for the object detection network. It is reported in the "Sync" mode only.
- Wallclock time: combined application-level performance
Pedestrian Tracker Demo
This demo showcases Pedestrian Tracking scenario: it reads frames from an input video sequence, detects pedestrians in the frames, and builds trajectories of movement of the pedestrians in a frame-by-frame manner. The corresponding pre-trained models are delivered with the product:
person-detection-retail-0013, which is the primary detection network for finding pedestriansperson-reidentification-retail-0031, which is executed on top of the results from inference of the first network and makes reidentification of the pedestrians
For more details on the topologies, refer to the descriptions in the deployment_tools/intel_models folder of the Intel Distributions of OpenVINO toolkit installation.
How It Works
On the start-up, the application reads command line parameters and loads the specified networks.
Upon getting a frame from the input video sequence (either a video file or a folder with images), the application performs inference of the pedestrian detector network.
After that, the bounding boxes describing the detected pedestrians are passed to the instance of the tracker class that matches the appearance of the pedestrians with the known (i.e. already tracked) persons. In obvious cases (when pixel-to-pixel similarity of a detected pedestrian is sufficiently close to the latest pedestrian image from one of the known tracks), the match is made without inference of the reidentification network. In more complicated cases, the demo uses the reidentification network to make a decision if a detected pedestrian is the next position of a known person or the first position of a new tracked person.
After that, the application displays the tracks and the latest detections on the screen and goes to the next frame.
Running
Running the application with the -h option yields the following usage message:
./pedestrian_tracker_demo -h
InferenceEngine:
    API version ............ <version>
    Build .................. <number>

pedestrian_tracker_demo [OPTION]
Options:

    -h                             Print a usage message.
    -i "<path>"                  Required. Path to a video file or a folder with images (all images should have names 0000000001.jpg, 0000000002.jpg, etc).
    -m_det "<path>"              Required. Path to the Pedestrian Detection Retail model (.xml) file.
    -m_reid "<path>"             Required. Path to the Pedestrian Reidentification Retail model (.xml) file.
    -l "<absolute_path>"         Optional. For CPU custom layers, if any. Absolute path to a shared library with the kernels implementation.
          Or
    -c "<absolute_path>"         Optional. For GPU custom kernels, if any. Absolute path to the .xml file with the kernels description.
    -d_det "<device>"            Optional. Specify the target device for pedestrian detection (CPU, GPU, FPGA, MYRIAD, or HETERO).
    -d_reid "<device>"           Optional. Specify the target device for pedestrian reidentification (CPU, GPU, FPGA, MYRIAD, or HETERO).
    -r                             Optional. Output pedestrian tracking results in a raw format (compatible with MOTChallenge format).
    -pc                            Optional. Enable per-layer performance statistics.
    -no_show                       Optional. Do not show processed video.
    -delay                         Optional. Delay between frames used for visualization. If negative, the visualization is turned off (like with the option 'no_show'). If zero, the visualization is made frame-by-frame.
    -out "<path>"                Optional. The file name to write output log file with results of pedestrian tracking. The format of the log file is compatible with MOTChallenge format.
    -first                         Optional. The index of the first frame of video sequence to process. This has effect only if it is positive and the source video sequence is an image folder.
    -last                          Optional. The index of the last frame of video sequence to process. This has effect only if it is positive and the source video sequence is an image folder.
[ INFO ] Execution successful
To run the demo, you can use public models or the following pre-trained and optimized models delivered with the package:
- <INSTALL_DIR>/deployment_tools/intel_models/person-detection-retail-0013
- <INSTALL_DIR>/deployment_tools/intel_models/person-reidentification-retail-0031
For example, to run the application with the Intel Distribution of OpenVINO toolkit pre-trained models with inferencing pedestrian detector on a GPU and pedestrian reidentification on a CPU, run the following command:
./pedestrian_tracker_demo -i <path_video_file> \
                          -m_det <path_person-detection-retail-0013>/person-detection-retail-0013.xml \
                          -m_reid <path_person-reidentification-retail-0031>/person-reidentification-retail-0031.xml \
                          -d_det GPU
NOTE: Before running the demo with a trained model, make sure the model is converted to the Inference Engine format (*.xml + *.bin) using the Model Optimizer tool.
Demo Output
The demo uses OpenCV to display the resulting frame with detections rendered as bounding boxes, curves (for trajectories displaying), and text.
Smart Classroom Demo
The demo demonstrates an example of joint usage of several neural networks to detect three basic actions (sitting, standing, raising hand) and recognize people by faces in the classroom environment. The demo uses Async API for action and face detection nets. It allows to parallelize execution of face recognition and detection: while face recognition is running on one accelerator, face and action detection can be performed on other. The corresponding pre-trained models are delivered with the product:
face-detection-adas-0001, which is a primary detection network for finding faces.landmarks-regression-retail-0009, which is executed on top of the results from the first network and outputs a vector of facial landmarks for each detected face.face-reidentification-retail-0095, which is executed on top of the results from the first network and outputs a vector of features for each detected face.person-detection-action-recognition-0003, which is a detection network for finding persons and simultaneously predicting their current actions.
How It Works
On the start-up, the application reads command-line parameters and loads up to four networks the Inference Engine for execution on different devices depending on -m... options family. Upon getting a frame from the OpenCV VideoCapture, it performs inference of face detection and action detection networks. After that, the rois obtained by face detector are feed to facial landmarks regression network. Then landmarks are used to align faces by affine transform and feed them to the Face Recognition network.
Creating a Gallery for Face Recognition
To recognize faces on a frame, the demo needs a gallery of reference images. Each image should contain a tight crop of face. You can create the gallery from an arbitrary list of images:
- Put images containing tight crops of frontal-oriented faces to a separate empty folder. Each identity could have multiple images. Name images as
id_name.0.png, id_name.1.png, .... - Run the
create_list.py <path_to_folder_with_images>command to get a list of files and identities in.jsonformat.
Running
Running the application with the -h option yields the following usage message:
./smart_classroom_demo -h
InferenceEngine:
    API version ............ <version>
    Build .................. <number>

smart_classroom_demo [OPTION]
Options:

    -h                             Print a usage message.
    -i '<path>'                    Required. Path to a video or image file. Default value is "cam" to work with camera.
    -m_act '<path>'                Required. Path to the Person/Action Detection Retail model (.xml) file.
    -m_fd '<path>'                 Required. Path to the Face Detection Retail model (.xml) file.
    -m_lm '<path>'                 Required. Path to the Facial Landmarks Regression Retail model (.xml) file.
    -m_reid '<path>'               Required. Path to the Face Reidentification Retail model (.xml) file.
    -l '<absolute_path>'           Optional. For CPU custom layers, if any. Absolute path to a shared library with the kernels implementation.
          Or
    -c '<absolute_path>'           Optional. For GPU custom kernels, if any. Absolute path to an .xml file with the kernels description.
    -d_act '<device>'              Optional. Specify the target device for Person/Action Detection Retail (CPU, GPU, FPGA, MYRIAD, or HETERO).
    -d_fd '<device>'               Optional. Specify the target device for Face Detection Retail (CPU, GPU, FPGA, MYRIAD, or HETERO).
    -d_lm '<device>'               Optional. Specify the target device for Landmarks Regression Retail (CPU, GPU, FPGA, MYRIAD, or HETERO).
    -d_reid '<device>'             Optional. Specify the target device for Face Reidentification Retail (CPU, GPU, FPGA, MYRIAD, or HETERO).
    -out_v  '<path>'               Optional. File to write output video with visualization to.
    -pc                            Optional. Enables per-layer performance statistics.
    -r                             Optional. Output Inference results as raw values.
    -ad                            Optional. Output file name to save per-person action statistics in.
    -t_act                         Optional. Probability threshold for persons/actions detections.
    -t_fd                          Optional. Probability threshold for face detections.
    -inh_fd                        Optional. Input image height for face detector.
    -inw_fd                        Optional. Input image width for face detector.
    -exp_r_fd                      Optional. Expand ratio for bbox before face recognition.
    -t_reid                        Optional. Cosine distance threshold between two vectors for face reidentification.
    -fg                            Optional. Path to a faces gallery in .json format.
    -no_show                       Optional. Do not show processed video.
    -last_frame                    Optional. Last frame number to handle in demo. If negative, handle all input video.
Running the application with the empty list of options yields the usage message given above and an error message.
To run the demo, you can use public models or the following pre-trained and optimized models delivered with the package:
- <INSTALL_DIR>/deployment_tools/intel_models/face-detection-retail-0004
- <INSTALL_DIR>/deployment_tools/intel_models/landmarks-regression-retail-0009
- <INSTALL_DIR>/deployment_tools/intel_models/face-reidentification-retail-0071
- <INSTALL_DIR>/deployment_tools/intel_models/person-detection-action-recognition-0003
NOTE: Before running the demo with a trained model, make sure the model is converted to the Inference Engine format (*.xml + *.bin) using the Model Optimizer tool.
For example, you can use the following command to run the application:
./smart_classroom_demo -m_act <path to the person/action detection retail model .xml file> \
                       -m_fd <path to the face detection retail model .xml file> \
                       -m_reid <path to the face reidentification retail model .xml file> \
                       -m_lm <path to the landmarks regression retail model .xml file> \
                       -fg <path to faces_gallery.json> \
                       -i <path to the input video>
Demo Output
The demo uses OpenCV to display the resulting frame with labeled actions and faces.
Super Resolution Demo
This topic demonstrates how to run the Super Resolution demo application, which reconstructs the high resolution image from the original low resolution one.
The corresponding pre-trained model is delivered with the product:
single-image-super-resolution-0034, which is the primary and only model that performs super resolution 4x upscale on a 200x200 image
For details on the model, please refer to the description in the deployment_tools/intel_models folder of the Intel Distribution of OpenVINO toolkit installation directory.
How It Works
On the start-up, the application reads command-line parameters and loads the specified network. After that, the application reads a 200x200 input image and performs 4x upscale using super resolution.
Running
Running the application with the -h option yields the following usage message:
./super_resolution_demo -h
InferenceEngine:
    API version ............ <version>
    Build .................. <number>

super_resolution_demo [OPTION]
Options:

    -h                      Print a usage message.
    -i "<path>"             Required. Path to an image.
    -m "<path>"             Required. Path to an .xml file with a trained model.
    -pp "<path>"            Path to a plugin folder.
    -d "<device>"           Specify the target device to infer on (CPU, GPU, FPGA, or MYRIAD). The demo will look for a suitable plugin for the specified device.
    -ni "<integer>"         Number of iterations (default value is 1)
    -pc                     Enable per-layer performance report
Running the application with the empty list of options yields the usage message given above and an error message.
To run the demo, you can use public models or a pre-trained and optimized model delivered with the package:
<INSTALL_DIR>/deployment_tools/intel_models/single-image-super-resolution-0034
To do inference on CPU using a trained model, run the following command:
./super_resolution_demo -i <path_to_image>/image.bmp -m <path_to_model>/model.xml
NOTE: Before running the demo with a trained model, make sure the model is converted to the Inference Engine format (*.xml + *.bin) using the Model Optimizer tool.
Demo Output
The application outputs a reconstructed high-resolution image and saves it in the current working directory as *.bmp file with sr prefix.
Text Detection Demo
The demo shows an example of using a single neural network to detect printed text rotated at any angle in various environment. The corresponding pre-trained model is delivered with the product:
text-detection-0001, which is a detection network for finding text.
How It Works
On the start-up, the application reads command line parameters and loads one network to the Inference Engine for execution. Upon getting an image, it performs inference of text detection and prints the result as four points (x1, y1), (x2, y2), (x3, y3), (x4, y4) for each text bounding box.
Running
Running the application with the -h option yields the following usage message:
./text_detection_demo -h

text_detection_demo [OPTION]
Options:

    -h                           Print a usage message.
    -i "<path>"                  Required. Path to an image file.
    -m "<path>"                  Required. Path to the Text Detection model (.xml) file.
    -d "<device>"                Optional. Specify the target device to infer on: CPU, GPU, FPGA, or MYRIAD. The demo will look for a suitable plugin for a specified device.
    -l "<absolute_path>"         Optional. Absolute path to a shared library with the CPU kernels implementation for custom layers.
    -c "<absolute_path>"         Optional. Absolute path to the GPU kernels implementation for custom layers.
    -no_show                     Optional. If it is true, then detected text will not be shown on image frame. By default, it is false.
    -r                           Optional. Output Inference results as raw values.
Running the application with the empty list of options yields the usage message given above and an error message.
To run the demo, you can use the following pre-trained and optimized model delivered with the package:
<INSTALL_DIR>/deployment_tools/intel_models/text-detection-0001
For example, use the following command line command to run the application:
./text_detection_demo -m <path_to_model> -i <path_to_image>
Demo Output
The demo uses OpenCV to display the resulting frame with detections rendered as bounding boxes.
LeNet Number Classifications Network Using Graph Builder API
This sample demonstrates how to execute inference using Inference Engine Graph Builder API to build a network on example of the LeNet classifications network. An XML file is not required for network building. Inference Engine Graph Builder API allows network building "on the fly" from source code. The sample uses one-channel ubyte pictures as input.
How It Works
Upon the start-up the sample reads command line parameters and builds a network using Graph Builder API and passed weights file. Then, the application loads built network and an image to the Inference Engine plugin.
When inference is done, the application outputs inference results to the standard output stream.
Running
Running the application with the -h option yields the following usage message:
./lenet_network_graph_builder -h
InferenceEngine:
    API version ............ <version>
    Build .................. <number>

lenet_network_graph_builder [OPTION]
Options:

    -h                      Print a usage message.
    -m "<path>"             Path to a .bin file with weights for trained model
    -i "<path>"             Required. Path to image or folder with images
    -d "<device>"           Specify the target device to infer on this. Sample will look for a suitable plugin for device specified(default value is CPU)
    -pp "<path>"            Path to a plugin folder
    -pc                     Enables per-layer performance report
    -nt "<integer>"         Number of top results (default 10)
    -ni "<integer>"         Number of iterations (default 1)
Running the application with empty list of options yields the usage message given above.
For example, to do inference of an ubyte image on a GPU, run the following command:
./lenet_network_graph_builder -i <path_to_image> -m <path_to_weights_file> -d GPU
Demo Output
By default, the application outputs top-10 inference results for each infer request. In addition to this, it provides throughput value measured in frames per second.
Validation Application
Inference Engine Validation Application is a tool that allows to infer deep learning models with standard inputs and outputs configuration and to collect simple validation metrics for topologies. It supports top-1 and top-5 metric for Classification networks and 11-points mAP metric for Object Detection networks.
Possible use cases of the tool:
- Check if the Inference Engine infers the public topologies well (the engineering team uses the Validation Application for regular testing)
- Verify if a custom model is compatible with the default input/output configuration and compare its accuracy with the public models
- Use Validation Application as another sample: although the code is much more complex than in classification and object detection samples, the source code is open and can be re-used
Validation Application Options
The Validation Application provides the following command-line interface (CLI):
Usage: validation_app [OPTION]

Available options:

    -h                        Print a help message
    -t <type>                 Type of an inferred network ("C" by default)
      -t "C" for classification
      -t "OD" for object detection
    -i <path>                 Required. Folder with validation images. Path to a directory with validation images. For Classification models, the directory must contain folders named as labels with images inside or a .txt file with a list of images. For Object Detection models, the dataset must be in VOC format.
    -m <path>                 Required. Path to an .xml file with a trained model
    -lbl <path>               Labels file path. The labels file contains names of the dataset classes
    -l <absolute_path>        Required for CPU custom layers. Absolute path to a shared library with the kernel implementations
    -c <absolute_path>        Required for GPU custom kernels.Absolute path to an .xml file with the kernel descriptions.
    -d <device>               Target device to infer on: CPU (default), GPU, FPGA, or MYRIAD. The application looks for a suitable plugin for the specified device.
    -b N                      Batch size value. If not specified, the batch size value is taken from IR
    -ppType <type>            Preprocessing type. Options: "None", "Resize", "ResizeCrop"
    -ppSize N                 Preprocessing size (used with ppType="ResizeCrop")
    -ppWidth W                Preprocessing width (overrides -ppSize, used with ppType="ResizeCrop")
    -ppHeight H               Preprocessing height (overrides -ppSize, used with ppType="ResizeCrop")
    --dump                    Dump file names and inference results to a .csv file

    Classification-specific options:
      -Czb true               "Zero is a background" flag. Some networks are trained with a modified dataset where the class IDs  are enumerated from 1, but 0 is an undefined "background" class (which is never detected)

    Object detection-specific options:
      -ODkind <kind>          Type of an Object Detection model. Options: SSD
      -ODa <path>             Required for Object Detection models. Path to a directory containing an .xml file with annotations for images.
      -ODc <file>             Required for Object Detection models. Path to a file containing a list of classes
      -ODsubdir <name>        Directory between the path to images (specified with -i) and image name (specified in the .xml file). For VOC2007 dataset, use JPEGImages.
The tool options are divided into two categories:
- Common options named with a single letter or a word, such as
-bor--dump. These options are the same in all Validation Application modes. - Network type-specific options named as an acronym of the network type (
CorOD) followed by a letter or a word.
General Workflow
When executed, the Validation Application perform the following steps:
- Loads a model to an Inference Engine plugin
- Reads validation set (specified with the
-ioption):- If you specified a directory, the application tries to load labels first. To do this, it searches for the file with the same name as a model, but with
.labelsextension (instead of.xml). Then it searches for the specified folder, detects its sub-folders named as known labels, and adds all images from these sub-folders to the validation set. When there are no such sub-folders, validation set is considered empty. - If you specified a
.txtfile, the application reads this file expecting every line to be in the correct format. For more information about the format, refer to the Preparing the Dataset section below.
- If you specified a directory, the application tries to load labels first. To do this, it searches for the file with the same name as a model, but with
- Reads the batch size value specified with the
-boption and loads this number of images to the plugin.NOTE: Images loading time is not a part of inference time reported by the application.
- The plugin infers the model, and the Validation Application collects the statistics.
You can also retrieve infer result by specifying the --dump option, however it generates a report only for Classification models. This CLI option enables creation (if possible) of an inference report in the .csv format.
The structure of the report is a set of lines, each of them contains semicolon-separated values:
- Image path
- A flag representing correctness of prediction
- ID of Top-1 class
- Probability that the image belongs to Top-1 class in per cents
- ID of Top-2 class
- Probability that the image belongs to Top-2 class in per cents
This is an example line from such report:
"ILSVRC2012_val_00002138.bmp";1;1;8.5;392;6.875;123;5.875;2;5.5;396;5;
It means that the given image was predicted correctly. The most probable prediction is that this image represents class 1 with the probability 0.085.
The next section shows how to use the Validation application in classification mode to score a classification CNN on a pack of images.
Prepare a Dataset
You must prepare the dataset before running the Validation Application. The format of dataset depends on a type of the model you are going to validate. Make sure that the dataset is format is applicable for the chosen model type.
Dataset Format for Classification: Folders as Classes
In this case, a dataset has the following structure:
|-- <path>/dataset
    |-- apron
        |-- apron1.bmp
        |-- apron2.bmp
    |-- collie
        |-- a_big_dog.jpg
    |-- coral reef
        |-- reef.bmp
    |-- Siamese
        |-- cat3.jpg
This structure means that each folder in dataset directory must have the name of one of the classes and contain all images of this class. In the given example, there are two images that represent the class apron, while three other classes have only one image each.
NOTE: A dataset can contain images of both .bmp and .jpg formats.
The correct way to use such dataset is to specify the path as -i <path>/dataset.
Dataset Format for Classification: List of Images (ImageNet*-like)
If you want to use this dataset format, create a single file with a list of images. In this case, the correct set of files must be similar to the following:
|-- <path>/dataset
    |-- apron1.bmp
    |-- apron2.bmp
    |-- a_big_dog.jpg
    |-- reef.bmp
    |-- cat3.jpg
    |-- labels.txt
Where labels.txt looks like:
apron1.bmp 411
apron2.bmp 411
cat3.jpg 284
reef.bmp 973
a_big_dog.jpg 231
Each line of the file must contain the name of the image and the ID of the class that it represents in the format <image_name> tabulation <class_id>. For example, apron1.bmp represents the class with ID 411.
NOTE: A dataset can contain images of both .bmp and .jpg formats.
The correct way to use such dataset is to specify the path as -i <path>/dataset/labels.txt.
Dataset Format for Object Detection (VOC-like)
Object Detection SSD models can be inferred on the original dataset that was used as a testing dataset during the model training. To prepare the VOC dataset, follow the steps below:
- Download the pre-trained SSD-300 model from the SSD GitHub* repository at https://github.com/weiliu89/caffe/tree/ssd.
- Download VOC2007 testing dataset:
$wget http://host.robots.ox.ac.uk/pascal/VOC/voc2007/VOCtest_06-Nov-2007.tar tar -xvf VOCtest_06-Nov-2007.tar
- Convert the model with the Model Optimizer.
- Create a proper
.txtclass file from the originallabelmap_voc.prototxt. The new file must be in the following format:none_of_the_above 0 aeroplane 1 bicycle 2 bird 3 boat 4 bottle 5 bus 6 car 7 cat 8 chair 9 cow 10 diningtable 11 dog 12 horse 13 motorbike 14 person 15 pottedplant 16 sheep 17 sofa 18 train 19 tvmonitor 20
Save this file as
VOC_SSD_Classes.txt.
Validate Classification Models
Once you have prepared the dataset (refer to the Preparing the Dataset section above), run the following command to infer a classification model on the selected dataset:
./validation_app -t C -i <path_to_images_directory_or_txt_file> -m <path_to_classification_model>/<model_name>.xml -d <CPU|GPU>
Validate Object Detection Models
NOTE: Validation Application was validated with SSD CNN. Any network that can be inferred by the Inference Engine and has the same input and output format as one of these should be supported as well.
Once you have prepared the dataset (refer to the Preparing the Dataset section above), run the following command to infer an Object Detection model on the selected dataset:
./validation_app -d CPU -t OD -ODa "<path_to_VOC_dataset>/VOCdevkit/VOC2007/Annotations" -i "<path_to_VOC_dataset>/VOCdevkit" -m "<path_to_model>/vgg_voc0712_ssd_300x300.xml" -ODc "<path_to_classes_file>/VOC_SSD_Classes.txt" -ODsubdir JPEGImages
Understand Validation Application Output
During the validation process, you can see the interactive progress bar that represents the current validation stage. When it is full, the validation process is over, and you can analyze the output.
Key data from the output:
- Network loading time - time spent on topology loading in ms
- Model - path to a chosen model
- Model Precision - precision of the chosen model
- Batch size - specified batch size
- Validation dataset - path to a validation set
- Validation approach - type of the model: Classification or Object Detection
- Device - device type
Below you can find the example output for Classification models, which reports average infer time and Top-1 and Top-5 metric values:
Average infer time (ms): 588.977 (16.98 images per second with batch size = 10)

Top1 accuracy: 70.00% (7 of 10 images were detected correctly, top class is correct)
Top5 accuracy: 80.00% (8 of 10 images were detected correctly, top five classes contain required class)
Below you can find the example output for Object Detection models:
Progress: [....................] 100.00% done
[ INFO ] Processing output blobs
Network load time: 27.70ms
Model: /home/user/models/ssd/withmean/vgg_voc0712_ssd_300x300/vgg_voc0712_ssd_300x300.xml
Model Precision: FP32
Batch size: 1
Validation dataset: /home/user/Data/SSD-data/testonly/VOCdevkit
Validation approach: Object detection network

Average infer time (ms): 166.49 (6.01 images per second with batch size = 1)
Average precision per class table:

Class   AP
1   0.796
2   0.839
3   0.759
4   0.695
5   0.508
6   0.867
7   0.861
8   0.886
9   0.602
10  0.822
11  0.768
12  0.861
13  0.874
14  0.842
15  0.797
16  0.526
17  0.792
18  0.795
19  0.873
20  0.773

Mean Average Precision (mAP): 0.7767
This output shows the resulting mAP metric value for the SSD300 model used to prepare the dataset. This value repeats the result stated in the SSD GitHub* repository and in the original arXiv paper.
Calibration Tool
Inference Engine Calibration Tool calibrates a given FP32 model so that is can be run in low-precision 8-bit integer mode while keeping the input data of this model in the original precision.
Calibration Tool Options
The core command-line options for the Calibration Tool are the same as for Validation Application. However, the Calibration Tool has the following specific options: -t, -subset, -output, and -threshold.
Running the Calibration Tool with the -h option yields the following usage message with all CLI options listed:
Usage: calibration_tool [OPTION]

Available options:

    -h                        Print a help message
    -t <type>                 Type of an inferred network ("C" by default)
      -t "C" to calibrate Classification network and write the calibrated network to IR
      -t "OD" to calibrate Object Detection network and write the calibrated network to IR
      -t "RawC" to collect only statistics for Classification network and write statistics to IR. With this option, a model is not calibrated. For calibration and statisctics collection, use "-t C" instead.
      -t "RawOD" to collect only statistics for Object Detection network and write statistics to IR. With this option, a model is not calibrated. For calibration and statisctics collection, use "-t OD" instead
    -i <path>                 Required. Path to a directory with validation images. For Classification models, the directory must contain folders named as labels with images inside or a .txt file with a list of images. For Object Detection models, the dataset must be in VOC format.
    -m <path>                 Required. Path to an .xml file with a trained model, including model name and extension.
    -lbl <path>               Labels file path. The labels file contains names of the dataset classes
    -l <absolute_path>        Required for CPU custom layers. Absolute path to a shared library with the kernel implementations.
    -c <absolute_path>        Required for GPU custom kernels. Absolute path to an .xml file with the kernel descriptions.
    -d <device>               Target device to infer on: CPU (default), GPU, FPGA, or MYRIAD. The application looks for a suitable plugin for the specified device.
    -b N                      Batch size value. If not specified, the batch size value is taken from IR
    -ppType <type>            Preprocessing type. Options: "None", "Resize", "ResizeCrop"
    -ppSize N                 Preprocessing size (used with ppType="ResizeCrop")
    -ppWidth W                Preprocessing width (overrides -ppSize, used with ppType="ResizeCrop")
    -ppHeight H               Preprocessing height (overrides -ppSize, used with ppType="ResizeCrop")
    --dump                    Dump file names and inference results to a .csv file
    -subset                  Number of pictures from the whole validation set tocreate the calibration dataset. Default value is 0, which stands forthe whole provided dataset
    -output <output_IR>      Output name for calibrated model. Default is <original_model_name>_i8.xml|bin
    -threshold               Threshold for a maximum accuracy drop of quantized model. Must be an integer number (percents) without a percent sign. Default value is 1, which stands for accepted accuracy drop in 1%
    - stream_output           Flag for printing progress as a plain text. When used, interactive progress bar is replaced with multiline output

    Classification-specific options:
      -Czb true               "Zero is a background" flag. Some networks are trained with a modified dataset where the class IDs  are enumerated from 1, but 0 is an undefined "background" class (which is never detected)

    Object detection-specific options:
      -ODkind <kind>          Type of an Object Detection model. Options: SSD
      -ODa <path>             Required for Object Detection models. Path to a directory containing an .xml file with annotations for images.
      -ODc <file>             Required for Object Detection models. Path to a file with a list of classes
      -ODsubdir <name>        Directory between the path to images (specified with -i) and image name (specified in the .xml file). For VOC2007 dataset, use JPEGImages.
The tool options are divided into two categories:
- Common options named with a single letter or a word, such as
-bor--dump. These options are the same in all calibration tool modes. - Network type-specific options named as an acronym of the network type (
CorOD) followed by a letter or a word.
Calibrate a Classification Model
To calibrate a classification convolutional neural network (CNN) on a subset of images (first 2000 images) from the given dataset (specified with the -i option), run the following command:
./calibration_tool -t C -i <path_to_images_directory_or_txt_file> -m <path_to_classification_model>/<model_name>.xml -d <CPU|GPU> -subset 2000
The dataset must have the correct format. Classification models support two formats: folders named as labels that contain all images of this class and ImageNet*-like format, with the .txt file containing list of images and IDs of classes.
For more information on the structure of the datasets, refer to the Prepare a Dataset section of the Validation Application document.
If you decide to use the subset of the given dataset, use the ImageNet-like format instead of folder-as-classes format. This brings a more accurate calibration as you are likely to get images representing different classes.
To run the sample, you can use classification models that can be downloaded with the OpenVINO Model Downloader or other image classification models.
For example, to calibrate the trained Caffe* resnet-50 classification model, run the following command:
./calibration_tool -t C -m resnet-50.xml -i ILSVRC2012_val.txt -Czb false -ppType "ResizeCrop" -ppSize 342 -b 1 -d CPU -subset 2000
NOTE: Before running the tool on a trained model, make sure the model is converted to the Inference Engine format (*.xml + *.bin) using the Model Optimizer tool.
Calibrate Object Detection Model
This topic demonstrates how to run the Calibration Tool on the Object Detection CNN on a set of images. Please review the list of Object Detection models used for validation of the Calibration Tool in the 8-bit Inference Introduction. Any network that can be inferred with the Inference Engine and has the same input and output format as the SSD CNN should be supported as well.
Run SSD Network on the VOC dataset
Before you start calibrating the model, make sure your dataset is in the correct format. For more information, refer to the Prepare a Dataset section of the Validation Application document.
Once you have prepared the dataset, you can calibrate the model on it by running the following command:
./calibration_tool -d CPU -t OD -ODa "<path_to_image_annotations>/VOCdevkit/VOC2007/Annotations" -i "<path_to_image_directory>/VOCdevkit" -m "<path_to_model>/vgg_voc0712_ssd_300x300.xml" -ODc "<path_to_classes_list>/VOC_SSD_Classes.txt" -ODsubdir JPEGImages -subset 500
Benchmark Application Demo
This topic demonstrates how to use the Benchmark Application to estimate deep learning inference performance on supported devices. Performance can be measured for two inference modes: synchronous and asynchronous.
NOTE: This topic describes usage of C++ implementation of the Benchmark Application.
How It Works
NOTE: To achieve benchmark results similar to the official published results, set CPU frequency to 2.9GHz and GPU frequency to 1GHz.
Upon the start-up, the application reads command-line parameters and loads a network and images to the Inference Engine plugin. The number of infer requests and execution approach depend on a mode defined with the -api command-line parameter.
Synchronous API
For synchronous mode, the primary metric is latency. The application creates one infer request and executes the Infer method. A number of executions is defined by one of the two values:
- Number of iterations defined with the
-nitercommand-line argument - Predefined duration if
-niteris skipped. Predefined duration value depends on device.
During the execution, the application collects two types of metrics:
- Latency for each infer request executed with
Infermethod - Duration of all executions
Reported latency value is calculated as mean value of all collected latencies. Reported throughput value is a derivative from reported latency and additionally depends on batch size.
Asynchronous API
For asynchronous mode, the primary metric is throughput in frames per second (FPS). The application creates a certain number of infer requests and executes the StartAsync method. A number of infer is specified with the -nireq command-line parameter. A number of executions is defined by one of the two values:
- Number of iterations defined with the
-nitercommand-line argument - Predefined duration if
-niteris skipped. Predefined duration value depends on device.
The infer requests are executed asynchronously. Wait method is used to wait for previous execution to complete. The application measures all infer requests executions and reports the throughput metric based on batch size and total execution duration.
Running
Running the application with the -h option yields the following usage message:
./benchmark_app -h
InferenceEngine:
        API version ............ <version>
        Build .................. <number>
[ INFO ] Parsing input parameters

benchmark_app [OPTION]
Options:

    -h                      Print a usage message
    -i "<path>"             Required. Path to a folder with images or to image files.
    -m "<path>"             Required. Path to an .xml file with a trained model.
    -pp "<path>"            Path to a plugin folder.
    -api "<sync/async>"     Required. Enable using sync/async API.
    -d "<device>"           Specify a target device to infer on: CPU, GPU, FPGA or MYRIAD. Use "-d HETERO:<comma separated devices list>" format to specify HETERO plugin. The application looks for a suitable plugin for the specified device.
    -niter "<integer>"      Optional. Number of iterations. If not specified, the number of iterations is calculated depending on a device.
    -nireq "<integer>"      Optional. Number of infer requests (default value is 2).
    -l "<absolute_path>"    Required for CPU custom layers. Absolute path to a shared library with the kernels implementations.
          Or
    -c "<absolute_path>"    Required for GPU custom kernels. Absolute path to an .xml file with the kernels description.
    -b "<integer>"          Optional. Batch size value. If not specified, the batch size value is determined from IR.
Running the application with the empty list of options yields the usage message given above and an error message.
You can run the application for one input layer four-dimensional models that support images as input, for example, public AlexNet and GoogLeNet models that can be downloaded with the OpenVINO Model Downloade.
NOTE: Before running the application with a trained model, make sure the model is converted to the Inference Engine format (*.xml + *.bin) using the Model Optimizer tool.
For example, to perform inference on CPU in the synchronous mode and get estimated performance metrics for AlexNet model, run the following command:
./benchmark_app -i <path_to_image>/inputImage.bmp -m <path_to_model>/alexnet_fp32.xml -d CPU -api sync
For the asynchronous mode:
./benchmark_app -i <path_to_image>/inputImage.bmp -m <path_to_model>/alexnet_fp32.xml -d CPU -api async
Demo Output
Application output depends on a used API. For synchronous API, the application outputs latency and throughput:
[ INFO ] Start inference synchronously (60000 ms duration)

[ INFO ] Latency: 37.91 ms
[ INFO ] Throughput: 52.7566 FPS
For asynchronous API, the application outputs only throughput:
[ INFO ] Start inference asynchronously (60000 ms duration, 2 inference requests in parallel)

[ INFO ] Throughput: 48.2031 FPS
Legal Information
You may not use or facilitate the use of this document in connection with any infringement or other legal analysis concerning Intel products described herein. You agree to grant Intel a non-exclusive, royalty-free license to any patent claim thereafter drafted which includes subject matter disclosed herein.
No license (express or implied, by estoppel or otherwise) to any intellectual property rights is granted by this document.
All information provided here is subject to change without notice. Contact your Intel representative to obtain the latest Intel product specifications and roadmaps.
The products described may contain design defects or errors known as errata which may cause the product to deviate from published specifications. Current characterized errata are available on request.
Intel technologies’ features and benefits depend on system configuration and may require enabled hardware, software or service activation. Learn more at http://www.intel.com/ or from the OEM or retailer.
No computer system can be absolutely secure.
Intel, OpenVINO, and the Intel logo are trademarks of Intel Corporation in the U.S. and/or other countries.
*Other names and brands may be claimed as the property of others.
Copyright © 2019 Intel Corporation. All rights reserved.