
Your first Chatbot using Microsoft’s Bot Framework and Dialogflow API: Day 3 (Integrate and Test the chatbot on Slack and Facebook Messenger)
5.00/5 (4 votes)
How to integrate and test the chatbot on Slack and Facebook Messenger)
Table of Contents
- Preface
- Chatbot Tutorial Roadmap
- Prerequisites
- Deploy the Chatbot in Facebook Messenger
- Live Chatbot on Facebook
- Deploy the Chatbot in Slack
- Conclusion
Preface
This article is the submission against CodeProject’s Slack API Challenge. The contest officially began on January 7, 2019, and ends on March 7, 2019.
Slack is no doubt the platform that every developer needs nowadays and is trending in a new way.
It is easy to use and manage, and not only this, we can create our own slack app and add a lot of custom functionality to it. You can learn how to create your own slack app in this article. It is very easy and may hardly take 20 minutes to create your first app.
Chatbot Tutorial Roadmap
Since this is a vast topic and beyond the scope of a single article, I have divided the sections into multiple articles. In the first article, we’ll see how to create a chatbot using Google’s Dialogflow and test the bot in the Dialogflow console. We’ll also see how it could be integrated with Slack. The second article will demonstrate how to create a custom chatbot using Microsoft’s bot framework and enable the webhooks in Dialogflow and return the response from the custom bot to Dialogflow intents as a fulfillment response. This third article of the series will demonstrate how to integrate the complete crated bot in articles two and three with Facebook Messenger and Slack and test the webhook response in the two environments. Following are the three articles of tutorial about learning how to create a custom chatbot.
- Your first Chatbot using Microsoft’s Bot Framework and Dialogflow API: Day 1 (Dialogflow and Slack Integration)
- Your first Chatbot using Microsoft’s Bot Framework and Dialogflow API: Day 2 (Bot using Microsoft’s Bot Framework)
- Your first Chatbot using Microsoft’s Bot Framework and Dialogflow API: Day 3 (Integrate and test the bot on Slack and Facebook Messenger)
Prerequisites
The reader of this article is expected to have covered the first two articles in the series.
Deploy the Chatbot in Facebook Messenger
Our initial basic bot is completed, you can enhance it more as per your will and requirement. In this section, we’ll see how to deploy the bot on Facebook messenger as a chatbot to your custom Facebook page.
So, the need here would be that suppose you have a Facebook page for your business or company and you need to deploy a feature of auto chatbot in that page so that any user can seek information or talk to that bot.
First things first, for deployment of the bot to the Facebook page, we need to have a Facebook page.
- Open the URL https://developer.facebook.com and sign in with your existing Facebook credentials or create a new account.

- I am signing in with my existing Facebook account. It will ask to create a Facebook developers account, and yes, we need to, so click Next.

- Provide the App Name (whatever you want) and contact email and click Next.

- Pass the security check and click Submit.

- It will show the welcome message and ask to add your first product. Click on “Add Your First Product” button.

- The next screen you’ll see is the Facebook developer’s dashboard. Since we need to set up the Facebook Messenger, click on the button to setup messenger as shown below:

- You need to have an access token and a secret key for that. So, navigate to Settings and scroll down to the section that says Token Generation. Select an existing page if you have or create a new one as per your wish.

- Select the type of page you want to create, i.e., Community or Business.

- Provide the page name and the category.

- You can skip the steps like providing profile pic or choose to apply one.

- In the next step, you’ll see the page created.

- Now again, go to settings and Token generation section and choose the newly created page.

- It will again prompt you for authentication. Do that.

- After the authentication, in the Token Generation section, we see now a Page Access token is generated. Copy that token and keep that at some location. We’ll soon need that.

- No, go to Settings->Basic to get the App Secret key as shown below. Copy and keep the App Secret key at some safe location, we’ll need that soon.

- Go back to
Dialogflowconsole’s Integration section and enable Facebook messenger option.
- Follow the instructions shown on the popup.

- Again, go back to Facebook’s developer's account and click Settings. Go to Webhooks section and click Setup Webhooks to provide the webhook to that copied call-back URL in the last step.

- In the New Page Subscription, i.e., the page opened after clicking setup webhooks, provide the Callback URL and verify token name that we stored earlier. Check the options like messages, postbacks, and options as shown below. Click Verify and Save.

- Once the webhook setup is complete, select the page to subscribe to webhook events. So, select your Facebook page there.

- Click on the “Subscribe” button.

- Once done, go back to the Facebook page and add a new button by clicking “Add a button” button as shown below:

- Provide details for all the steps, i.e., selecting Contact you feature for my messenger type. Select the option to send messages.

Live Chatbot on Facebook
After performing all the steps in the last section, we can say that our bot is successfully deployed and integrated with our Facebook page. Time to test it.
- Click on newly added “Send Message” button and from the context menu, click “Test Button”.

- As soon as the Test Button link is clicked, the chatbot will open and note that the name of the chatbot is CodeBusiness. You can start typing your request to book a table and it will respond as expected.

Our bot seems to be working well. Like-wise, you can test everything that we tested on the BotService on Lex like talking to a human, seeing slot information and all. You can also provide the tester permissions to the user you want to see this bot when they see your page on Facebook. I find it very cool.
Deploy the Chatbot in Slack
You can also deploy and test the chatbot in Slack.
- Go to the Integrations section of the Google
Dialogflowconsole and enable Slack.
- Follow the instructions as shown in the popup.
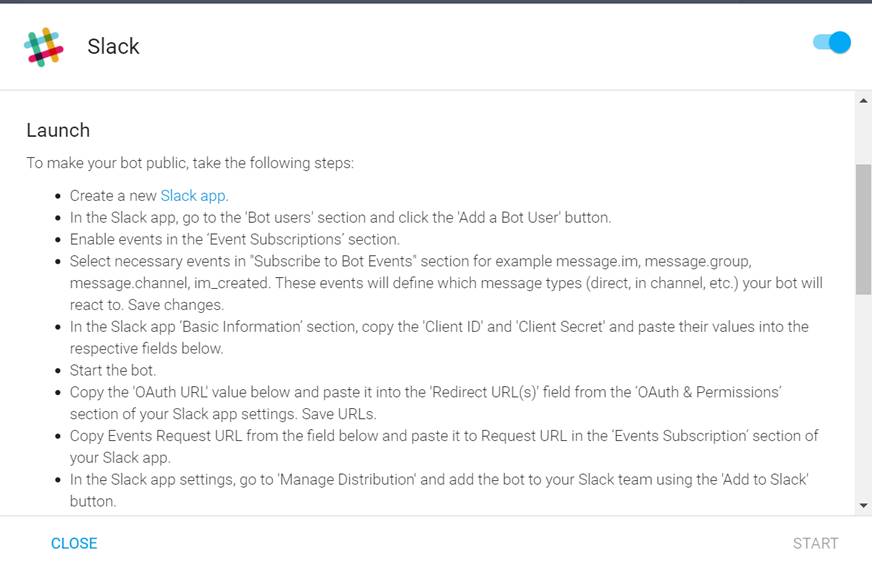
- Create your new slack app and get the needed details to be filled in this section.


- Open the newly created Slack app and type “
Hi”. It will respond as expected.


So, we get the response from the webhook.

Yippie!
Conclusion
In this detailed article, we learned how to integrate the chatbot developed using Google’s Dialogflow API and Microsoft’s bot framework in Facebook and Slack. The bot integration could also be done to other platforms like Alexa, Cortana Twilio, etc. Just a matter of exploring and playing with it.