
Body Tracking using Orbbec Astra + Nuitrack (Kinect Alternative)
Today, I would like to introduce you to the Orbbec Astra sensor and the Nuitrack body-tracking SDK. This is an in-depth tutorial for software developers who would like to use a new depth sensor and a new body-tracking SDK to develop amazing motion applications.
Introduction
After Microsoft announced the (not so sudden) death of Kinect, I have committed myself to providing viable alternatives for my customers and their businesses. My company has been developing motion-analysis applications for the past seven years, so I know first-hand how demanding such projects are.
Today, I would like to introduce you to the Orbbec Astra sensor and the Nuitrack body-tracking SDK. This is an in-depth tutorial for software developers who would like to use a new depth sensor and a new body-tracking SDK to develop amazing motion applications. We are going to develop a simple Windows app that will do the following:
- Visualize and display the depth feed
- Track the skeleton of the closest person
- Display the human body joints on top of the depth stream
Here’s how it’s going to look like:
Let's meet Orbbec Astra and Nuitrack!
Prerequisites
- Orbbec Astra or Orbbec Astra Pro (also available on Amazon)
- Nuitrack body-tracking SDK
- Unity3D 5.5+
- Visual Studio 2017
- Windows 10
The Sensor: Orbbec Astra
Orbbec Astra is a tiny yet powerful depth camera. It comes with a 1280×960 RGB color camera and a 640×480 depth camera. It weighs just 300 grams (0.6 pounds). More important, the camera only needs a USB 2 port. No separate power supply is required.

Forget about that bulky Kinect adapter and its USB 3 limitations. Orbbec Astra is as portable as your laptop.
Here is a table of its hardware specs:
| Color resolution | Depth resolution | Range | Field of view | Microphones |
| 1920×960 | 640×480 | 0.6 – 8.0m (2 – 26ft) | 60° (hor) x 49.5° (vert) x 73° (diag) | 2 |
Let’s now meet the software we’ll be using to detect and track the human body joints.
The SDK: Nuitrack
Nuitrack is a cross-platform framework that allows us to access the camera streams and track the human body. Nuitrack provides the following stream readers:
| Stream | Description |
ColorSensor | Provides access to the raw RGB color data. |
DepthSensor | Provides access to the raw depth data. |
UserTracker | Determines the depth points that belong to the tracked players. |
SkeletonTracker | Provides access to the 3D and 2D coordinates of the human body joints. |
Nuitrack is compatible with desktop computers and mobile devices. I’ll talk more about its mobile capabilities in my next article.
Set up Astra & Nuitrack
Before diving into the development work, you first need to install the proper software packages on your Windows computer.
Step 1 – Orbbec Drivers
Start by downloading the official Orbbec Astra drivers. The download link can be found on Orbbec’s website. If you miss this step, your camera will not function properly.
Step 2 – Nuitrack
Now that the camera drivers are installed, it’s time to download Nuitrack from its official website. Go to the Nuitrack Downloads page and select either nuitrack-win32.zip or nuitrack-win64.zip. In my case, I am running a 64-bit machine, so I selected the latter option.
Download and extract the package on your computer. It’s important to select a location that’s easy for you to remember. You’ll need to use the location of the Nuitrack folder in step #3 below. In my case, the path is:
C:\Users\Vangos\Desktop\Nuitrack\nuitrack
To develop motion-tracking apps using Nuitrack, you’ll also need to download the Nuitrack SDK. The SDK can be stored in a separate folder.
Nuitrack is a paid package, however, you can try it for free for as long as you like. The trial version has a 3-minute time limit. Upon reaching the 3-minute limit, you’ll need to restart the app.
Nuitrack supports a variety of cameras, but, for now, we’ll be focusing on Orbbec Astra.
Step 3 – OpenNI
Remember OpenNI? OpenNI was one of the first open-source software kits for accessing the streams of depth cameras. Nuitrack is using OpenNI, too, so you should install the bundled OpenNI package:
OpenNI-Win64-1.5.7-Dev.msi
Step 4 – Environment Variables
We are almost done… Nuitrack will be referenced from your projects using the path we specified back in step #2. The path should be stored in two environment variables.
Hit the Start button and search for “Environment Variables”.

The System Properties window should open. Click the “Environment Variables” button and navigate to the System variables panel.
Add a new property named NUITRACK_HOME. Assign the installation folder of the Nuitrack SDK as its value:

Finally, search for the Path environment variable and click Edit. Add the Nuitrack folder with the “bin” extension:

Step 5 – Test!
If everything was done correctly, you should be able to run one of the Nuitrack samples.
Connect the Orbbec Astra to a USB port and navigate to the Nuitrack installation folder. Open the “bin” directory (e.g. “C:\Users\Vangos\Desktop\Nuitrack\nuitrack\bin”). Then, double-click the nuitrack_c11_sample.exe to test the camera. If you see something like this, congratulations!

Your camera and SDK are working properly!
Developing a Body-Tracking Application
Let’s get to the good parts now. We’ll develop our first body-tracking application using Nuitrack and Unity3D. I assume you have already downloaded the Nuitrack SDK.
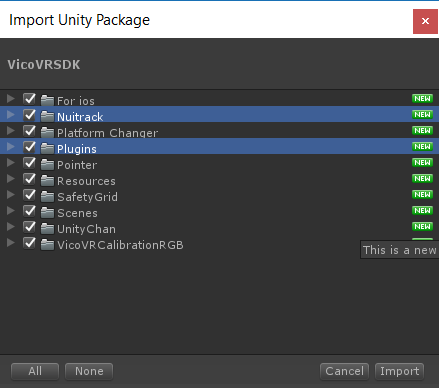
Launch Unity and open the VicoVRSDK.unitypackage sample. This will automatically launch Unity3D and will prompt you to create a new project:

Unity will then prompt you to import the package. You only need the contents of the Nuitrack and Plugins folder, but you may import everything, so you can experiment with the built-in demos.
To get started, we’ll add a new Unity scene with the following components:
- A
Canvaselement; this will contain the user interface of the application - A
RawImageelement; this will display a visualization of the depth stream - 17
RawImageelements; each one corresponds to a human joint
Also, add a NuitrackSample.cs script where you’ll reference all of the above. To use Nuitrack, you first need to import its namespace:
using nuitrack;
To access the depth and skeletal information, you need to create a DepthSensor and a SkeletonTracker object.
The DepthSensor object will give us access to the raw depth stream. The raw depth stream is an array of distance values.
The SkeletonTracker object will let us access a high-level representation of the body data.
private DepthSensor depthSensor;
private SkeletonTracker skeletonTracker;
In your Start() method, initialize Nuitrack, create an instance of the DepthSensor & SkeletonTracker object, and subscribe to their corresponding events:
private void Start()
{
    Nuitrack.Init();

    depthSensor = DepthSensor.Create();
    depthSensor.OnUpdateEvent += DepthSensor_OnUpdateEvent;

    skeletonTracker = SkeletonTracker.Create();
    skeletonTracker.OnSkeletonUpdateEvent += SkeletonTracker_OnSkeletonUpdateEvent;

    Nuitrack.Run();
}
Last but not least, call the Run() method.
In your OnApplicationQuit() method, remember to dispose of the unmanaged resources and unsubscribe from the events:
private void OnApplicationQuit()
{
    if (depthSensor != null)
    {
        depthSensor.OnUpdateEvent -= DepthSensor_OnUpdateEvent;
    }

    if (skeletonTracker != null)
    {
        skeletonTracker.OnSkeletonUpdateEvent -= SkeletonTracker_OnSkeletonUpdateEvent;
    }

    Nuitrack.Release();
}
In your Unity Update() method, simply call Nuitrack.Update():
private void Update()
{
    Nuitrack.Update();
}
Displaying the Depth Stream
To display the depth stream, we need a reference to the RawImage component. We also need a Texture2D object that will be updated whenever we have a new frame available. The raw frame data will be stored into a simple byte array. To check whether the current frame is new, we’ll hold a reference to its timestamp.
[SerializeField]
private RawImage image;
private Texture2D texture;
private byte[] colorData;
private ulong previousTimestamp;
private readonly ushort MaxDepth = 8000;
Bringing everything together, this is how you can create a visualization of the depth frame:
private void DepthSensor_OnUpdateEvent(ColorFrame frame)
{
    if (frame != null)
    {
        if (frame.Timestamp != previousTimestamp)
        {
            previousTimestamp = frame.Timestamp;

            if (texture == null)
            {
                texture = new Texture2D(frame.Cols, frame.Rows, TextureFormat.RGBA32, false);
                colorData = new byte[frame.Cols * frame.Rows * 4];
                image.texture = texture;
            }

            int index = 0;

            for (int i = 0; i < frame.Rows; i++)
            {
                for (int j = 0; j < frame.Cols; j++)
                {
                    ushort depth = frame[i, j];

                    byte color = (byte)(depth * 255 / MaxDepth);

                    colorData[index + 0] = (byte)(255 * color);
                    colorData[index + 1] = (byte)(255 * color);
                    colorData[index + 2] = 0;
                    colorData[index + 3] = 255;

                    index += 4;
                }
            }

            texture.LoadRawTextureData(colorData);
            texture.Apply();
        }
    }
}
You can experiment with the byte array to create a visualization of a different color. I have chosen to create a shade of blue visualization. The MaxDepth value is the maximum depth allowed (aka 8000 millimeters; aka 8 meters; aka 26 feet).

All of the depth values are measured in millimeters. One millimeter is approximately 0.039 inches. Nuitrack is using the metric system.
Tracking the user Body/Skeleton
As of now, our application can show the depth visualization, but it cannot detect any people. Let’s go to the event handler of the SkeletonTracker. The following code snippet shows how you can acquire the 3D and 2D coordinates of the tracked bodies. Keep in mind that Nuitrack can track up to 6 people.
private void SkeletonTracker_OnSkeletonUpdateEvent(SkeletonData skeletonData)
{
    if (skeletonData != null)
    {
        Debug.Log("Tracked users: " + skeletonData.NumUsers);

        Skeleton body = skeletonData.Skeletons.Closest();

        if (body != null)
        {
            var head3D = body.Joints[(int)JointType.Head].Real;
            var head2D = depthSensor.ConvertRealToProjCoords(head3D);

            var neck3D = body.Joints[(int)JointType.Neck].Real;
            var neck2D = depthSensor.ConvertRealToProjCoords(neck3D);

            var torso3D = body.Joints[(int)JointType.Torso].Real;
            var torso2D = depthSensor.ConvertRealToProjCoords(torso3D);

            // etc...
         }
   }
}
The 3D coordinates (X, Y, Z) are measured in millimeters.
The 2D coordinates (X, Y) are measured in pixels within the bounds of the 640×480 depth frame.
To detect the closest body, I created a simple extension method that sorts the detected skeletons based on their descending distance from the sensor:
public static class NuitrackExtensions
{
    public static Skeleton Closest(this Skeleton[] skeletons)
    {
        Skeleton body = null;

        float minDistance = 0f;

        foreach (Skeleton current in skeletons)
        {
            if (body == null)
            {
                body = current;
            }
            else
            {
                float distance = body.Joints[(int)JointType.Waist].Real.Z;

                if (distance < minDistance)
                {
                    minDistance = distance;
                    body = current;
                }
            }
        }

        return body;
    }
}
You can use the information above to update the position of the RawImages that correspond to the human body joints. You can also draw lines between the points. Here is how the result would look like:

During the past few years, I have helped numerous companies embrace motion technology in their business. In case you are planning to migrate your existing Kinect project or just need to create a motion-analysis product from scratch, feel free to start a project with me.
Troubleshooting
Here are a few comments regarding common failures.
The application cannot detect the camera.
Ensure you have installed the camera drivers from the manufacturer’s website. Also, check the nuitrack_c11_sample.exe file to ensure Nuitrack is installed properly.
The application is crashing at runtime while in use.
The Nuitrack trial has a 3-minute limit. This means you can test your body-tracking apps for no longer than 3 minutes. An app using the trial version of Nuitrack will automatically crash after 3 minutes of activity. To distribute your app, you need to purchase the commercial version.
Unity 2017 Error “PlayerSettings.mobileMTRendering”
Unity 2017 may display the following error:
Assets/Platform Changer/Editor/PlatformChanger.cs(77,28):
error CS0117:
`UnityEditor.PlayerSettings' does not contain a definition for `mobileMTRendering'
The mobileMTRendering property is missing. Navigate to the PlatformManager.cs file and change line 77 from:
PlayerSettings.mobileMTRendering = GetPlatform().multithreadedRendering;
to:
PlayerSettings.MTRendering = GetPlatform().multithreadedRendering;
Unity throws ModuleNotInitializedException
The ModuleNotInitialized exception usually means that no depth camera is connected to the computer. In case your camera is connected, it means there was a problem with the installation of Nuitrack or the drivers. Unplug the camera, re-install the drivers, and plug the camera again.
So, did you like the Orbbec Astra camera? Did you enjoy the Nuitrack SDK? Let me know in the comments below!
‘Til the next time… keep coding!