
Realtime Serverless IoT Data using Azure SignalR and Azure Functions in Angular
5.00/5 (2 votes)
How we can show the real-time data from our IoT device in an Angular application using Azure SignalR service and Azure Functions
Introduction
The data coming from the IoT devices are to be shown in real time, if we failed to do that, then there is no point in showing it. Here in this article, we will see how we can show the real-time data from our IoT device in an Angular application using Azure SignalR service and Azure Functions. Sounds interesting? So the flow of data can be defined as IoT device -> Azure IoT Hub -> Azure Function -> Azure SignalR Service -> Angular application. Sounds interesting? Let’s start then.
Background
In our previous article, we have already created an Azure Function which pulls the Data from our IoT Hub whenever there are any new messages/events happening. If you have not read the same, please read it.
Source Code
Please feel free to fork, clone this project from GitHub here: Realtime-IoT-Device-Data-using-Azure-SignalR-and-Azure-Function-in-Angular
Real-Time IoT Data Processing
We will be creating two solutions, one for Angular application and one for Azure Functions. We will also create a new Azure Signal R service in the Azure portal.
Azure SignalR Service
According to Microsoft, Azure SignalR Service is an Azure managed PaaS service to simplify the development, deployment, and management of real-time web application using SignalR, with Azure supported SLA, scaling, performance, and security. The service provides API/SDK/CLI/UI, and the rich set of code samples, templates, and demo applications.
Core features for Azure SignalR Service:
- Native ASP.NET Core SignalR development support
- ASP.NET Core SignalR backend for improved performance and stability
- Redis based backplane scaling
- Web Socket, comet, and .NET Server-Sent-Event support
- REST API support for server broadcast scenarios
- Resource Provider support for ARM Template based CLI
- Dashboard for performance and connection monitoring
- Token-based AUTH model
Let’s log in to our Azure portal and create a new Azure Signal R service. Click on the +Create a resource and search SignalR Service. Once you have created the service, go to the keys section and copy the connection string, we will be using the same in our Azure Function.
Azure Functions
As we discussed in my previous article, we will be creating an Azure Function with an IoTHubTrigger in it. You can refer to this article for the hints on how to create an Azure Function solution in Visual Studio. Please make sure that you had installed the required packages as mentioned in the image below.

Once you have created a new Function in the solution, it is time to add some code.
using Microsoft.Azure.EventHubs;
using Microsoft.Azure.WebJobs;
using Microsoft.Azure.WebJobs.Extensions.SignalRService;
using Microsoft.Extensions.Logging;
using Newtonsoft.Json;
using System;
using System.Text;
using System.Threading.Tasks;
using IoTHubTrigger = Microsoft.Azure.WebJobs.EventHubTriggerAttribute;

namespace AzureFunction
{
    public static class SignalR
    {
        [FunctionName("SignalR")]
        public static async Task Run(
            [IoTHubTrigger("messages/events",
            Connection = "IoTHubTriggerConnection",
            ConsumerGroup = "ml-iot-platform-func")]EventData message,
            [SignalR(HubName =
            "broadcast")]IAsyncCollector<SignalRMessage> signalRMessages,
            ILogger log)
        {
            var deviceData = JsonConvert.DeserializeObject
            <DeviceData>(Encoding.UTF8.GetString(message.Body.Array));
            deviceData.DeviceId = Convert.ToString
            (message.SystemProperties["iothub-connection-device-id"]);


            log.LogInformation($"C# IoT Hub trigger function p
            rocessed a message: {JsonConvert.SerializeObject(deviceData)}");
            await signalRMessages.AddAsync(new SignalRMessage()
            {
                Target = "notify",
                Arguments = new[] { JsonConvert.SerializeObject(deviceData) }
            });
        }
    }
}
As you can see, we are using Microsoft.Azure.WebJobs.EventHubTriggerAttribute for pulling data from our IoT Hub. Here “messages/events” is our Event Hub Name and Connection is the IoT Hub connections string which is defined in the local.settings.json file and the ConsumerGroup is the group I have created for the Azure Function solution.
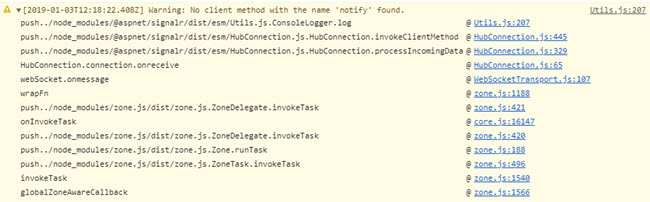
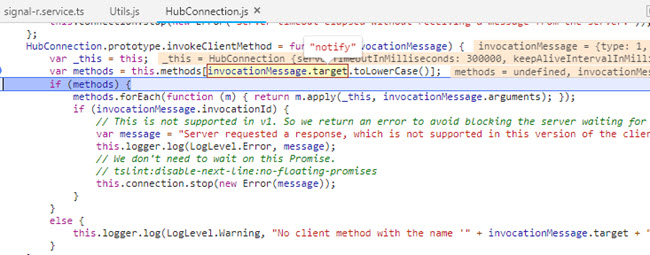
If you have noticed, we are using the HubName as “broadcast” in the SignalR attribute and “notify” as the SignalR message Target property. If you change the Target property, you may get a warning in your browser console as “Warning: No client method with the name ‘notify’ found.”. The @aspnet/signalr package is checking for the Target property ‘notify’ by default.
So, I will keep the Target property as ‘notify’. By default, the message data doesn’t contain the device id value, so we will have to get the same from SystemProperties.
var deviceData = JsonConvert.DeserializeObject(Encoding.UTF8.GetString(message.Body.Array));
deviceData.DeviceId = Convert.ToString(message.SystemProperties["iothub-connection-device-id"]);
Below is my DeviceData class.
using Newtonsoft.Json;
using System;

namespace AzureFunction
{
    public class DeviceData
    {
        [JsonProperty("messageId")]
        public string MessageId { get; set; }

        [JsonProperty("deviceId")]
        public string DeviceId { get; set; }

        [JsonProperty("temperature")]
        public string Temperature { get; set; }

        [JsonProperty("humidity")]
        public string Humidity { get; set; }

        [JsonProperty("pressure")]
        public string pressure { get; set; }

        [JsonProperty("pointInfo")]
        public string PointInfo { get; set; }

        [JsonProperty("ioTHub")]
        public string IoTHub { get; set; }

        [JsonProperty("eventEnqueuedUtcTime")]
        public DateTime EventEnqueuedUtcTime { get; set; }

        [JsonProperty("eventProcessedUtcTime")]
        public DateTime EventProcessedUtcTime { get; set; }

        [JsonProperty("partitionId")]
        public string PartitionId { get; set; }
    }
}
When you work with any client like Angular application, it is important that we need to get the token/connection from the server, so that the client can persist the connection with the server, hence the data can be pushed to the client from SignalR service. So, we will create a new Azure Function which will return the connection information with the Url and AccessToken.
using Microsoft.AspNetCore.Http;
using Microsoft.Azure.WebJobs;
using Microsoft.Azure.WebJobs.Extensions.Http;
using Microsoft.Azure.WebJobs.Extensions.SignalRService;
using Microsoft.Extensions.Logging;

namespace AzureFunction
{
    public static class SignalRConnection
    {
        [FunctionName("SignalRConnection")]
        public static SignalRConnectionInfo Run(
            [HttpTrigger(AuthorizationLevel.Anonymous, "get", Route = null)] HttpRequest req,
            [SignalRConnectionInfo(HubName = "broadcast")] SignalRConnectionInfo info,
            ILogger log) => info;
    }
}
Please make sure that you have set AuthorizationLevel.Anonymous in HttpTrigger attribute and also to use the same HubName we have used for our other Azure Function, which is SignalR.
Now we can customize our local.settings.json file.
{
  "IsEncrypted": false,
  "Values": {
    "AzureWebJobsStorage": "UseDevelopmentStorage=true",
    "FUNCTIONS_WORKER_RUNTIME": "dotnet",
    "AzureSignalRConnectionString": "",
    "MSDEPLOY_RENAME_LOCKED_FILES": 1,
    "IoTHubTriggerConnection": ""
  },
  "Host": {
    "LocalHttpPort": 7071,
    "CORS": "*"
  }
}
Please note that this file is for local configuration and remember to change the connections strings here before you run the application. If you want to enable the CORS in the Azure Function in the Azure Portal, you can do that by following the steps mentioned in the image below.

Angular Client
As we have already created our Azure Functions, now it is time to create our Angular client. Let’s use Angular CLI and create a new project. Now we can add a new package @aspnet/signalr to our application which will help us to talk to our Azure SignalR service.
home.component.ts
Below is my code for home.component.ts file:
import { Component, OnInit, NgZone } from '@angular/core';
import { SignalRService } from 'src/app/services/signal-r.service';
import { StreamData } from 'src/app/models/stream.data';

@Component({
  selector: 'app-home',
  templateUrl: './home.component.html',
  styleUrls: ['./home.component.css']
})
export class HomeComponent implements OnInit {
  streamData: StreamData = new StreamData();

  constructor(private signalRService: SignalRService) {
  }

  ngOnInit() {
    this.signalRService.init();
    this.signalRService.mxChipData.subscribe(data => {
      this.streamData = JSON.parse(data);
      console.log(data);
    });
  }
}
home.component.html
We use Material card to show the Device data, so we can define our home.component.html file as shown below:
<div class="container">
  <div class="row">
    <mat-card class="example-card">
      <mat-card-header>
        <div mat-card-avatar class="example-header-image"></div>
        <mat-card-title>Real Time Values</mat-card-title>
        <mat-card-subtitle>The real time values of humidity, temprature etc...</mat-card-subtitle>
      </mat-card-header>
      <mat-card-content>
        <p>
          <label>DeviceId: </label>
          {{streamData?.deviceId}}
        </p>
        <p>
          <label>Temperature: </label>
          {{streamData?.temperature}}
        </p>
        <p>
          <label>Humidity: </label>
          {{streamData?.humidity}}
        </p>
      </mat-card-content>
    </mat-card>
  </div>
</div>
signal-r.service.ts
Now, we can create a new service which calls our Azure SignalR service.
import { Injectable } from '@angular/core';
import { HttpClient } from '@angular/common/http';
import { Observable, Subject } from 'rxjs';
import { SignalRConnection } from '../models/signal-r-connection.model';
import { environment } from '../../environments/environment';
import * as SignalR from '@aspnet/signalr';

@Injectable({
  providedIn: 'root'
})

export class SignalRService {
  mxChipData: Subject<string> = new Subject();
  private hubConnection: SignalR.HubConnection;

  constructor(private http: HttpClient) {
  }

  private getSignalRConnection(): Observable<SignalRConnection> {
    return this.http.get<SignalRConnection>(`${environment.baseUrl}SignalRConnection`);
  }

  init() {
    this.getSignalRConnection().subscribe(con => {
      const options = {
        accessTokenFactory: () => con.accessToken
      };

      this.hubConnection = new SignalR.HubConnectionBuilder()
        .withUrl(con.url, options)
        .configureLogging(SignalR.LogLevel.Information)
        .build();

      this.hubConnection.start().catch(error => console.error(error));

      this.hubConnection.on('notify', data => {
        this.mxChipData.next(data);
      });
    });
  }
}
As you can see, we are doing the following things in our service:
- Get the SignalR connection information which contains
UrlandAccesstoken, by calling theSignalRConnectionAzure Function. - Create the Hub connection using
SignalR.HubConnectionBuilder. - Start the Hub connection.
- Wire the ‘
notify’ function, remember we have set this in our Azure Function SignalR.
signal-r-connection.model.ts
export class SignalRConnection {
   url: string;
   accessToken: string;
}
stream.data.ts
export class StreamData {
    messageId: string;
    deviceId: string;
    temperature: string;
    humidity: string;
    pressure: string;
    pointInfo: string;
    ioTHub: string;
    eventEnqueuedUtcTime: string;
    eventProcessedUtcTime: string;
    partitionId: string;
}
Output
Now, let’s just run our Angular application, Azure Function, and a simulated device. Please refer to this link for the information related to the Simulated device. Please feel free to connect to your IoT device, if you haven’t configured the simulated device.

References
Conclusion
Wow! Now we have learned:
- How to connect IoT Hub and Azure Function
- What is Triggers in Azure Function
- How to connect Azure Function and Azure SignalR service
- How to post data to Azure SignalR service
- How to connect Azure SignalR service from Angular client
- How to show real time data in Angular application from IoT device
You can always ready my IoT articles here.
Your Turn. What Do You Think?
Thanks a lot for reading. Did I miss anything that you may think is needed in this article? Could you find this post as useful? Kindly do not forget to share your feedback.