
ASP.NET Core 2.1: Integrating VMD.RESTApiResponseWrapper.Core to Your REST API Application
3.32/5 (4 votes)
A quick tutorial on how to integrate VMD.RESTApiResponseWrapper.Core library into your ASP.NET Core 2.1 REST API application
Introduction
A few months ago, I wrote an article on how to create a consistent object response wrapper for your ASP.NET Core and Web API applications. I also made two versions of NuGet packages for the wrapper which can be found below:
I was surprised that both NuGet packages had hundreds of downloads now and I got a few comments and emails from developers asking for a tutorial on how to actually use them in a project. This article aims to answer those frequently asked questions that I received, so here you go.
Getting Started
Before we start, I’d like to thank those folks who are looking into this library and probably tried it out. I really appreciate all your feedback on this library and I hope somehow this helps in your projects.
Without further ado, let’s see in action how we are going to use it in the application. Let’s go ahead and fire up Visual Studio 2017. Create a new Project by navigating through File > New Project. On the left pane of the New project dialog, select Installed > Visual C# > Web > .NET Core > ASP.NET Core Web Application. Name the project to whatever you like but for this demo, let’s just call it “MyWebApp.API” as shown in the figure below:

Click OK and it should take you to the next screen as shown in the figure below:

Select Empty and then click OK to let Visual Studio generate the default project files and dependencies for you. Here’s the default generated files:
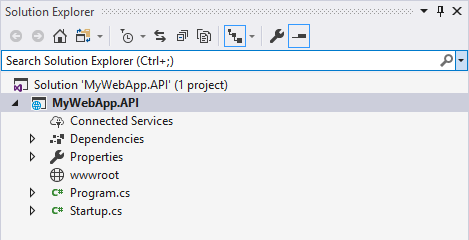
Let’s take a quick overview about each file generated.
If you already know the core significant changes of ASP.NET Core, then you may skip this part, but if you are new to ASP.NET Core, then I would like to highlight some of those changes. If you have worked with previous versions of ASP.NET before, then you will notice that the new project structure is totally different. The project now includes these files:
- Dependencies: Contains Analyzers, NuGet and SDK dependencies needed for the application
- Properties: Contains the launchSettings.json file which manages application configuration settings associated with each debug profile such as IIS, IIS Express and the application itself. This is where you define profile-specific configuration (Compilation and Debug profiles) for frameworks used in the application.
- wwwroot: A folder in which all your static files will be placed. These are the assets that the web app will serve directly to the clients, including HTML, CSS, Image and JavaScript files.
- Startup.cs: This is where you put your startup and configuration code.
- Program.cs: This is where you initialize all services needed for your application.
The Model
Let’s create a few simple Models that we are going to use for this demo with the following properties:
namespace MyWebApp.API.Model
{
    public class Band
    {
        public int Id { get; set; }
        public string Name { get; set; }
        public string Genre { get; set; }
    }

    public class CreateBandDTO
    {
        public string Name { get; set; }
        public string Genre { get; set; }
    }

    public class UpdateBandDTO
    {
        public string Name { get; set; }
        public string Genre { get; set; }
    }
}
Models are nothing but just plain classes that house a few properties for holding information.
The Mock Data
I’ll try to make this demo as simple as possible, so I will not be using any database here because it’s not really the intent of this article. If you want to learn how to work with real data from database, then check out my other articles:
- Getting Started with Entity Framework Core: Database-First Development
- Getting Started with Entity Framework Core: Building an ASP.NET Core Application with Web API and Code First Development
Now, let's get back to work. Assuming that we have the following class that defines the mocked data:
public class SampleData
{
        public static List<Band> GetBands()
        {
            return new List<Band>()
            {
                new Band { Id = 1, Name="Alice in Chains", Genre= "Heavy Metal"},
                new Band { Id = 2, Name="Soundgarden", Genre= "Grunge"},
                new Band { Id = 3, Name="Pearl Jam", Genre= "Grunge"},
                new Band { Id = 4, Name="Audioslave", Genre= "Alternative Metal"},
                new Band { Id = 5, Name="Stone Temple Pilots", Genre= "Hard Rock"},
                new Band { Id = 6, Name="Nirvana", Genre= "Grunge"},
                new Band { Id = 7, Name="Third Eye Blind", Genre= "Alternative Rock"},
                new Band { Id = 8, Name="Led Zeppelin", Genre= "Blues Rock"},
                new Band { Id = 9, Name="The Beatles", Genre= "Rock and Roll"},
                new Band { Id = 10, Name="The Rolling Stones", Genre= "Blues Rock"}
            };
        }
}
The class above is nothing but just a plain class with a public static method called GetBands(). The method defines a List of type Band and added some default records to the collection.
Create an API Controller
Let’s create a new ASP.NET Core API Controller and define some endpoints that we can use for testing. Here’s how my Controller class looks like:
using Microsoft.AspNetCore.Mvc;
using MyWebApp.API.Model;
using System.Collections.Generic;
using System.Linq;

namespace MyWebApp.API.v1
{
    [Route("api/v1/[controller]")]
    [ApiController]
    public class BandsController : ControllerBase
    {
        // GET: api/v1/bands
        [HttpGet]
        public IEnumerable<Band> Get()
        {
            return SampleData.GetBands();
        }

        // GET api/v1/bands/7
        [HttpGet("{id}")]
        public Band Get(int id)
        {
            var data = SampleData.GetBands().Where(o => o.Id.Equals(id));
            if (data.Any())
                return data.First();

            return null;
        }

        // POST api/v1/bands
        [HttpPost]
        public IActionResult Post([FromBody]CreateBandDTO band)
        {
             //Call a method to add a new record to the entity
            return Ok();
        }

        // PUT api/v1/bands/7
        [HttpPut("{id}")]
        public IActionResult Put(int id, [FromBody]UpdateBandDTO band)
        {
            //Call a method to update the entity
            return Ok();
        }

        // DELETE api/bands/7
        [HttpDelete("{id}")]
        public IActionResult Delete(int id)
        {
            //Call a method to delete an entity
            return Ok();
        }
    }
}
The Controller class above contains the four basic HTTP methods such as GET, POST, PUT and DELETE. This is how a typical RESTful API looks like. Notice that you can’t find any code implementation for POST, PUT and DELETE. That’s because we’re not dealing with database or in-memory data store here. I just included them there, so you can visualize how the endpoint looks like.
Test Output
Let’s build and run the application. Here are sample screenshots of a couple of tests I made from POSTMAN:
GET: /api/v1/bands

GET: api/v1/bands/{id}

At this point, the API works but the problem is it doesn’t give the developers a meaningful response. We know that the data is a very important part of the response. However, spitting out just the data as the JSON response isn’t really helpful especially when there’s an unexpected behavior that happens between each request.
As a quick recap, if you are taking a RESTful approach to your API, then you will be utilising HTTP verbs such as GET, POST, PUT and DELETE. Each of these actions may return different types depending on how your method/action is designed. Your POST, PUT and DELETE end-points may return a data or not at all. Your GET end-point may return a string, a List<T>, an IEnumerable, a custom class or an object. On the other hand, if your API throws an error, it will return an object or worst an HTML string stating the cause of the error. The differences among all of these responses make it difficult to consume the API, because the consumer needs to know the type and structure of the data that is being returned in each case. Both the client code and the service code become difficult to manage.
That’s why I came up with a library that provides consistency of response format for both successful and error results.
Integrating the VMD.RESTApiResponseWrapper.Core Library in 3 Easy Steps!
With just a few steps, you can turn your API Controller to return something meaningful response without doing much development effort on your part. All you have to do is:
Step 1
Download and Install the library from NuGet.

You can install the package via NPM as shown in the figure above or using the following command in NPM Console:
PM> Install-Package VMD.RESTApiResponseWrapper.Core -Version 1.0.4
Quote:Note: The latest version as of this time of writing is
v1.0.4which is targeted for ASP.NET Core 2.1 version.
Step 2
Declare the namespace below within Startup.cs:
using VMD.RESTApiResponseWrapper.Core.Extensions;
Step 3
Register the UseAPIResponseWrapperMiddleware within the Configure() method of Startup.cs as shown below:
public void Configure(IApplicationBuilder app, IHostingEnvironment env) {
    if (env.IsDevelopment())
    {
        app.UseDeveloperExceptionPage();
    }

    app.UseAPIResponseWrapperMiddleware();
    app.UseMvc();
}
Quote:Note: Make sure to register it "before" the MVC middleware.
That's simple! Now try to build and run the application again. Based on our example, here’s how the response is going to look like:

You notice that the response object now contains a few properties such as Version, StatusCode, Message and that the actual data is being stored in the Result property.
Here’s another sample output when we try to point to a URL which doesn’t exist:

Any unexpected error that could possibly happen will be handled automatically without doing anything on your side. You notice that the response output is dynamic. By dynamic, I mean instead of including the Result property, we omitted that and use the ResponseException property instead for errors and exceptions information.
Enable Custom Response
Let’s move on by modifying our existing API endpoints to return a message for other HTTP verbs.
GET
// GET api/bands/7
[HttpGet("{id}")]
public APIResponse Get(int id) {
    var data = SampleData.GetBands().Where(o => o.Id.Equals(id));
    if (data.Any())
        return new APIResponse(200, "Data found", data.First());

    return null;
}
Result

POST
// POST api/bands
[HttpPost]
public APIResponse Post([FromBody]CreateBandDTO band) {
    long bandID = 10; //10 is just an example here

    //Call a method to add a new record to the entity
    //bandID = YourRepo.Add(band);

    return new APIResponse(201, $"New record with ID {bandID} successfully added.");
}
Result

PUT
// PUT api/bands/6
[HttpPut("{id}")]
public APIResponse Put(long id, [FromBody]UpdateBandDTO band) {
    //Call a method to update the entity
    //YourRepo.Update(band);

    return new APIResponse(200, $"The record with ID {id} has been successfully updated.", id);
}
Result

DELETE
// DELETE api/bands/7
[HttpDelete("{id}")]
public APIResponse Delete(int id) {
    //Call a method to delete an entity
    //YourRepo.Delete(id);

    return new APIResponse(200, $"The record with ID {id} has been successfully deleted.", id);
}
Result

Notice that the response objects are consistent for every HTTP action requests. This definitely gives better and meaningful information to your API consumers.
Implement Model Validations
Model validations allows you to enforce pre-defined validation rules at a class/property level. You'd normally use this validation technique to keep a clear separation of concerns, so your validation code becomes much simpler to write, maintain, and test.
As you have already known, ASP.NET Core 2.1 introduced the APIController attribute which performs automatic model state validation for 400 Bad Request error. When the Controller is decorated with APIController attribute, the framework will automatically register a ModelStateInvalidFilter which runs on the OnActionExecuting event. This checks for the Model State validity and returns the response accordingly. This is a great feature, but since we want to return a custom response object instead of the 400 Bad Request error, we will disable this feature in our case.
To disable the automatic model state validation, just add the following code at ConfigureServices() method in Startup.cs file:
public void ConfigureServices(IServiceCollection services) {
    services.Configure<ApiBehaviorOptions>(options =>
    {
        options.SuppressModelStateInvalidFilter = true;
    });

    services.AddMvc();
}
Using Data Annotation Validation
Data annotations are attribute classes that live under System.ComponentModel.DataAnnotations namespace that you can use to decorate classes or properties to enforce pre-defined validation rules. To enable Data Annotation model validation, we need to register the following namespace below:
using System.ComponentModel.DataAnnotations;
Let’s modify our CreateBandDTO class to implement a basic model validation using Data Annotation. Here’s the modified code below:
public class CreateBandDTO
{
    [Required]
    [MaxLength(20)]
    public string Name { get; set; }
    [Required]
    public string Genre { get; set; }
}
Now when we run the app again and issue a POST request, it should result in something like in the figure below when a Name property is left out empty:

Notice that the wrapper captures the validation errors and puts it inside the ValidationErrors property for easy tracing. For more information about Model Validation, see Model validation in ASP.NET Core MVC.
Using Fluent Validation
If for some reason, you don’t want to use the System.ComponentModel.DataAnnotations for validating your Models and wanted to use FluentValidation, you can also do that. Let’s take a look at a quick example how you can integrate FluentValidation.
First, download and install the NuGet package as shown in the figure below:

You can also use the NPM console to install it by running the following command:
Install-Package FluentValidation.AspNetCore
After the installation, we can now start using the FluentValidation API. You should declare the following namespace below to where you declare your Models:
using FluentValidation;
Let’s revert the CreateBandDTO class to its original state and add a new class called CreateBandValidator. Here’s the modified code below:
public class CreateBandDTO
{
    public string Name { get; set; }
    public string Genre { get; set; }
}

public class CreateBandValidator : AbstractValidator<CreateBandDTO>
{
    public CreateBandValidator() {
        RuleFor(o => o.Name).NotEmpty().MaximumLength(20);
        RuleFor(o => o.Genre).NotEmpty();
    }
}
You notice that we are not using the Required and MaxLength attributes any more for enforcing pre-defined validations rules to the Model. Instead, we keep them plain and simple. What I like about FluentValidation is we can separate the logic for the validation by creating a Validator class for each Model for which we want to implement some constraints and other validation rules.
The final piece to make this work is to configure FluentValidation in Startup.cs file as shown in the code below:
public void ConfigureServices(IServiceCollection services) {
    services.Configure<ApiBehaviorOptions>(options =>
    {
        options.SuppressModelStateInvalidFilter = true;
    });

    services.AddMvc().AddFluentValidation();
    services.AddTransient<IValidator<CreateBandDTO>, CreateBandValidator>();
}
For more information, see this link.
Here’s a sample screenshot of the response when a Model validation fails:

Having an informative, consistent and meaningful response like this should help developers easily consume your API and troubleshoot issues.
Handle Custom Errors and Exceptions
You can use the ApiException object to return error and exception message. For example, the following code handles and simulates an unexpected error that could happen to your code using try-catch block:
[HttpGet]
public IEnumerable<Band> Get() {
    try
    {
        //This is just an example to trigger an error
        int number = Convert.ToInt32("100abc");
    }
    catch (NullReferenceException ex)
    {
        throw new ApiException(ex);
    }
    catch (FormatException ex)
    {
        throw new ApiException(ex);
    }
    catch (ArithmeticException ex)
    {
        throw new ApiException(ex);
    }
    catch (Exception ex)
    {
        throw new ApiException(ex);
    }

    return SampleData.GetBands();
}
The code above tries to convert a string that contains non-numeric values into an integer type which will cause an error at runtime. The response output is going to look like this:

You can also use the ApiException to throw your own message when your custom code validation fails. For example, if your code validates a user credentials and it fails, you could do something like this:
throw new ApiException($"The userid {id} does not exist.", 400);
Enable Swagger
Swagger provides an advance documentation for your APIs where it allows developers to reference the details of your API endpoints and test them when necessary. This is very helpful especially when your API is public and you expect many developers to use it.
To enable Swagger to your API application, go ahead and download and install Swashbuckle package via NPM as shown in the figure below:

Add the following code at the ConfigureServices() method of Startup.cs file:
// Register the Swagger generator, defining 1 or more Swagger documents
services.AddSwaggerGen(c =>
{
     c.SwaggerDoc("v1", new Info
     { Title = "My REST API with VMD.RESTApiResponseWrapper.Core", Version = "v1" });
});
Next, we need to enable the middleware for serving the generated JSON document and the Swagger UI. To do that, add the following code at the Configure() method of Startup.cs file:
// Enable middleware to serve generated Swagger as a JSON endpoint.
app.UseSwagger();

// Enable middleware to serve swagger-ui (HTML, JS, CSS, etc.),
// specifying the Swagger JSON endpoint.
app.UseSwaggerUI(c =>
{
     c.SwaggerEndpoint("/swagger/v1/swagger.json", "My API V1");
});
Now run your app and append “/swagger” to the URL and it should display the Swagger UI as shown in the figure below:

And here’s a sample POST request/response issued from Swagger UI:

Sweet!
For more information, see this link.
Summary
In this article, we’ve learned how to incorporate the VMD.RESTApiResponseWrapper.Core package library to your ASP.NET Core 2.1 application.
Feel free to try it out. Comments and suggestions are welcome, so feel free to drop a message and I’d be happy to answer any queries as I can.