
Azure and Alexa, Creating Conversation with Ease
A quick walkthrough on creating an Alexa Skill backed by Azure Functions
It might surprise you to know that I own an Alexa device, being the Microsoft die-hard that I am.
As you know, I wrote a blog post a while back about creating a Microsoft Flow integration that starts up a Minecraft server in Azure for my kids. After a few months of using this setup, I became annoyed by how many times the kids had to send me a message, call me, etc. just to ask me to start the server for them. After being involved in our Bot Framework space for a while and now focusing on our Serverless platform, the thought occurred to me – why not just make this a bot they can ask to start the server??
By making my MS Flow accessible via an HTTP request, this becomes quite easy. Simply architect your conversation, ship it to a place it can be hit from Bot Framework (Azure App Service, etc.), and you’re done!
But what if we wanted to take it a step further, what if we wanted to quickly & easily ship an Alexa Skill that turns on a server in Azure? Turns out with Azure Functions and a great Alexa .NET package from my colleague Tim Heuer, this is incredibly quick and easy!
Create Your Azure Function
Fire up Visual Studio 2017, and create a new Azure Function.

For Alexa integration, your Azure Function needs to be an HTTP Endpoint (a v2 Function works great since it’s based on .NET Standard):

After your project is set up, you need to add only one additional nuget package to it:
Install-Package Alexa.NET
Implement Alexa’s Handshake Protocol
Now we’re ready to integrate with Alexa. If you’ve ever heard of or done Alexa Skill development, you know there’s a pretty rigorous authentication path that an Alexa Skill takes to validate that your endpoint is good to communicate with the Alexa Skill backend and is the endpoint that’s supposed to be handling the requests. Fortunately, Alexa.NET makes this easy as pie to handle!
Modify the signature of your function method to accept Function-authorized POST requests (it’s easy to embed the query string parameter in to your Alexa Skill’s configuration):
public static async Task<IActionResult>
RunAsync([HttpTrigger(AuthorizationLevel.Function, "post", Route = null)]HttpRequest req,
TraceWriter log)
Next, clear out the content of your Function’s handler, and replace it with this:
if (!(await IsValid(req)))
{
    return new BadRequestResult();
}

return new OkResult();
and add an IsValid method in to your Function class that looks like this:
private static async Task<bool> IsValid(HttpRequest request, TraceWriter log)
{
    // Verify SignatureCertChainUrl is present
    request.Headers.TryGetValue("SignatureCertChainUrl", out var signatureChainUrl);
    if (String.IsNullOrWhiteSpace(signatureChainUrl))
    {
        log.Error(@"Alexa - empty Signature Cert Chain Url header");
        return false;
    }

    Uri certUrl;
    try
    {
        certUrl = new Uri(signatureChainUrl);
    }
    catch
    {
        log.Error($@"Alexa - Unable to put sig chain url in to Uri: {signatureChainUrl}");
        return false;
    }

    // Verify SignatureCertChainUrl is Signature
    request.Headers.TryGetValue("Signature", out var signature);
    if (String.IsNullOrWhiteSpace(signature))
    {
        log.Error(@"Alexa - empty Signature header");
        return false;
    }

    // rewind body so we get the full payload
    request.Body.Position = 0;
    var body = await request.ReadAsStringAsync();

    // rewind so caller gets body back at the beginning
    request.Body.Position = 0;

    if (String.IsNullOrWhiteSpace(body))
    {
        log.Error(@"Alexa - empty Body");
        return false;
    }

    var valid = await RequestVerification.Verify(signature, certUrl, body);

    if (!valid)
    {
        log.Error(@"Alexa - RequestVerification.Verify failed");
    }
    return valid;
}
With this done, your Skill will now properly respond to requests from Alexa and validate them when appropriate (e.g.: whether in testing, beta, or production).
Write the Conversation
Now let’s get to the meat of implementing your conversation.
There was one interesting thing I learned while I was developing my first Alexa Skill which I didn’t anticipate: a skill can never take more than 8 seconds to end its turn, period. While you can add “progress” responses to what Alexa sends back, these don’t extend the amount of time you get to “complete” the ask from the user.
For me, this meant I needed to rethink how I was executing my task. Initially, I wanted Alexa to tell my kids when the server was finally up and running, or when the shutdown was complete. The Azure Automation task in a Logic App has the “Wait for Finish” option but of course, this task almost never completes in under 8 seconds.
This meant I had to change how I executed my Start/Stop asks to instead use the Azure Management REST API; a much quicker approach. But I digress.
Let’s see how we write conversation in an Alexa Skill using Alexa.NET.
The first thing to do is parse the payload that came in to your skill once you’ve determined it’s all good. To do this, simply take the JSON that was posted and turn it in to an SkillRequest object from Alexa.NET like so:
var requestPayload = await req.ReadAsStringAsync();
var alexaRequest = JsonConvert.DeserializeObject<SkillRequest>(requestPayload);
Much like a Cortana Skill, Alexa kicks off your skill with an “Intent” to which your code reacts. Alexa.NET nicely maps these to strong types so you get to do the following:
SkillResponse response = null;
try
{
    if (alexaRequest.Request is LaunchRequest launch)
    {
        response = ResponseBuilder.Ask($@"Welcome to the Minecraft bot. Whatchya wanna do.",
            new Reprompt { OutputSpeech = new PlainTextOutputSpeech
             { Text = @"Sorry, I don't understand. You can say start the server,
               stop the server, or is it on" } });
    }
    else if (alexaRequest.Request is IntentRequest intent)
Here you see me handling if my kids say “Alexa, Start Minecraft Bot”. This will come through from the backend as a LaunchRequest intent which I can handle.
This also introduces us to the one-turn nature of Alexa. Every request to your skill must be met with, in Alexa.NET, a single SkillResponse result which must be returned at the end of the handler. For me, the code became easiest if I set a single response variable, and at the bottom of my Function’s code, simply return response; (you’ll see this in a bit with the finished product).
Also much like Cortana, Alexa maps what your users say, outside “launch”, “open”, “start” and the like, to intents you define in the Developer Portal (more on this later). For me, the flows I anticipated handling were to start the server, stop it, or check to see if it’s on. So this code goes on to look like so:
if (intent.Intent.Name.Equals(@"is_it_on"))
{
...
}
else if (intent.Intent.Name.Equals(@"start_server"))
{
...
}
else if (intent.Intent.Name.Equals(@"stop_server"))
{
...
}
else
{
...
}
In each handler for the intent, then, we simply implement the work to do and the response to send back. Here’s what it looks like for is_it_on:
var prog = new ProgressiveResponse(alexaRequest);
if (prog.CanSend())
{
    await prog.SendSpeech(@"One second, checking.");
}

if (IsVmStarted(_config))
{
    response = ResponseBuilder.Tell(@"Yup, it's up and running!");
}
else
{
    response = ResponseBuilder.Ask(@"Nope it's off. Would you like to start it?",
        new Reprompt { OutputSpeech = new PlainTextOutputSpeech
                     { Text = @"Sorry, I don't understand. Just say yes or no" } });
}
Here, we are also introduced to the concept of a “Progressive Response”. Now, remember, even though you’ve sent a response back as your Skill is running, you still only get 8 seconds to set & return the response object we’re populating. You can see the Progressive Response is sent to the user right away by the fact you have to await the SendSpeech method.
This also introduces the concept of an ‘Ask’ from Alexa. For my skill, if the server isn’t on, I let the kids know and give them the option of starting it right away with this prompt. We’ll go in to more of how this gets defined in the Skill portal soon.
There are two other intents for which I also implemented handling: start_server where I tell the kids “ok I’ve sent the request!” and stop_server where I simply issue the REST request and let them know it’s shutting down.
Handling the Answer to a Question, aka an “Ask”, from Alexa
I mentioned previously that when the kids ask for the status of the server, I go ahead and let them know that it’s on/off and, if it’s off, I ask if they want me to turn it on. If they answer ‘yes’ here, obviously I want to run that routine & let them know it’s turning on. But how do I know that their response (“yes”, “no”) was in reply to Alexa’s ask, and not something else?
Enter the ‘prompt’ value in each request coming in from Alexa.
In the portal, you can configure prompts for any intent (i.e., a prompt that comes back from Alexa after it’s handled a particular intent). To do this, you have a fill out a couple of areas in the Alexa Skills Kit console:
- Define a slot type for expected responses from your user to your prompt.

Here, you can see that I’ve created a new slot type called
PROMPTOPTIONS. I’ll use this later. Here’s what it looks like:
Take special note of the
valueandsynonymsareas. Thevalueis what you’ll be checking for in code, thesynonymsare used to train the underlying Natural Language (NL) model for each of the values so, in theory, my kids should be able to say “yah” and it should get mapped toyeseven though I haven’t explicitly defined that as a synonym.Once you’ve defined your slot type, it’s time to tell the
is_it_onintent to use it now. - Direct an existing intent to use the new slot type:
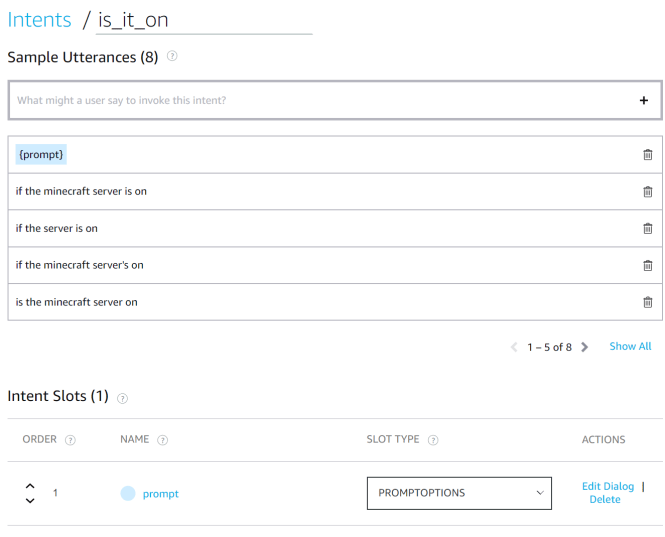
In my
is_it_onintent, I now add an Intent Slot, call itpromptand map it to the newPROMPTOPTIONSslot type. Additionally, I add an utterance for my intent that says the user can say one of the slot values (e.g.: “yes”, “no”) and it should trigger this intent. This seems a little problematic in my mind; I feel like my kids could say “start minecraft bot” to Alexa, and when she answers back “Whatchya wanna do?” they could just say “yes” and end up triggering theis_it_onintent which wouldn’t be desirable; I haven’t tried this flow yet, though.
After making these two changes, click ‘Save Model’ and ‘Build Model’ to make the new language model active for your skill.
Now let’s head back to the code:
response = ResponseBuilder.Ask(@"Nope it's off. Would you like to start it?",
    new Reprompt { OutputSpeech = new PlainTextOutputSpeech
    { Text = @"Sorry, I don't understand. Just say yes or no" } });
Here, we tell Alexa to ask the user a question. The user’s next response will come back in under the same Intent as it was asked during (e.g.: is_it_on) but with slots filled in accordingly. So the handling code for my is_it_on intent now looks like this:
if (intent.Intent.Name.Equals(@"is_it_on"))
{
    string promptResponse = intent.Intent.Slots[@"prompt"]?.Value;
    if (!string.IsNullOrEmpty(promptResponse))
    {
        if (promptResponse.Equals("yes", StringComparison.OrdinalIgnoreCase))
        {
            response = StartServer(alexaRequest);
        }
        else
        {
            response = ResponseBuilder.Empty();
        }
    }
    else
    {
        _logger.TrackEvent(@"AlexaIsItOn");
        var prog = new ProgressiveResponse(alexaRequest);
        if (prog.CanSend())
        {
            await prog.SendSpeech(@"One second, checking.");
...
Where you can now see I’m checking that slot we created, prompt, to see if it’s been populated with anything and, if it has and it’s the yes value, go ahead and turn on the server. Otherwise, just stop responding (ResponseBuilder.Empty()).
Sparing the full detail of the bot (calling in to Azure Management API to do the work, etc.), hopefully you can now see how quick & easy it is to write an Alexa Skill using Azure Functions and Alexa.Net! Curious how much this may end up costing you? I think you might be quite surprised.