
Developing Visual Retail Solutions Using Intel® Hardware and Software
The Retail Workshop: Hands on Learning with Intel®-based Retail Solutions
Hands on Labs
Learn about the Intel®-based software and hardware tools/SDKs used to build advanced, high performance video playback, advanced remote management and video analytics.
Section Overview and Objectives
In this section we will explore the list of hardware and software needed to complete the labs in this course.
By the end of this module, you should be able to:
- Get an understanding of required hardware and software
- Install Ubuntu* 16.04
- Install Intel® Media Server Studio
- Install OpenCV with Python* support
Hardware Requirements
- Intel® NUC kit with 5th Generation Intel® Core™ processors
- Make sure your device supports Intel® vPro™ technology. This course material is tested on Intel® NUC kit NUC5i5MYHE
Software and OS Requirements
- Ubuntu 16.04
- Intel® Media Server Studio
- OpenCV with Python Support
Using an open network is recommended while running the Intel® Media Server Studio and OpenCV installations, because corporate proxy rules and firewall settings can block downloading necessary files.
- Install Ubuntu 16.04 from http://old-releases.ubuntu.com/releases/16.04.1/ubuntu-16.04-desktop-amd64.iso
- Update the Ubuntu packages. WARNING: Do not choose the Upgrade option.:
$sudo apt-get update
Note: If you encounter a core dump during the update process, run following command and then run apt-get update:
$sudo apt-get purge libappstream3
-
Download Intel® Media Server Studio for Linux from https://software.intel.com/en-us/intel-media-server-studio
- Follow the latest installation procedure documented at Getting Started Guide - Linux* Installation. You should use "Generic" installation steps in the installation documentation to install on Ubuntu.
- Reboot the system.
- Install OpenCV with Python from https://opencv.org/releases.html
- Reboot the system.
-
System Analyzer: System analyzer tool is a python script available for download from: https://software.intel.com/en-us/articles/mss-sys-analyzer-linux.
-
Copy the sys_analyzer_linux.py python script to /home/intel/workshop folder by creating suitable directory structure.
-
Download samples from https://github.com/Intel-Media-SDK/samples
Extract the samples to /home/intel/Documents/workshop/msdk_samples/
Intel® Media Server Studio installation:
- Execute
$vainfoand make sure there are no errors - Execute
$cd /opt/intel/mediasdk/samples/_bin/x64 $./sample_decode h264 -i ../content/test_stream.264 -hw -vaapi -r - Look in the terminal. You should see hardware IMPL as "hw(hardware)" and vaapi as Memory for decoding frames.
OpenCv installation:
- Run pythonfrom terminal.
$python
- Type:
import cv2There should be no errors. - Type:
print cv2.__version__. It should display the cv2 version
<!-- Lab Conclusion -->
Read about the next lab
Congratulations! You have successfully setup your development machine for labs.
Overview
These labs demonstrate the enhancement of Video Performance using Intel® tools and technologies.
Why Enhance Video Performance?
The video processing pipeline is filled with compute intensive tasks such as decoding, pre-processing, post-processing, encoding, and more. To improve overall video processing performance, the individual subsystems have to leverage the complete computing capabilities of underlying hardware and related software. To aid in this end, Intel has developed hardware and software optimizations. As an example, we will use the Intel® Media Server Studio in a visual retail use case.
The Intel® Media Server Studio is a set of libraries, tools, header and sample code files that define cross-platform APIs for developing consumer and professional grade media applications on Intel® platforms. It provides access to Intel® Quick Sync Video, hardware accelerated codecs using Intel® Processor Graphics. These allow application developers to speed up video playback, encoding, processing and media conversion. Intel® Media Server Studio for Windows helps to deliver desktop applications, such as video players, editors and video conferencing clients. Its counterpart, Intel® Media Server Studio for Embedded Linux, enables the development of digital security and surveillance systems, and allows connected car manufacturers to deliver smart cameras, infotainment and cluster display solutions.
Hardware acceleration in Linux is supported by the Video Acceleration API (VA API). Both VA API and it’s free and open-source library (libVA) are royalty-free and distributed under the MIT License. The VA API allows end-user software, such as VLC media player or GStreamer, access to available video acceleration hardware, such as PureVideo (through the libva-vdpau driver, which implements VA API in terms of VDPAU) or Unified Video Decoder. The API enables and provides access to hardware-accelerated video processing, using hardware such as graphics processing units (GPU) to accelerate video encoding and decoding by offloading processing from the central processing unit (CPU). The VA API specification was originally designed by Intel for its GMA (Graphics Media Accelerator) series of GPU hardware with the specific purpose of eventually replacing the XvMC standard as the default Unix* multi-platform equivalent to Microsoft Windows* DirectX Video Acceleration (DxVA) API, but today the API is no longer limited to Intel® hardware or GPUs. Other hardware and manufacturers can freely use this open standard API for hardware accelerated video processing with their own hardware without paying a royalty fee.
This section explores Intel® Media Server Studio related packages installed on your computer. It also covers the related customized applications, such as the sample decoder bundled with installation.
By leveraging the power of Intel® Media Server Studio, you will learn to offload video related payload to the GPU, freeing up about 60-70% of CPU utilization. These CPU cycles now can be leveraged for running other applications, or video analytics. In fact, we will cover video analytics in another section.
Exploration
- This section starts with exploring and understanding the Intel® Media Server Studio related packages installed on your computer. It also covers the related customized applications, such as the sample decoder bundled with installation.
- Understand the performance differences between hardware and software based encoding/decoding.
Observation
- Observe the performance difference between various Intel® Media SDK operations using a system performance monitoring tool.
- Observe the utilization of GPU and CPU in software and hardware acceleration modes.
Learning Outcome
By the end of this module, you should have a basic understanding of the Intel® Media Server Studio, the installation structure, and the performance enhancement of selected applications.
Packages Installed on Your Machine
- Intel® Media Server Studio:
Default installs located at: /opt/intel/mediasdk/
- Intel®Media Server Studio Sample applications:
Pre built samples are available at /opt/intel/mediasdk/samples/ for 64-bit architecture
- Intel® Media Server Studio documentation: /opt/intel/mediasdk/doc/
Commands:
$ls /opt/intel/mediasdk/
$ls /opt/intel/mediasdk/samples/
$ls /opt/intel/mediasdk/doc/
System Analyzer
System Analyzer tool reports back following information about CPU, GPU and Intel ® Media Server studio components.

- Platform readiness: check if processor has necessary GPU components
- OS readiness: check if OS can see GPU, and if it has required glibc/gcc level
- Check for successful installation of Intel® Media Server Studio/Intel® SDK for OpenCL™ applications components
- Run smoke test programs and validate Intel® Media Server Studio and OpenCL™
Run
$cd /home/intel/workshop
$python sys_analyzer_linux.py
Perfromance Monitoring
We need a few performance monitoring tools before we proceed with Intel® Media Server Studio sample programs.

Open the Performance monitoring tool as shown in the picture
This tool is used to compare the CPU performance of software and hardware decode processing in the Intel® Media Server Studio.
Note: If you are running any other programs alongside the decode program below, their process will be added to the CPU, GPU & memory utilization results.
Hence, this might give your incorrect results. Close all other programs before running this test. Then, observe the sample_decode process performance from the system monitor tool.
Decode a raw video
Intel® Media Server Studio ships with a few basic samples demonstrating various functinalities. Here we are using a console application which performs decoding of elementary compressed video stream to raw frames.
Make sure to review the performance parameters while running these samples. This can illustrate the difference between software and hardware acceleration modes.
Open new terminal and change the directory:
$cd /opt/intel/mediasdk/samples/
Case 1: Execute the below command for software implementation:
In this example -sw stands for Software base Acceleration, -r is for rendering the output.
$./sample_decode h264 -i ../content/test_stream.264 -sw -r
Note: These are very small video clips, they may close down before you notice. Try to download bigger H264 files and try this application.

Case 2: Execute the below command for hardware acceleration:
In this example, we are instructing the application to use the vaapi memory type. If you don't specify, then application will use system memory as default. -hw stands for hardware Acceleration.
$./sample_decode h264 -i ../content/test_stream.264 -vaapi -hw -r
If you wish to see all the available options for decode, then type ./sample_decode

Encode raw video frames
sample_encode is another console application which encodes raw video frames into elementary compressed streams.
Case 1: Execute the below command for software implementation:
We are passing an input raw video stream and converting it to h264 formatted elementary stream.
We specify width, height and framerate for this conversion. You can review all the available switches by typing ./sample_encode at the terminal.
$./sample_encode h264 -nv12 -i /home/intel/Videos/test_stream.yuv -o /home/intel/Videos/sw_out.h264 -w 176 -h 96 -f 60 -sw
Observe the CPU utilization from System Monitor.
Case 2: Execute the below command for hardware acceleration:
$./sample_encode h264 -nv12 -i /home/intel/Videos/test_stream.yuv -o /home/intel/Videos/hw_out.h264 -w 176 -h 96 -f 60 -hw
To view the converted h264 file, run the decoding sample as follows:
$./sample_decode h264 -i /home/intel/Videos/hw_out.h264 -vaapi -hw -r
Lessons learnt
- Explored Intel® Media Server Studio sample applications.
- Performance monitoringing of video decoding and encoding processes.
Objectives
Introduction
In this lab, we will build a custom console application, which decodes elementary compressed video streams and renders them on the screen:

Video Decoding Process
- Setup parameters to decode pipeline.
- Initialize decoder.
- Decode frame by frame.
- Once the end of stream is reached, release all memory allocations.
Observation
Pass different parameters associated with "sInputParams" parameter and observe the differences.
Learning Outcome
By the end of this module, you should have a basic understanding of how to build a video decoding solution using Intel® Media Server Studio.
Building new sample
We will modify an existing Intel® Media Server Studio decode example just to avoid cmake steps.
Navigate to the workshop/msdk_samples/samples directory
$cd /home/[user]/Documents/workshop/msdk_samples/samples
Copy and paste the sample_decode folder by renaming it to custom_decode.
$sudo cp -R sample_decode custom_decode
Delete the sample_decode.cpp and CMakeLists.txt files in this custom_decode project.
$cd custom_decode
$cd src
$sudo rm -rf sample_decode.cpp CMakeLists.txt
Create new custom_decode.cpp file to enter your custom decoding program.
$sudo gedit custom_decode.cpp. You can also use any of your favorite text editor here.
Save this custom_decode.cpp using Ctrl+S.
Header file Includes
Open custom_decode.cpp file to complete the steps with the code given in the following steps:
Include the pipeline_decode.h and sstream headers. pipeline_decode has CDecodingPipeline class which does all the critical tasks associated with decode process.
#include "pipeline_decode.h"
#include <sstream>
Input Processing
Define a method InputSetup() that accepts the sInputParams structure as parameter.
This method first checks the input structure for consistency.
Then you can set the video type, memory type, hardware acceleration, asynchronous depth factor, mode, etc.
Other possible parameter values are commented in the code block below. Try different options by changing the paramter values.
It also writes the input h264 file path to parameter list.
            mfxStatus InputSetup(sInputParams* pParams)
            {
            //Check the pParams pointer
            MSDK_CHECK_POINTER(pParams, MFX_ERR_NULL_PTR);
            //Set the Video type:
            //MFX_CODEC_AVC for H264 codec
            //MFX_CODEC_JPEG for JPEG codec
            pParams->videoType = MFX_CODEC_AVC;
            msdk_opt_read(MSDK_STRING("/opt/intel/mediasdk/samples/content/test_stream.h264"), pParams->strSrcFile);
            //Set the memory type:
            //D3D11_MEMORY for Directx11
            //D3D9_MEMORY for Directx9
            //SYSTEM_MEMORY for System Memory
            pParams->memType = D3D9_MEMORY;    //For VAAPI
            //set hardware implementation as default
            //Software implementation can be tried by setting this to false.
            pParams->bUseHWLib = true;
            //Depth of asynchronous pipeline, this number can be tuned to achieve better performance.
            pParams->nAsyncDepth = 4;
            //Set the eWorkMode from:
            //MODE_PERFORMANCE = enable performance mode,
            //MODE_RENDERING = Render output on the display,
            //MODE_FILE_DUMP = Dump the output to a file.
            pParams->mode = MODE_RENDERING;
            pParams->libvaBackend = MFX_LIBVA_X11;
            //Some other parameters which can be explored further are:
            /*bIsMVC ; // true if Multi-View Codec is in use
            bLowLat; // true if low latency mode needs to be enabled
            nMaxFPS; //maximum of frames per second that can be rendered
            */
            return MFX_ERR_NONE;
            }
Initialize variable for CDecodingPipeline, which is primarily responsible for initializing the Media SDK context, reading the input file, decoding and so on.
Then setup the input parameters and perform error checking.
            int main()
            {
            // input parameters
            sInputParams        Params;
            // pipeline for decoding, includes input file reader, decoder and output file writer
            CDecodingPipeline   Pipeline;
            // return value check
            mfxStatus sts = MFX_ERR_NONE;
            //Setup your input parameters.
            sts = InputSetup(&Params);
            MSDK_CHECK_PARSE_RESULT(sts, MFX_ERR_NONE, 1);
Decoding Pipeline
Initialise the decoding pipeline and check the error status.
Continue coding in the main function
            //Initialise the Decode pipeline
            sts = Pipeline.Init(&Params);
            MSDK_CHECK_RESULT(sts, MFX_ERR_NONE, 1);
            //print stream info
            Pipeline.PrintInfo();
            msdk_printf(MSDK_STRING("Decoding started\n"));
Main Decoding Loop
Now let us loop through all the frames in the video to decode them using Pipeline.RunDecoding()
Every method in MSS returns a status. These statuses could be incompatible video parameters, a lost device, a failed device, etc.
You act according to the return message of each function execution. If it asks for more sufaces, provide more surface, if it asks for more frames, then provide more frames.
Reset the device using Pipeline.ResetDevice in case of hardaware error.
If there are no errors, it will set the flag to MFX_ERR_NONE
Finally, clear all decode buffer and move to the next frame using Pipeline.ResetDecoder(&Params);
Continue following coding in the main function:
            for (;;)
            {
            //Decode frame by frame
            sts = Pipeline.RunDecoding();
            if (MFX_ERR_INCOMPATIBLE_VIDEO_PARAM == sts || MFX_ERR_DEVICE_LOST == sts || MFX_ERR_DEVICE_FAILED == sts)
            {
            if (MFX_ERR_INCOMPATIBLE_VIDEO_PARAM == sts)
            {
            msdk_printf(MSDK_STRING("\nERROR: Incompatible video parameters detected. Recovering...\n"));
            }
            else
            {
            msdk_printf(MSDK_STRING("\nERROR: Hardware device was lost or returned unexpected error. Recovering...\n"));
            //Reset device in case of hardware error
            sts = Pipeline.ResetDevice();
            MSDK_CHECK_RESULT(sts, MFX_ERR_NONE, 1);
            }
            //Clear all decode buffer and move to next frame.
            sts = Pipeline.ResetDecoder(&Params);
            MSDK_CHECK_RESULT(sts, MFX_ERR_NONE, 1);
            continue;
            }
            else
            {
            MSDK_CHECK_RESULT(sts, MFX_ERR_NONE, 1);
            break;
            }
            }
            msdk_printf(MSDK_STRING("\nDecoding finished\n"));
            return 0;
            }// End of main
Save the file using CTRL+S.
Configure and generate solution
Navigate to custom_decode directory and create CMakeLists file:
$cd /home/[user]/Documents/workshop/msdk_samples/samples/custom_decode
$sudo gedit CMakeLists.txt
Make sure your CMakeLists.txt file contents matches the below ones:
include_directories (
${CMAKE_CURRENT_SOURCE_DIR}/../sample_common/include
${CMAKE_CURRENT_SOURCE_DIR}/../sample_misc/wayland/include
${CMAKE_CURRENT_SOURCE_DIR}/include
)
list( APPEND LIBS_VARIANT sample_common )
set(DEPENDENCIES libmfx dl pthread)
make_executable( shortname universal "nosafestring" )
install( TARGETS ${target} RUNTIME DESTINATION ${MFX_SAMPLES_INSTALL_BIN_DIR} )
Generate, clean and build the project using build.pl script as follows:
cd /home/[user]/Documents/workshop/msdk_samples/samples/
$perl build.pl --cmake=intel64.make.debug --build --clean
$make -j4 -C __cmake/intel64.make.debug
End result should say state: ok
New folder named __cmake will have executables. Navigate to the same as follows:
$cd __cmake/intel64.make.debug/__bin/debug/
Execute the custom_decode:
$./custom_decode
It should show the video rendered on the screen with settings enabled in custom decoding.
Overview
The Remote Management section is intended to demonstrate the extended power of Intel® vPro™ technology, which is an umbrella marketing term used by Intel for a large collection of computer hardware technologies, including hyperthreading, Intel® Turbo Boost Max Technology 3.0, Intel® Virtualization Technology (Intel® VT) for IA-32, Intel® 64 and Intel® Architecture (Intel® VT-x), Intel® Virtualization Technology (Intel® VT) for Directed I/O (Intel® VT-d), Intel® Trusted Execution Technology (Intel® TXT), and Intel® Active Management Technology.
Why Choose Remote Management using Intel® vPro™ technology?
The Intel® vPro™ platform is made up of hardware, BIOS extensions and applications that deliver solutions for a robust and reliable retail applications.
This section gives you hands on experience enabling Intel® AMT, browsing through Intel® vPro™ platform and modes, and explains how to manage remote systems using a desktop tool like Intel® Mesh Commander. It also demonstrates how to use an open source cloud based solution like Mesh Central to store data.
Objectives
This guide is intended to be a starting point for testing your Intel ® vPro™ technology systems within your environment.
It will guide you through the process of setting up a "Sandbox" test environment using your own network environment so that you can test your specific use cases on Intel® vPro™ technology that ultimately reduces overall support costs and costly service/truck rolls.
The first step in enabling Intel® Active Management Technology is to install the Intel® AMT agent. In this section, <!--we create a USB drive that will install the Intel® AMT agent onto a host system.--> we will manually configure the AMT from Intel® Management Engine BIOS Extension (Intel® MEBX). Then we will verify if the agent is correctly installed/enabled by going to a web browser and accessing the Intel® AMT firmware based web configuration console.
Configuring Intel® AMT
Start by performing these actions on the device with Intel® vPro™ technology.

During power up, the Intel® AMT platform displays the BIOS startup screen, then it processes the Intel® MEBx. During this process, you can access Intel® MEBx; however the method is BIOS vendor-dependent. Some methods are discussed here.
- Most BIOS vendors add entry into the CSME via the one-time boot menu. Select the appropriate key (Ctrl+P is typical) and follow the prompts.
- Some OEM platforms prompt you to press <Ctrl+P> after POST. When you press <Ctrl+P>, control passes to the Intel® MEBx (CSME) main menu.
- Some OEMs integrate the CSME configuration inside the BIOS (uncommon).
- Some OEMs have an option in the BIOS to show/hide the <Ctrl+P> prompt, so if the prompt is not available in the one-time boot menu, check the BIOS to activate the CTRL+P.
Enter the CSME default password admin
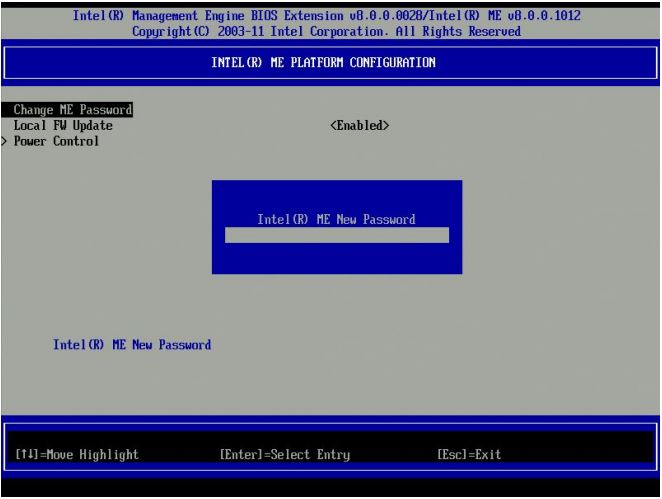
- Change the default password (required to proceed).
- The new value must be a strong password.
- It should contain at least one uppercase letter, one lowercase letter, one digit, and one special character, and be at least eight characters.
- A management console application can change the Intel® AMT password without modifying the CSME password.
Remember your password. If you forget, then you will have to short CMOS battery to reset the password. This is a tedius task.
- Go back to previous menu using Esc key
- Select Intel® AMT Configuration.
- Select/Verify Manageability Feature Selection is Enabled.

- Under the Intel® MEBX Network Setup menu Select 'TCP/IP Settings' and Press Enter.
- The Intel Network Setup menu changes to the TCP/IP Settings page.
- Goto Wired LAN IPV4 Configuration Under the TCP/IP Settings, Select 'Wired LAN IPV4 Configuration' and press Enter.
- Enable DHCP.
- Activate Network Access option by enabling it.
- Press Esc key to go to exit screen.
- Select "Y" to confirm Activating the interface.
- Exit CSME.
Use a Web Browser to Connet to the Intel® Active Management Technology web interface
To use the Intel® Active Management Technology web interface, open a browser and go to the IP address of the Intel® NUC (or use localhost). The port number is 16992
When prompted for username/password, type admin for username and <your password> as the password

You are now connected. Please explore different sections.
Overview
The Mesh Commander is an application that provides an interface for using Intel® Active Management Technology. It's purpose is to make hardware configuration easy over the Internet.
MeshCommander is primarily used for peer to peer remote management of devices. Currently supported features include:
- Hardware KVM viewer
- Serial over LAN terminal
- IDE-R support
- Power control
- Event viewer
- Audit log viewer
- Hardware asset
- Account management
- Network settings
- Wi-Fi management
- User consent and control
- Certificate & TLS management
- CIRA(Client Initiated Remote Access) & Environment Detection
- WSMAN browser
The MeshCommander utility should be installed on any other Windows* machine, such as your personal Laptop.

Download Link: meshcommander.msi
Go to the Windows launch bar icon in the lower left of your screen and type Mesh Commander.

- First, add a computer to MeshCommander by clicking on a computer. It there are no known computers, get started by adding computers.
- After that you can specify a friendly name which is simply a string that allows you to easily identify the system.
- You can use tags that allow you to put several systems together into recognizable categories.
- You'll need to enter either the host name or the IP address of the computer.
- Depending on the way you configured your remote machine, you should choose the authentication. Most common method is Digest/None.
- Lastly, the username and password are the same as username and password that you configured in previous section.
Next to each computer that has been added to the mesh commander there is a button labeled Connect.

Click the Connect button to begin communicating with your remote machine.
After connecting to a system, you'll see the system information on the screen, such as the power state, the unique identifier, Intel® ME version, Intel® AMT activation mode and basic settings of the remote machine. Take a moment to browse around and see the different bits of information available to you.


To view the screen of the remote computer system, do the following steps:
- Click on the Remote Desktop link in the left sidebar.
- Then click the Connect button as shown in the image.
- If user consent was enabled, it will display a code in the Intel® NUC, which has to be entered in the Mesh Commander interface to proceed further.
- In admin control mode, on clicking Connect it will directly give remote access.
You will now see the screen of the remote system.

Since Intel® AMT is out of the band control to remote device, you will be able to see the screen of the remote system even if the remote computer is rebooting, in the BIOS, or in a crashed state.
Notice the button labelled Power Actions. This button will display a dialog box that allows you to change the state of the system's power. You can start, stop, reboot or choose from other supported power states.

Intel® AMT is an out of band service, that is, at a level lower than the operating system. So it is possible to have a remote view of the display even when viewing the BIOS.


IDE-Redirection
- Navigate to Remote Desktop.
- Click IDE-R, which opens up Storage Redirection.
- Choose any .iso file and .img file.
- "IDE-R Session, Connected, 0 in, 0 out" message will be displayed at top.
- Click Power Actions and select "Reset to IDE-R CDROM".
- Now observe the top row showing variation in the message "IDE-R Session, Connected, 0 in, ###### out" showing number of packets going out.
- Using this technique, any image can be flashed on the Intel® NUC remotely.

- CDROM Image content will be displayed.
- Your OS image will be loaded here.
- Click the Disconnect button inside the Remote Desktop.
- Click Stop IDE-R Session.
- Goto Power Actions then click on Reset option to complete the session.
Explore MeshCommander
Mesh commander website has many code samples, documentation and very nice video tutorials on each of MeshCommander features. We would recommend you going through http://www.meshcommander.com/meshcommander/tutorials to learn more.
Objective
Meshcentral is an open source and peer-to-peer technology with a wide range of use cases, including web services that enable remote monitoring and management of computers and devices. Users can manage all their devices from a single web site, no matter the location of the computers, or if they are behind proxies.

In this section we will explore following
- How to create device mesh?
- How to remotely share the desktop of the remote machine?
- How to explore file system on the remote machine?
- How to login via command line?
You can refer to http://www.meshcommander.com/meshcentral2/tutorials for detailed video tutorials on various features of meshcentral.
Create meshcentral account
You have two options.
- Install meshcentral by following this http://www.meshcommander.com/meshcentral2/installation guide.
- Create account directly on meshcentral.com website.

We will use the second option in this section.
- Create an account with convenient username and password on www.meshcentral.com.
- Login to meshcentral using above credentials.
Create Mesh Agent
- Goto MyAccount tab > Administrative Meshes > New.
- In the Create new mesh popup, provide mesh name and password.
- Check all the options and click create mesh.

Test & install the created Mesh
- Goto MyAccount tab and click the newly created mesh.
- Have a look at Web Authorizations.
- Click on Install.
- Select Linux/x86-64 (Ubuntu) Mesh Agent.

Run the commands given there in a Linux terminal to install the Mesh Agent.
Web device refresh
Goto My Devices tab and click the newly attached device.
This takes you to device information page, which shows the information about Mesh agent version, target operating system, associated mesh name and interface IP address.
You can remotely configure this page using Intel® Active Management Technology, as was discussed in a previous lab. Click on appropriate links and icons to know more about these configurations.
 You can refer http://www.meshcommander.com/meshcentral2/tutorials for detailed video tutorial on various features of meshcentral.
Step 5: Explore file system
This method gives access to the client file system.

Various file operations can be performed using file system explorer. You can copy, upload, delete files using this interface.
Explore Terminal
This method gives access to the terminal, through which system supported commands can be executed. You need to CTRL+C to start the command prompt.

Remote desktop sharing
This method accessess the client desktop using web sockets.

In this example, we are sharing the desktop from the machine, hence you see this infinite loop of desktops. However, in realtime scenario, you would be connecting to your remote machine from another machine sitting miles away.
Overview
The video analytics section provides simple tutorials using OpenCV for performing some of the basic, retail-specific video analytics scenarios.
In the video performance section, we have seen the performance enhancement by using Intel ® Media Server Studio and Intel® integrated graphics. By moving video playack to the GPU, we were able to free up the CPU by 60-70%, which we can leverage to perform the video analytics examples explained in this section. There are few common video analytics use cases in Visual Retail. They are motion detection, and face detection/tracking. We will explore these two techniques, using OpenCV to count the number of people in front of our digital signage. We are using these as a starting point, but there is definately room for improving the accuracy.
Introduction
OpenCV (Open Source Computer Vision Library) is released under a BSD license and hence it’s free for both academic and commercial use. It has C++, C, Python* and Java* interfaces and supports Windows*, Linux*, Mac OS*, iOS* and Android*. OpenCV was designed for computational efficiency and with a strong focus on real-time applications. Written in optimized C/C++, the library can take advantage of multi-core processing. Enabled with OpenCL™, it can take advantage of the hardware acceleration of the underlying heterogeneous compute platform.

Take a look at the OpenCV Homepage.
Complete the McAfee® Embedded Control Exercises
Learn how to capture video from the a camera using OpenCV and Python.
- Make sure you have connected a webcam to your Intel® NUC or PC.
- Mount camera at some position where you can see your face when we capture video.
Navigate to OpenCV Python directory
To create the Python programs in this lab, we will use the terminal and gedit editor in Linux.
- Open terminal using Ctrl + Alt + t.
- Now create and navigate to new directory as follows:
$sudo mkdir python_samples
$sudo chmod 777 python_samples
$cd python_samples/
Create new file and save it as camera.py by following these steps:
import numpy as np
import cv2
- Issue the command:
$sudo gedit camera.py - A blank file opens up.
- Save the file using Ctrl + S.
- Begin by importing the numpy and opencv packages as shown below.
Video Capture and Display
- Capture the video using cv2.VideoCapture.
- The video capture method takes one parameter. This parameter is the index number of cameras that you want to use. If you are using only one camera, then this value would be zero.
- Create a
namedWindowto render the output. - Show the output on this
namedWindowusingimshowmethod. - Copy the below code, put it in your file and run your application.
- Press Esc to exit.
-
cap = cv2.VideoCapture(0) while(True): # Capture frame-by-frame ret, frame = cap.read() #Set full screen cv2.namedWindow("Target", cv2.WND_PROP_FULLSCREEN) cv2.setWindowProperty("Target",cv2.WND_PROP_FULLSCREEN,cv2.WINDOW_FULLSCREEN) # Display the resulting frame cv2.imshow('Target',frame) if cv2.waitKey(1) & 0xFF == 27: break # When everything done, release the capture cap.release() cv2.destroyAllWindows() - Press CTRL + S to save the file.
- Close the file and return to terminal. Connect the camera to the computer and Execute:
$python camera.py
Download final solution
Copy completed application if you are getting errors:
import numpy as np
import cv2

cap = cv2.VideoCapture(0)

while(True):
    # Capture frame-by-frame
    ret, frame = cap.read()

    #Set full screen
    cv2.namedWindow("Target", cv2.WND_PROP_FULLSCREEN)
    cv2.setWindowProperty("Target",cv2.WND_PROP_FULLSCREEN,cv2.WINDOW_FULLSCREEN)

    # Display the resulting frame
    cv2.imshow('Target',frame)

    if cv2.waitKey(1) & 0xFF == 27:
        break

# When everything done, release the capture
cap.release()
cv2.destroyAllWindows()
References
Objectives
Lab Overview
Our motion detector will observe the difference between consecutive frames; when this difference is high, we can assume that motion was found. In order to prevent false positives, we will observe the standard deviation of the frame. When motion of a suitably sized object is detected, the standard deviation will rise, allowing us to trigger a motion event.
Our program will be laid out as follows:
- Import OpenCV and its dependencies.
- Initialize values.
- Start video loop.
- Calculate distance between frames.
- Shift frames.
- Apply Gaussian blur to distance mapping.
- Apply thresholding.
- Calculate standard deviation.
- If motion detected is above threshold, then print a message.
- Show the video.
- Release resources.
Motion detection using OpenCV
To create the Python* programs in this section, we will use the terminal and gedit editor in Linux*.
- Open terminal using Ctrl + Alt + t.
- Now navigate to the new directory as follows:
$cd python_samples
Create new file and save it as motion_detect.py by following these steps:
- Issue the command:
$sudo gedit motion_detect.py - A blank file opens up.
- Save the file using Ctrl + s.
- Begin by importing the numpy and opencv packages.
-
import numpy as np
import cv2
- Press CTRL + s to save the file.
Set global variables and functions
We need variables for setting the motion level threshold and display font.
sdThreshis used for motion level threshold.- font is used for setting for for text display on video.
distMap function gives us the Pythagorean distance between the three BGR layers of 2 frames.
sdThresh = 10
font = cv2.FONT_HERSHEY_SIMPLEX

#TODO: Face Detection 1
def distMap(frame1, frame2):
    """outputs pythagorean distance between two frames"""
    frame1_32 = np.float32(frame1)
    frame2_32 = np.float32(frame2)
    diff32 = frame1_32 - frame2_32
    norm32 = np.sqrt(diff32[:,:,0]**2 + diff32[:,:,1]**2 + diff32[:,:,2]**2)/np.sqrt(255**2 + 255**2 + 255**2)
    dist = np.uint8(norm32*255)
    return dist
Setup video capture and display
Lets make the necessary setup for displaying our motion image and actual RGB image, then we will start capturing the frames.
cv2.namedWindow('frame')
cv2.namedWindow('dist')

#capture video stream from camera source. 0 refers to first camera, 1 referes to 2nd and so on.
cap = cv2.VideoCapture(0)

_, frame1 = cap.read()
_, frame2 = cap.read()
Main part of the program
Begin the main video loop
-
while (True): _, frame3 = cap.read() - Get frame3's cols and rows matrix.
-
rows, cols, _ = np.shape(frame3)
- Next, the crucial step in our program is to take the difference between two frames; we do this by using the
distMapfunction we have created:dist = distMap(frame1, frame3)
- Now that this is done, we can shift our frames:
frame1 = frame2 frame2 = frame3 - Next, we apply Gaussian smoothing to even out our distance mapping:
mod = cv2.GaussianBlur(dist, (9,9), 0)
- And threshold this result to retrieve a binary mapping of where motion is taking place.
_, thresh = cv2.threshold(mod, 100, 255, 0)
- At this point, we have a binary array that indicates where motion has occurred and where it has not. Now, we will use standard deviation to calculate where the motion is significant enough to trigger an alarm.
- Calculate the standard deviation using:
_, stDev = cv2.meanStdDev(mod)
- Lets show what we found after standard deviation and display that value on the video.
cv2.imshow('dist', mod) cv2.putText(frame2, "Standard Deviation - {}".format(round(stDev[0][0],0)), (70, 70), font, 1, (255, 0, 255), 1, cv2.LINE_AA) - If standard deviation is more than our threshold, then print a message.
if stDev > sdThresh: print("Motion detected.. Do something!!!"); - Show the BGR color video.
- Wait for escape button press to exit.
Here is the complete main program.
facecount = 0
while(True):
    _, frame3 = cap.read()
    rows, cols, _ = np.shape(frame3)
    cv2.imshow('dist', frame3)
    dist = distMap(frame1, frame3)

    frame1 = frame2
    frame2 = frame3

    # apply Gaussian smoothing
    mod = cv2.GaussianBlur(dist, (9,9), 0)

    # apply thresholding
    _, thresh = cv2.threshold(mod, 100, 255, 0)

    # calculate st dev test
    _, stDev = cv2.meanStdDev(mod)

    cv2.imshow('dist', mod)
    cv2.putText(frame2, "Standard Deviation - {}".format(round(stDev[0][0],0)), (70, 70), font, 1, (255, 0, 255), 1, cv2.LINE_AA)


    if stDev > sdThresh:
            print("Motion detected.. Do something!!!");
            #TODO: Face Detection 2

    cv2.imshow('frame', frame2)

    if cv2.waitKey(1) & 0xFF == 27:
        break

cap.release()
cv2.destroyAllWindows()
- Save the file
- Press F5
Here is the final code base.
Keep those TODO as it is. We will re-use this program during face detection.
import numpy as np
import cv2

sdThresh = 10
font = cv2.FONT_HERSHEY_SIMPLEX
#TODO: Face Detection 1

def distMap(frame1, frame2):
    """outputs pythagorean distance between two frames"""
    frame1_32 = np.float32(frame1)
    frame2_32 = np.float32(frame2)
    diff32 = frame1_32 - frame2_32
    norm32 = np.sqrt(diff32[:,:,0]**2 + diff32[:,:,1]**2 + diff32[:,:,2]**2)/np.sqrt(255**2 + 255**2 + 255**2)
    dist = np.uint8(norm32*255)
    return dist

cv2.namedWindow('frame')
cv2.namedWindow('dist')

#capture video stream from camera source. 0 refers to first camera, 1 referes to 2nd and so on.
cap = cv2.VideoCapture(0)

_, frame1 = cap.read()
_, frame2 = cap.read()

facecount = 0
while(True):
    _, frame3 = cap.read()
    rows, cols, _ = np.shape(frame3)
    cv2.imshow('dist', frame3)
    dist = distMap(frame1, frame3)

    frame1 = frame2
    frame2 = frame3

    # apply Gaussian smoothing
    mod = cv2.GaussianBlur(dist, (9,9), 0)

    # apply thresholding
    _, thresh = cv2.threshold(mod, 100, 255, 0)

    # calculate st dev test
    _, stDev = cv2.meanStdDev(mod)

    cv2.imshow('dist', mod)
    cv2.putText(frame2, "Standard Deviation - {}".format(round(stDev[0][0],0)), (70, 70), font, 1, (255, 0, 255), 1, cv2.LINE_AA)
    if stDev > sdThresh:
            print("Motion detected.. Do something!!!");
            #TODO: Face Detection 2

    cv2.imshow('frame', frame2)
    if cv2.waitKey(1) & 0xFF == 27:
        break

cap.release()
cv2.destroyAllWindows()
References
Objectives
Lab Overview
We've covered motion detection in our previous module. In this lab, we will count the number of faces present when motion detection is triggered. We will:
- Instantiate a cascade classifier for the face.
- We will identify the faces using Haar cascade method.
- Finally we will count the number of faces in the frame.
- Show the video.
- Release resources.
Overview of the Facial Recogition Sample
The first step is to load the Haar-like features classifer cascade file, which is a file created through machine learning to contain the esstential features of a face. In OpenCV, you can detect different types of objects by changing the classifier file.
Download the haar cascade file, named haarcascade_frontalface_default.xml face, and save it into the same directory as your Python* script.
Create a new Python file named face_detect.py
Paste the following line:
import cv2
You will need to open the classifier file and a connection to the video camera.
# Create a Haar-like feature cascade classifier object
faceCascade = cv2.CascadeClassifier("haarcascade_frontalface_default.xml")

# Set the camera to the first camera detected by the NUC
cap = cv2.VideoCapture(0)
The Facial Detector's main loop
This code performs a number of steps:
- It captures the current frame.
- Converts it to grayscale for a faster comparison.
- Sends the grayscale frame to the facial recogition detector.
- The detector returns an array of coordinates of a box with a (x,y,w,h).
- Draws a rectangle around the face.
- Shows the frame.
- If the user hits the Esc key the program will exit.
while True:
    # Capture frame-by-frame
    ret, frame = cap.read()

    gray = cv2.cvtColor(frame, cv2.COLOR_BGR2GRAY)
    # begin face cascade
    faces = faceCascade.detectMultiScale(
        gray,
        scaleFactor=1.25,
        minNeighbors=5,
        minSize=(30, 30),
    )

    for (x, y, w, h) in faces:
        cv2.rectangle(frame, (x, y), (x+w, y+h), (0, 255, 0), 2)

    # Display the resulting frame
    cv2.imshow('Video', frame)

    # If the user presses the 'q' key then quit the program
    if cv2.waitKey(1) & 0xFF == 27:
       break
Here is the final solution
Here is the final code for face counting including the motion detection sample we completed previously. Here we first we detect motion, then we try to find faces in the scene.
import cv2

            cv2.namedWindow('frame')
            cv2.namedWindow('dist')

            # the classifier that will be used in the cascade
            faceCascade = cv2.CascadeClassifier('haar_face.xml')

            #capture video stream from camera source. 0 refers to first camera, 1 referes to 2nd and so on.
            cap = cv2.VideoCapture(0)


            triggered = False
            sdThresh = 10
            font = cv2.FONT_HERSHEY_SIMPLEX

            def distMap(frame1, frame2):
                """outputs pythagorean distance between two frames"""
                frame1_32 = np.float32(frame1)
                frame2_32 = np.float32(frame2)
                diff32 = frame1_32 - frame2_32
                norm32 = np.sqrt(diff32[:,:,0]**2 + diff32[:,:,1]**2 + diff32[:,:,2]**2)/np.sqrt(255**2 + 255**2 + 255**2)
                dist = np.uint8(norm32*255)
                return dist

            _, frame1 = cap.read()
            _, frame2 = cap.read()
            facecount = 0
            while(True):
                _, frame3 = cap.read()
                rows, cols, _ = np.shape(frame3)
                cv2.imshow('dist', frame3)
                dist = distMap(frame1, frame3)

                frame1 = frame2
                frame2 = frame3

                # apply Gaussian smoothing
                mod = cv2.GaussianBlur(dist, (9,9), 0)

                # apply thresholding
                _, thresh = cv2.threshold(mod, 100, 255, 0)

                # calculate st dev test
                _, stDev = cv2.meanStdDev(mod)

                cv2.imshow('dist', mod)
                cv2.putText(frame2, "Standard Deviation - {}".format(round(stDev[0][0],0)), (70, 70), font, 1, (255, 0, 255), 1, cv2.LINE_AA)


                if stDev > sdThresh:
                        # the cascade is implemented in grayscale mode
                        gray = cv2.cvtColor(frame2, cv2.COLOR_BGR2GRAY)

                        # begin face cascade
                        faces = faceCascade.detectMultiScale(
                            gray,
                            scaleFactor=2,
                            minSize=(20, 20)
                        )
                        facecount = 0
                        # draw a rectangle over detected faces
                        for (x, y, w, h) in faces:
                            facecount = facecount + 1
                            cv2.rectangle(frame2, (x, y), (x+w, y+h), (0, 255, 0), 1)
                        cv2.putText(frame2, "No of faces {}".format(facecount), (50, 50), font, 1, (0, 0, 255), 1, cv2.LINE_AA)
                else:
                        if facecount > 0:
                                print("Face count:")
                                print(facecount)
                                facecount = 0
                cv2.imshow('frame', frame2)

                if cv2.waitKey(1) & 0xFF == 27:
                    break

            cap.release()
            cv2.destroyAllWindows()
References
Lab Overview
We have covered motion and face detection in our previous modules. We've also successfully counted the number of faces present when motion is detected.

In this module we will setup a local cloud and publish this data to it for analysis.
We will be replacing those two TODOs with following:
- We will import a package called "requests".
- We will publish the number of faces after showing the face count.
- Login to cloud and view charts showing the number of faces.
Import packages
We need to import the requests package:
- Replace first #TODO: Cloud integration 1
- Paste the following line:
import requests
Publish number of faces to cloud
We have counted the number of faces in the scene. We need to publish this counter value to the cloud.
Note: We are not publishing video stream or pictures of the screen. We are only publishing the number of faces.
- Replace second #TODO: Cloud integration 2
- Note that we are sending the data to cloud when the motion stops.
- Paste the following line:
- Replace device id "1234" with the device id (or any 4 digit unique number) written on your Intel® NUC
- Replace <cloud server url> with the cloud URL provided in the workshop
- Your cloud server URL would be:
"http://" + window.location.hostname + ":9002";
-
else:
            query = 'id=1234' + '&value=' + str(facecount)
            resp = requests.get('http://<cloud server url>/analytics/face?'+ query)
            if resp.status_code != 201:
                # This means something went wrong.
                print("Unable to submit the data")
            else:
                print("Data Submitted for analysis")
Here is the final code base including cloud integration:
import numpy as np
import cv2
import requests

cv2.namedWindow('frame')
cv2.namedWindow('dist')

# the classifier that will be used in the cascade
faceCascade = cv2.CascadeClassifier('haar_face.xml')

#capture video stream from camera source. 0 refers to first camera, 1 referes to 2nd and so on.
cap = cv2.VideoCapture(0)


triggered = False
sdThresh = 10
font = cv2.FONT_HERSHEY_SIMPLEX

def distMap(frame1, frame2):
    """outputs pythagorean distance between two frames"""
    frame1_32 = np.float32(frame1)
    frame2_32 = np.float32(frame2)
    diff32 = frame1_32 - frame2_32
    norm32 = np.sqrt(diff32[:,:,0]**2 + diff32[:,:,1]**2 + diff32[:,:,2]**2)/np.sqrt(255**2 + 255**2 + 255**2)
    dist = np.uint8(norm32*255)
    return dist

_, frame1 = cap.read()
_, frame2 = cap.read()
facecount = 0
while(True):
    _, frame3 = cap.read()
    rows, cols, _ = np.shape(frame3)
    cv2.imshow('dist', frame3)
    dist = distMap(frame1, frame3)

    frame1 = frame2
    frame2 = frame3

    # apply Gaussian smoothing
    mod = cv2.GaussianBlur(dist, (9,9), 0)

    # apply thresholding
    _, thresh = cv2.threshold(mod, 100, 255, 0)

    # calculate st dev test
    _, stDev = cv2.meanStdDev(mod)

    cv2.imshow('dist', mod)
    cv2.putText(frame2, "Standard Deviation - {}".format(round(stDev[0][0],0)), (70, 70), font, 1, (255, 0, 255), 1, cv2.LINE_AA)


    if stDev > sdThresh:
            # the cascade is implemented in grayscale mode
            gray = cv2.cvtColor(frame2, cv2.COLOR_BGR2GRAY)

            # begin face cascade
            faces = faceCascade.detectMultiScale(
                gray,
                scaleFactor=2,
                minSize=(20, 20)
            )
            facecount = 0
            # draw a rectangle over detected faces
            for (x, y, w, h) in faces:
                facecount = facecount + 1
                cv2.rectangle(frame2, (x, y), (x+w, y+h), (0, 255, 0), 1)
            cv2.putText(frame2, "No of faces {}".format(facecount), (50, 50), font, 1, (0, 0, 255), 1, cv2.LINE_AA)
    else:
            if facecount > 0:
                    query = 'id=1234' + '&value=' + str(facecount)
                    resp = requests.get('http://<cloud server url>:9002/analytics/face?'+ query)
                    if resp.status_code != 201:
                        # This means something went wrong.
                        print("Unable to submit the data")
                    else:
                        print("Data Submitted for analysis")
                    facecount = 0
    cv2.imshow('frame', frame2)

    if cv2.waitKey(1) & 0xFF == 27:
        break

cap.release()
cv2.destroyAllWindows()
Visualize Your data
Visualizing your data on the cloud:

- Go to
http://< cloud server url>:9002 - Example:
"http://" + window.location.hostname + ":9002"; - Enter your device ID
- Click on plot