
Using Encryption and Authentication to Secure MongoDB
5.00/5 (5 votes)
How to use encryption and authentication to secure MongoDB
Introduction
This guide shows how to implement MongoDB Community Edition’s two main authentication methods, Scram-SHA-1 and X509 Certificate Authentication. It also covers how to encrypt transactions between the client and server using TLS/SSL.
Authentication
Authentication is the mechanism where the client proves its identity to the server and the server proves its identity to the client. The system is designed to prevent malevolent entities from impersonating either the server or the client.
Scram-SHA-1
Scram-SHA-1 is now the default authentication method used by mongoDB. There is an excellent article here showing, in detail, how the mechanism is applied. Putting it simply, it’s a challenge response system. The server has access to the client’s password when the client is first registered with the server. The server does not store the password directly but stores two hashed values derived from the password along with some of the metadata that was used to implement the hashing algorithm. The server sends the metadata to the client and the client proves that it has the correct password by creating the same hashed value in the same way that the server did. The server proves itself to the client by first sending its second stored hashed value. The client then uses its password to verify the hashed value. The transactions are not subject to replay attacks as session-specific random bytes are added to the data exchanges.
The Server’s Authentication Database
Clients are registered with the server by storing their details in the server’s authentication database. Before activating the authentication mechanism, it is necessary to have at least one client registered with the server. The recommended way to proceed is to add an administrator as the first client. The administrator’s role is to create other users. Once this user has been created, the authentication mechanism can be activated.
Creating an Administrator
At a windows command prompt, navigate to the mongoDB/bin folder, then paste the following:
mongo
use admin
db.createUser(
  {
    user: "AdminUser",
    pwd: "AdminUserPwd",
    roles: [ { role: "userAdminAnyDatabase", db: "admin" } ]
  }
)
exit
Here, a client is created with the name of AdminUser and a password of AdminUserPwd. It is given the role of userAdminAnyDatabase that allows it to create other users. Roles are another important security measure as they control the number of valid commands that a specific client can issue to the database. For some of the examples that follow, the administrator needs to have unrestricted access to mongoDB's internal databases. To achieve this, it needs to be configured as the Root user.
mongo
use admin
db.createUser(
  {
    user: "AdminUser",
    pwd: "AdminUserPwd",
    roles: [ "root" ]
  }
)
exit
To examine the data that the server stores for a client named AdminUser, paste the following at the command prompt.
mongo
use admin
 db.system.users.findOne({user: "AdminUser"})
exit
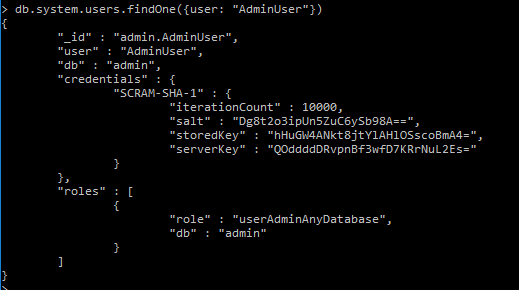
The iterationCount is the number of times the hashing algorithm is applied to the password. The salt is a random array of bytes used with the password to derive the keys. It prevents clients with identical passwords producing identical keys. The storedKey is used to identify the client to the server and the serverKey is used to identify the server to the client.
Activating Authentication
In the examples that follow, it is assumed that mongoDB has been installed into the C:\mongodb\bin directory. It's best to avoid having to use file paths that contain spaces, they can cause exceptions in certain cases. The server is started by issuing the following commands:
cd  C:\mongodb\bin
mongod.exe --config C:\mongodb\bin\mongoDB0.cfg --serviceName MongoDB0
           --serviceDisplayName MongoDB0 --install
net start MongoDB0
In this example installation, mongoDB is configured using the following mongoDB0.cfg file.
storage:
    dbPath: "C:/MongoDB/MongoDB0"
systemLog:
    destination: file
    path: "C:/MongoDB/log/MongoDB0.log"
    logAppend: true
    timeStampFormat: iso8601-utc
#replication:
    #replSetName: "myReplSet"
net:
    port: 27017
    #ssl:
        #mode: requireSSL
        #PEMKeyFile: "C:/MongoDB/SSL/mongo0.pem"
        #CAFile: "C:/MongoDB/SSL/mongoCA.crt"
        #clusterFile: "C:/MongoDB/SSL/mongo0.pem"
#security:
    #authorization: enabled
    #clusterAuthMode: x509
The # symbol at the start of a line, comments out the rest of the line. To enable authorization, remove the # from the lines beginning ‘#security:’ and ‘ #authorization: enabled’ and save the file. Then stop and restart the service by issuing the following commands in a Command window.
net stop  MongoDB0
net start MongoDB0
It’s now possible to logon to the service as AdminUser using the mongo client shell and then create another user.
mongo
use admin
db.auth("AdminUser", "AdminUserPwd" )
db.createUser(
  {
    user: "ScramUser",
    pwd: "ScramUserPwd",
    roles: [ { role: 'readWrite', db: 'TestMongoDB'} ]
  }
)
exit
ScramUser is now able to read and write to a database named TestMongoDB. This example shows how to connect to the database using the C# driver.
const string connectionString ="mongodb://ScramUser:ScramUserPwd@localhost";
var client = new MongoClient(connectionString);
IMongoDatabase database = client.GetDatabase("TestMongoDB");
IMongoCollection<clubmember> collection = database.GetCollection<clubmember>("CarClub");
 long count = collection.Count(new BsonDocument());
Certificate-based Authentication
With this method of authentication, both the client and server verify their identity to each other by using X.509 identity certificates. The certificates are encrypted (signed) by a trusted Certificate Authority(CA) using the authority's private key. The certificates contain the public key of their owner along with some data, such as an expiry date, that enables the validity of the certificates to be determined. The server decrypts the client's certificate using the CA's public key and checks that the certificate is acceptable. The client does the same with the server's certificate. The server also checks that the client has been registered with it by comparing the client’s certificate with entries stored in the server’s database. The registration process stores the details given in the subject line of the client’s certificate. The subject line, otherwise known as the Distinguished Name (DN), can have several attributes. The most common ones are as follows:
- C= country
- ST= state or province
- L= location
- O= organizationName
- OU= organizational Unit Name
- CN= commonName, can be a website
To register a client with the following subject line in its certificate:
C=GB,ST=NPT,L=London,O=HPUser,OU=IT,CN=George-HP,emailAddress=myemail@myemail.com
Do something like this:
mongo
use admin
db.auth("AdminUser", "AdminUserPwd" )
use $external
db.createUser(
  {
    createUser: "C=GB,ST=NPT,L=London,O=HPUser,OU=IT,CN=George-HP,
                 emailAddress=myemail@myemail.com",
    roles: [
             { role: 'readWrite', db: 'TestMongoDB' }
           ],
    writeConcern: { w: "majority" , wtimeout: 5000 }
  }
)
The AdminUser used here needs to have root privileges to be able to write to the external database. The authentication methods only encrypt data during the authentication process. Data exchanges that take place after authentication are not encrypted. In order to encrypt these exchanges, another layer of security has to be added, namely, Transport Layer Security (TLS). Scram-SHA-1 authentication can be employed without using TLS, but X.509 authentication requires TLS to be enabled.
Transport Layer Security
Tls employs X.509 certificate validation. With TLS, the public keys of both the client and server are employed to encrypt data during the initial (handshake) exchanges. The handshaking procedure is used to determine the protocols to be followed and to formulate the symmetric session-key. The same session key is then used by both parties to encrypt the subsequent data exchanges. A session key is used because it has better performance than that of public/private key pairs. Mongo’s configuration files may refer to SSL but the protocol used in the current version of mongoDb is actually TLS. SSL is a legacy protocol that has been replaced by TLS.
How to Use Self-signed Certificates to Enable Authentication and Encryption
The test examples that follow are only suitable for use on a local intranet that is isolated from the world wide net. The certificates used are self-signed and do not employ an independent commercial Certificate Authority. The certificates are generated using OpenSSl. OpenSSL is an open-source Console application used for generating self-signed certificates. It can be downloaded from here. Installation is straight forward but it’s probably best to run it as an administrator to avoid problems when trying to write to certain directories. My preference is not to enter commands directly at the command prompt, because they are difficult to edit, but to copy a series of commands to the clipboard and then paste them at the command prompt by simultaneously pressing the ‘ctrl’ and ‘v’ key. There is an explanation of the most common commands here.
Generating the Certificate Authority Certificate
The first thing is to generate the CA’s private key. This key should be stored securely.
genrsa -out mongoCA.key -aes256 8192
You will be prompted to enter a pass phrase for the key. The pass phrase will not be echoed to the Console and the command prompt will not move when entering the phrase. The key is used to produce a CA Certificate.
req -x509 -new -extensions v3_ca -key mongoCA.key -days 365 -out mongoCA.crt
This produces a certificate named mongoCA.crt that is valid for 365 days. You will be prompted to enter the attributes for the Distinguished Name.
Generating the Server Certificates
The technique is to create a certificate request, then to create the certificate using the CA's private key and the certificate request. It is much easier to use a command string with OpenSSL rather than inputting the required parameters individually. This following generates a certificate request for a server named mongo0 with a challenge password of mongo0Pwd.
req -new -newkey rsa:4096 -nodes -out mongo0.csr -keyout mongo0.key
-subj “/C=GB/ST/=NPT/L=London/O=mongo0/OU=IT/CN=George-HP/emailAddress=myemail@myemail.com "
-passin pass:mongo0Pwd
To generate the certificate, enter the following:
x509 -CA mongoCA.crt -CAkey mongoCA.key -CAcreateserial
     -req -days 365 -in mongo0.csr -out mongo0.crt
It’s now necessary to bungle up the key and certificate into a PEM file for use by the server. Open a windows command prompt as administrator, navigate to OpenSSl’s bin directory and enter:
type mongo0.key mongo0.crt > mongo0.pem
Where type is a command, it’s not a request to hit the keyboard.
Generating Client Certificates
Similar procedures are used to generate client certificates as for the server certificates. On local networks, the Common Name is usually set to the domain name of the client's machine and the OrganizationName is the name of the client.
To create a certificate request for a client named x509User:
req -new -newkey rsa:4096 -nodes -out x509User.csr -keyout x509User.key
-subj “/C=GB/ST/=NPT/L=London/O=x509User/OU=IT/CN=George-HP/emailAddress=myemail@myemail.com "
-passin pass:x509UserPwd
Create a certificate for a client named x509User:
x509 -CA mongoCA.crt -CAkey mongoCA.key -CAcreateserial -req -days 365
     -in x509User.csr -out x509User.crt
The client requires that the key and certificate are bungled up into a PFX file as the PFX file is referenced in the client’s connection string.
pkcs12 -export -in x509User.crt -inkey x509User.key -out x509User.pfx
Enter the challenge password (x509Pwd) when prompted for the Export Password.
Configuring the Server to Use TLS with X.509 Authentication
Step 1. Housekeeping Tasks
Make three sub-directories in the MongoDB folder named SSL, log, MongoDB0 respectively. Copy the following files that have been generated in the openssl /bin folder to the SSL folder.
- x509User.pfx
- mongo0.pem
- mongoCA.crt
Step 2. Edit the Server’s Configuration File
The file mongoDB0.cfg should be stored in the mongodb/bin folder:
storage:
    dbPath: "C:/MongoDB/MongoDB0"
systemLog:
    destination: file
    path: "C:/MongoDB/log/MongoDB0.log"
    logAppend: true
    timeStampFormat: iso8601-utc
#replication:
    #replSetName: "myReplSet"
net:
    port: 27017
    ssl:
        mode: requireSSL
        PEMKeyFile: "C:/MongoDB/SSL/mongo0.pem"
        CAFile: "C:/MongoDB/SSL/mongoCA.crt"
security:
    authorization: enabled
Step 3. Restart the Server
To enable the mongodb server to use the config file, simply stop it and restart it by entering the following at a command prompt:
net stop MongoDB0
net start MongoDB0
Step 4. Generate the Certificates for the Root User
Now that TLS has been enabled, a pem file is needed to enable the AdminUser to log on to the mongo service so that it can register the x509User as a client.
req -new -newkey rsa:4096 -nodes -out AdminUser.csr -keyout AdminUser.key
-subj “/C=GB/ST/=NPT/L=London/O=AdminUser/OU=IT/CN=George-HP/emailAddress=myemail@myemail.com "
-passin pass:AdminUserPwd
Use the certificate request to produce the certificate:
x509 -CA mongoCA.crt -CAkey mongoCA.key -CAcreateserial -req -days 365
     -in AdminUser.csr -out AdminUser.crt
To generate the pem file, open a windows command prompt as administrator, navigate to the OpenSSL/bin directory and enter:
type AdminUser.key AdminUser.crt > AdminUser.pem
Copy the file to the mongoDB/SSL folder. It’s now possible for AdminUser to register a new user by first using TSL to connect to the database and then authenticating itself using SCRAM.
mongo  --ssl --sslCAFile C:/MongoDB/SSL/mongoCA.crt
       --sslPEMKeyFile C:/MongoDB/SSL/AdminUser.pem --host George-HP
use admin
db.auth("AdminUser", "AdminUserPwd" )
use $external
db.createUser(
  {
    createUser: "C=GB,ST=NPT,L=London,O=x509User,OU=IT,
                 CN=George-HP,emailAddress=myemail@myemail.com"
    roles: [
             { role: 'readWrite', db: 'TestMongoDB' }
           ],
    writeConcern: { w: "majority" , wtimeout: 5000 }
  }
)
Connect to the Server using the C# Driver
Here is the code to connect to an instance running on localhost.
  const string connectionString = "mongodb://localhost";
  //For a server running on a domain named GEORGE-DELL and port 27025 use
  //const string connectionString = "mongodb://GEORGE-DELL:27025";
     var clientSettings = MongoClientSettings.FromUrl(new MongoUrl(connectionString));
         clientSettings.SslSettings = new SslSettings();
         clientSettings.UseSsl = true;
         clientSettings.SslSettings.ClientCertificates = new List<x509certificate>()
          {
       		 new X509Certificate2(@"C:\MongoDB\SSL\x509User.pfx", "x509UserPwd")
           };
            clientSettings.Credentials = new[]
            {
                MongoCredential.CreateMongoX509Credential(
              "C=GB,ST=NPT,L=London,O=x509User,OU=IT,CN=George-HP,
               emailAddress=myemail@myemail.com")
            };
            clientSettings.SslSettings.EnabledSslProtocols = SslProtocols.Tls12;
            clientSettings.SslSettings.CheckCertificateRevocation = false;
            clientSettings.VerifySslCertificate = false;

        var client = new MongoClient(clientSettings);
</x509certificate>
It's very important that the subject sub-string used to register a user with mongod or contained in the C# driver's connection string is an exact copy, character by character, of the subject line contained in the X.509 certificate belonging to the client. To view the subject of the certificate displayed in the required order and format (RFC2253), enter the following at the SSL prompt:
req -text -noout -verify -nameopt RFC2253 -in x509User.csr
Use a Template
It's a bit tedious producing the certificates. But some of the tedium can be reduced by using a template that lists the commonly used commands. Most of the attributes are constant for a given implementation and, as mentioned above, it’s important that they remain constant. The attributes that change from certificate to certificate can be altered by simply editing the template using 'find and replace' in a text editor.
Configuring Windows Firewall
You may need to change the settings in Windows Firewall to enable connections between different domains on the network. For example, you can use netsh at a command prompt to add a rule to the firewall to allow private network TCP connections for a mongoDB server listening on port 27025 by using the following command:
netsh advfirewall firewall add rule name="mongod config svr inbound"
profile=private dir=in action=allow protocol=TCP remoteip=any localport=27025
The command to show all the existing rules is:
netsh advfirewall firewall show rule name=all
There are other examples here.
Conclusion
MongoDB affords a high degree of security if time can be taken to implement it. It's my hope that this article will help to reduce that time.
History
- 25th January, 2018: Initial version