
IoT Starter Raspberry Pi Thing
4.94/5 (15 votes)
An embryo for Home Intelligence using Raspberry Pi with Linux
Introduction
Please check the first part of this series at IoT Starter Raspberry Pi Core.
IoT Starter Pi Thing includes the basic stuff to be included in any Thing, which means future projects are expected to start from here. The Thing is an embryo of an IoT device, with the objective of helping us to start managing ambient light, air conditioner, heater, home theater, and other functionality at home.
For most IoT Home Intelligence projects, the Raspberry Pi (RPI) with arm 32-bit CPU is supposed to be equipped with custom hardware like temperature and humidity sensors, proximity sensors, and maybe switches and motors to open doors and windows. Also, infrared leds are very interesting components to be explored, since they enable RPI to output commands to home appliances, as a universal remote control.
Specs
Modeling and development follows API First strategy, in order to define the services provided by the Thing.
- The API, taken as a sample for this
Thing, can be found here. - Depending on the
Thingyou need, adjustments should be done at current API, aiming your goals. - The API modeling should decompose the intelligence of the
Thingconcerning security, control and data access. - Programming and Development (P&D) will be accomplished at speedy x64 micros with Windows 10 and Visual Studio 2017 exploring .NET Core 2.0 and ASP.NET Core 2.0 platforms.
- Deployment at RPI is based on Docker containers. As shown at this Alex Ellis tutorial, code is generated at x64 machine, containers are pushed to the cloud and then pulled back to be deployed at the RPI.
- The
Thingis supposed to be installed at some location (coordinates or zip code) and internal zone inside location (0-n); - Each
Thingwill be designed to handle home environment (temperature, humidity), lighting, sound, video, human presence, etc. - The
Thingmay access external web, in order to store and retrieve info related to its activities. - A temperature (optionally also humidity) sensor is mandatory at any
Thing. It is expected that temperature (and humidity) of eachThingbe reported to external web; - The
Thingis based on the IoT.Starter.Pi.Core which meanshome-webandhome-uiare the starting projects.
Setup
Operating System
The RPI is supposed to be installed with following:
- Linux Raspbian GNU/Linux 9.1 (stretch). Lite version, the minimal image based on Debian Stretch, is used to initialize the
Thing. Generate the Micro SD Card with Etcher, for example, and boot the RPI. - Then, it is wise to update/upgrade everything. Follow this tutorial published by Tlindener in 2015. Skip the beginning, start at step 3. If you need the configuration program
raspi-config, it is already available at Stretch Lite version. - Docker is available for RPI since 2016, see the announcement from Matt Richardson, director of Raspberry Pi Foundation North America. Several other tutorials are available for Docker setup at RPI, like this one by Alex Ellis.
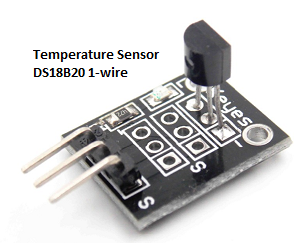
Temperature Sensor DS18B20 1-wire
The Thing is supposed to be attached to a temperature sensor. In order to explore the built in 1-Wire technology available at Linux, the DS18B20 is featuring at this Thing. Please see more details below.
Other popular temperature sensors are available, for example, the DHT22 allows temperature and humidity readings from the same component. Please check this post from Adam Garbo, containing valuable info to get RPI running.
DS18B20 Digital Thermometer
- Dallas DS18B20 Programmable Resolution 1-Wire Digital Thermometer
- Keyes assembly already includes pull up and led
1-Wire setup
In order to activate Linux drivers, it is necessary to append the configuration below to /boot/config.txt (no spaces) and reboot. Sensor Data In/Out pin is wired to GPIO 4 of RPi, header pin 7.
# Enable 1-wire interface
dtoverlay=w1-gpio-pullup,gpiopin=4
Commands
#Start
modprobe w1_gpio
modprobe w1_therm

#List
lsmod | grep w1

#Read the temperature
cd /sys/bus/w1/devices
cd 28-*
cat w1_slave
Following is a screenshot related to temperature sensor. First, the lsmod command filtered by grep shows w1-related modules. Then, navigating through /sys/bus/w1/devices/, we check sensors details, for example, the unique sensor id for my DS18B20 is "28-00000523113b", shown at directory name below. Other similar components tied to 1-wire bus would be properly identified as well.
pi@lumi:~ $ lsmod | grep w1
w1_therm                6401  0
w1_gpio                 4818  0
wire                   32619  2 w1_gpio,w1_therm
pi@lumi:~ $ cd /sys/bus/w1/devices
pi@lumi:/sys/bus/w1/devices $ ll
total 0
lrwxrwxrwx 1 root root 0 Dec 18 18:27 28-00000523113b ->
                       ../../../devices/w1_bus_master1/28-00000523113b
lrwxrwxrwx 1 root root 0 Dec 18 18:27 w1_bus_master1 -> ../../../devices/w1_bus_master1
pi@lumi:/sys/bus/w1/devices $ cd 28-*
pi@lumi:/sys/bus/w1/devices/28-00000523113b $ ll
total 0
lrwxrwxrwx 1 root root    0 Dec 18 18:28 driver -> ../../../bus/w1/drivers/w1_slave_driver
-r--r--r-- 1 root root 4096 Dec 18 18:28 id
-r--r--r-- 1 root root 4096 Dec 18 18:28 name
drwxr-xr-x 2 root root    0 Dec 18 18:28 power
lrwxrwxrwx 1 root root    0 Dec 18 18:28 subsystem -> ../../../bus/w1
-rw-r--r-- 1 root root 4096 Dec 18 18:28 uevent
-rw-r--r-- 1 root root 4096 Dec 18 18:28 w1_slave
pi@lumi:/sys/bus/w1/devices/28-00000523113b $ cat w1_slave
bc 01 4b 46 7f ff 04 10 d2 : crc=d2 YES
bc 01 4b 46 7f ff 04 10 d2 t=27750
pi@lumi:/sys/bus/w1/devices/28-00000523113b $
After reading the temperature from our component with cat w1_slave command, the value appears at bottom, after "t=". The actual temperature is 27.750 degrees Celsius and "YES" means that CRC was checked OK after DS18B20 transmitted the info to RPI. A simple and safe device that can be multiplied, thanks to the 1-wire bus technology.
Please note that this is all available out of the box, from the Lite version of Linux Raspbian operating system.
SSL Reverse Proxy
How about security? Which protocols should be used? Http is fine or cryptography should be added through https?
Since the Thing is based on the IoT.Starter.Pi.Core, the http protocol through ports 80 and 5010 are being used for outside world communication, respectively by home-ui and home-web projects. Behind the scenes, this code is supposed to be a Kestrel implementation of the web server provided by ASP.NET Core.
It would be great if we could keep home-ui and home-web away from these security questions. This post from Oliver Zampieri shows how to set up a reverse proxy with NginX in a docker container, and configure it with self signed certificates. Based on that, the proxy.Dockerfile shown below creates a safe path for the Thing device, using htpps and SSL.
# Self-signed SSL reverse proxy with docker
#
# Starting from arm32v7/nginx image, based on Oliver Zampieri post below.
# https://medium.com/@oliver.zampieri/self-signed-ssl-reverse-proxy-with-docker-dbfc78c05b41
#
# Key and Cert files were generated separately at RPI:
# /usr/bin/openssl req -subj '/CN=localhost' -x509 -newkey rsa:4096 -nodes -keyout key.pem -out cert.pem -days 365

FROM arm32v7/nginx

WORKDIR /app
COPY proxy.conf /etc/nginx/conf.d/
COPY key.pem /etc/nginx/conf.d/
COPY cert.pem /etc/nginx/conf.d/

EXPOSE 443
CMD ["nginx", "-g", "daemon off;"]
The NginX configuration requires a proxy.conf file to be added, redirecting https traffic to http://192.168.20.102:80 where home-ui server is listening to, more details below:
server {
  listen 443;
  ssl on;
  ssl_certificate /etc/nginx/conf.d/cert.pem;
  ssl_certificate_key /etc/nginx/conf.d/key.pem;
  location / {
     proxy_pass http://192.168.20.102:80;
  }
}
A new service ssl.proxy is added to pi.docker-compose.yml, as shown below:
version: '3'

services:
  io.swagger:
    image: josemottalopes/home-web
    build:
      context: .
      dockerfile: src/IO.Swagger/pi.Dockerfile
    ports:
    - "5010"
    network_mode: bridge
    environment:
      - ASPNETCORE_ENVIRONMENT=Development

  home.ui:
    image: josemottalopes/home-ui
    build:
      context: .
      dockerfile: src/Home.UI/pi.Dockerfile
    ports:
    - "80"
    network_mode: bridge
    environment:
      - ASPNETCORE_ENVIRONMENT=Development

  ssl.proxy:
    image: josemottalopes/nginx-proxy
    build:
      context: .
      dockerfile: proxy.Dockerfile
    ports:
    - "443"
    network_mode: bridge
Use commands below to build the Thing at a speedy x64 machine. Then, all three images are pushed to the cloud.
cd home
docker-compose -f pi.docker-compose.yml build
docker push josemottalopes/home-web:latest
docker push josemottalopes/home-ui:latest
docker push josemottalopes/nginx-proxy:latest
There are now three images that each Thing should deploy to RPI: the previous docker images for home-web, home-ui and the new nginx-proxy image.
Deployment at RPI is accomplished by commands below. See that the nginx-proxy and home-ui images are pulled completely from the web. When the last command starts downloading home-web, the same .NET platform than home-ui, four memory modules "Already exists" and don't need to be downloaded again. That's cool!
alias yhomeui='docker run --privileged -p 80:80 -d josemottalopes/home-ui:latest'
alias yhomeweb='docker run --privileged -p 5010:5010 -d josemottalopes/home-web:latest'
alias yproxy='docker run --privileged -p 443:443 -d josemottalopes/nginx-proxy:latest'

root@lumi:~# yproxy
Unable to find image 'josemottalopes/nginx-proxy:latest' locally
latest: Pulling from josemottalopes/nginx-proxy
cd8b673adb84: Pull complete
1e2b2afc1dc6: Pull complete
8877327663c1: Pull complete
30769b69127d: Pull complete
566ebde5ccae: Pull complete
8750acaf84ea: Pull complete
ee0b0682ef1e: Pull complete
Digest: sha256:08ccedc3ada5104cf207265c96755dd97bede056a4b92ec73e08c2ac09b4bf41
Status: Downloaded newer image for josemottalopes/nginx-proxy:latest
d9e682be83592d7bf61d41f12e0e14718b4bcb7f46026a13b2e2a1cc023edf1e
root@lumi:~# yhomeui
Unable to find image 'josemottalopes/home-ui:latest' locally
latest: Pulling from josemottalopes/home-ui
0d9fbbfaa2cd: Pull complete
b015fdc7d33a: Pull complete
60aaa226f085: Pull complete
01963091a185: Pull complete
09d3726a2ea3: Pull complete
999141c5092e: Pull complete
Digest: sha256:67b10ee226a9ba8aa41abd9639cdddb34096b51475f3461ad7a2a487a8103d53
Status: Downloaded newer image for josemottalopes/home-ui:latest
398ba160a6bb2d780e0e9aaf9aed03304358ef36eee7b362ebd4487fa117cb70
root@lumi:~# yhomeweb
Unable to find image 'josemottalopes/home-web:latest' locally
latest: Pulling from josemottalopes/home-web
0d9fbbfaa2cd: Already exists
b015fdc7d33a: Already exists
60aaa226f085: Already exists
01963091a185: Already exists
e487938a6461: Pull complete
92a06faf2aa0: Pull complete
Digest: sha256:c2483c67935a7fa7f4a227788a9799056f016be456bb61f9619ad303f793dd12
Status: Downloaded newer image for josemottalopes/home-web:latest
5df1f1f8d0e0a049534f87e07bfc05b202451f23c35e7c3c418446d019a35e87
root@lumi:~# docker ps
CONTAINER ID        IMAGE                               COMMAND                  CREATED              STATUS              PORTS                            NAMES
5df1f1f8d0e0        josemottalopes/home-web:latest      "dotnet IO.Swagger..."   About a minute ago   Up About a minute   80/tcp, 0.0.0.0:5010->5010/tcp   xenodochial_elion
398ba160a6bb        josemottalopes/home-ui:latest       "dotnet Home.UI.dll"     2 minutes ago        Up 2 minutes        0.0.0.0:80->80/tcp               vibrant_goodall
d9e682be8359        josemottalopes/nginx-proxy:latest   "nginx -g 'daemon ..."   7 minutes ago        Up 7 minutes        80/tcp, 0.0.0.0:443->443/tcp     angry_mcclintock
root@lumi:~#
The docker ps command at the bottom shows three containers running. After the first run, you should be patient to access the Thing device, since a lot of stuff is loaded and initialized by .NET Core and ASP.NET platforms. Please see below access to both home-ui and home-web.

Please note that home-web is using http protocol at port 5010, showing the typical swagger UI. The other window from home-ui shows https protocol being used at "About" page. As you can see, the self-signed certificate generates a "Not secure" alert from the browser. This should be fixed with a true certificate generated by proper key.pem and cert.pem files.
Project home-ui
The starter kit concept suggests to keep home-ui clear for proper customization.
Based on this Peter Leow post, geolocation tests with a couple static pages are added to home-ui, exploring the HTML5 Geolocation API. Both files listed below can be found at home\src\Home.UI\wwwroot:
- map.html: show the current position on map;
- geolocate.html: show the current latitude and longitude coordinates.
The tests work fine using https, as you can see below. But the small window at right is using http and got an error. Looks like the HTML5 Geolocation API supports only https protocol.

Project home-web
For the same reason mentioned before, the home-web should follow the API customization.
As an example, the GetZoneTemperature operation is implemented. This simple solution takes into account that only one DS18B20 temperature sensor is wired. The code is added to EnvironmentApi controller and extracts temperature info from /sys/bus/w1/devices/28-00000523113b/w1_slave.
    /// <param name="zoneId"></param>
    /// <response code="200">Zone temperature</response>
    [HttpGet]
    [Route("/motta/home/1.0.1/temperature/{zoneId}")]
    [ValidateModelState]
    [SwaggerOperation("GetZoneTemperature")]
    [SwaggerResponse(200, typeof(TemperatureZoneStatus), "Zone temperature")]
    public virtual IActionResult GetZoneTemperature([FromRoute]string zoneId)
    {
        TemperatureZoneStatus tzs = null;

        DirectoryInfo devicesDir = new DirectoryInfo("/sys/bus/w1/devices");

        foreach (var deviceDir in devicesDir.EnumerateDirectories("28*"))
        {
            var w1slavetext =
                deviceDir.GetFiles("w1_slave").FirstOrDefault().OpenText().ReadToEnd();
            string temptext =
                w1slavetext.Split(new string[] { "t=" },
                            StringSplitOptions.RemoveEmptyEntries)[1];
            string name = deviceDir.Name;

            tzs = new TemperatureZoneStatus
            {
                Id = zoneId,
                Name = deviceDir.Name,
                Value = double.Parse(temptext) / 1000,
                Units = TemperatureZoneStatus.UnitsEnum.CelsiusEnum,
                Timestamp = DateTime.Now
            };
        }

        var example = tzs ?? default(TemperatureZoneStatus);

        return new ObjectResult(example);
    }
The Thing is now able to inform the temperature, using the swagger UI interface. Please see below:

Conclusion
The current tests were done with a Raspberry Pi 2 Model B. The Thing is now available to be used as a starter device on an IoT Home Intelligence application.
Have fun!
History
- 8th January 2018: Initial version, repository at https://github.com/josemotta/IoT.Starter.Pi.Thing
- 14th February 2018: Version 1.1, repository at https://github.com/josemotta/IoT.Starter.Pi.Thing