
Programming Windows 10 Desktop: UWP Focus (14 of N)
Get Started in UWP (moving away from WinForms) Chapter 14: Add ability to delete an entry with a pop up confirmation dialog, add AccessKeys (keyboard shortcuts) and fix some bugs in our DailyJournal app.
- Download DailyJournal_v028.zip - 126.4 KB
- Download DailyJournal_v029.zip - 126.5 KB
- Download DailyJournal_v030.zip - 126.7 KB
- Download DailyJournal_v031.zip - 126.9 KB
- Download DailyJournal_v032.zip - 126.9 KB
- Download DailyJournal_v033.zip - 127 KB
- Download DailyJournal_v034.zip - 127 KB
Introduction
We are continuing the work we've been doing on our DailyJournal app.
We have a few loose ends to wrap up with our DailyJournal app to make it more usable and the code a bit cleaner.
Work List For This Chapter
We need to :
-
Fix the bug that occurs when you attempt to alter a previously created entry and it saves the data to a new entry.
-
Add the ability to delete an entry (and its associated entry file)
-
Fix
EntriesListViewso it is refreshed when a new entry is added (Saved the first time). Currently theListViewis only refreshed when you change the selected date. -
Add shortcut keys to our functionality
After we make these finishing touches to the app we will use the rest of the book to build an app that examines every available control (via XAML) that you can add to a UWA (Universal Windows App) so you can get a better idea of what is (and is not) available and have a place to go for basic starter XAML for those controls.
Background
You can read all the chapters that have come before this one:
Programming Windows 10: UWP Focus (1 of N)[^]
Programming Windows 10: UWP Focus (2 of N)[^]
Programming Windows 10: UWP Focus (3 of N)[^]
Programming Windows 10 Desktop: UWP Focus (4 of N)[^]
Programming Windows 10 Desktop: UWP Focus (5 of N)[^]
Programming Windows 10 Desktop: UWP Focus (6 of N)[^]
Programming Windows 10 Desktop: UWP Focus (7 of N)[^]
Programming Windows 10 Desktop: UWP Focus (8 of N)[^]
Programming Windows 10 Desktop: UWP Focus (9 of N)[^]
Programming Windows 10 Desktop: UWP Focus (10 of N)[^]
Programming Windows 10 Desktop: UWP Focus (11 of N)[^]
Programming Windows 10 Desktop: UWP Focus (12 of N)[^]
Programming Windows 10 Desktop: UWP Focus (13 of N)[^]
 Print or Kindle Available at Amazon
You can also read the first 8 chapters of the book as a print or kindle book from amazon:
Programming Windows 10 Via UWP: Learn To Program Universal Windows Apps For the Desktop (Program Win10) [^]
Let’s work on fixing our bug first.
Getting Started
If you don't have the previous code, you can get the DailyJournal_v028 which is the code we left off with in Chapter 12 & 13. Also, keep in mind all source code is available at Github : https://github.com/raddevus/Win10UWP
Bug Fix
I recently noticed that if you click on a previously created entry and try to edit it and save, you will actually get a new entry created on the same day which contains the new data you typed.
After doing an additional bit of debugging I’ve learned that the code in MainPage.xaml.cs is incorrect when it adds the list of existing entries to the currentJournalEntries collection.
The incorrect line of code is in the LoadEntriesByDate() method:
currentJournalEntries.Add(
  new JournalEntry(reb,
  Path.Combine(appHomeFolder.Path),
  YMDDate, entryText));

This line of code does not send in the value for the existing name of the file when the new JournalEntry is constructed.
That was an oversite in the last version (DailyJournal_v028) of the code.
Let’s fix that now.
Resolving the Problem Is Easy
All we need to do is add the filename to the JournalEntry constructor so it will get set properly instead of generate a new filename for the JournalEntry. Obviously, since the file already exists we do not need to generate a new file name. The file name is already being used in that section of code so it can load the file data into the RichEditBox, so we can just take that code and add it to the JournalEntry constructor call.
currentJournalEntries.Add(
  new JournalEntry(reb,
  Path.Combine(appHomeFolder.Path),
  YMDDate, entryText,
  System.IO.Path.GetFileName(f)));

You can see that the line we add is the same call me make on line 77 where we do the LoadFileFromStorage().
That change fixes the problem with saving changes to a previously created entry. That will do a lot to move us forward with the work we are doing in this chapter so it’s good to get it done.
Build, Run and Test
You can get the updated code from the DailyJournal_v029 project and build, run and test it.
Add Delete Functionality
Let’s add our Delete functionality by adding a new CommandButton. I’m also going to add a vertical separator bar between the other two items and the delete button to provide a little more space so the user is less likely to click the delete button by accident. Of course we’ll need to add an “Are you sure?” warning of some type too.
If you go back to that Microsoft online doc and search for the word delete you will see that Microsoft provides a trash can for the delete button.
https://docs.microsoft.com/en-us/uwp/api/windows.ui.xaml.controls.symbol

We’ll use that symbol in our XAML for our new button.
<AppBarSeparator/>
<AppBarButton
  x:Name="DeleteEntryButton"
  Icon="Delete"
  Label="Delete"
  ToolTipService.ToolTip="Save (Ctrl+D)" >
</AppBarButton>

The vertical separator is called an AppBarSeparator and you can see we added that new element on one line which creates the line to the left of the trash can icon.
Now we can add a new event handler for when the delete button is clicked.
Add Event Handler
I’m sure you remember how easy it is to add the event handler.
-
Select the element we want to add the event handler to (usually easiest to select in the XAML view).
-
Click the [lightning bolt] button in the Properties window (usually found on bottom right of Visual Studio.
-
Scroll down until you see the Click event handler and its associated text box.
-
Double-click in the Click event handler’s associated text box and Visual Studio will add the event handler and open up the
MainPage.xaml.csso you can add code to the event handler.

Once Visual Studio opens up the file and places the cursor in the DeleteEntryButton_Click method the code is relatively simple.
We could just add our delete functionality right inside the DeleteEntryButton_Click method but this would break our focus on SoC (Separation of Concerns) since the JournalEntry should delete itself the same way that we decided it should save itself.
The best way to keep our concerns separated is to let the JournalEntry itself do the work of deleting the backing file. That way we can just call a method named Delete() on the JournalEntry and be done with it. That follows the pattern we used with having the JournalEntry save itself too (we just call Save()).
Adding the JournalEntry Delete Method
Switch over to the JournalEntry class (open up the JournalEntry.cs file) and we’ll add a stub for our new Delete() method.
Here’s the code I initially add into the JournalEntry class:
public bool Delete()
{
  return false;
}

Why Add a Boolean Return?
I added that return of false just so Visual Studio wouldn’t give me the angry red squiggly lines.
I want to return a boolean (true / false) value because I’m thinking that the caller might need to know if an item was deleted or not so it can decide whether or not it needs to run other functionality.
Did We Delete A File?
Next, we need to add a check to see if the associated Entry file exists.
If it does, we delete it and return true.
If it does not exist, we do nothing and return false.
Here’s the code we’ll add before the line which currently has the return false:
String targetFile = Path.Combine(AppHomeFolderPath, YMFolder, FileName);

if (File.Exists(targetFile))
{
  File.Delete(targetFile);
  return true;
}

On line 46 I create a local variable to hold the full path of the target file which we are looking for.
I create the local variable because I will use it in two places and if I didn’t store it somewhere I’d have to make that call to Path.Combine() two different times.
After that, we check to see if the file exists using the library method File.Exists().
If it does exist we delete it. We don’t actually have to check for file existence before calling File.Delete() because File.Delete is a fail-safe method meaning that if the file doesn’t exist then it simply doesn’t do anything and doesn’t throw any exception.
We check for the existence of the file simply so we can know if we want to return true or false back to the original caller.
But, Wait, There’s More!
This would fulfill our delete needs if all we needed to do was delete the file. However, earlier we decided that all Entry files would be numbered in consecutive order and we decided that the app itself would guarantee this order at all times so that when a new entry (and associated entry file) is created then the numbering will stay consecutive.
Handling File Entry Numbering Upon Delete
Now that we are deleting entries and associated entry files, we could create a problem where we delete entry number 2 of 3, for example, and then we’d have entry file numbers of 1 and 3 but no 2. We need to write a method that will handle that, so when the file is deleted the entry numbers on the existing files will be updated appropriately.
Let’s add a new private method named UpdateFileNumbers(). We will send in an integer value which will represent the starting entry number of the deleted entry. The entries below that number do not need to be renamed.
Here’s the entire method we are going to add.
private void UpdateFileNumbers(int startAtNumber)
{
  string targetDirectory = Path.Combine(AppHomeFolderPath, YMFolder);

  if (Directory.Exists(targetDirectory))
  {
     String[] allCurrentFiles = Directory.GetFiles(targetDirectory,
     String.Format("{0}*.rtf", YMDDate), SearchOption.TopDirectoryOnly);
     allCurrentFiles = allCurrentFiles.Skip(startAtNumber).ToArray();

     foreach (String f in allCurrentFiles)
     {
        (++startAtNumber).ToString("000"));
        File.Move(f, Path.Combine(targetDirectory,targetFileName));
     }
  }
}

On line 61 you can see we simply set up the targetDirectory that we will be dealing with. This is exactly the same code we use in GenerateFileName().
Next, on line 62, we insure that the directory does exist just to make sure our call to discover existing files doesn’t throw an exception. We then get the list of existing files (remember the one we deleted is already gone.
We use the Skip method again to move past all the entry files that have a lower number since we do not need to rename those.
Finally on line 67 we iterate through all the remaining files. Each time through the loop we generate the new targetFileName (line 69) using the startAtNumber which we increment before use each time with the ++ operator.
On line 71, we call the File.Move() method which takes the source file name and renames it to our targetFileName. You might’ve expected that method to be called rename but Move is the convention used for moving and renaming a file.
Now, we simply need to add a call to this method each time a file is deleted.
We add that line back in the JournalEntry.Delete() method, just above where we creatd this method in the JournalEntry.cs file.
The added code is just one line but I added two lines of comments and broke the line across lines so we can see it easier.
UpdateFileNumbers(Convert.ToInt16(FileName.Substring(FileName.Length - 7, 3))-1);

Completing The Delete Functionality
With that code in place, we are ready to completely wrap up the delete functionality with just a couple more lines of code to call the method.
Now that we’ve added this public method we can call it very easily from our DeleteEntryButton_Click method. Save your changes to the JournalEntry class and switch back to the MainPage.xaml.cs and let’s continue making our changes to that method.
Visual Studio can be very helpful to us, because now when we get back over in our DeleteEntryButton_Click method and start typing our code in, we should get some help.
As you begin to type currentJournalEntries.currentJournalEntry. and you hit that dot after currentJournalEntry, Visual Studio should try to provide you some Intellisense help.

You can see that now, along with your previously available public members, you now also have the Delete method available.
We’re wrapping the call in a if() statement so that if the method did delete a file we can do some additional work.
if (currentJournalEntries.currentJournalEntry.Delete())
{

}

Inside that if() statement we actually want to run the functionality that executes when the user clicks a new date in the MainCalendar. We want it to do that so the entries will be initialized again so the associated pivot item for the deleted entry will be removed.
However, that code we need to run is currently wrapped up in the MainCalendar_SelectedDatesChanged event handler.

Since we don’t want to call that handler, but we do want the functionality to run again, we need to move the code from that handler into its own method so we can call it from multiple places.
Let’s cut that code from the event handler and put it in a new method in the MainPage.xaml.cs file which we will name InitializeEntryItems.
I’m going to add the new method directly above our MainCalendar_SelectedDatesChanged() event handler and then add the call to the new method into the event handler again so everything will continue working just as it previously did.
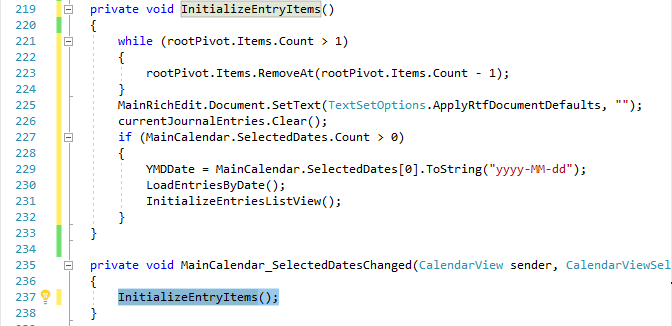
Plus, since that method is now separated out, we can now easily call the functionality in our DeleteEntryButton_Click handler. Let’s move back to that method and add our new method call in.
All we have to add is that one call to our new InitializeEntryItems() method.

Yet Another Bug
When I built this and tested it extensively, I found that there was a bug in existing code. It is a very small bug that occurs when you attempt to delete an entry on a date that has not entries. When you do that, the app will improperly delete the first entry from the currentJournalEntries.currentJournalEntry (whichever one is current at the time).
This problem occurs because the AddDefaultEntry() method doesn’t set the default entry as the currentJournalEntry as it should.
It only takes one line of code to fix the problem so let’s move to the AddDefaultEntry() method (still in MainPage.xaml.cs) file and add the one line of code to fix the problem.
currentJournalEntries.GetSelectedEntry("Entry1");

Of course, this is the default entry so we always set the EntryHeader to “Entry1”. Here we just needed to insure that the GetSelectedEntry() method is called so that it will set the currentJournalEntry properly.
With that fix in place our delete functionality is complete and works very well.
Build, Run, Test : The Dev’s Triad
Get the DailyJournal_v030 code and build it, run it and test it out.
Create Three Entries As A Test
If you create three entries (Entry1, Entry2, Entry3) and then delete Entry2 for example, you will see that the entry3 entry file which is associated will be renamed / renumbered so it is 002.
On screen you’ll see that there will only be two entries and the user focus will be set on Entry1.
It all works very well. However, we need to add a way to ask the user she really wants to delete the entry and require her to confirm the deletion so she has a chance to change her mind.
Let’s take a look at how we’ll do that.
I did some research by reading the Microsoft docs at : https://docs.microsoft.com/en-us/windows/uwp/design/controls-and-patterns/dialogs
ContentDialog or Flyout
That document helps explain the difference between when you should use a ContentDialog or a Flyout. A Flyout is a simpler kind of message that is used for displaying some relevant information to the user which they can easily ignore by clicking anywhere else on the form and causing the flyout to disappear. In contrast, a ContentDialog requires the user to interact with the dialog by accepting or canceling somewhere on the dialog. The user cannot interact further with the app until she responds to the dialog. For a situation like we have with the deletion of an entry the ContentDialog is the better option so we will continue down that path.
There was a nice example with that Microsoft documentation so grabbed it as a template for the work we are going to do. That code is runnable as it is so let’s add it in, try it out and then alter it for our needs.
private async void DisplayLocationPromptDialog()
{
   ContentDialog locationPromptDialog = new ContentDialog
   {
       Title = "Allow AppName to access your location?",
       Content = "AppName uses this information to help you find places, connect with friends, and more.",
       CloseButtonText = "Block",
       PrimaryButtonText = "Allow"
   };

   ContentDialogResult result = await locationPromptDialog.ShowAsync();
}
Let’s drop that new method directly into our MainPage.xaml.cs at the bottom of the file, right after our DeleteEntryButton_Click method.

Bug In Microsoft's Sample Code
That method would work without any other changes, except the sample that Microsoft provides actually has a bug in it. Seriously.
The code makes reference to CloseButtonText (which is supposedly a property of the ContentDialog) but either Microsoft changed the property name since the doc was created or the doc author just got that wrong, because that property does not exist. That property should be named : SecondaryButtonText, so let’s change that first thing.
Once you make that change we can use the code. Let’s call the code from our DeleteEntryButton_Click method, just to see what it will do.
We just need one line of code to call the method and we’ll add that as the first line of DeleteEntryButton_Click.
DisplayLocationPromptDialog();

WARNING: The code obviously doesn’t have the correct text we will use nor does it stop your item from being deleted. To test this, I suggest you click the [Delete] button on a date that has no entries already created. That way nothing will actually be deleted but you’ll be able to see this ContentDialog appear.
Once you add that line of code, you can run the app and try out the new functionality by clicking the [Delete] button. When you run the app and click the [Delete] button, you will see something like the following:

You will notice that you cannot click anywhere behind or around the ContentDialog. With the ContentDialog the app forces you to make a choice of one or the other button to continue. That makes sense in our case because we want to user to accept or cancel the deletion of the entry.
Keyboard Shortcuts
There are also two default keys which will work to respond to the dialog : <ESC> and <ENTER>
Pressing the <ESC> button will automatically choose the Cancel option of the dialog box. Pressing <ENTER> will automatically choose the Accept option of the dialog box.
What Does DisplayLocationPromptDialog Do?
The DisplayLocationPromptDialog method really does three things:
-
Sets up a
ContentDialog -
Displays the dialog
-
Gets a return value, which is dependent upon which button the user clicked
The display of the dialog and the obtaining of the return value is all done on that one line (line 276 of our previous code listing).
Using Breakpoints In Visual Studio
Let’s add a breakpoint on that line and I’ll show you how we can examine the value (and type) of the return value while the app is running in debug mode.
To add a breakpoint, all you have to do is click in the gutter area in Visual Studio’s code editor.

Click to the left of the line number (276) and a breakpoint will be added. A breakpoint will cause the app to stop when that line of code runs. Now, run the app with debugging (press <F5>) and click the [Delete] button.
When you follow those steps, after hitting the Delete button Visual Studio will pop up to the top of the screen and look like the following:

Instruction Pointer, Immediate Window, Locals
Notice that yellow arrow is pointing to the line of code which is about to be executed. Also notice that the lower right window (default position) is a window named Immediate Window. During debugging we will see that we can write code in there to inspect values. I’ll show you how in just a moment.
Also notice that there is a tab named Locals, which will display local variable (local to the method and class running) so we can inspect values easily.
Click that Locals tab so we can take a look at the values of some of the local variables.
The one we are most interested in is result.

Viewing Values of Local Variables
You can see that result is currently set to None which means that no button has been clicked yet. I also wanted you to see that the result has a type of ContentDialogResult which is an enumeration. An enumeration is basically a specialized class which maps some friendly names to integer values. In our case the ContentDialogResult has three possible values :
-
None
-
Primary
-
Secondary
These map to which button was clicked by the user.
Go ahead and press the <F10> key to take one step further into the code. When you do the app will pop back up on the screen and display the ContentDialog.
When it does, click the [Allow] button and the app will disappear again and Visual Studio will pop up and you’ll be sitting on the last bracket in the method, right before the code returns to the calling method.

Again, you can see where the instruction pointer is currently located because Visual Studio highlights it with a yellow arrow.
You can also see in the Locals window that the result variable now holds the value of Primary since we clicked the button we’ve defined as the Primary button. Of course, if you had clicked the other button then the value in result would’ve been Secondary.
This is how we determine which button the user clicked.
Immediate Window
If we wanted to inspect the possible values in the ContentDialogResult enumeration, we can use the Immediate window. Click inside the Immediate window and type : ContentDialogResult. (there is a dot at the end of that).

Now, you can see that the ContentDialogResult provides 3 values inside the enumeration. You can also see that I’ve floated over the Primary value to show that it has an integer value of 1. None is equal to 0 and Secondary is equal to 2.
That gives you an idea about how to check values when the code is running, so now let’s alter the code a bit so it is better suited to our purposes.
You can stop the app by going to [Debug] menu and choosing the [Stop Debugging] menu item.

Altering Code To Suit Our Purposes
We need to change the message displayed and the button text to match what we are doing in our app. We also need to change the method name to make more sense (DisplayDeleteConfirmationDialog).
Let’s change the code to look like the following.
private async void DisplayDeleteConfirmationDialog()
{

  ContentDialog confirmDialog = new ContentDialog
  {
     Title = "Are you sure you want to delete this entry?",
     Content = "If you choose Delete, the entry file will be permanently removed.",
     PrimaryButtonText = "Delete",
     SecondaryButtonText = "Cancel"
  };
  ContentDialogResult result = await confirmDialog.ShowAsync();
}
This replaces the previous method name. Also notice that I changed the method call in the DeleteEntryButton_Click method, of course, since the method name changed.

We can run the code and now the message and the buttons make more sense, but the app still does the same thing and deletes the file no matter which button is clicked.
Build, Run, Try
You can get the latest code, just to see the new dialog messages and buttons show up. Get the DailyJournal_v031 code and try it out.
Now when you run the app and test the delete functionality, at least the text is all correct and related to the action the user is actually taking.

Alter Return To Determine What To Do
What we’d like to do now is alter the return of the DisplayDeleteConfirmationDialog method so we can use the returned value to decide if the app should go ahead and delete the entry file or not.
However, since the DisplayDeleteConfirmationDialog is an async method there will be a couple of challenges to resolve.
The first thing I do is change the last line of code so that instead of setting the result variable, we simply return the ContentDialogResult value. We’ll change line 276 so it looks like the following:
return await confirmDialog.ShowAsync();
Of course, the method needs to return that type now, instead of a void, so we change the method signature too. When we do, however, we are warned by Visual Studio Intellisense that something is amiss.

The message is letting us know that an async method must return one of three things (void, Task, or Task<T> where T is any type. That makes it very easy for us to fix. All we have to do is wrap our ContentDialogResult in Task<>.
Our method signature will now be:
private async Task<ContentDialogResult> DisplayDeleteConfirmationDialog()

Once again, the code will build and run, but of course we still aren’t using the returned value. Let’s make that change where we make the call to that method in DeleteEntryButton_Click and then everything will work properly.
We simply change the line of code which calls the method so that we now capture the return value in a variable which we can use.
ContentDialogResult result = DisplayDeleteConfirmationDialog();
When you alter that line of code, Intellisense is going to warn you again and try to help.

Intellisense is letting us know that we need to use the await operator since the method we are calling is an async method. Under the Usage section in the Intellisense text you can see we just need to add the await keyword to fix the problem. Of course, as soon as we do that, we also need to change our method’s signature so it is an async method also. So let’s go ahead and make both of those changes now.

Now, the method is valid, however, we still need to add our code so that when the entry file is only deleted when the user clicks the Primary (Delete) button.
It’s very easy to do that work now that we’ve prepared everything.
All we have to do is wrap our existing code in an if() statement which checks to see if the result is equal to ContentDialogResult.Primary.
if (result == ContentDialogResult.Primary)

That’s it. The Delete code will work as you expect it to now.
It works quite well. If you don’t have the code, get DailyJournal_v032 and try it out.
If you click Delete and then choose the [Cancel] button or press the <ESC> key then the entry will not be deleted.
If you click Delete and then choose the [Delete] button or press the <ENTER> key the entry will be deleted.
Fixing Small Issue With Saving Entries
We have another fix to do on the SaveEntryButton_Click which will allow us to fix the third item in our list at the top of this chapter.
The method has been calling the JournalEntry.Save() method asynchronously without waiting on the result. That means if we attempt to refresh our list of items then it doesn’t work consistently because that code may run before the asynchronous Save() method is complete.
The code we want to change in SaveEntryButton_Click is on line 216. We just want to add the await keyword to that line so the method will wait for the Save to complete before moving on.

When we add the await keyword, Intellisense warns us that the method we are awaiting cannot return void. If you click the [Show potential fixes] link it will give you an option of changing the Save() method’s return to a Task.

I clicked the choice and let Visual Studio do its magic. Keep in mind that it makes this change to the Save() method of the JournalEntry class.
I switched over there to take a look at the code and I saw this mess.

Well, that does compile but it sure is an ugly looking mess in the editor.
I collapsed it down to one line.

Now we can switch back to our SaveEntryButton_Click method in MainPage.xaml.cs and complete our fix. It’s very easy. We just need to add three lines of code to fix the save issue so that the entry will get added to the EntriesListView Count.
var selectedIdx = rootPivot.SelectedIndex;
InitializeEntryItems();
rootPivot.SelectedIndex = selectedIdx;

On line 218 we create a new local variable to save the integer value stored in the rootPivot’s SelectedIndex property. That value represents the currently selected PivotItem (EntryX). We need to store that because we’re going to call the InitializeEntryItems() method and that will reset all the entry items as they reload the entry files. After we call InitializeEntryItems() the entry counts in the listview will be correct since it will have completed the code which counts the entries which includes our newly created (saved) entry. The last line makes sure the user is placed back on the EntryX item which she was currently editing.
A Few Minor Things Still Wrong With The Code
There are a couple of issues with this code:
-
For updating previously saved items it is unnecessary to do the call to
InitializeEntryItems() since no new item is created. -
The user’s cursor in the
RichEditBoxgets moved to the first line and first character even though she was probably typing at the bottom lines of theRichEditBox.
We can fix those items later or you can work through fixing them yourself.
Get The Code and Run
Get the code and try it out. Get DailyJournal_v033 and try the code out. It’s quite a bit closer to what you expect from a completed app.
Let’s complete our last item on our list and wrap this chapter up.
AccessKey Creates Keyboard Shortcut
These keyboard shortcuts are actually called AccessKeys.
Adding them is extremely easy because all we have to do is add the AccessKey property to the XAML of each AppBarButton.
Let’s alter all three of our AppBarButtons and add appropriate AccessKeys.
You only need one simple setting for each:
AccessKey = “N” for New Entry
AccessKey = “S” for Save Entry
AccessKey= “D” for Delete Entry

You can see that I’ve also altered the TooltipService.Tooltip of each to indicate that the ALT key plus the AccessKey value is what will execute the functionality. Previously those each said CTRL+KEY but these AccessKeys use the ALT key by default.
Once you add that code, you can simply type ALT+N to create a new entry, ALT+S to Save an entry and ALT+D to delete an entry. Of course all of the functionality runs just as if you had clicked the button, so in the case of ALT+D the confirmation dialog will still pop up.
Also, when you float over each of the buttons, a tooltip will appear to let the user know which keys she can use to run the functionality.

In the example, I hovered over the Save button and the tooltip appeared.
Get the Code And Run
Get DailyJournal_v034 and try it out. When you press ALT+N a new entry will be created and you can type in it and then press ALT+S and it will be saved. It works quite nicely since you can just use the keyboard now.
That was a lot of work for this chapter but we covered a lot of territory, learned a lot and made the app quite a bit better.
History
2017-12-22: First publication