
Programming Windows 10 Desktop: UWP Focus (9 of N)
Get Started in UWP (moving away from WinForm) Chapter 9 Refactor (MVC thinking), More OOP, Designing Objects, SoC continuing work on DailyJournal app.
- Download DailyJournal_v013.zip - 124.4 KB
- Download DailyJournal_v014.zip - 124.4 KB
- Download DailyJournal_v015.zip - 124.4 KB
- Download DailyJournal_v016.zip - 124.6 KB
- Download DailyJournal_v017.zip - 124.9 KB
Introduction
It's taken us 8 chapters to get here. Take a look at the previous entries to get up to speed with the DailyJournal app we are building as I lead you with specific details and numerous screen shots.
Programming Windows 10: UWP Focus (1 of N)[^]
Programming Windows 10: UWP Focus (2 of N)[^]
Programming Windows 10: UWP Focus (3 of N)[^]
Programming Windows 10 Desktop: UWP Focus (4 of N)[^]
Programming Windows 10 Desktop: UWP Focus (5 of N)[^]
Programming Windows 10 Desktop: UWP Focus (6 of N)[^]
Programming Windows 10 Desktop: UWP Focus (7 of N)[^]
Programming Windows 10 Desktop: UWP Focus (8 of N)[^]
Background
I'm continuing to attempt to tell the story of Programming Windows 10 Via UWP (Universal Windows Platform) as we work our through refactoring the code into appropriate classes we'll discuss the thinking behind the refactoring and discuss OOD (Object Oriented Design).
This chapter ended up being something like 32 pages long but I'll hope you'll follow along. You can literally sit and read it and examine the screenshots to experience the changes we make. I really put a lot of work into it and I hope you enjoy it.
Also, it may be a better experience for you as a print book and you can now get the first 8 chapters in print (I will publish the second half of the book after I create it):
 Programming Windows 10 Via UWP: Learn To Program Universal Windows Apps For the Desktop (Program Win10) [^] My printing costs are $5.93 but I'm making the book available for only $6.95.
You can also get the Kindle version if that is more convenient to read too:
Programming Windows 10 Via UWP: Learn to program Universal Windows Apps for the desktop (Programming Win10) Kindle Edition[^]
NOTE: I know some CPers may think this is a bit gratuitous but consider that I'm providing the articles here completely free also, before you downvote me just because I've tried to make my book available in numerous formats.
Of course you can always read all of the chapters here at CP.
Continuing Right Where We Left Off
Let’s jump right in and start solving the issues we identified in the last chapter.
If you haven’t followed all of the steps so far or you just want to make sure you have the same code, you can get DailyJournal_v013.zip and start with that code.
First of all we want to make sure our JournalEntries object is actually a collection type of object. To do that we can simply make sure it is a child of a List<> type.
That simply means that we let the system know that it inherits the behaviors of the generic List<>. A generic List<> can be of any type so that means we can make it a List<JournalEntry>
<meta charset="utf-8" />The syntax we use when we define the class and make it inherit from a class looks like the following:
public class JournalEntries : List<JournalEntry>
Reading Code In Natural Language
If you read that using natural language you would say, the public class JournalEntries _is a_ List of JournalEntry. Just replace the : (colon) with the two words “is a” and replace the angle brackets <> with of and it all makes sense.
Here’s how our JournalEntries class should look now:

We’ll come back and fill this class out with more of what we need later, but now let’s move back to MainPage.xaml.cs and start writing the code to load the entries.
Loading Journal Entries
In the last chapter we also decided how loading the entries would work:
-
A date is selected on the
CalendarView(either when app starts or user selection) -
The appropriate
Y-Mdirectory is calculated. -
If the
Y-Mdirectory exists, then there are entries already created -
Determine if any of the file names match the date selected.
-
If the
Y-Mdirectory does not exist or no file names match then display one empty entry with the Header of Entry1 -
If the
Y-Mdirectory does exist and one or more file names match, generate aPivotItemfor each one and load the RTF data into the associatedRichEditBox.
When the Page_Loaded event fires we will want to do all of that work so let’s add a method named LoadEntriesByDate() and then call it from the Page_Loaded() event.
When we do the work in the LoadEntriesByDate() method we are going to need to access the CalendarView and I just noticed that we never gave it a name so let’s switch over to the XAML and name that control so we can reference it easier and so our code is easier to follow. I’ll name the CalendarView, MainCalendar.
Here’s the XAML we need to add;
x:Name="MainCalendar"

After you add that code switch back to MainPage.xaml.cs and we’ll add our new method.
It’s time to remove all those extra lines in our Page_Loaded method which were inserting into the ListView. I’ve highlighted those lines you should delete. After you delete those lines go ahead and add the one line to Page_Loaded method which will call our new method.
After you do that, go ahead and stub out the new method. Stub out just means add the basic function block with no actual code in the function.

Now, let’s figure out how to get the value that the CalendarView is set to.
Okay, I just put a line of code in LoadEntriesByDate() which looks like the following:
EntriesListView.Items.Add(MainCalendar.SelectedDates[0].ToString());
App Crashed
I then built the app, ran it and it crashed.
That’s because I’m trying to call the MainCalendar.SelectedDates[0] which is a reference to the first SelectedDate in the MainCalendar when the app loads. However, that is wrong thinking. The problem is that the Page_Loaded method fires before the MainCalendar work is selected (even though it is autoselected) when you run the app the selection happens sometime after the Page_Loaded method runs.
What we really need to do is call LoadEntriesByDate() when the MainCalendar’s SelectedDatesChanged event fires.
We can make sure we handle that event by adding it to our MainCalendar control. We’ve done this in previous chapters so you probably remember how to do this.
-
Open up
MainPage.xaml file -
highlight the
MainCalendar(CalendarView) control in the XAML. -
In the Properties window click the [Lightning Bolt] icon and the list of available events will be displayed
-
Scroll down until you see the
SelectedDatesChangedevent -
Double-click in the TextBox next to
SelectedDatesChangedevent -
Visual Studio will open up the
MainPage.xaml.csfile, add the method and move the cursor into that method so you can write the code.

Next we need to remove our method call of LoadEntriesByDate(); from the Page_Load method and into our new MainCalendar_SelectedDatesChanged method.

After you make that change, go ahead and build and run.
Note: Make sure you move the LoadEntriesByDate method from the Page_Load method or your app will crash.
Get the Code
You can run the code in DailyJournal_v014.zip if you haven’t typed all the code in yourself.
More Challenges
When you start the app you will see that the CalendarView does get set to the current date (it shows up in mine as selected in solid green.

However, as you can see there is no value in our ListView even though I expected a value to show up there.
It should’ve shown up there because of our line of code in LoadEntriesByDate():
private void LoadEntriesByDate()

       {

  EntriesListView.Items.Add(MainCalendar.SelectedDates[0].ToString());

      }
That line of code will add the SelectedDates[0] (zero is the first index of all SelectedDates). In our case we only want one selected date and it should be the current date since the app just loaded.
It seems that our MainCalendar_SelectedDatesChanged is not firing when the app starts.
However, if you click any date in the CalendarView, you will see that it’s associated date value gets added into our ListView.

The question is, “why do we have to click the current date for the functionality to fire?”
A Clue to The Problem
Also, look at the difference between the December 2 calendar item and December 11. December 2 is the current date and the solid green is not indicating that it is selected, but instead indicating that it is the current date.
The green line around the December 11 date is indicating that it is selected since that was the last day I clicked on.
I’m going to restart the app and check the state of current date and see what it looks like.
Here’s the snapshot of the CalendarView when the app starts.

Notice that December 2 is solid green. Let’s click it now.

I’ve also included top of our ListView control in the previous snapshot to show you that the MainCalendar_SelectedDatesChanged event handler did actually get called when I clicked the current date.
Also notice that now the December 2 date has a small outline of white which indicates that it is now the selected date. What does this all tell us?
No Date Is Selected When the App Starts
It tells us that no date is actually selected when the app starts. That’s why the MainCalendar_SelectedDatesChanged event handler never runs.
As developers, these are the subtle things we have to understand. We can’t always know exactly how these controls will function because they’ve been created by other developers (in this case Microsoft developers).
I’m guessing that we can fix this by handling the Loaded event on the CalendarView. So, let’s go ahead and add that event handler to MainCalendar. You will follow the steps we just took when we added the SelectedDatesChanged event so I won’t repeat all that here.
Once you add the Loaded event handler to the CalendarView, we just need to add one line of code to insure the current date is selected when the CalendarView is loaded.
MainCalendar.SelectedDates.Add(System.DateTime.Now);

What Is System.DateTime.Now?
The System library contains methods and classes that Microsoft provides to help us do our work. In this case they’ve provided a static class DateTime which has a static property called Now which is globally available so you can get the current system date. That’s the same date that the CalendarView uses to to set its current date.
What Is a Static Property or Method
You may have noticed that we did not have to instantiate a new DateTime object to use it.
If we would’ve had to instantiate the DateTime object we would’ve used the new keyword something like the following:
DateTime currentDate = new DateTime();
In this case the Microsoft developers decided that the DateTime functionality should be more easily available so they made it into a static Class which allows it to be easily and globally accessed from your program (simply by adding the System library reference).
So instead of having to instantiate a new variable (currentDate) you can just call the static method directly from the static class and the library will instantiate a global object for you to use.
In this case it’s really just a convenience. You can read more about static variables in the Microsoft documentation and we’ll talk about how they should and shouldn’t be used as we continue through this book.
Continuing Loaded Event Handler Discussion
Now, let’s continue the explanation of what our one line of code is doing in the Loaded event handler.
After you obtain the current date from the System.DateTime.Now static method call, we pass it into the collection of SelectedDates that is a part of our MainCalendar control by calling the Add method.
Build, Run and Try It Out
Get the DailyJournal_v015.zip to get the updated code and build it and try it out.
Now, when the app starts it behaves as we originally expected it to and selects the current date which fires the MainCalendar_SelectedDatesChanged event handler. You can see that the current date now has the selected look to it and the current date value is added to the ListView.

Now that all that works, we can begin to fill out our LoadEntriesByDate() method.
Following our list of work items (at the beginning of this chapter) we now need to check to see if the Y-M directory for this Year-Month exist.
Checking For Existence of a Folder
When we wrote our Save() method which is now in our JournalEntry class we already determined where the files for our app would be stored. That line of code allows us to get the base folder that we will use to contain all of our Y-M directories:
Windows.Storage.StorageFolder storageFolder =

     Windows.Storage.ApplicationData.Current.LocalFolder;
Let’s add a member variable to our MainPage.xaml.cs (Page class) which we will call our appHomeFolder.
Go ahead and add a new line at the top of the class which looks like:
private Windows.Storage.StorageFolder appHomeFolder;
Then we’ll add a line of code to initialize it to our apps local folder location in the Page_Loaded event handler:
appHomeFolder = Windows.Storage.ApplicationData.Current.LocalFolder;
This will make sure any time the app starts that it is then working with the appropriate home folder.

We can also go ahead and store the current Y-M directory value in a member variable so we don’t have to access it every time.
Let’s add that member variable now.
That value may change any time the CalendarView selectedDates change so we’ll add the initialization to our MainCalendar_SelectedDatesChange.
Here’s what the line of code will look like which will initialize the YMFolder.
YMFolder = System.DateTime.Now.ToString("yyyy-MM");
We are using the ToString() method of the Now property to format the date string that we will use.
Date String Format Specifier
In this case the string we pass to ToString() is a format specifier with special values which tell it to get the 4-digit year followed by a dash (-) and the two-digit month value. The case of this format specifier is important and you can see that the year specifier is lowercase but the month (M) specifier has to be uppercase. You can look up the Date.ToString() method in the Microsoft docs and find all the format specifiers and more about how they work.
When this line of code runs the YMFolder will be set to “2107-12” because it is currently December 2017.

Notice that we add the line in before the LoadEntriesByDate() method is called to insure the value is set before the method which will use it.
We can now check to see if the folder exists (in LoadEntriesByDate()) and do one thing if it does and another if it doesn’t.
Here’s the code I’m adding to that method:
if (Directory.Exists(Path.Combine(appHomeFolder.Path, YMFolder)))

 {

 }

 else

 {

     EntriesListView.Items.Add(Path.Combine(appHomeFolder.Path, YMFolder));

 }

Let’s examine line 45 first. There are actually two different methods called on that one line off code.
There is an order of operations that the runtime uses when methods are called. It’s very similar to order of operations on math problems. In this case items within parenthesis are run before other items. The most nested item is run first and in general that means the item furthest to the right in the line of code.
In this case that is the Path.Combine() method is called first.
Path.Combine Convenience Method
Path.Combine is another convenience method provided by base .NET libraries which will take a number of strings as parameters and concatenate (put one after another) them into one string which becomes a path.
In our case we are giving it our appHomeFolder path and our YMFolder and asking it to create one path string. This method adds the appropriate backslash separators between the different parameters that you send into it so we don’t have to worry about those being in there.
When Path.Combine completes, it returns a string (representing our created path). We take that string and immediately pass it into our next method call Directory.Exists().
Directory.Exists()
Yet another convenience method provided by the .NET libraries which allows us to pass in a string representing a path and tells us if the path exists or not. It returns a boolean (true or false) depending on whether or not the path exists.
The last added line is in the else statement.
I know that we have not yet created any YMFolders under our appHomeFolder yet so I know the result of Directory.Exists() will always be false and I want to see something happen on the User Interface so I’ve added some code in the else statement.
You can see that I’m calling Path.Combine again. This time I’m calling it to create the string that represents our path just so I can add it to the EntriesListView so I can view it.
EntriesListView.Items.Add(Path.Combine(appHomeFolder.Path, YMFolder));
Build and Run the Code : A Problem
We can build and run the code now. You can get the DailyJournal_v016.zip and try it out.
However, the app does behave a bit oddly now due to the way that we’ve created the original XAML layout. You’ll recognize the problem as soon as the app starts depending upon the size of MainPage upon start up.

Our Pivot Is Pushed Off Screen
Suddenly because we’ve added this long string to the EntriesListView we have pushed the entire row way out to the right and the Pivot which spans two rows gets pushed off screen.
If you resize the MainPage or maximize it you should see the Pivot appear again:

That’s not great, but we won’t deal with that right now.
Notice instead that you can see the entire path of the YMFolder now and that is good, because we are going to use it to save our entry files into it.
However, our Save is now encapsulated inside of our JournalEntry. This means that we want to pass in the entire path to our YMFolder when a new Entry is created. We need to go back and take a look at our CreateNewEntryButton_Click and see how we will change it and our JournalEntry class.
Refactoring Begins
Since we are now going to have the Page interact with (collaborate) the JournalEntries collection, let’s remove our journalEntry member variable and add the new JournalEntries member variable.

Delete the highlighted line and add the line that is shown before it.
After you do that, let’s bring up the CreateNewEntryButton_Click and edit it to create a new JournalEntry and add it to the currentJournalEntries collection.
Create New JournalEntry Add It To JournalEntries Collection
We can add a new JournalEntry to our member collection with the following line of code:
currentJournalEntries.Add(new JournalEntry(reb));
It looks like this in our CreateNewEntryButton_Click method:

That doesn’t help us a whole lot though, because we aren’t really using the item we are adding to the collection. Also, we need to change the constructor for the JournalEntry so it can take the full YMDirectory path so it will save the file in the correct place.
Refactoring Is About Iterating
This may feel like we are moving back and forth as we continue to change one thing then another, but I promise you we are getting to better cleaner code. I’m also including this narrative so you can see what it is like for real developers who work through solving a problem.
Let’s switch over to the JournalEntry class and add the new member to store the YM Full path and alter the constructor to take the value so it can initialize the member variable properly.
Altering JournalEntry
We will do the following work:
-
Add the new member variable named YMFullPath.
-
Add the new incoming parameter to the JournalEntry constructor
-
Initialize our member with the incoming value.
Here’s what the new code looks like in the JournalEntry:

Breaking The Build
If you try building the code once you add this new code the build will fail.
That’s because we are calling the JournalEntry constructor from NewEntryButton_Click and when the compiler checks the signature of the defined constructor it knows they do not match.

I’ve highlighted the first error for you so we can take a look at it. It states, “There is no argument that corresponds to the required formal parameter ‘YMFullPath’ of DailyJournal ‘JournalEntry.JournalEntry’ (RichEditBox, String).
Compiler Errors Can Be Confusing
The compiler tries to be helpful but you have to get used to the language it uses to describe the problem to you.
Of course, it also tells you which file the error occurs in and which line so that is very helpful. Visual Studio makes it easy to move to the line where the error is occurring by allowing you to double-click the error and moving you to the line in the source code.
Consider Fixing Errors in Order Listed
Take a look at the second error though. It says, “journalEntry does not exist in the current context…” The compiler is reminding us that we removed the journalEntry member so it no longer exists. We’ll fix that error to, but first let’s fix the first one listed.
We need to go back to CreateNewEntryButton_Click and add the parameter which represents the YMFullPath.
Add New Parameter to Constructor Call
Here’s the new altered JournalEntry constructor call:
currentJournalEntries.Add(new JournalEntry(reb, Path.Combine(appHomeFolder.Path, YMFolder)));
We’ve simply added our Path.Combine to create the full path to the YM directory.

After we add that, we do still have fix our missing member variable problem down in the RichEditBox_SetFocus method which isn’t going to work either.
Tying a Screen Element to A Specific JournalEntry
The main thing we are changing with our code is how the View element (control that is on the screen -- Pivot and associated RichEditBox) to the Model* object (JournalEntry ) which represents our journal entry.
About Models
*A Model object is simply a class that represents a thing in our solution. Another way to say that is that the class models the thing and its associated behaviors. As you learn more about OOP (Object Oriented Programming) you will find that the idea of binding Views to Models is so prevalent that there is a pattern called MVC (Model-View-Controller) which provides a common methods for designing code like this.
This becomes more apparent in the RichEditBox_SetFocus method because we have wrapped up the RichEditBox inside of our JournalEntry model. Now, we need to figure out a way to determine which Model is selected when the associated view item (RichEditBox) gets focus.
Of course we are attempting to have the view interact with our JournalEntries member so we probably need to add a method in our JournalEntries class to give us the currently selected JournalEntry object.
What Do We Know About the JournalEntries Collection?
To be able to determine which JournalEntry is selected we need a way to uniquely identify a JournalEntry in the JournalEntries collection. Here are a couple of things we know about our JournalEntries collection:
-
The collection represents only the entries for one specific day.
-
Each day can have multiple entries but each one has a unique EntryHeader - the text which is shown at the top of the PivotItem.
That leads us to see that we can use the EntryHeader as the unique ID for the JournalEntry. However, we now need to add that member variable to the JournalEntry and again we need to add it to our JournalEntry constructor. So, before we fix this RichEditBox_SetFocus problem, let’s go alter our JournalEntry class.
Add EntryHeader To JournalEntry Class
Adding the new member variable and fixing the JournalEntry constructor is just a couple of lines of code. Notice that I have actually borken the constructor’s signature onto two lines so the screenshot images don’t get so wide. C# allows you to break lines like that with no problems.
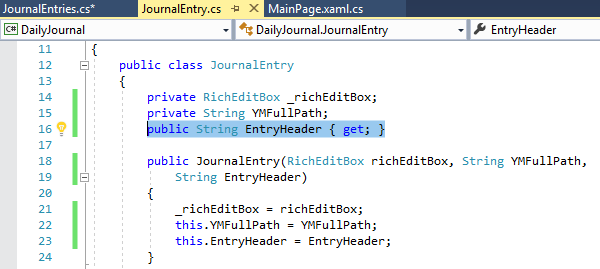
Also notice that this time we are setting our member variable’s access modifier to public. We are also defining a get method using the get keyword which sets this item to be publicly accessible for read-only. The value cannot be set any time except when the developer calls the constructor. This insures that no methods outside of the class will suddenly or accidentally change our EntryHeader. This is important since we are using it as an identity for the item.
You will see how we use this member value in our JournalEntries class in just a few moments.
When we build we will get the same errors about our missing parameter to the constructor so again, let’s build and fix that constructor call in the CreateNewEntryButton_Click method.
Again, you’ll see that I’ve broken that long line up into multiple lines so you can see it easier.
I’ve highlighted the one line which makes multiple method calls in the following image:

Now, let’s add the EntryHeader value to the JournalEntry constructor call.
As soon as you type a comma at the end of the JournalEntry constructor call Visual Studio will pop up some Intellisense.

You can see that it already knows about the new EntryHeader parameter.
We want the EntryHeader to be created just as we previously created it at the top of our CreateNewEntryButton_Click method where we set our entryText variable.
We can use that entryText value as our EntryHeader so simply add that variable to the end of the constructor call.

Go ahead and build but we still have those errors we need to clear up in our MainPage class.
Again, to fix those errors we need to be able to get the current journal entry that the user is viewing on the screen. But now we can write a method in our JournalEntries class which should return the Model item to us when we provide the EntryHeader string value to it. Of course that value will come from our PivotItem (View) which is currently being displayed (currently selected by the user.
JournalEntries Helper Method
The JournalEntries class has been empty and so far we have just been using the inherited methods that it provides (since we have made it a child of List<>). Now we are ready to add a new public method which we can call to get the Model object (JournalEntry) which will match the currently selected View object (PivotItem).
Really, all we need to do is:
-
Pass in the
EntryHeadervalue which will identify theJournalEntrywe are looking for -
Iterate through the collection until we find the matching
JournalEntry -
Return the
JournalEntry(if one is found) or a null (empty) object if no matches are found.
I’m going to name the method GetSelectedEntry. Here’s the entire code listing for that method:
public JournalEntry GetSelectedEntry(String EntryHeader)

       {

 foreach (JournalEntry je in this)

 {

     if (je.EntryHeader == EntryHeader)

     {

         return je;

     }


 }

 return null;

}

The foreach syntax (on line 13) is very helpful. We simply provide a temporary variable name (je) which is of the proper type (JournalEntry) that the collection holds and it knows how to iterate through the collection. Notice the _this_ variable. That allows us to reference the class we are currently working with. Since we are working inside the JournalEntries class the this variable is a reference to the JournalEntries object which is currently instantiated (when the program is running). Since C# is a strongly typed system (it knows what type an object is when the system is running), the program knows that the this variable is a collection of JournalEntry objects.
je.EntryHeader : Public Member
The je.EntryHeader is the property that gives us our EntryHeader value and we simply compare that value to the value that the user passed in, which she is attempting to find a match for.
Finally, if a matching JournalEntry is found we return the object so that the user can interact with it however they want to.
If no match is found for some reason, we return a null (empty object) so the caller can determine what she wants to do in that case. You’ll see that code back in our RichEditBox_SetFocus method.
Again, we can build but we will still get some errors. However, we should be able to fix those errors now, because we can get the currently displayed journal entry.
Back in MainPage.xaml.cs our RichEditBox_SetFocus method looks something like the following:

Now, we need to add our call to GetSelectedEntry() and remove the old constructor call.
We don’t need to construct a JournalEntry because it should’ve already been added to our JournalEntries collection. Instead, we now just want to get the matching one out.
Refactoring Again : It Really Is What Devs Do
Now, I’m thinking about this and I’m questioning why I want to get the current one when the control gets focus. The real reason is just so that later when we got to save the data to the file that we call the Save() method on the correct JournalEntry.
Now, I see that really the JournalEntries collection should simply track the current JournalEntry for us. So, instead of really needing to obtain a JournalEntry object when the focus is set, what we really want is just to have a member of JournalEntries to contain the currently selected JournalEntry. That way, later when we need to call the Save() method on the currently selected JournalEntry we can just get the currently selected JournalEntry and call Save().
This thinking means that we need to change the JournalEntries one more time to add a member that again will be publicly accessible only for a get (not a set) and which will represent the currently selected JournalEntry.
Let’s go change that and it’ll all make more sense.
Switch back over to the JournalEntries class and add the following line of code at the top of the class:
public JournalEntry currentJournalEntry { get; private set; }
We will set this member in our GetSelectedEntry so we have to allow it to set the member also so we have used the private (access modifier) on our set definition. That private set means that the set can only be called on JournalEntry within the class.

No Need To Return JournalEntry
Now we have a member which represents the currently selected entry.
This means that we no longer need to return the JournalEntry on GetSelectedEntry(). Instead we just need to have that method set the currentJournalEntry.
Let’s change that method now.
Here’s the final GetSelectedEntry method code:
 public void GetSelectedEntry(String EntryHeader)

{

 foreach (JournalEntry je in this)

 {

     if (je.EntryHeader == EntryHeader)

     {

         currentJournalEntry = je;

         return;

     }

 }

  currentJournalEntry = null;

}

You can see that on line 13 we have changed the return type to void now since it no longer needs to return an JournalEntry.
We also changed lines 19 and 23 to set the currentJournalEntry appropriately depending on whether or not the match was found.
But, also take a quick look at line 20. That line immediately exits the method when a matching JournalEntry is found. It is helpful because it doesn’t waste time looking through more entries after it has already found the correct one and if it doesn’t exit then it will end up always return a null value at the bottom of the method.
Let’s go back to our MainPage.xaml.cs and wrap this up.
When we switch back to MainPage.xaml.cs and examine the RichEditBox_SetFocus method we find that it needs no changes. That’s because when that method runs, it simply sets the currently selected JournalEntry on the collection class. That currently selected JournalEntry is only used later by the SaveEntryButton_Click when it attempts to Save() the entry’s data.
We just need to change the SaveEntryButton_Click so it will make sure it only saves if the currentJournalEntry is not null. Here’s the code for the SaveEntryButton_Click:
  private async void SaveEntryButton_Click(object sender, RoutedEventArgs e)

 {

     if (currentJournalEntries.currentJournalEntry != null)

   {

      currentJournalEntries.currentJournalEntry.Save();

    }

}

When I built the code I got a warning -- which indicates an issue which will cause the program to crash.
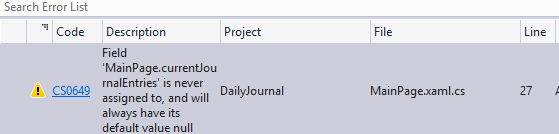
When I double-click that error it takes me to the location where we’ve created our collection member variable.

Crash Explained
The problem here is that we never instantiated a new JournalEntries object. We can do that easily by adding a line to our MainPage constructor. Let’s do that and build again.
Here’s the line of code we need to add to the MainPage constructor:
currentJournalEntries = new JournalEntries();

Why Save() Won't Work Properly
Now the app will build, but the JournalEntry.Save() method won’t work properly because we never did implement the YMFullPath changes that we made. Let’s go do that.
I Encountered a Challenge At This Point
At this point I had to work through numerous issues in order to determine how to save our folders in the Y-M subfolder. It took a bit of work but I figured it out and during that work I determined that I needed to add a another member variable to the JournalEntry class.
I named it YMFolder and it will hold the name of the Y-M folder (“2017-12”). I found this made the code much cleaner for our Save() method.
Also, of course, I went ahead and added the item to the JournalEntry constructor also.
Here’s the update code you can just copy into the top of the JournalEntry class:
private RichEditBox _richEditBox;

       private String YMFullPath;

       private String YMFolder;

       public String EntryHeader { get; }

public JournalEntry(RichEditBox richEditBox, String YMFullPath,

 String YMFolder,

 String EntryHeader)

       {

 _richEditBox = richEditBox;

 this.YMFullPath = YMFullPath;

 this.YMFolder = YMFolder;

 this.EntryHeader = EntryHeader;

}

Of course, after you make that change you also need to change the JournalEntry constructor call over in CreateNewEntryButton_Click so it looks like the following (simply adding the YMFolder into the call):
currentJournalEntries.Add(

     new JournalEntry(reb,

     Path.Combine(appHomeFolder.Path),

     YMFolder,entryText));

Refactoring Is Designing Code & It Takes Time
This chapter has become extremely long (it’s coming up on 31 pages) and that is how development is at times: once you get started you cannot stop. A refactoring of code like this requires that we fix everything involved and it can cascade through. There are huge benefits however, and we will continue to talk about (and see) the benefits as we move forward in our app creation.
There Is Still More Work To Do
Since the chapter has become so long I’ll provide the Save() method here and we’ll talk a bit about what it does. However, there are still some things that don’t work entirely properly and there are some things we just need to talk more about like the things we are doing in the file system (FileStorage) which is so different than it was under WinForm development.
JournalEntry Save()
Here’s the entire source for the Save() method:
public async void Save()

       {

 StorageFolder storageFolder =

     Windows.Storage.ApplicationData.Current.LocalFolder;

 if (!Directory.Exists(Path.Combine(YMFullPath,YMFolder)))

 {

     await storageFolder.CreateFolderAsync(YMFolder);

 }

StorageFolder subStorage = await storageFolder.GetFolderAsync(YMFolder);

StorageFile sampleFile =

     await subStorage.CreateFileAsync(

         "FirstRichEdit.rtf",

         Windows.Storage.CreationCollisionOption.ReplaceExisting);

 IRandomAccessStream documentStream =

     await sampleFile.OpenAsync(Windows.Storage.FileAccessMode.ReadWrite);

 _richEditBox.Document.SaveToStream(TextGetOptions.FormatRtf, documentStream);

 documentStream.Dispose();

       }

Challenges of Creating SubFolders In Storage
I had to send in the YMFolder separately and have the Save() method use it because of the way that the UWP API forces you to create a storageFolder. I could not create the entire path to the folder at one time. Instead I had to create the root and then as you can see on line 37 I have to call CreateFolderAsync that is the subfolder name only. It allowed me to create a new subfolder with the name of the Y-M directory.
For now that will work. All of this will build and you can save a file and now the file will be saved in the subfolder (Y-M) directory under the LocalStorage path.
In my case that path under:
C:\Users\Roger\AppData\Local\Packages\116d1010-a1e4-452a-a1d2-c84aea07af6d_gw4zt26480tv8\LocalState

If you have created your own project originally then your Package id will be different and of course your <UserName> will be different. Keep in mind the easy way to get to this path is %LocalAppData%\Packages
You can paste that into File Explorer and hit <ENTER> and it’ll get you close.
Other Problems : Bugs In The App
-
Also, the Entry1 item will never save, because it is not currently added to the JournalEntries list. We need to do that work and we will later, but this chapter is just too long. Just know that if you try to save Entry1 it is not going to happen.
-
To test the Save() method you need to create a new Entry and then type some text and try saving it. Depending on which Year/Month you create the entry then it will create a matching Y-M folder for you and save a file under there.
-
-
The app saves all of the data to the same file name under th Y-M directory. We have not yet implemented the algorithm which creates a good file name for each entry yet. However, you will see that now that we’ve separated our code into classes that work will be very easy since we’ll be able to get the JournalEntry to generate an appropriate file name itself.
-
None of the entries are reloaded yet. This is related to the fact that the filenames are not named properly yet. We will handle this soon and again we are almost there now that we’ve separated the code out.
-
I needed a way to reset the entire View (Page) to what it looks like when the app starts every time the user changes the selected date. Right now, I simply iterate through the entries and remove them each time you click a new date so you will only have the Entry1.
-
I also had to fix a bug in the MainCalendar_SelectedDatesChanged which was improperly always using the DateTime.Now value instead of the date selected on the MainCalendar. I fixed that in the last source code drop that is attached (DailyJournal_v017.zip) -- The fix looks like:
-
YMFolder = MainCalendar.SelectedDates[0].ToString("yyyy-MM");
-
I know there are a lot of changes we still need to make, but this has been a huge chapter of learning and seeing how real code is refactored and I feel confident that if you worked your way through this chapter you have learned a lot.
Download Code : Try It Out
Get the DailyJournal_v017.zip and try out the code. See if you can fix some of the issues before reading Chapter 10 if you like, since it will help you learn.
History
2017-12-03 : first publication