
Implement Validations in Angular 5 App
5.00/5 (1 vote)
How to implement validations in Angular 5 app

Table of Contents
- Introduction
- Developing an Angular 5 App series
- Source Code
- Background
- Validation in Angular
- Conclusion
- Your turn. What do you think?
Introduction
This post is a continuation of the course, Developing an Angular 5 App series. If you haven’t gone through the previous posts yet, I strongly recommend you to do that. You can find the links to the previous posts below. In this post, we are going to implement Two Way binding and validations in Angular 5 registration form. So at the end of this article, you will be proficient in how to do validations in Angular. I hope you will like this article.
Developing an Angular 5 App Series
These are the posts in this series. Please go ahead and take a look.
- What Is New and How to Set Up our First Angular 5 Application
- Angular 5 Basic Demo Project Overview
- Generating Your First Components And Modules in Angular 5 App
- Implement Validations in Angular 5 App
Source Code
You can always clone or download the source code here.
Background
Validations have a vital role in all the applications, without validation, anyone can push invalid data to your application. So here, we are also going to implement some validations, it is our application and we want to make it perfect, right?
Validation in Angular
To get started with the Angular forms, we need to import some modules to our app.module.ts.
import { FormsModule, ReactiveFormsModule } from '@angular/forms'
@NgModule({
  declarations: [
    AppComponent,
    RegistrationComponent,
    HomeComponent,
    NavComponent
  ],
  imports: [
    BrowserModule,
    BrowserAnimationsModule,
    AppRoutingModule,
    MatButtonModule, MatCardModule, MatInputModule, MatSnackBarModule, MatToolbarModule,
    FormsModule, ReactiveFormsModule,
    RouterModule.forRoot(myRoots)
  ],
  providers: [],
  bootstrap: [AppComponent]
})
In our previous post, we have developed an Angular form in the component named Registration. Now let us open registration.component.ts file and import FormBuilder, Validators in it.
import { FormBuilder, Validators } from '@angular/forms';
Let’s inject the FormBuilder in our constructor.
constructor(private fb: FormBuilder) {}
Next is building a form group, so that we can include our model in it.
form;
  constructor(private fb: FormBuilder) {
    this.form = fb.group({
      firstName: ['', Validators.required],
      lastName: ['', Validators.required],
      email: ['', Validators.required],
      password: ['', Validators.required],
      confirmPassword: ['', Validators.required]
    });
  }
In the group model, the first argument is the initial value that you may need to show. You can always do as follows:
firstName: ['Sibeesh', Validators.required]
We will have to make some more changes in our registration.component.html.
<mat-card>
 <form [formGroup]="form">
 <mat-input-container>
 <input matInput placeholder="First Name" formControlName="firstName" />
 </mat-input-container>
 <mat-input-container>
 <input matInput placeholder="Last Name" formControlName="lastName" />
 </mat-input-container>
 <mat-input-container>
 <input matInput type="email" placeholder="Email" formControlName="email" />
 </mat-input-container>
 <mat-input-container>
 <input matInput type="password" placeholder="Password" formControlName="password" />
 </mat-input-container>
 <mat-input-container>
 <input matInput type="password"
 placeholder="Confirm Password" formControlName="confirmPassword" />
 </mat-input-container>
 <button mat-raised-button color="primary">Register</button>
 </form>
</mat-card>
Here, formControlName is the tag which connects our model value and the control, so if you are not providing this value in your HTML, the validation for that particular control will not work. Now, let us run our application and see the output.
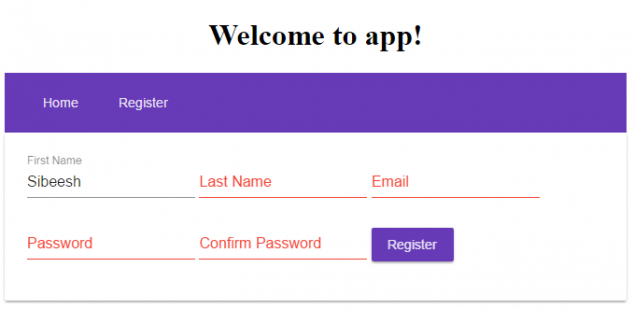
Please note that we have given value only for the field First Name, so the remaining fields are showing in red color when we click our Register button. So our validation is working as expected.
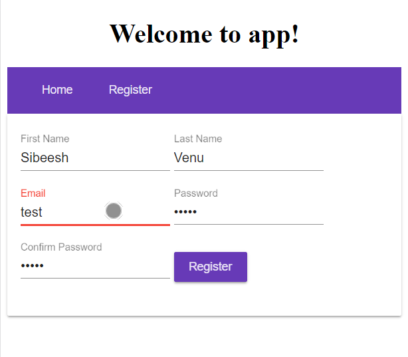
You can always apply some custom validations too, like Email field validators. Let’s do that now. Please change your constructor as follows:
constructor(private fb: FormBuilder, private auth: AuthService) {
    this.form = fb.group({
      firstName: ['', Validators.required],
      lastName: ['', Validators.required],
      email: ['', [Validators.required, isEmailValid('email')]],
      password: ['', Validators.required],
      confirmPassword: ['', Validators.required]
    });
  }
Now as you guessed, we need to implement the function isEmailValid.
function isEmailValid(control) {
  return control => {
    var regex = /^(([^<>()\[\]\\.,;:\s@"]+(\.[^<>()\[\]\\.,;:\s@"]+)*)|(".+"))
    @((\[[0-9]{1,3}\.[0-9]{1,3}\.[0-9]{1,3}\.[0-9]{1,3}])|
                     (([a-zA-Z\-0-9]+\.)+[a-zA-Z]{2,}))$/
    return regex.test(control.value) ? null : { invalidEmail: true };
  }
}
Now that we have done our custom validation, let’s check it out in our application.
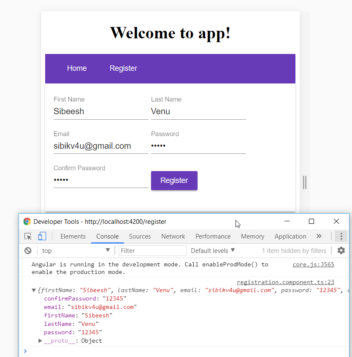
Let’s create a click event to our Register button and get the form values that we have typed, so that we can pass these values to our server and save the same in our next article.
<button mat-raised-button (click)="register()" color="primary">Register</button>
 register() {
    console.log(this.form.value);
}
Please make sure that you are getting the values in your browser console.
That’s all for today. In our next article, we can do some database actions, be ready.
Conclusion
Thanks a lot for reading. Did I miss anything that you think is needed? Could you find this post useful? I hope you liked this article. Please share your valuable suggestions and feedback.
Your Turn. What Do You Think?
A blog isn’t a blog without comments, but do try to stay on topic. If you have a question unrelated to this post, you’re better off posting it on C# Corner, Code Project, Stack Overflow, ASP.NET Forum instead of commenting here. Please leave your question in the Comments below and I’ll definitely try to help if I can.