
Programming Windows 10 Desktop: UWP Focus (5 of N)
Get Started in UWP (moving away from WinForm) Chapter 5 Adding Tabs (Pivot) For Multiple Journal Entries
Introduction
*NaNoWriMo[^], you've got nothing on me. :) It looks like I'm writing Programming Windows 10 in one month.
*November is National Novel Writing Month (write your novel in a month)
This article continues the series of articles where I am attempting to tell the story of Desktop development under the UWP (Universal Windows Platform) paradigm.
You can read the other articles which precede this one:
Programming Windows 10: UWP Focus (1 of N)[^]
Programming Windows 10: UWP Focus (2 of N)[^]
Programming Windows 10: UWP Focus (3 of N)[^]
Programming Windows 10 Desktop: UWP Focus (4 of N)[^]
Background
We are jumping right in where we left off with our DailyJournal app from last time.
Grab the code from the previous article, open it in Visual Studio and we’ll add some more test data to our ListView.
Add Some More Test Data
Add the following lines to the Page_Load() method in the MainPage.xaml.cs file.
           EntriesListView.Items.Add("2 super");

          EntriesListView.Items.Add("2 extra");

           EntriesListView.Items.Add("2 maximum");

           EntriesListView.Items.Add("2 advanced");

           EntriesListView.Items.Add("2 efficient");

This will help make the problem more evident.
Missing Scrolling Functionality
One of the most noticeable problems with the state we left our app in last time is that the ListView does not scroll properly or much at all. Additionally, the RichEditBox does not scroll at all. No scrollbar ever appears, even if you paste in text that goes far off the screen.
Now that you’ve made the change above go ahead and build and run the app (CTRL-F5).
Depending on the size of your initial window yours may differ some, but if you attempt to scroll down through the ListView items you will find that you cannot scroll all the way to the bottom and see all the items.

In mine, I can only show the top item (2 super) from this second bunch that were added. There are actually more items in that list but we cannot scroll to them.
Also notice that I pasted in a number of lines into the RichEditBox and although the lines go off the Page I do not get any available scrollbar. Let’s fix these two items and learn a bit more about XAML and UWP.
Asterisk This, Asterisk That
Fixing this scroll problem is very easy because we have our Grid set up properly.
The only problem in our case is that I set the height of the second row improperly in our previous code, because I set it to a hard-coded value. Hard-coded values are almost always wrong, aren’t they? Previously I had set the second row to be 400 pixels high. However, we actually want the second row (where our ListView lives and where our RichEditBox overflows into) to be defined proportionally in relation to the Grid element they live in.
To do that we simply set the Grid RowDefinition height to an asterisk.
Previously the code looked like:

We just want to change the 400 to an * (asterisk).
Change that one line to:
<RowDefinition Height="*"/>
It’ll now look like:

Build and run again (CTRL-F5) and you will now be able scroll to the last item in the ListView.
Fixed!
You will also be able to use the RichEditBox exactly as you would expect. You can type in it and keep on typing and creating new lines and when the lines extend beyond the size of the viewable area then the scrollbar will appear.
Download Fixed Source
You can download the zip file named DailyJournal_v003.zip from the top of this article to get the fixed code so you can try it out.
The following screenshot captured the two scrollbars (one in the ListView and one in the RichEditBox) and shows you that the last item in the ListView (2 efficient) is now available via scrolling.

That is a big win for only changing one value and few characters in our XAML.
Forgot the Tab Control
There is just one thing that I forgot to add to our app: a tab control to allow us to have multiple file entries for each day.
Tab Control Is Gone: Pivot Is Replacement
Oh, the joke is on me. I just searched and learned there is no tab control in UWP. Uh oh.
I found the following question posted which led me to the tab control replacement which is called a Pivot: https://social.msdn.microsoft.com/Forums/windowsapps/en-US/bf1eb831-a049-432d-a86b-ec70f014e6fd/tab-control-in-uwp-application?forum=wpdevelop
There was a very simple XAML sample of a Pivot so I am hoping that I can wrap my RichEditBox with a Pivot and add some PivotItems and get this thing working.
Experiment
Let’s try an experiment to see how that thing might work.
The Pivot looks fairly simple to use. It looks like another container so we’ll just need to wrap our target control (RichEditBox) in a Pivot. Then, for each “tab” you’d like to show up you simply add a PivotItem.
Here’s the Pivot and PivotItem I added (wrapped the RichEditBox) :
<Pivot x:Name="rootPivot" Title="Pivot Title" Grid.Column="1" Grid.Row="0" Grid.RowSpan="2" >

           <PivotItem Header="Entry1">

               <RichEditBox Name="MainRichEdit" Grid.Column="1" Grid.Row="0" Grid.RowSpan="2"

                    HorizontalAlignment="Stretch" VerticalAlignment="Stretch"/>

           </PivotItem>

       </Pivot>
When I added that my Page changed in the Designer so it now looks like:

Stay Aware of Grid Rows & Columns
The first thing to recognize is that to get our Pivot to show up in the correct place in the Grid element I still had to add attributes to it that match our original RichEditBox (Grid.Column="1" Grid.Row="0" Grid.RowSpan="2").
With those changes in place, you can see that it has nested our RichEditBox inside the Pivot (shown as Pivot Title) as PivotItem (shown as Entry1).
Delete Pivot Title?
I’m guessing (and hoping) that if I delete the Title=”Pivot Title” then that extra header will disappear. We don’t need it for our purposes and it is just taking up extra space.
Let’s delete that attribute and see what happens.
Success! You can see that now it only displays the PivotIem’s title which is all we need.

That’s not too bad. We seem to be on the right track.
However, to get a good example of what we want, we need to add another PivotItem which contains a separate RichEditBox in order to create an example that will match our final result of having multiple files available on a single day. Let’s see if we can add another PivotItem which will contain another RichEditBox.
Copy / Paste Current PivotItem
I will simply copy the current PivotItem and paste it under the one which already exists. After that, I will alter the PivotItem’s title to “Entry2”.
Visual Studio Provides a Clue
When I do that, Visual Studio complains at me but does give me a good clue about what the problem is.

Notice that the new PivotItem did not render in the DesignView either. Visual Studio and the DesignView cannot decide what to do so it gives us that warning.
The easy solution for our test is to simply change the name from MainRichEdit to MainRichEdit2.
When I did that then everything worked great and we have a good example of what we want to do.
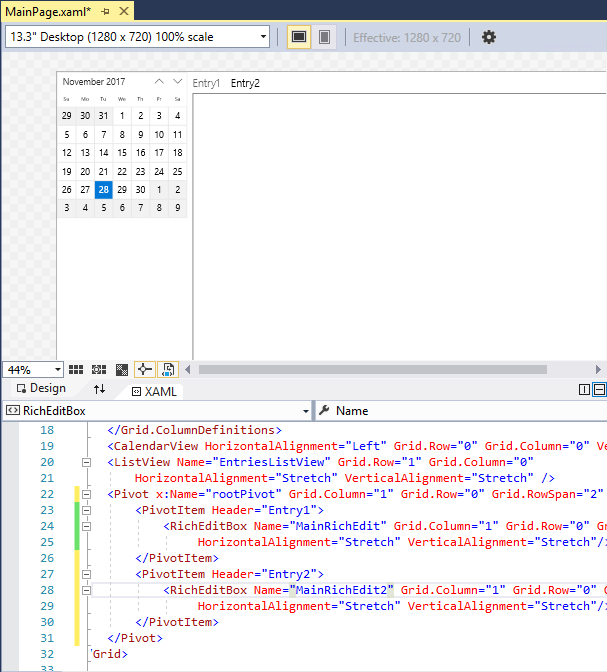
Now you can clearly see two PivotItems (tabs). Let’s run this and make sure all of our scrollbars still work properly and we’ll test to see if each RichEditBox will allow us to have different text in them.
Download Code: DailyJournal_v004.zip
You can download the DailyJournal_v004.zip from the top of this article to get the source and try it yourself.
Everything works great according to my tests. In an effort to not drive you more crazy with more images in this article I will just show you this one screenshot which shows you that I do have text in the Entry 2 RichEditBox and scrollbars for the RichEditBox and the ListView still work properly.

I think this is another big win. Especially considering that I forgot about the tab functionality and was able to add it in after the fact.
What We Really Need the App To Do
Of course, this isn’t exactly what we need in our app. We aren’t going to know exactly how many PivotItems exist because each PivotItem and its associated RichEditBox will represent a journal entry.
We need the ability to dynamically add PivotItems (and associated RichEditBoxes) when the app finds journal entries in the file system.
More Work For Next Article
That’s going to take some work, because I’ll need to explain the scheme for saving the journal entry files on disk. I’ll think about how to explain that clearly and we’ll start in next time, by getting our RichEditBox to save its data.
History
2017-11-28 : First publication of article