
Custom PageSize Of GridView In Runtime
4.33/5 (2 votes)
How to set pagesize of your gridview at runtime? Let your user decide the how many records they want to see in a GridView screen.
Introduction
Today, I am sharing one more helpful code snippet related to GridView in ASP.NET. GridView are used to display records from database or external datasource and are replacement of Static HTML tables which can’t work with data bound controls like GridView.
Background & Need
When the data is large in nature and we need to display it in small view, we use paging feature of GridView and achieve Custom PageSize.
Paging allows us to load large data quickly as well as make rendered HTML page of small size which make website load faster.
But in some cases where user might want to change pagesize at their own convenience. Typically this is needed when our general configured screen-size and display resolution and size of user is not equal, not even close to near. Lets be clear with below example.
I have developed a application considering for screen resolution of 1366×768 but one of my user accessed application using a Full HD (1920×1080) display which caused mess with GridView size.
So, I implemented some changes in that GridView control which helped me to make application more useful as well as more user friendly and environment adaptable.
Design & code

Lets be clear with a design followed by its source code. This is the source code for the above output. We will add additional code just after this code.
<asp:Panel ID="pnlGrid" runat="server" GroupingText="Product Listing">
<table width="100%">
<tr>
<td valign="middle" align="center">Size:
<asp:TextBox ID="txtSize" runat="server" CssClass="TextBox" Width="30px" OnTextChanged="txtSize_TextChanged" AutoPostBack="true"></asp:TextBox>
Page No:
<asp:TextBox ID="txtPageNo" runat="server" CssClass="TextBox" Width="30px" OnTextChanged="txtPageNo_TextChanged" AutoPostBack="true"></asp:TextBox></td>
</tr>
<tr>
<td>
<asp:GridView runat="server" ID="gvProducts" AutoGenerateColumns="false" AllowPaging="true" PageSize="10" AlternatingRowStyle-BackColor="Linen" HeaderStyle-BackColor="SkyBlue" Width="100%" OnPageIndexChanging="gvProducts_PageIndexChanging" EmptyDataText="Sorry! No Products to List. First Add from Add Product Link.">
<Columns>
<asp:TemplateField HeaderText="Product ID">
<ItemTemplate>
<asp:Label ID="lblProductID" runat="server" Text='<%#Eval("ProductID")%>' ToolTip="ID of Product as stored in Database."></asp:Label>
</ItemTemplate>
</asp:TemplateField>
</Columns>
<Columns>
<asp:TemplateField HeaderText="Product Name">
<ItemTemplate>
<asp:Label ID="lblProductName" runat="server" ToolTip="Name of Product" Text='<%#Eval("ProductName")%>'></asp:Label>
</ItemTemplate>
</asp:TemplateField>
</Columns>
<Columns>
<asp:TemplateField HeaderText="Brand">
<ItemTemplate>
<asp:Label ID="lblBrandName" runat="server" ToolTip="Brand of Product" Text='<%#Eval("BrandName")%>'></asp:Label>
</ItemTemplate>
</asp:TemplateField>
</Columns>
<Columns>
<asp:TemplateField HeaderText="Category">
<ItemTemplate>
<asp:Label ID="lblProductCat" runat="server" ToolTip="Category of Product" Text='<%#Eval("CategoryName")%>'></asp:Label>
</ItemTemplate>
</asp:TemplateField>
</Columns>
<Columns>
<asp:TemplateField HeaderText="In Stock">
<ItemTemplate>
<asp:Label ID="lblProductinStock" runat="server" ToolTip="Quantity available in Stock"
Text='<%#Eval("UnitsInStock")%>'></asp:Label>
</ItemTemplate>
</asp:TemplateField>
</Columns>
</asp:GridView>
</td>
</tr>
<tr>
<td align="right">
<asp:LinkButton ID="lnkExportAll" runat="server" ToolTip="Export this List" Text="Export to Excel" OnClick="lnkExportAll_Click"></asp:LinkButton>
<asp:LinkButton ID="lnkAddNew" runat="server" ToolTip="Add New Product"
Text="Add New" OnClick="lnkAddNew_Click"></asp:LinkButton>
</td>
</tr>
</table>
</asp:Panel>
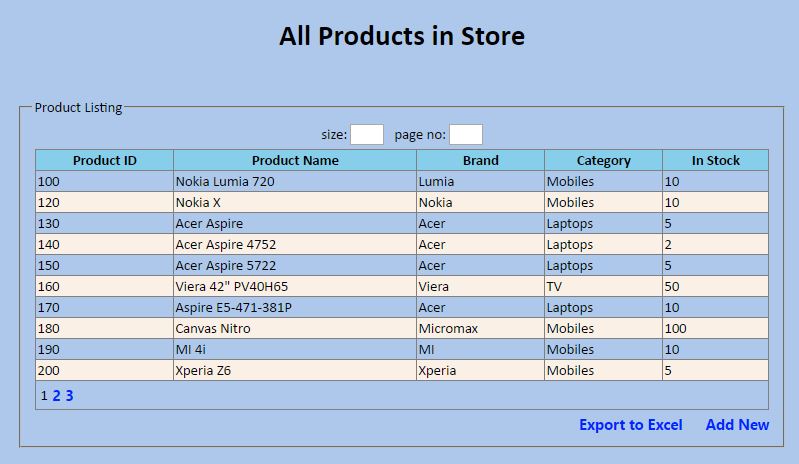
We have added a new row and two TextBox in above design to put Page Size and Page Number. In this design you can enter the size and page number of the view. Lets see the important section of code in above source code.
<tr>
<td valign="middle" align="center">
Size: <asp:TextBox ID="txtSize" runat="server" CssClass="TextBox" Width="30px"
OnTextChanged="txtSize_TextChanged" AutoPostBack="true"></asp:TextBox>
Page No: <asp:TextBox ID="txtPageNo" runat="server" CssClass="TextBox" Width="30px"
OnTextChanged="txtPageNo_TextChanged" AutoPostBack="true"></asp:TextBox>
</td>
</tr>
In above two TextBox, we set their AutoPostBack property to true and coded some event in TextChanged Event of both TextBox.
This is what it looked like after adding the above code showing two textboxes for holding values of PageSize and page number PageIndex.
Code for Making this Actually Work
protected void txtsize_textchanged(object sender, EventArgs e)
 {
    gvProducts.PageSize = Convert.ToInt32(txtsize.Text);
    ListProducts();
 }
protected void txtpageno_textchanged(object sender, EventArgs e)
 {
    gvProducts.PageIndex = Convert.ToInt32(txtpageno.Text) - 1;
    ListProducts();
 }
In these two event, we write code to re-bind data and set the properties PageSize and PageIndex. Lets have a look at output produce.

- The Number entered in Custom Pagesize field, GridView PageSize property will be updated with the above value and page will refresh to load GridView in with new settings.
- Similarly, Page no field will change the current page index of gridview to value entered in GridView.
- No need to hit Enter or press any button,
TextChangedcommand will be automatically executed due to PostBack nature of TextBox object.
In this article, we have learnt how to make a Custom Pagesize GridView which can change hard coded value from user input to make it more useful and fancy.