
Reason-Based State Transitions for TFS WorkItems
Reason-Based State transitions for TFS WorkItems provides better usability and flexibility over the current State-Based transitions that place the collection of the Reason as secondary and often optional.
Advantages of Reason-Based Workflow Transitions
Reason-Based workflow transitions capture more accurate information from the Product Development team as TFS WorkItems are handed off between team members. Though the TFS system allows the user to second guess the State, and then provide the Reason for the transition, since the Default Reason is prefilled, it can be accepted without consideration. The usability of submitting two fields when only one field is needed aside, this leads to the Reason field being an unreliable source of workflow transition information.
Reason-Based Workflow Transitions provide more flexibility and finer control and coordination of the fields of the WorkItem.

Active and Approved WorkItems are usually AssignedTo a member of the Software Engineering Team. If the Software Developer requires more information to proceed (e.g., 'info needed'), then the WorkItem should be assigned to either a member of the Quality Assurance Team or the Product Management Team, typically the creator of the WorkItem. Once the requested information is provided, the WorkItem should be assigned back to the Software Developer. But this 'info provided' transition, does not necessarily imply that the WorkItem has fully transitioned to an Active State. If you are measuring schedule integrity or calendar work verus Estimated Effort, by each Software Developer, it is best to let the Software Developer accept the 'info provided' WorkItem back into the Active State when they are actually ready to work on it (e.g., an 'info accepted' reason).

When a WorkItem is parked in a Removed or Deleted state, you might want to have someone from the Product Management Team, the Quality Assurance Team, or the Development Lead assigned to review the WorkItem depending upon the reason for the removal. A questionably defaulted 'not a bug' reason cannot be relied upon for routing where a non-defaulted reason can reliably differentiate, e.g.:
- 'works as designed/redesign needed' can be parked in the Feature Request state and assigned to the Product Stakeholders to refactor
- 'duplicate issue' can be parked in the
Removedstate, but assigned to Quality Assurance for verification that no nuance has been overlooked or perhaps to indicate that better training or coordination are needed - 'work unapproved or rejected' can be parked in the triage TBD state and assigned to the Development Team Lead or Manager for oversight
As the designer of your Product Development workflow, once you move from State-Centric analysis to Reason-Centric analysis, what would have been ignored intent, or subtle differences in intent can have broader, more consistent outcomes.
Caveats
- Please use at your own risk and [in]convenience.
- Unless you are able to import the
WorkItemType.xml files into your hosted TFS environments, this approach will only work for on-premise TFS servers. - This article is intended as reference, ... Though you might not adopt Reason-Based workflow, you might find parts of this solution useful for other TFS workflow applications. Please skim read and skip over familiar or unrelated sections.
- Frankly, Reason-Based TFS Workflow is a fair amount of work and customization. If any one of the stock workflows functions satisfactorily for your team, consider whether the benefit is worth the cost.
- A TFS Sandbox is recommended to test and debug your workflows before foisting them upon your team. Be aware that poor scripts and customizations are susceptible to dead ends and infinite loops.
TFSAggregator

TFS Aggregator (see https://tfsaggregator.github.io/) is a mature, open source utility that provides a server-side TFS extension to run custom scripts upon changed WorkItems in the TFS Application Tier. It can be used for much more than Reason-Based State Changes, such as time and cost estimate rollups, or field propagation to parent WorkItems, not covered in this article.
To Get Started
- Install the extension upon your on-premise TFS server (see https://tfsaggregator.github.io/admin/install/). Or, if you use a hosted TFS service, deploy and configure the extension as a Web Application (see https://tfsaggregator.github.io/admin/install-webhooks/).
- Brush up on the TFS Aggregator's Policies and Rules (see https://tfsaggregator.github.io/using/writing-rules/writing-rules/ and other pages in the User's Guide section of the online documentation).
- If you have an on-premise TFS server, setup a more convenient way to collect trace and diagnostic information (see https://tfsaggregator.github.io/using/scripting-tricks-n-tips/scripting-tricks-n-tips/#trace-your-steps). If you have a hosted TFS, this might be a good reason to setup an on-premise TFS server as a debugging and test sandbox for your solution.

TFS Aggregator installs as a plugin to the TFS Application Pool. Check your IIS configuration, or search for the location of the TFSAggregator2.ServerPlugin.policies file. On my TFS2013 system, it is found at C:\Program Files\Microsoft Team Foundation Server 12.0\Application Tier\Web Services\bin\Plugins. To load any changes that you make to this file, you will have to 'Recycle' the TFS Application Pool either from the IIS Manager (shown above) or from the command line using the appcmd recycle apppool /apppool.name: string command.
--more on TFSAgregator Policy Editing below--
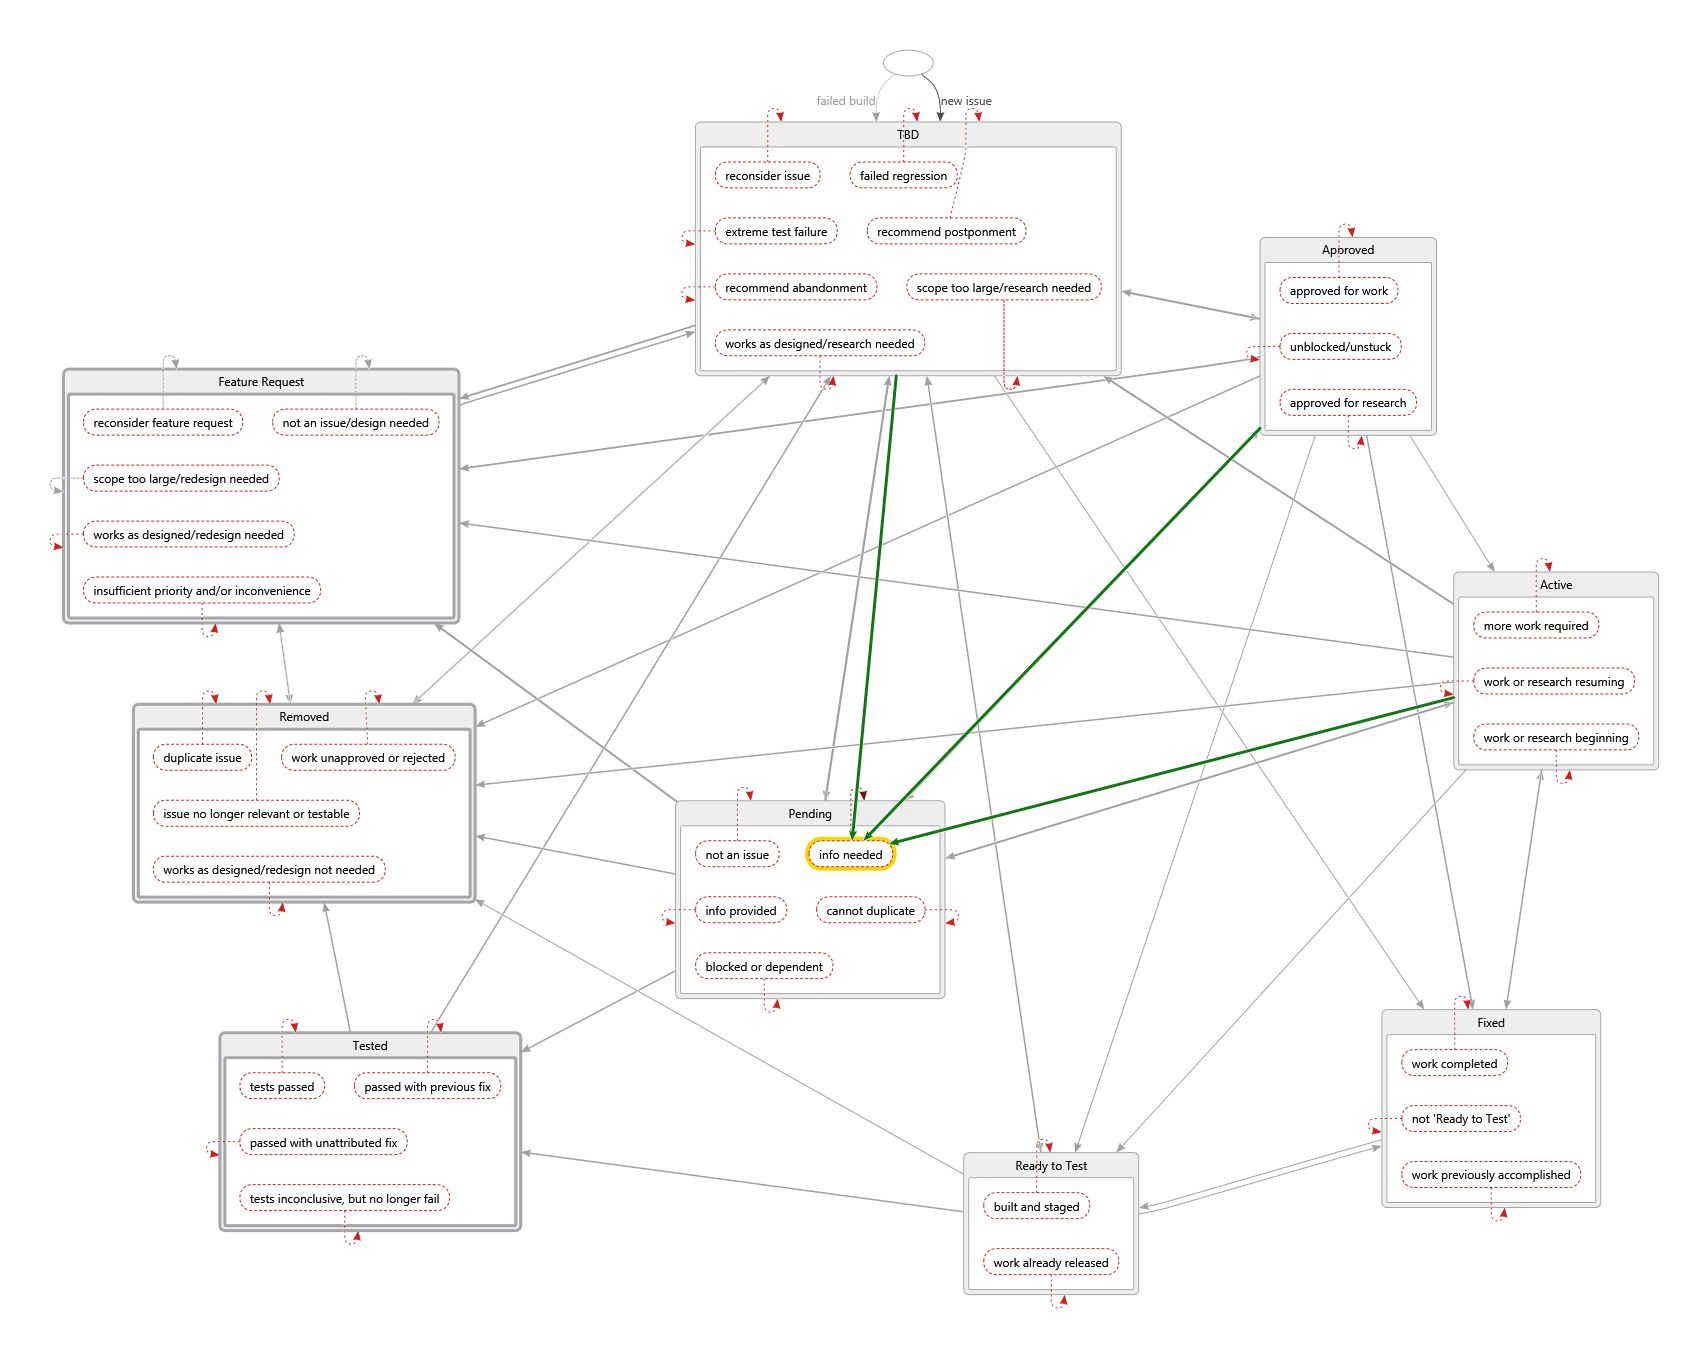
Primary States

Each primary state represents a queue of WorkItems either parked or requiring attention. If you have a SCRUM process, then WorkItems are parked in the 'Backlog' and are pulled out and become 'Approved' or 'Active' during the Sprint Planning Meeting. If you have a triage process (as shown above), then generally the team leads meet regularly to 'Approve' and prioritize or park the WorkItems. To work efficiently as a team, these primary states signify the broader team's division of labor. Each team member looks at their own assigned WorkItems, working to move them out of their own queue and on to the next.
TFS provides a rich interaction of field and process constraints, in support of these WorkItem's primary state transitions, as defined https://msdn.microsoft.com/en-us/library/cc339553(v=vs.90).aspx. If you are not already familiar with the WorkItemType schema, it may be worth your time to detour now and export your WorkItemTypes out of TFS (see below) to review what your system is currently doing.
Reasons Promoted to Secondary States
Promoting the workflow reasons to secondary states, is a way to get TFS to conveniently enforce the collection of the reason from the users. Which then requires the TFSAggregator (above) to automatically promote these secondary states back to primary states after the fact. As the designer of your team's workflow, this approach has the drawback of geometrically expanding both the workflow states as well as the workflow transitions. I recommend the use of design tools (e.g., DGML diagrams from Visual Studio or UML State Diagrams from Visio) to help you understand and analyze the workflow. DGML is an optional module to Visual Studio, so you might need to modify your installed components before you proceed (see https://stackoverflow.com/a/43405858/4151626). This module gives you a graphical editor for your IDE, and though I display the DGML graphically in the IDE, I prefer to edit it in XML. This can be accomplished by using the 'Open With'->XML Editor option on the IDE's File|Open dialog (see the DGML schema overview here: https://docs.microsoft.com/en-us/visualstudio/modeling/directed-graph-markup-language-dgml-reference).
Phase I: Capture and Analyze the Existing TFS Workflow
Introducing witAdmin
For background, see:
- witAdmin: Customize and manage objects for tracking work, and
- Import, export, and manage work item types
If they do not already exist on your system, install the witAdmin tools that match your version of TFS. Then use witadmin to export the TFS WorkFlows for the various WorkItemTypes of your project.
#>witadmin.exe exportwitd /?
Microsoft (R) Work Item Tracking Administration tool.
Copyright (c) Microsoft Corporation. All rights reserved.

Exports the XML definition of a work item type.

Usage: witadmin exportwitd /collection:collectionurl /p:project /n:typename
       [/f:filename] [/e:encoding] [/exportgloballists]

 /collection           Specifies the Team Foundation project collection.
                       Use a fully specified URL such as
                       http://servername:8080/tfs/Collection0.
 /p                    Specifies the name of the team project.
 /n                    Specifies the name of the work item type to export.
 /f                    Specifies the destination file for exporting
                       the work item type XML. If not specified, the XML is output to
                       the display.
 /e                    Specifies the name of the .NET Framework 2.0 encoding
                       used to import the XML file. For example, /e:utf-7
                       will use Unicode (UTF-7) encoding.
                       Encoding is automatically detected whenever possible.
                       If the encoding cannot be detected, UTF-8 is used.
 /exportgloballists    Exports the definitions of referenced global lists.
                       If not specified, global list definitions are omitted.
The /e:encoding and /exportgloballists options are not needed to export a working copy of your WorkItemType.xml file.
Extract the Primary States
The WorkItemType XML is organized by a <FIELDS> section, and a <WORKFLOW> section, and a <FORM> section. For reason-based state transitions, we only need to focus on the <WORKFLOW> section. This section is subdivided into a <STATES> subsection and a <TRANSITIONS> subsection. If you are using DGML to analyze your workflow, create a <Node> element in the .dgml file for every <STATE> element in the WorkItemType .xml file.
WorkItemType.xml
<STATES>
  <STATE value="Active">...</STATE>
  <STATE value="Approved"/>
  <STATE value="Feature Request">...</STATE>
  <STATE value="Fixed">...</STATE>
  <STATE value="Pending"/>
  <STATE value="Ready to Test">...</STATE>
  <STATE value="Removed">...</STATE>
  <STATE value="TBD">...</STATE>
  <STATE value="Tested">...</STATE>
</STATES>
WorkItemType.dgml
<DirectedGraph GraphDirection="LeftToRight" Layout="Sugiyama"
 ZoomLevel="1.25" xmlns="http://schemas.microsoft.com/vs/2009/dgml">
  <Nodes>
    <!--Primary 'Work Queue' STATES-->
    <Node Id="New" Label="" NodeRadius="50"/>
    <Node Id="TBD" Group="Expanded"/>
    <Node Id="Feature Request" Group="Expanded"
          StrokeThickness="4" StrokeDashArray="3 2"/>
    <Node Id="Removed" Group="Expanded" StrokeThickness="4"/>
    <Node Id="Approved" Group="Expanded"/>
    <Node Id="Active" Group="Expanded"/>
    <Node Id="Fixed" Group="Expanded"/>
    <Node Id="Ready to Test" Group="Expanded"/>
    <Node Id="Pending" Group="Expanded"/>
    <Node Id="Tested" Group="Expanded" StrokeThickness="4"/>
  </Nodes>
</DirectedGraph>
In the DGML above, I have added the TFS hidden New or "" <STATE>, used for newly created WorkItems and seen later in the <TRANSITIONS> section. I have also added DGML decoration attributes to modify the displayed shape of the "New" node (e.g. NodeRadious="50") as well as the various "parking" node's displayed border thickness and pattern (e.g. StrokeThickness="4" and StrokeDashArray="3 2"). I use the heavy border to differentiate 'parking' states from 'active' ones. Lastly, in preparation for future analysis, I have turned each of the primary states into a hierarchal node in the DGML with the Group="Expanded" attribute.
Extract the Transitions and Reasons
The <TRANSITIONS> section of the WorkItemType XML details all of the allowed STATE transitions for your current workflow.
WorkItemType.xml
<TRANSITION from="Active" to="Removed">
  <REASONS>
    <DEFAULTREASON value="Insufficient Priority and/or Inconvenience to User" />
    <REASON value="Duplicate" />
    <REASON value="Unapproved for work" />
  </REASONS>
</TRANSITION>
WorkItemType.dgml
<DirectedGraph GraphDirection="LeftToRight" Layout="Sugiyama"
 ZoomLevel="1.25" xmlns="http://schemas.microsoft.com/vs/2009/dgml">
  <Links>
    <Link Source="Active" Target="Removed" Index="1"
     Label="Insufficient Priority and/or Inconvenience to User"/>
    <Link Source="Active" Target="Removed"
        Index="2" Label="Duplicate"/>
    <Link Source="Active" Target="Removed"
        Index="3" Label="Unapproved for work"/>
  </Links>
</DirectedGraph>
For each <TRANSITION> element, create analogous <Link> elements in the DGML file, one for each <REASON> sub-element in the XML file. The Index attribute in the DGML tells the display engine to not collapse redundant links.
Review and Refine
After you have captured all of the workflow <REASONS> as DGML <Link>s, you can now view and analyze the your team's current workflow by opening the .dgml file using the default graphical editor in the Visual Studio IDE. The graphical editor will let you reposition and reorder your nodes as well as copy an image of the DGML graph to the computer clipboard (just don't save your graphical edits if you want to continue to edit the XML). Even if you do not implement the full reason-based transitions advocated here, you can make straightforward refinements to your existing workflow by modifying the WorkItemType.xml file as needed.
Import Current Workflow Refinements (if any)
Whether you continue with the promotion of <REASON>s to secondary <STATE>s or not, you can fine tune your current workflow for the team based upon your analysis. You can add reasons, change field constraints, even prepopulate many of the WorkItem fields, all by importing a revised WorkItemType.xml file.
#>witadmin.exe importwitd /?
Microsoft (R) Work Item Tracking Administration tool.
Copyright (c) Microsoft Corporation. All rights reserved.

This command imports a work item type XML definition file into a team project
on a Team Foundation Server.
If a work item type with the same name already exists,
the new work item type definition will overwrite the existing definition.
If the work item type does not already exist, a new work item type will be created.

Usage: witadmin importwitd /collection:collectionurl
       [/p:project] /f:filename [/e:encoding] [/v]

 /collection    Specifies the Team Foundation project collection.
                Use a fully specified URL such as
                http://servername:8080/tfs/Collection0.
 /p             Specifies the team project in which the new work item type
                is imported.  This is required, except when the
                validation-only option is used.
 /f             Specifies the work item type XML definition file to import.
 /e             Specifies the name of the .NET Framework 2.0 encoding
                used to import the XML file. For example, /e:utf-7 will use
                Unicode (UTF-7) encoding. Encoding is automatically detected
                whenever possible. If the encoding cannot be detected,
                UTF-8 is used.
 /v             Validates the XML definitions for the work item type,
                link type, or global workflow without importing them.
Though not in the scope of this article, the following references might be useful when refining your existing workflow:
- Work Item Type Definition Schema: https://msdn.microsoft.com/en-us/library/cc339553(v=vs.90).aspx
- Customizing Work Item Types: https://msdn.microsoft.com/en-us/library/ms243849(v=vs.90).aspx
Phase II: Condensed/Inverted Analysis as Preparation for the Promotion of Reasons to Secondary States
Depending upon the number of transitional reasons that you choose to implement, your Phase I DGML graph can become unwieldy quickly. The solution to this is to recognize that reasons cluster around their destination states. Further, inverting this into the DGML hierarchy, greatly simplifies the graph by subsuming the outer cluster of reason transitions into internal reason nodes. This also sets up the structure of the DGML to match what the subsequent WorkItemType XML will end up being. Let me show this by example as the transitional reasons (now <Link> elements) become secondary states (<Node> elements in the DGML and future <STATE> elements in the WorkItemType.xml file) along with new supporting DGML <Link> elements.
Promote the DGML Reason <Link> Elements to <Node> Elements
WorkItemType.dgml (before)
<DirectedGraph GraphDirection="LeftToRight" Layout="Sugiyama"
 ZoomLevel="1.25" xmlns="http://schemas.microsoft.com/vs/2009/dgml">
  <Nodes>...</Nodes>
  <Links>
    <Link Source="Active" Target="Removed" Index="1"
     Label="Insufficient Priority and/or Inconvenience to User"/>
    ...
  </Links>
</DirectedGraph>
WorkItemType.dgml (after)
<DirectedGraph GraphDirection="LeftToRight" Layout="Sugiyama"
 ZoomLevel="1.25" xmlns="http://schemas.microsoft.com/vs/2009/dgml">
  <Nodes>
    ...
    <!--Secondary 'Reason' STATES-->
    <Node Id="Insufficient Priority and/or Inconvenience to User"
     NodeRadius="12" Stroke="#FFCF1F1F" StrokeDashArray="2 3"/>
    ...
  </Nodess>
  <Links>
    ...
    <!--Each Primary STATE 'Contains' the reasons that cause TRANSITIONs to it.-->

    <Link Source="Removed" Target="Insufficient Priority
     and/or Inconvenience to User" Category="Contains"/>
    <Link Target="Removed" Source="Insufficient Priority
     and/or Inconvenience to User" Stroke="#FFCF1F1F" StrokeDashArray="2 3"/>
    ...
    <!--TRANSITIONS from Primary STATES to Secondary 'Reason' STATES-->

    <Link Source="Active" Target="Insufficient Priority
     and/or Inconvenience to User" Stroke="#FF1FCF1F" StrokeThickness="3"/>
    ...
  </Links>
</DirectedGraph>
- (Line 15 above) Each reason
<Link>becomes a<Node>with theLabelattribute promoted to theIdattribute and theSourceandTargetattributes being removed. I addNodeRadius,Stroke, andStrokeDashArraydecorative attributes to help visually distinguish these secondary reason states from the primary ones. - (Line 22 above) In the
<Links>section, each primary target of the new secondary 'Reason' state must hierarchically contain the new secondary reason<Node>. This is accomplished via the DGMLCategory="Contains"attribute in an overloaded, and inversely directed<Link>element. - (Line 23 above) For visual parody, I prefer to create the directed link from the secondary reason
<Node>to the destination primary 'Work Queue'<Node>in conjunction with its containment. Note that I have inverted theSourceandTargetattribute order for visual consistency and added differentStrokeandStrokeDashArrayattributes for visual differentiation in the later analysis. - (Line 27 above) Finally, the primary state can link to the interposed secondary reason state. Again,
StrokeandStrokeDashArrayattributes are added for visual differentiation in the later analysis.
In-depth Review and Refinement

I have posted my full DGML file for your download, review, and manipulation at the top of the article. You can view mine as an example, but your team's process should be preeminent and should have evolved different from mine. Loading the Condensed/Inverted DGML into the Visual Studio Graphical editor, you can reposition the Primary states on the display for better visual clarity.

The Stroke et. al. decorative attributes, especially function when selecting nodes. Selecting a primary state will highlight the <Link>s or future <TRANSITION>s to every secondary reason transitional state.
Similarly, because of the Stroke et. al. attributes, selecting a secondary reason transitional state will highlight every path from a primary state to the selected secondary state.
Use these selection highlights as you step through and analyze your transitions and workflow. Refine and review as needed, since this design phase is much more fluid than the following implementation phases.
Phase III: Server-Side Policy Editing
<?xml version="1.0" encoding="utf-8"?>
<AggregatorConfiguration>
  <runtime debug="false">
    <rateLimiting interval="00:00:01.0" changes="5" />
    <logging level="Normal" />
    <script language="C#" />
    <authentication autoImpersonate="false" />
  </runtime>
  <rule name="AdvanceByReason" hasFields="System.State">
    <![CDATA[
      string currentstate = (string)self["System.State"];
      logger.Log(LogLevel.Verbose, "AdvanceByReason considering {1} #{0}
      with State of '{2}'.", self.Id, self.TypeName, currentstate);
      if (!string.IsNullOrWhiteSpace(currentstate) && currentstate.Contains("->"))
      {
        string newstate = currentstate.Remove(0, currentstate.LastIndexOf("->") + 2);
        if (!string.IsNullOrWhiteSpace(newstate))
        {
          self.TransitionToState(newstate, "Seems reasonable,");
          logger.Log(LogLevel.Normal, "AdvanceByReason of {1} #{0}
          to State of '{2}'.", self.Id, self.TypeName, newstate);
        }
      }
    ]]>
  </rule>
  <policy name="YourPolicies">
    <collectionScope collections="YourCollection" />
    <templateScope/>
    <projectScope projects="YourProject(s)" />
    <ruleRef name="AdvanceByReason" />
  </policy>
</AggregatorConfiguration>
TFSAggregator installs with sample policy files, as well as an empty main policy file. See https://tfsaggregator.github.io/using/writing-rules/writing-rules/ and other pages in the User's Guide for more direction. Above is a condensed version of the main policy file that I use (comments removed). I found that not all C# primitives would work on my TFS2013 system, even some scripts shown in the documentation and samples would fail when testing. Thus, I recommend that you code and test in a step-wise fashion.
- (Line 11) I was unable to script
nullchecking without a script error (e.g.,(string)(self["System.State"] ?? "")) and resorted to the use of a local variable. - (Line 13) I took a generic, open-ended approach to the promotion of secondary states; that is to encode the promotion into the secondary state name using "->" as the delimiter. You are welcome to implement a more rigorous approach.
- (Line 18)
self.TransitionToState()is a TFS server-side API that advances the WorkItem ('self') to the specified state, if possible (more on this later).
Until you have verified that your policy scripts are working effectively, without errors, and without infinite loops (see https://tfsaggregator.github.io/using/scripting-pitfalls/). Implement and verify a single Reason-Based transition from the next section before importing the full solution.
Phase IV: Final Implementation
TFS/TFSAggregator Constraint
State changes from secondary states to primary states should not be uninhibited (i.e., no <FIELDS> element).
Because the server is the change agent, not the user; there can be no prompting for unsupplied fields. Also, blocked or unspecified transitions will simply not occur and the WorkItem will be stuck in an unwatched secondary state. This is accomplished by migrating the TFS workflow constraints (or the <FIELDS> elements) from the primary state <TRANSITION> elements to the secondary state <TRANSITION> elements, as detailed below.
TFS <TRANSITION>s must supply a <DEFAULTREASON>.
Another thing that will block a TFS state transition is the lack of a specified value for the System.Reason field. It is best to ensure that each automated Secondary to Primary state transition specifies a <DEFAULTREASON> that can be used.
TFS requires a single <TRANSITION> from="" to your initial primary state for newly created WorkItems.
In general, you can leave this initial <TRANSITON from="" ...> element unmodified.
Add the Secondary States to the TFS WorkFlow; Migrating the TFS Constraints in the Process
WorkItemType.xml (before)
<WORKFLOW>
  <STATES>
    ...
    <STATE value="TBD"/>
      <FIELDS>
        <FIELD refname="Microsoft.VSTS.Common.ActivatedBy">
          <EMPTY />
        </FIELD>
        <FIELD refname="Microsoft.VSTS.Common.ActivatedDate">
          <EMPTY />
        </FIELD>
        <FIELD refname="Microsoft.VSTS.CMMI.Blocked">
          <EMPTY />
        </FIELD>
        <FIELD refname="Microsoft.VSTS.Common.ClosedBy">
          <EMPTY />
        </FIELD>
        <FIELD refname="Microsoft.VSTS.Common.ClosedDate">
          <EMPTY />
        </FIELD>
        <FIELD refname="Microsoft.VSTS.Scheduling.Effort">
          <EMPTY />
        </FIELD>
        <FIELD refname="Microsoft.VSTS.Scheduling.RemainingWork">
          <EMPTY />
        </FIELD>
        <FIELD refname="Microsoft.VSTS.Common.ResolvedBy">
          <EMPTY />
        </FIELD>
        <FIELD refname="Microsoft.VSTS.Common.ResolvedDate">
          <EMPTY />
        </FIELD>
      </FIELDS>
    </STATE>
    ...
  </STATES>
</WORKFLOW>
WorkItemType.xml (after)
<WORKFLOW>
  <STATES>
    <!--Primary 'Work Queue' States-->
    ...
    <STATE value="TBD"/>
    ...

    <!--Secondary 'Reason' States-->
    ...
    <STATE value="failed regression->TBD">
      <FIELDS>
        <FIELD refname="Microsoft.VSTS.Common.ActivatedBy">
          <EMPTY />
        </FIELD>
        <FIELD refname="Microsoft.VSTS.Common.ActivatedDate">
          <EMPTY />
        </FIELD>
        <FIELD refname="Microsoft.VSTS.CMMI.Blocked">
          <EMPTY />
        </FIELD>
        <FIELD refname="Microsoft.VSTS.Common.ClosedBy">
          <EMPTY />
        </FIELD>
        <FIELD refname="Microsoft.VSTS.Common.ClosedDate">
          <EMPTY />
        </FIELD>
        <FIELD refname="Microsoft.VSTS.Scheduling.Effort">
          <EMPTY />
        </FIELD>
        <FIELD refname="Microsoft.VSTS.Scheduling.RemainingWork">
          <EMPTY />
        </FIELD>
        <FIELD refname="Microsoft.VSTS.Common.ResolvedBy">
          <EMPTY />
        </FIELD>
        <FIELD refname="Microsoft.VSTS.Common.ResolvedDate">
          <EMPTY />
        </FIELD>
      </FIELDS>
    </STATE>
    ...
  </STATES>
</WORKFLOW>
Following the outline of your DGML design, create the secondary reason states and migrate the TFS <FIELD> constraints from the primary states to each of the precursor secondary states. Additional field constraints can be added or subtracted now or in a second pass after you have validated basic functionality (see https://msdn.microsoft.com/en-us/library/aa337626(v=vs.90).aspx).
Splice in the Secondary 'Reason-Based' State Transitions
WorkItemType.xml (before)
<WORKFLOW>
  ...
  <TRANSITIONS>
    ...
    <TRANSITION from="Tested" to="TBD">
      <REASONS>
        <DEFAULTREASON value="Regression Failure." />
        <REASON value="Needs reevaluation and research." />
      </REASONS>
      <FIELDS>
        <FIELD refname="System.AssignedTo">
          <COPY from="field" field="Microsoft.VSTS.Common.ResolvedBy" />
        </FIELD>
      </FIELDS>
    </TRANSITION>
    ...
  </TRANSITIONS>
</WORKFLOW>
WorkItemType.xml (after)
<WORKFLOW>
  ...
  <TRANSITIONS>
    ...
    <!--Primary to Secondary State Transitions-->
    ...
    <TRANSITION from="Tested" to="failed regression->TBD">
      <REASONS>
        <DEFAULTREASON value="Regression Failure" />
      </REASONS>
      <FIELDS>
        <FIELD refname="System.AssignedTo">
          <COPY from="field" field="Microsoft.VSTS.Common.ResolvedBy" />
        </FIELD>
      </FIELDS>
    </TRANSITION>
    ...

    <!--Secondary to Primary State Transitions-->
    ...
    <TRANSITION from="failed regression->TBD" to="TBD">
      <REASONS>
        <DEFAULTREASON value="Regression Failure" />
      </REASONS>
    </TRANSITION>
    ...
  </TRANSITIONS>
</WORKFLOW>
Again, following your DGML design, create a <TRANSITION> from every primary state to every secondary state, copying the <FIELD> constraints from the appropriate former destination <TRANSITION>. You might want to keep the primary to primary <TRANSITION>s around, to copy from; deleting them only after all of your splicing is accomplished.
Follow up with the creation of the simplified (<DEFAULTREASON> only) secondary to primary <TRANSITION> elements.
After proofing the workflow in your TFS Sandbox, deploy for your team and refine as needed.
History
- 17th August, 2017 - Initial submission