
Building Out Cloud Infrastructure with Terraform
5.00/5 (5 votes)
How to use Terraform to build out a more complex network
Introduction
In the first article in this series, I introduced 'Terraform', and gave an introduction to what it is, and how to use it. This article dives a bit deeper, and looks at how to create a cluster of machines. If you had to manage your infrastructure manually, it would kill your time for all but the most basic of scenarios, therefore using automation technology like Terraform can free up your time to do more interesting things!
Declarative Approach
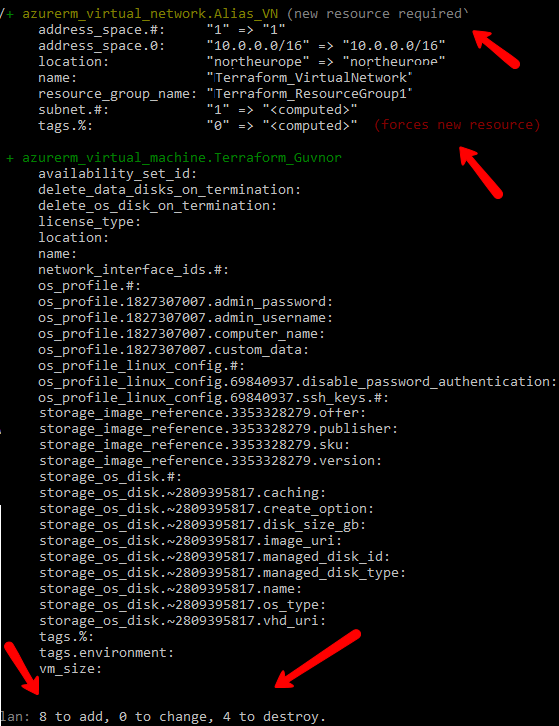
One of the critical things about Terraform, and one of the main reasons for its use, is that it is declarative. In other words, we *describe* the state we want our infrastructure to be in, and Terraform does the heavy lifting necessary to create that desired state. Terraform remembers the state that your infrastructure is meant to be in, maintains that state. If you later come along and make changes, Terraform takes care of tidying up whatever changed between your first infrastructure design and the second. So you could think of it as a kind of auto-merge/diff for infrastructure. The screenshot below shows the result of creating an infrastructure, then making a change to the infrastructure plan, and asking Terraform to implement it. You can see how it recognizes the changes required and tells you what it 'plans' to do on execution.
So why is this declarative approach useful? ... well, consider if you had to manage your automation infrastructure using some simple scripts you put together, perhaps in powershell or bash or even a tool like Ansible. The first run or two usually go fine, when you start making more changes however, you need to write code that remembers what the state was, and then changes it. Over time, this leads to what is known as 'configuration drift', especially when you are in a team of developers and more than one person takes care of your machines. Configuration drift simply states that over time, what you *intend* to be the state of your infrastructure is not ... somewhere along the line, the configuration got out of sync with the existing state, and it's now foobar. If you've been there, you will very much appreciate the approach I am demonstrating here.
Azure Gotcha!
Terraform will run on a multitude of cloud providers, Azure, AWS, Alibaba, Google. My preference is Azure, and that's what I am demonstrating this technology on. Sadly, it's almost the norm for developers to develop systems and not stress test them. I have worked in many different organizations and locations across the world, and I have seen this issue raise its ugly head over and over again. Developing a system and testing it against a handful of data, or with a handful of auto-generated machines is fine, but to really know if your solution will work in production, not only now, but in 12/24/36 months time, you need to put it under pressure, and observe what happens. The infrastructure I am building out will start on day one with 50 machines, I expect within 6 months that it will be 100, and from 12 months out we are expecting 10 10x everything. So while the setup in the previous article for one machine was great, I wanted to spin up a number of machines and see how things looked. Anyway, while testing, I came across a gotcha that bit hard and it took a bit of digging to solve.
Testing with 1 machine worked great. I then copied and pasted my code and did two. Fantastic - just as expected. Then I decided to ramp things up and spin 100 machines. Well, it chugged along and then boom! ... gave me an error:
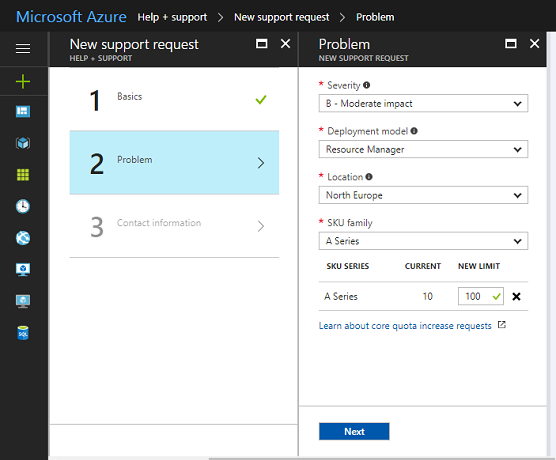
So it turns out that by default, Azure limits the amount of resources you can spin up - both to protect you, and them also I suppose. The solution to this is to put in a support request for additional quota allocation. When I saw 'support request', I thought, oh dear, I'll have to wait 24/48 hours for a response. I am extremely happy to report that it seems like this is an automated system, and I received an email within less than a minute saying my ticket had been resolved and I had my quota increased... go Microsoft Azure team .. howza!
Here's what you need to do if you hit this barrier:
- Top right of your portal dashboard, select Help + support

- In the resulting blade, set the issue type as 'Quota' and quota type to 'Cores'.

- Set the impact of this issue on your organization (play fair! ...) ... in my case, it wasn't mission critical, but it did stop me working on this particular test so it was moderately severe. Then, the important part, select the SKU family you want to increase, and set the new limit you want.
In my case, as I said, I had my extra resources within the minute - your mileage may vary!
Building Out the Infrastructure
In the first article, we went through the process of building up a Terraform configuration file for one virtual machine resource (if you haven't read that introduction article to Terraform, please do so now or you may get lost very quickly!). Now let's look at what we need to do to build out a bit. Typically in a cloud infrastructure, you have certain types of machines. Some for managing the system, others for reporting, others for basic work, etc. In this case, there's little point in cutting and pasting x number of VMs we want ... that would be quite mad :P
Instead, we will define a particular VM setup, and say that we want it repeated X number of times. It works by giving a new key "count" and setting its value.
resource "azurerm_virtual_machine" "workerNode" {
    count = "10"
	name = "workerNode"
    location = "North Europe"
    resource_group_name = "${azurerm_resource_group.Alias_RG.name}"
	network_interface_ids = [network_interface_ids = ???]
    vm_size = "Standard_A0"
Right, that seems ok, but, there's a problem waiting to bite us. The thing is, this machine declaration will basically LOOP itself x COUNT TIMES (10), and while its looping, it duplicates all of its properties. For most properties, this is ok and what we want, however, for things like node NAME and NETWORK INTERFACE, we need to have something unique - we can't have more than one machine using a virtual network interface, and we can't have all of our machines named the same. Thankfully, there's something we can do about this issue. Terraform has a thingy called 'Interpolation Syntax' ... now there's a fancy word! ... the dictionary say it's "the insertion of something of a different nature into something else." or "a remark interjected in a conversation" .... so the next time you are at a party, just nudge your way into a group of people you don't know, and simply say 'Oh, do excuse me while I interpolate..." ...(lol, be careful, you might just get arrested!).
Interpolation syntax means you can inject some calculation into a line and the application will evaluate whatever you have and convert it. Interpolations are wrapped, as in ${}, such as ${var.foo}. This is a very simple, yet powerful feature. There are a number of different operations you can do, 'count' and 'format' being just two. You can find out more detail about interpolation options on the Terraform interpolation documentation page.
So, let's see how this can be useful to us by changing up the code:
resource "azurerm_virtual_machine" "workerNode" {
    count = "10"
	name = "WorkerNode-${count.index}"
...
So as Terraform builds out the configuration, it evaluates "WorkerNode-X" and increments the number as it iterates, thus giving us a unique name per virtual machine. We end up with:
WorkerNode-1
WorkerNode-2
WorkerNode-3
.. and so on...
That solves the problem of our machine names, but what about the virtual network interfaces? ... well, we can handle that as well. My approach in this case, was to declare a VARIABLE in Terraform as a global 'count' (called 'WorkerCount'), and then use this in two places.
Variables are very simple to create. You declare Variable, followed by its name, then brackets enclosing the details of the variable. The only ones we are interested in are 'name ' and 'default value'.
variable "WorkerCount" {
    type = "string"
	default = "20"
}
The variable is referenced by the string that follows its declaration (WorkerCount), we tell it that it has a type of string, and the default value is what I am setting the starting value to be. Now we can change our WorkerNode declaration to the following:
resource "azurerm_virtual_machine" "workerNode" {
    count = "${var.WorkerCount}"
	name = "WorkerNode-${count.index}"
...
As you can see above, we can access the variable we declared by INTERPOLATING (weehoo! party time!).
Now let's look at how this can help us with our virtual network interfaces. Before I create the worker VMs, I create a series of network interface resources, also using the variable WorkerCount. I also use the same ${count.index} to append to a string and assign a unique name to each interface.
# create network interface for WorkerNodes x WorkerCount
resource "azurerm_network_interface" "NodeNIC" {
    count = "${var.WorkerCount}"
    name = "workerNIC.${count.index}"
    location = "North Europe"
    resource_group_name = "${azurerm_resource_group.Alias_RG.name}"
    internal_dns_name_label = "nodeNic${count.index}"

    ip_configuration {
        name = "node-nic-${count.index}"
        subnet_id = "${azurerm_subnet.Alias_SubNet.id}"
        private_ip_address_allocation = "dynamic"
        # private_ip_address = "10.0.2.5"
        # public_ip_address_id = "${azurerm_public_ip.Alias_PubIP.id}"
    }
}
Now we can update our VM resources to map to those interfaces as follows:
resource "azurerm_virtual_machine" "workerNode" {
    count = "${var.WorkerCount}"
	name = "WorkerNode-${count.index}"
    internal_dns_name_label = "nodeNic${count.index}"

    ip_configuration {
        name = "workerNIC.${count.index}"
        subnet_id = "${azurerm_subnet.Alias_SubNet.id}"
        private_ip_address_allocation = "dynamic"
    }
That's all we need for the moment. In the next article, we will look at how we can reach into those machine once they are created and install some useful software into them (for example docker ... oh yes, we are going all containerized!)
History
- 3rd August, 2017 - Version 1