
Creating Mixed Dimension application for HoloLens
5.00/5 (2 votes)
This article will show how to create a mixed dimension (2d+3D) application on HoloLens and switch between 2D and 3D views
Introduction
HoloLens can run all Universal Windows Platform applications which include support for ‘Windows.Holographic’ device family. It is possible to have one single two-dimensional application with multiple views inside the application. Every 2D view is constructed as a window. You can switch between these multiple views using UWP APIs. You can create 2D applications using XAML UI and C# using Visual Studio. If you create a three-dimensional application using game engines like Unity, you can have multiple scenes and you can switch between scenes using Unity APIs.
Background
Some specific scenario may require a single application with the combination of 2D views and 3D scenes. For example, you may want a 2D application for a digital brochure which simply displays product images and video. If you want to include an interactive demo of that particular product, you need 3D scenes to demonstrate the functionality of that product. It is possible to build a UWP application which includes 2D and 3D contexts.
In this article, you will learn how to develop one single UWP application which includes both 2D views and 3D scenes and how to switch between 2D and 3D contexts. You will also learn, how to create a bridge, basically a link library, between unity code and UWP portion of the application. To build a hybrid (2D+3D) app, we need the following:
- UWP class library
- 3D Unity application built for XAML
- 2D views using XAML and c#
UWP class library for linking
To communicate between Unity code and 2D C# code, we need a link library. We are going to create a universal class library which will act as a bridge between 2D and 3D contexts.
Open Visual Studio (I’m using VS Professional 2015). Go to File ⇒ New ⇒ Project. You will see a popup window with all available options to create a new project. Expand Installed ⇒ Templates ⇒ Visual C# ⇒ Windows ⇒ Universal. Select “Class Library (Universal Windows)”. Enter a name to your library. I have named my library as “HoloLinkLibrary” and click “Ok”.

You will now see a popup for selecting target and minimum platform versions. Most of the times you do not have to change this. Click “OK”. Your class library project will be created successfully.

You can see the newly created library project in the solution explorer. By default, visual studio will name your class as “Class1”. I prefer to leave it as is for this tutorial.

Copy and paste the below code in “Class1” and build the solution.
using System;
using System.Collections.Generic;
using System.Diagnostics;
using System.Linq;
using System.Text;
using System.Threading.Tasks;
using Windows.ApplicationModel.Core;
using Windows.UI.Core;
using Windows.UI.Text;
using Windows.UI.ViewManagement;
using Windows.UI.Xaml;
using Windows.UI.Xaml.Controls;
using Windows.UI.Xaml.Navigation;

namespace HoloLinkLibrary
{
    public class Class1
    {
        static CoreApplicationView ThreeDimView;
        static CoreApplicationView TwoDimView;

        public static Type TwoDimPageType { get; set; }

    static async Task RunOnDispatcherAsync(CoreApplicationView appView,
      Func<task> actionToPerform)
    {
        await appView.Dispatcher.RunAsync(CoreDispatcherPriority.Normal,
          () => actionToPerform());
    }


        static async Task ViewSwitcherAsync()
        {
            // Get the current application view
            var view = ApplicationView.GetForCurrentView();
            // Use ApplicationViewSwitcher API to
            await ApplicationViewSwitcher.SwitchAsync(view.Id);
            Window.Current.Activate();
        }

        public static async Task GotoThreeDimViewAsync()
        {
            if (ThreeDimView != null)
            {
                await RunOnDispatcherAsync(ThreeDimView, ViewSwitcherAsync);
            }else
            {
                Debug.WriteLine("3D view is null");
            }
        }

        public static async void Open2DView()
    {
        Debug.WriteLine("Opening 2D view");
        try
        {
                ThreeDimView = CoreApplication.MainView;

                // you can create a new view everytime or you can reuse same view. If so, check if 'TwoDimView' is for not null.
                TwoDimView = CoreApplication.CreateNewView();

            await RunOnDispatcherAsync(
              TwoDimView,
              async () =>
              {
                  Window.Current.Content = Get2DView();
              }
            );

            await RunOnDispatcherAsync(TwoDimView, ViewSwitcherAsync);
        }
        catch (Exception e)
        {
            Debug.WriteLine("{0} Exception caught.", e);
        }
    }

         //We cannot switch form 3D scene to XAML view directly. We need to create a window which will give us 2D context.

        static UIElement Get2DView()
        {
            TextBlock SampleText = new TextBlock();
            SampleText.Text = "Switching views\nPlease wait....";
            SampleText.TextWrapping = TextWrapping.WrapWholeWords;
            SampleText.FontWeight = FontWeights.Bold;
            SampleText.HorizontalAlignment = HorizontalAlignment.Stretch;

            SampleText.Loaded += async (s, e) =>
            {
                Frame rootFrame = Window.Current.Content as Frame;
                // Do not repeat app initialization when the Window already has content,
                // just ensure that the window is active
                if (rootFrame == null)
                {
                    // Create a Frame to act as the navigation context and navigate to the first page
                    rootFrame = new Frame();

                    rootFrame.NavigationFailed += OnNavigationFailed;

                    // Place the frame in the current Window
                    Window.Current.Content = rootFrame;
                }
                try
                {
                    Debug.WriteLine("library : pagetype :" + TwoDimPageType);
                    rootFrame.Navigate(TwoDimPageType);
                }
                catch (Exception ex)
                {
                    Debug.WriteLine("{0} Navigation Exception caught.", ex);
                }
            };
            return (SampleText);
        }

        private static void OnNavigationFailed(object sender, NavigationFailedEventArgs e)
        {
            Debug.WriteLine("Navigation failed");
        }
    }
}
</task>
You can find the compiled library files in <ProjectRoot>\<ProjectName>\bin\Debug
If you have selected “Release” build type, then the library files will be seen under <ProjectRoot>\<ProjectName>\bin\Release folder.

Note:We need to create a 2D window to get context. We cannot switch from 3D scene to XAML without 2D context.
Preparing 3D unity app
You can configure your Unity application for HoloLens by following the step-by-step instructions provided in Holograms 100 tutorial. Now you have to import ‘HoloLinkLibrary.dll’ in to Unity project.
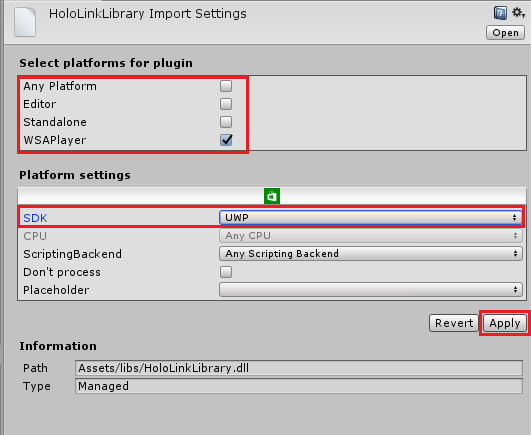
Create a new folder named ‘libs’ under ‘Assets’. Drag and drop HoloLinkLibrary.dll in to ‘libs’ folder. If you select ‘HoloLinkLibrary.dll’ in Unity Editor, ‘Inspector’ window will be opened. “Any Platform” option will be selected by default. You should uncheck “Any Platform” and check “WSAPlayer” option. Then, under ‘Platform Settings’, select “UWP” in SDK dropdown. Then click “Apply”.
Add the below code to your 3D button click in Unity scene. For this article, I have created a simple cube and added the below method to ‘OnClick’ event of that cube.
public void SwitchToTwoDimView()
    {
#if UNITY_UWP
            HoloLinkLibrary.Class1.Open2DView();
#endif
    }
Note that the code is wrapped inside #if UNITY_UWP. This will execute this line of code only on UWP environment.
Next important thing is to build the application. Open ‘Build Settings’ in unity editor. Select ‘Windows Store’ as the platform. Select ‘Universal 10’ in SDK and ‘XAML’ in ‘UWP Build Type’. Check ‘Unity C# Projects’ checkbox and click ‘Build’. Save the build in “App” folder inside the main project folder.

Creating 2D XAML views
Till now we have created a universal link library which can be executed from Unity code and XAML/C# code. We have built the unity application for UWP platform. Now we are going to add an XAML form using Visual Studio.
Open the solution <ProjectRoot>\App\Test Project.sln in Visual Studio. You can see the ‘HoloLinkLibrary.dll’ file under ‘Unprocessed’ folder.

Refer the below screenshots to add new XAML file to the project. Save that page as ‘TwoDimPage.xaml’.


Copy the below code and paste it in ‘TwoDimPage.xaml’ file.
<page mc:ignorable="d" x:class="Test_Project.TwoDimPage" xmlns="http://schemas.microsoft.com/winfx/2006/xaml/presentation" xmlns:d="http://schemas.microsoft.com/expression/blend/2008" xmlns:local="using:Test_Project" xmlns:mc="http://schemas.openxmlformats.org/markup-compatibility/2006" xmlns:x="http://schemas.microsoft.com/winfx/2006/xaml">

    <grid background="{ThemeResource ApplicationPageBackgroundThemeBrush}">
        <textblock>
            Two Dimensional Page
        </textblock><button click="Button_Click">Switch To 3D</button>
    </grid>
</page>
Add the below function in the code behind. When you click the button
private void Button_Click(object sender, RoutedEventArgs e)
        {
            HoloLinkLibrary.Class1.GotoThreeDimViewAsync();
        }
Open App\Test Project\MainPage.xaml.cs in Visual Studio Editor. Find the constructor function MainPage(). Add the below line to the constructor function.
HoloLinkLibrary.Class1.TwoDimPageType = typeof(TwoDimPage);

Now we have used the ‘TwoDimPageType’ property to set the type of the XAML page. This property is declared in the link class library.
Change the build architecture to ‘x86’ and choose HoloLens Device or Emulator and run. You should see your 3D scene on HoloLens Device or Emulator.
If you tap this cube, you will be able to see the 2D XAML view as shown in the below screenshot. If you click the “Switch To 3D” button, you will be taken back to 3D context.

Conclusion
I hope that you have learned how to create a mixed dimensional hybrid HoloLens application. You can switch to any number of XAML views from the 3D scene.