
Create React App with an Express Backend
4.00/5 (1 vote)
How to create a React app with an Express backend
If you haven't heard of it yet, Create React App is an awesome way to get started with React. It creates a project structure for you, all set up and ready to go. You get to skip the configuration of Webpack and Babel, and get right down to writing your app.
But what if your app isn't purely frontend? What if you need to connect to a backend server? Create React App has you covered.
In this post, we'll set up a React app alongside an Express backend app, and wire up the UI to fetch some data from the backend.
And, if your backend is not written with Express, don't worry! This same process will work for you too (skip to the Configure the Proxy section).
Let's get into it.
Create the Express App
We'll need an Express app first off. If you have one already, you can skip this step.
For the purpose of this post, we'll generate one with the express-generator utility. Install the generator:
$ npm install -g express-generator
# or:  yarn global add express-generator

Then run it to create the Express app:
$ express react-backend

It'll create a react-backend folder. Then make sure to install the dependencies:
$ cd react-backend
$ npm install   # or yarn
We can ignore most of the generated files but we'll edit the react-backend/routes/users.js file as a simple way to return some data. Here's the change we'll make:
var express = require('express');
var router = express.Router();

/* GET users listing. */
router.get('/', function(req, res, next) {
	// Comment out this line:
  //res.send('respond with a resource');

  // And insert something like this instead:
  res.json([{
  	id: 1,
  	username: "samsepi0l"
  }, {
  	id: 2,
  	username: "D0loresH4ze"
  }]);
});

module.exports = router;
That's all we'll do to Express. Start up the app by running this:
$ PORT=3001 node bin/www
Leave it running, and open up a new terminal. Note the PORT variable: this Express app will default to port 3000, and Create React App will also default to port 3000. To avoid the conflict, start Express on 3001.
Create the React App
You can put the React app anywhere you like. It doesn't need to be a subfolder of the Express app, but that's what we'll do here to keep things organized.
First things first, make sure you have create-react-app installed if you don't already:
npm install -g create-react-app
Then, from inside the react-backend folder, create the React app:
create-react-app client
Configure the Proxy
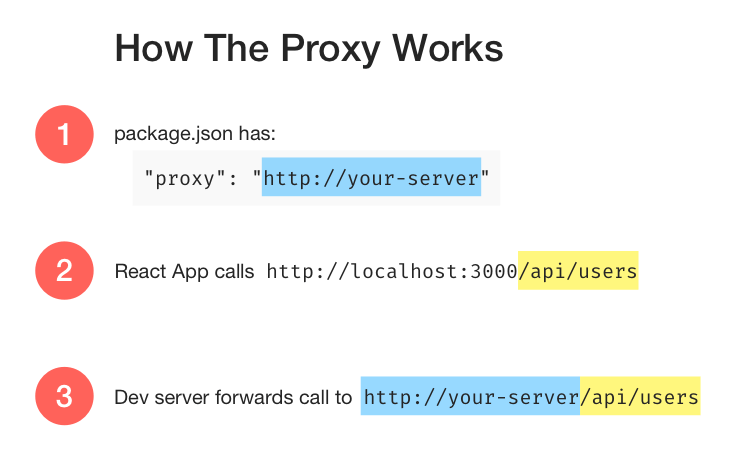
This is the key change that will let the React app talk to the Express backend (or any backend).
Inside the React app's folder (client), open up package.json (make sure it's not Express package.json - it should have things like "react" and "react-scripts" in it). Under the "scripts" section, add the "proxy" line like this:
  "scripts": {
    "start": "react-scripts start",
    "build": "react-scripts build",
    "test": "react-scripts test --env=jsdom",
    "eject": "react-scripts eject"
  },
  "proxy": "http://localhost:3001"
The port (3001) in the "proxy" line must match the port that your Express server is running on.
Note that this can point to any server. It can be another local backend in Java or Python, or it could be a real server on the internet. Doesn't matter.
The way this works is, any time your React app makes a request to something that's not a static asset (not an image or CSS or index.html, basically), it will forward the request to the server specified in "proxy".
Once this is done, start the React development server by running npm start (or yarn start).
Fetch the Data from React
At this point, 2 servers are running: Express (on port 3001) and Create React App's Webpack dev server (on port 3000).
Let's make a call to the /users endpoint and make sure the whole pipeline is working.
Open up client/src/App.js and tweak it to look like this:
import React, { Component } from 'react';
import './App.css';

class App extends Component {
  state = {users: []}

  componentDidMount() {
    fetch('/users')
      .then(res => res.json())
      .then(users => this.setState({ users }));
  }

  render() {
    return (
      <div className="App">
        <h1>Users</h1>
        {this.state.users.map(user =>
          <div key={user.id}>{user.username}</div>
        )}
      </div>
    );
  }
}

export default App;
The changes here are:
- Setting an initial state at the top: an empty users array will prevent the
this.state.users.mapfrom blowing up before the users are loaded. - Changed
renderto render the list of users. - Added
componentDidMountto get the data usingfetch, and save them in state.
If your browser doesn't have fetch support yet, you'll need to install the polyfill. See here for which browsers currently support fetch.
There's also further reading if you're wondering how to do AJAX in React or why the fetch is in componentDidMount instead of componentWillMount.
Wrap Up
Now you're a pro at hooking up a CRA-generated app to any backend you can throw at it! Got more questions? Want to see something else? Leave a comment below.
Create React App with an Express Backend was originally published by Dave Ceddia at Dave Ceddia on April 19, 2017.