
Quantum Computing for Everyone - Part IV: IBM Quantum Experience
5.00/5 (3 votes)
An introduction to using IBM's Quantum Experience platform that allows users to design quantum circuits and to simulate the results of a calculation or to run the circuit on a real quantum computer.
| Part III: Quantum Circuits and OpenQASM |
Table of Contents
- Introduction
- Getting Started
- Quantum Composer
- Coin Flip Program
- Random Number Program
- Running On The Processor
Introduction
All the previous articles of this series have been leading up to this part. In it, we will simulate the OpenQASM programs we wrote in Part III and then run them on an actual quantum processor via the IBM Quantum Experience platform.
Getting Started
Before we can begin using the service, we will need to create an account on the IBM Quantum Experience platform. To do that, go to their Sign Up form and fill out all the required information.
Once you have finished signing up, the first thing I would recommend is checking out their User Guides. They have a beginner's guide, and advanced guide, as well as a developer's guide. Going through the beginner's guide, and then the advanced guide, will provide you with a wealth of information not only on how to use the IBM Quantum Experience platform, but on quantum computing in general.
There is an additional benefit for going through both guides beginning to end. You receive additional units. Simulating quantum programs on the platform is free, however to run the programs on the actual processor requires units. I imagine IBM's way of preventing people from abusing the service. If you run out of units at any point, you can email them to request additional ones. As long as you aren't abusing the service, it is almost certain they will grant your request.
Once you have finished going through the guides, using the login link at the top right of the page to log into the platform using the account you just created. Once you have successfully logged in, you will be taken to the community page by default. This is their forum where you can ask questions, discuss solutions to quantum algorithms, etc. To begin creating a quantum circuit, click on the Composer link near the top left of the bag (under the "IBM Q experience" logo)

Quantum Composer
When you click on the Composer link, you are taken to a new page and presented with a New Experiment dialog box. Since we will be using the example programs we developed in Part III of this series, enter Coin Flip in the Experiment Name textbox. After that, click on the ibmqx2 button. The Custom Topology button allows you to simulate quantum circuits and add multiple quantum and classical registers as well as specify how many qubits/bits they are. However, since we want to eventually run our programs on the real quantum processor, select ibmqx2 for now. Once you get more comfortable with the platform, I encourage you to play around with this feature.
The quantum composer is made of two major sections. On the left hand side is the score:

From our overview of quantum circuits in Part III, this should look familiar to you. Each line is an individual qubit and they are all initialized to the \(\vert 0 \rangle\) state. The line at the very bottom, labeled c is the classical register.
The second major part is the toolbox:

The toolbox contains the various gates you can place on the score, it allows to you select if you want to simulate the score or run it on the real processor, as well as allows you to see the OpenQASM code for the gates currently on the score. You can also see how many units you have remaining by clicking on the My Units link.
Once helpful feature is if you click the question mark next to Gates:

This brings up a dialog which contains information on every available gate that can be used. Each description also contains two buttons: QASM and Matrix. Clicking the QASM button shows the OpenQASM code for the gate and clicking the Matrix button shows the matrix for the gate.

Coin Flip Program
To create the coin flip program, first click, and hold, on the blue square with "H" while dragging the mouse towards the score. You will notice that dots appears on each of the qubit lines. These dots represent places where you can place a gate:

Drag the mouse over the first point of the first qubit (i.e. q[0]) and then release the mouse button. The blue square with an "H" will now be on the score. This square represents the Hadamard gate.
Now do the same thing with the measurement operation. This is the square that looks like a dial, under the Operations heading, in the toolbox:

Drag this item and place it on the next dot of the same qubit line that you placed the Hadamard gate. Once you have done this, your score should look like this:

You will notice an arrow going from the measurement icon to the classical bit register. This represents that we are measuring the value of the qubit and placing the results into the classical register so that we can read the value.
Now lets simulate our circuit to see what the results are. To see the current parameters, click to button next to the Simulate button (it has a "v" shaped icon in it):

You can see the current setup the seed is random and shots are set to 100. The see we do not need to worry about right now. The shots value is the number of times that the circuit will be run. Remember, all quantum processes are random so running the circuit two times will almost definitely produce different results. This is way the circuit is run many times - so we can get an average value. For now we can leave this value as is. However, if you want to increase, or decrease, this value, you can click the Edit parameters link.
To simulate the circuit, click on Simulate. While the simulation is running, the composer will be grayed out and show the following:

Once the simulation has finished, a dialog window will be shown with the following parts.
- The first part is a Quantum Sphere of the results. This is the same as a Bloch Sphere that we discussed in Part I. You may click and drag the sphere around to view all sides of it:

- The next part are the Computation Basis results:

Since we had a gate operating on a single qubit there was only two possible results. Either the qubit was going to end up in the \(\vert 0 \rangle\) or \(\vert 1 \rangle\) state. All the other qubits would remain in the state that they were originally initialized to (\(\vert 0 \rangle\)). When the measurement placed the results in the classical register, the possible, binary, values were 00000 or 00001. Has the Hadamard gate puts the qubit into a superposition of \(\vert 0 \rangle\) and \(\vert 1 \rangle\), we would expect to find each of these states occurring the same number of times over multiple runs and that is exactly what these results show. Half the time the q[0] qubit ended up in the \(\vert 0 \rangle\) state and half the time it ended up in the \(\vert 1 \rangle\) state. The Downlaod CSV button does exactly what it sounds likes. It downloads a CSV file of the results.
- The final part is a copy of the score along with the OpenQASM code for the circuit. This code should look familiar to you as it is what was shown in Part III of this series:

Random Number Program
Now we will do the random number program. First click and hold the measurement icon that is currently on the score. You will see a Delete object appear. Drop it the measurement objectd on it to remove it from the score:

Now drag additional Hadamard gates, and measurement objects, onto to the score so that the score looks like the the following image and then click the Simulate button again:
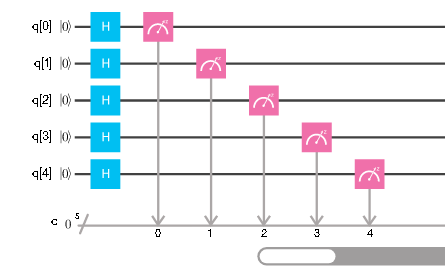
When the simulation is complete you will notice that the Quantum/Bloch Sphere and the Computation Basis results will have additional values. The Computation Basis results for my run is:

You can see that almost all values occurred with the same frequency, however some were slightly more and some slightly less. As the number of shots is increased, these values would be get even closer in frequency. Again, since these are random process, your values may different slightly, even though we have the same quantum circuit on the same platform.
In case like this, were there are numerous results, the outcome of every posibility is not show in the results dialog. The value not shown will be aggregated under Other Values:

However, if you download the CSV file, it will contain the outcome of all the possible values.
Running On The Processor
As was mentioned at the beginning of this part, running a circuit on the real processor requires units. Before clicking the Run button, I recommend clicking the button next to it (with the "v" shaped icon) and then clicking Edit parameters. This will bring up a dialog window that shows you how many units are required based on the number of shots (runs) you select:

As you can see in the image above, to run the coin flip program one time (i.e. one shot) cost three units, but so does running it 1,024 times (i.e. 1024 shots). Since we would like to see if the results are similar to the simulation, in this case I will leave 1,024 shots selected.
If the exact quantum circuit you are trying to run on the processor has been recently run on it (whether by you or another user), you have the option of getting the results from the cache. In this case, you do not use any of your units and you can still see the results of the program running on a real quantum processor.

Sometimes there are multiple cached results, in which case you can select which cached results you would like to view:

You can see from the cached results that the two outcomes almost occur with the same frequency but that there is a slight difference in them:

Conclusion
This concludes the end of this article series. It has been quite a journey from learning the difference between classical and quantum computer, to discovering how quantum gates operate on qubits, and ending with the ability to use a real quantum processor.
I hope you have enjoyed this article series has much as I have in writting it. I am currently planning additional articles to add to this series including using the IBM Quantum Experience API so that you can get the results of simulations, or actual runs, from your own programs. IBM has also developed a new 16-qubit processor that is currently in beta. Once this is accessible I may update this series with any new features that come along with it.
If there is something that you feel is missing, or that you would like to see added and/or expanded on, please feel free to leave a comment. I may not respond to all comments but I definitely read all of them and take into consideration any feedback from the readers.
Once again, thank you for allowing me to introduce you to this new era of computing. The next few years should be very exciting and you should be glad to know that as a programmer you can now be at the forefront of this field.
History
June 26, 2017: First version
| Part III: Quantum Circuits and OpenQASM |