
1. HoloToolkit Unity - Environment
5.00/5 (1 vote)
This is the first article in an introduction series to Hololens developement in Unity3D. We start with getting our development environment ready.
Introduction
Augmented Reality and Hololens is finally a reality and demand for skilled developers will soon emerge.
Background
With Hololens, people are able to watch 3D models (Holograms) floating in "real" space. Studies have shown that this new visual way of presenting information through creating holograms increases our ability to understand, and also to remember what we learned, considerably. The consequences and implications in society this new technology will bring off, remains to be fully understood and chartered.
Using the Code
You should be on a Windows 10 PC, preferably Professional or Enterprise edition since you need Hyper-V enabled to be able to run the Hololens Emulator. (Hyper-V: Right click on Windows Icon (down-/left-corner), choose Programs and Features, Turn Windows features on of off, check Hyper-V). That said, with new tools, you are now able to simulate interactions, as from the Hololens, right inside your developer environment.
Necessary downloads:
- Visual Studio 2017: https://www.visualstudio.com/ (Any edition will do)
- Unity 3D: https://store.unity.com/?_ga=1.242480258.1475798219.1490851373 (Free edition will suffice, V5.5.2f1 is nice)
- HoloToolkit: http://holotoolkit.azurewebsites.net/
After installing, start Unity and create a new project called Test_HoloToolkit.
Open menu: Edit\Preferences -> External Tools -> External Script Editor and make sure you are using Visual Studio 2017.
Import HoloToolkit.unitypackage into your unity project.
Try running unity. This might force getting errors from a script in the Toolkit-Example\GazeRuler directory.
You can then either:
Delete: HoloToolkit-Examples\GazeRuler
Or
Edit: PloygonManager.cs in Visual Studio
by adding two using statements:
using HoloToolkit.Examples.GazeRuler;
using HoloToolkit.Unity.InputModule;
You should now be able to see a new choice: HoloToolkit in the Menu line:
- In menu HoloToolkit\Configure, you will have 3 Apply menus: Scene, Project and Capabilities.
- Apply all of them (with default choices or just all options)
- This is mainly a short cut of doing most of what else you could do manually in File\Build Settings… and Player Settings...
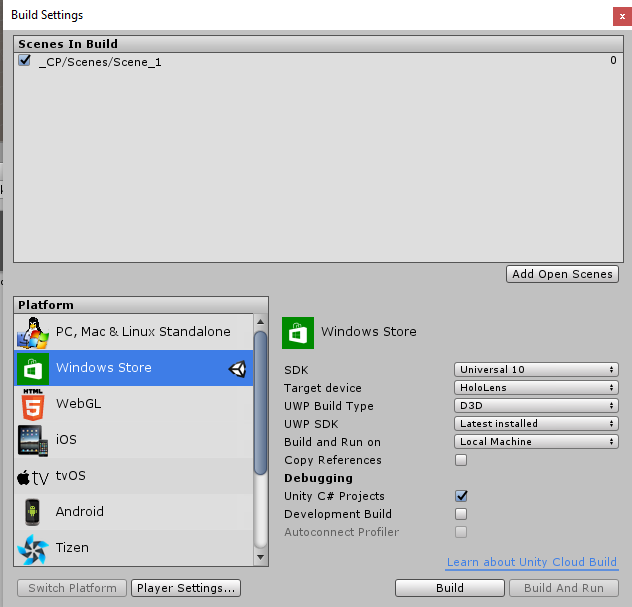
In the Project window, now create a folder named _CP with a folder within called Scenes. As you might have guessed from the Build Settings picture, save your open scene here and name it Scene_1.
- In the Hierarchy window, delete Main Camera.
- Create a new Empty and call it Managers.
- From Project window HoloToolkit\Input\Prefabs, drag the
HololensCamerainto the Hierarchy. - Make sure to reset its transform. (
Position(0,0,0), Rotation(0,0,0), Scale(1,1,1)) - Also drag the
InputManagerPrefab beneath the Managers Empty you created. - From the HoloToolkit\Input\Prefabs\Cursor folder, drag the Cursor prefab into the Hierarchy window.
Congratulations, you should now have all the essentials in place to start developing simple Hololens apps.
But we want to test it out, so in the Hierarchy window, create a new 3D object: Cube with
Position(0,0,2), Rotation(0,0,0), Scale(0.2, 0.2, 0.2)

You might also want to go to the menu Window\Holographic Emulation and turn Emulation Mode on to Simulate in Editor. This should enable you to use a Xbox controller to simulate input from the Hololens. You might then "walk around"(Body movements) with your left stick and "Look around"(Head movements) with your right stick when you are running your scene. The A key simulates the airtap gesture.
If you don't have a Xbox controller, turn off the Emulation Mode by setting it to None.
You will now be able to simulate Hololens input with mouse and keyboard.
Your right mouse button will simulate Head movements when dragged, while arrow keys, numeric keypad keys and "QWEASD" simulate body movements(strife) and tilt. Play around and you will get the hang of it.
If you press the space key on your keyboard while pressing your left mouse button, you will simulate an airtap with your right hand. If you press the left shift key on your keyboard while pressing your left mouse button, you will simulate an airtap with your left hand.
This is a much faster way of verifying changes in your project than the "old" way of having to go through generating a Hololens Visual Studio project and then run this in the Hololens Emulator. (This last process is well described in the Holographic Academy documentation) https://developer.microsoft.com/en-us/windows/mixed-reality/academy.
But if you want to try out the Hololens Emulator, I would still recommend using a Xbox controller as input device. The Hololens Emulator also gives you a nice impression of startup menus and other stuff in the actual hardware.
In the next article, we will have a brief look at Gaze and Airtap gesture implementation.