
BlockIt - Chrome extension to block requests
5.00/5 (4 votes)
Extension to block selected hosts from Chrome brower
Introduction
Whenever we browse a website, behind the scenes many requests are made to get all the content. Some of these requests are important while some can be avoided as they may be to get advertisements or recommendations etc. In this article I am trying to create an extension that will help block and unblock selected URLs.
It will not tell you what to block, though.
Background
I have noticed that for some websites, I see advertisements showing even though I have AdBlock extensions installed. These websites were making separate requests to ad providers which for some reason AdBlock could not pick up. One solution to fix this is to add entries to host file (on Windows) which I found cumbersome. So, I read up about Chrome extensions and attempted to create one myself.
Disclaimer
- Chrome APIs might have changed since the time of writing this code. Please refer to Google's documentation for up-to-date information
- This extension was tested on 64-bit Windows 10 and Chrome Version 57.0.2987.133
- This extension is not available on Google Play store/Web store.
Using the Code
You just need a text editor and Chrome installed on your computer to see/modify the code.
Chrome extensions are comprised of at least these four items:
- Manifest.json file
- HTML page
- CSS files
- Javascript files
Manifest file
A manifest file can be considered to be a definition of the extension. It is a simple JSON file with pre-defined attributes that tell the browser about the extension. Among other details, it helps with setting up the name, versioning, description, permissions, user interface for the extension and the JS files associated with it.
Here is how the manifest file looks for this extension:
{
  "manifest_version": 2,

  "name": "BlockIt",
  "description": "Blocks a website domain for you in Chrome. All your settings will be synchronized if it is enabled in Chrome",
  "version": "1.0",

  "browser_action": {
    "default_icon": "icon.png",
    "default_popup": "popup.html"
  },
  "permissions": [
    "webNavigation","<all_urls>","tabs","webRequest","webRequestBlocking","storage"
  ],
  "background":{
    "scripts":["background.js"]
  }
}
In the JSON above,
manifest_versionshould be 2 as indicated by Google documentation.browser_actiontells the icon for the extension and HTML page that contains the pop up.permissionsdefine the set of permissions which are given to the extension. In this case we are assigning permissions to be able to access the URLs and tabs. We also need extension to be able to track and block requests along with storage access to save blocked URLs.backgrounddefines that we will be running some JavaScript as a background process. Chrome takes care of the extension system and will generate a page that will include this script. In this case, we do not need any specific HTML. If needed, that can be specified as well.
For more details about the manifest file, please refer to Google's documentation here [^].
HTML Page and CSS files
The HTML page for this extension is rather simple. It merely contains a list and couple of buttons. Complete HTML for the pop up is as below:
<!doctype html>
<html>
<head>
  <title>BlockIt</title>
  <link href="popup.css" rel="stylesheet" type="text/css">
  <script src="popup.js"></script>
</head>
<body>
  <div>
    <p>Select the domains to block: </p>
    <div>
      <ul style="list-style: none;" id="hosts"></ul>
    </div>
    <div>
      <button id="yes">Yes, block these domains</button>
      <button id="no">No, changed my mind</button>
    </div>
  </div>
</body>
</html>
The CSS file too is bare minimum styling of list and buttons.
JavaScript
This is where all the magic happens. As seen in the manifest and HTML file, there are two JS files here: background.js and popup.js. As the name might suggest, the former deals with background tasks and the latter deals with code for the extension popup.
background.js
Background scripts allow us to maintain states or to write a long running process. In this case, we need to keep track of all the tabs and the URLs they are visiting. So, this script will need variables to store these details and also some event handlers to track when Chrome is started, when tab is opened or closed and when a request is made. Using Chrome's API, we can bind handlers to events in following format:
chrome.<item>.<eventName>.addListener(<handler>,<filterAsJSON>,<moreInfoAsJSON>);
Each handler has to have a specific definition (number and type of arguments) which can be found from documentation. For instance, if we were to fire some code when a new tab is created, we can bind our handler this way (I have used anonymous functions in most cases. We can have a named function with correct definition as well):
chrome.tabs.onCreated.addListener(function (tab){
// do something here
});
Some events can be handled both asynchronously and synchronously and some can also return data. For instance, onBeforeRequest can be handled both the sync and async way. It can also return data specifying what should be done with the request. The sample below will block all the requests to UglySite. It also specifies a filter that mentions only the requests to UglySite and VeryUglySite should be sent to extension.
chrome.webRequest.onBeforeRequest.addListener(function(details){
 return {cancel: true};
},
{urls:["*uglysite.com*","*veryuglysite.com*"]},
["blocking"]);
The code above will block the requests in a synchronous way while if we change blocking to asyncBlocking, we can do that asynchronously. We can also specify a callback function in that case.
Apart from listening to events, we can also register callbacks to listen to custom messages sent from the extension. For instance, when the user opens extension popup, we need to get all the requests done by the current tab. This can be achieved like this:
// In the background javascript
chrome.runtime.onMessage.addListener(function(request, sender, callback){
// request is an object that would look like this
// {
//  action:'requests',
//  tab: 1
// }
if(request.action = 'requests'){
  callback(GetRequests(requests.tab));
}
});

function GetRequests(tabId){
// requestsMade and requestsBlocked are objects which would look like this if tabId was 1
// {'1':['url 1', 'url 2']}
return {"made": requestsMade[tabId.toString()], "blocked": requestsBlocked[tabId.toString()]};
}
In the sample above, we listen to more messages using request.action property. The section below will show how to send messages to this listener.
For this extension, following events are handled:
chrome.tabs.onCreated: To add current tab's properties to objects storing requests made and blocked.chrome.tabs.onRemoved: To remove current tab's properties from objects storing requests made and blocked.chrome.webRequest.onBeforeRequest: To intercept all the requests made and block them if needed.chrome.runtime.onMessage: To listen to message asking for requests made by current tab. This will use action asrequests.chrome.runtime.onMessage: To listen to message telling background process that blocked URL list has been updated by user. This will use action asresync.
In order to save or get data, function under chrome.storage.local or chrome.storage.sync can be used. Both provide similar functions and event handler. The difference between the two is that local will only store data on the current computer. Sync will sync data between all browsers where the current user is signed in and has enabled synchronization. In case the user has not enabled it, sync will also work as local.
For this exension we are using get and set functions that allow us to read and write data to Chrome's storage. Note that this data is not encrypted by default so sensitive information must not be stored. The following snippets show saving and retrieving of data from storage.
// JSON data to save needs to be in key/value format
// set is used in popup.js
chrome.storage.sync.set(<jsonToSave>, <optionalCallback>);

chrome.storage.sync.get(['keyToGet'], function(result){
// Do something with result here
});
popup.js
This file contains all the code that is needed by the extension popup. It does two major tasks: get the requests made by tab when it is loaded and save the user selection to storage when the save button is clicked. To get the requests made by the tab, it sends the requests message to background process. The following is used to send the message:
// call format. Not actual code
chrome.runtime.sendMessage(<requestJSON>,<callbackFunction>);

// actual code
chrome.runtime.sendMessage({action:'requests', tab: currentTabId},function(value){ GetRequests(value); });
Here, in order to get the current tab's id, the following function from Chrome's APIs is used:
// Here first JSON is used to filter the results and the function is the callback for the data returned.
chrome.tabs.query({active:true,currentWindow:true}, function(tabs){
  // tabs array will contain one element with current tab
});
Stiching it all together, this is how it all works:
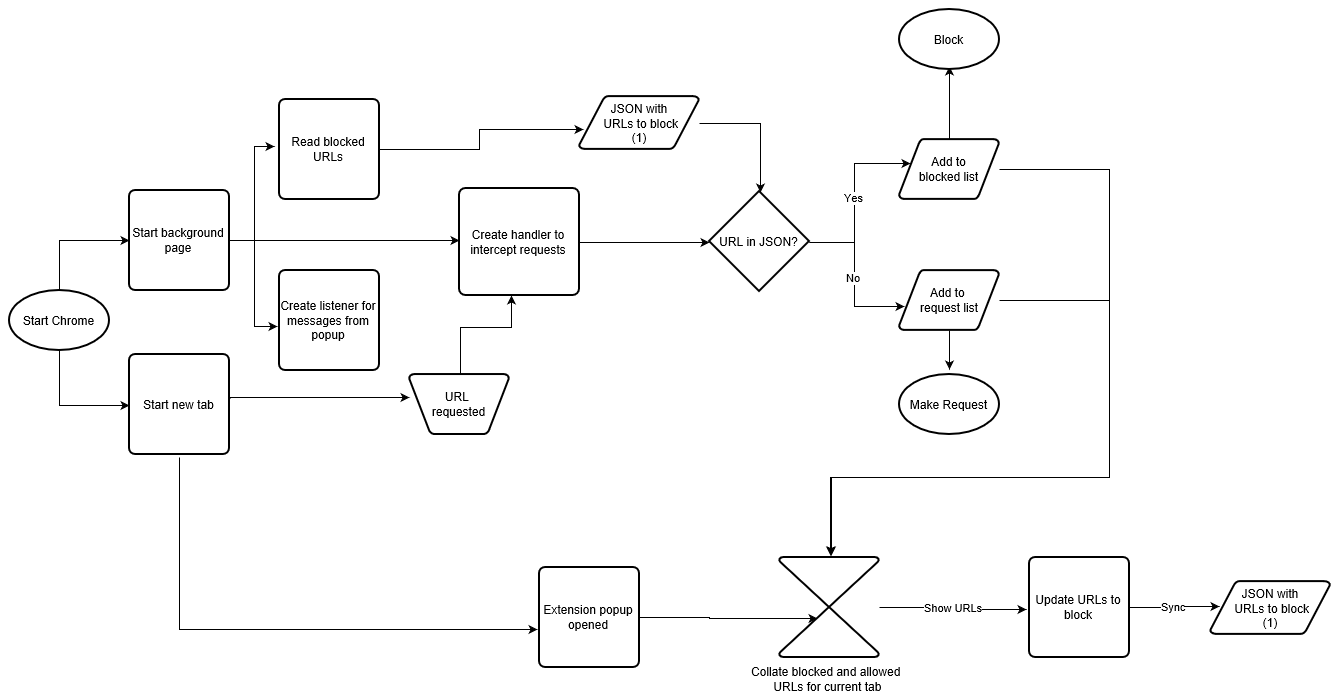
While it may look complicated, it is a very simple piece of code that is broken down to really small parts here.
Adding Extension to Chrome
- Download and extract the code from the link above.
- On Chrome, go to
chrome://extensionspage and checkDeveloper modecheckbox. - Click on
Load unpacked extensionand select the folder containing the code download. - Extension should be visible in toolbar now. Refresh the page to view requests.
Conclusion
The idea behind this article was to provide an idea about basics of writing a chrome extension. Hopefully it helped a little. For further reading, refer to Google's doumentation[^].
History
- Initial release - 01-April-2017