
Walkthrough in detail : Create Dataset and Database with two relational tables. An UpdateAll method on the TableAdapterManager.
Walkthrough in detail to create a relational database application using C# .NET without code.
Introduction
Create a 1)database and 2)dataset this is not a new topic, but I tried to outline the working project in detail without writing the code. (Please, pay attention to the sequence 1)database and 2)dataset.)
Prerequisites:
*Microsoft Visual Studio 2012-2015 (I used Visual Studio Community 2015)
*SQL Server 2012-2015
Tasks illustrated in this walkthrough include:
*Create a new Windows Application project.
*Create a new local SQL Server database file
*Create tables, columns, primary keys, and foreign keys.
*Create a new dataset object used Dataset Designer with two relational tables.
*Populate the tables with data, and save them.
*An Insert, Update, and Delete operations and save changes back to the database.
Application
1.Create a new Windows Forms Application project.
1.1 File>New>Project>Visual C#>Windows Form Application>named "DBExample">OK
1.2 The "DBExample" project is created and added to Solution Explorer.
2.Create a new SQL Server database file attached to the local instance.
2.1 Project>Add New Item>Data (Installed)>Service-based Database (Templates)>named Database1.mdf>Add

2.2 If The Data Source Configuration Wizard opens, click Finish
2.3 The "Database1.mdf" file added to project.(It's located in your folder "DBExample" project)
2.4 Important! It will save you from the problem:
'My database is not updated, but there were no errors.'
Click Database1.mdf in the Solution Explorer.
Edit properties Build Action=None and Copy to Output Directory=Do not copy

2.4.1 You can use Database1.mdf " file properties to indicate what actions the project system
should perform on the files. For example, you can set file properties to indicate
whether a file should be compiled or embedded into the build output as a resource.
2.4.1.1 The Build Action property indicates what Visual Studio does with a file
when a build is executed (main properties).
* None - The file is not included in the project output group
and is not compiled in the build process. An example is a Readme text fil.
* Compile - The file is compiled into the build output. This setting is used for code files.
* Content - The file is not compiled, but is included in the Content output group.
For example, this setting is the default value for an .htm or other kind of Web file.
* Embedded Resource - This file is embedded in the main project build output as a DLL or executable. It is typically used for resource files.
* Other properties are mainly for WPF.
2.4.1.2 The Copy to Output Directory Property
specifies the conditions under which the selected source file
will be copied to the output directory (.../bin/Debug/...).
* Do not copy - If the file is never to be copied to the output directory.
* Copy always - If the file is always to be copied to the output directory.
* Copy if newer - If the file is to be copied only when it is newer than
an existing file of the same name in the output directory." (MSDN source)
2.5 In Solution Explorer double click Database1.mdf. You are open Server Explorer window.

2.6 Select Database1.mdf and click Refresh.
The Refresh method updates the Database object properties from the instance of SQL Server.
2.6.1 The Properties window for the database shows the connection string
and the location of the primary .mdf file for the database.
3.Create database based on the Customers and Orders tables with relationship.
3.1 In Server Explorer, expand the Data Connections node, and then expand the Database1.mdf node.
If Server Explorer doesn't appear, you can display it by choosing View, Server Explorer on the menu bar.
3.2 Right-click the Tables node under the Database1.mdf
3.2.1 If you can't to see in drop-down menu Add New Table as shown below
one of possible is installation the SQL Server Data Tools (SSDT) appropriate version Visual Studio.

3.3 From the drop-down menu click Add New Table (The design surface is loading)

"The Table Designer is a visual tool that allows you to design
and visualize database tables to which you are connected.
The Table Designer opens and shows a grid with one default row,
which represents a single column in the table that you're creating.
By adding rows to the grid, you'll add columns in the table." (MSDN source)

3.4 Rename new table in T-SQL script pane (Customers)
3.5 The following table and fields should be created in the SQL Express database.

3.5.1 "In the new version SQL Server 2012, you can change a table definition through
a graphical interface or directly in a script pane.
If you use the graphical interface,the table’s definition is automatically updated
in the script pane.To apply the SQL code in the script pane, choose the Update button." (MSDN source)
3.6 Check the CustomerID row for setting Primary Key.
3.7 Select CustomerID column and edit these properties in the Properties window when the column is selected.
Edit an Is Identity=True , Identity Increment=1 , Identity Seed=1.

3.7.1 "Is Identity Indicates whether or not this column is an identity column.
3.7.2 Identity Seed Displays the seed value specified during the creation of this identity column.
3.7.3 Identity Increment Displays the increment value specified during the creation of this identity column." (MSDN source)
3.8 In the upper-left corner of the Table Designer, choose the Update button.
In the Preview Database Updates dialog box, choose the Update Database button.
Your changes are saved to the local database file.
3.8.1 An option Unclude Transaction Script saved transaction script
3.8.1 Used Generate Script you have the option of saving a change script
when you are using Table Designer.
3.9 Refresh Database1.mdf on Server Explorer, open Tables node.
It's appear you new Customers table.
3.10 Repeate 3.1-3.9 for new table with named Orders.

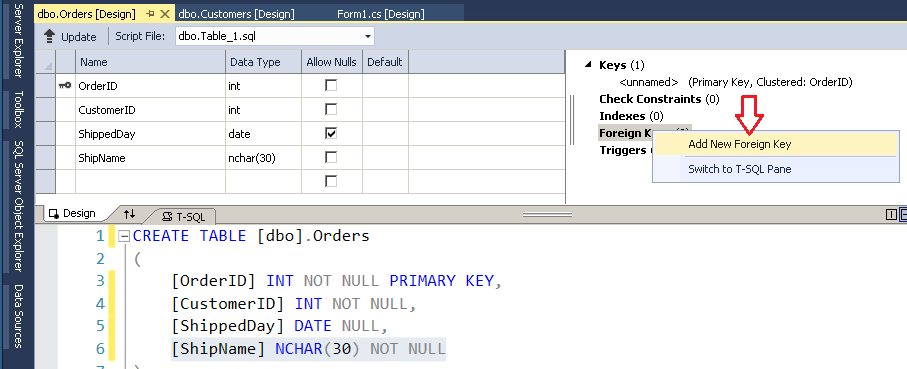
3.11 To create a relationship between the tables created in the previous step.
For the Orders table, in the context pane on the right side of the grid,
open the shortcut menu for Foreign Keys, and then choose Add New Foreign Key.
Click Enter.
3.11.1 SQL Server 2012-2015 doesn't support the Database Diagram Designer.
However, SQL Server 2005, SQL Server 2008, and SQL Server 2008 R2
does support this feature.
3.12 In the T-SQL pane update the default definition of the foreign key line reference with the following.
CONSTRAINT [FK_Orders_Customers] FOREIGN KEY (CustomerID) REFERENCES Customers(CustomerID)

3.13 In the upper-left corner of the Table Designer, click the Update button.
3.14 File>Save All or Save All(Ctrl+Shift+S) button.
4. You can easily display data from a local database file in your application by creating a dataset.
You will create and configure a dataset using Customers and Orders relational tables from Database1.mdf.
Dataset is object that contain data tables where you can temporarily store the data for use in your application.
The structure of a DataSet is similar to that of a relational database:
it exposes a hierarchical object model of tables, rows, columns, constraints and relationships.
4.1 Click Form1.cs[Design] view.
4.2 Create new DataSet object.
Project>Add New Items>Data (Installed)>DataSet (Templates)>named DataSet1.xsd>Add
 4.3 Opened Dataset Designer windows.
The Dataset Designer is a set of visual tools that you can use to create
and edit typed datasets and the individual items that they contain.
Drag two tables Customers and Orders from Server Explorer to Dataset Designer field
4.3.1 Note the Dataset Designer has created CustomersTablesAdapter and OrdersTablesAdapter
with Fill,GetData() main query that defines the SQL schema for the tables.
"TableAdapters provide communication between your application and a database.
They connect to the database, run queries or stored procedures, and either return
a new data table or fill an existing DataTable with the returned data.
TableAdapters can also send updated data from your application back to the database".(MSDN source)
4.3.2 Note the Customers and Orders tables has a relationship by foreign key FK_Orders_Customers.

4.3.3 Auto code generated connection string and saved it
in the application configuration file (application settings).
Check it in Solution Explorer click App.Config file

Connection string is the 'key-string' used to open a database.
4.4 Open Data Sources panel and open Customers node.
If the Data Sources window isn't showing, choose View, Other Windows, Show Data Sources on the menu bar.
Into Customers tables you see a node Orders table.

4.5 In the Dataset Designer for CustomerID DataColumn object into Customers DataTable,
open Properties window and change the AutoIncrement=True
AutoIncrementSeed=1 AutoIncrementStep=1 properties.
That indicates whether the column automatically increments the value of the column for new rows added to the table.

4.6 Change the AutoIncrement=True AutoIncrementSeed=1 AutoIncrementStep=1 properties
for OrderID DataColumn object into Orders DataTable.
4.7 On the menu bar, choose Build and choose Rebuild Solution to 'clean'
the solution and then build all project files and components.
Note. Database files (Database1.mdf,Database1_log.ldf)
is not copy to the output folder(.../bin/Debug/) of the project.
5. Design the UI by dragging items that represent data tables or objects from the Data Sources window.
5.1 Make sure that the Windows Forms designer is open, select Form1.cs[Design] view.
5.2 In the Data Sources window, select the DataGridView that represents the data table.

For information:
5.2.1 To display each data field in a separate control, click Details.
When you drag the data item to the designer, this action will
create a different data-bound control for each column or property of the
parent data table or object, along with labels for each control.
5.2.2 Select each column or property for which you want to set the control to be created

5.3 Drag the main Customers node as DataGridView from the Data Sources window onto Form1.
Data-bound control customersDataGridView appear on the form,
along with a tool strip customersBindingNavigator for navigating records.

5.4 Drag the main Orders node as DataGridView from the Data Sources window onto Form1.

5.5 Drag the relational Orders node as DataGridView from the Data Sources window onto Form1.

5.6 A dataSet1, customersTableAdapter, customersBindingSource, tableAdapterManager,
customersBindingNavigator, ordersBindingSource, ordersTableAdapter and ordersBindingSource1
appear in the component tray.

5.6.1 Click orderBindingSource (orderBindingSource1) and open Properties window.
Note the difference between ordersBindingSource and ordersBindingSource1
in the properties DataMember and AllowNew.
5.6.2 "By default, a TableAdapterManager class is generated when you create
a dataset that contains related tables with Hierarchical Update=true property.
By default, a dataset treats related tables as "relations only,"
which means that it doesn't enforce foreign key constraints.
You can modify that setting at design time by using the Dataset Designer.
Select the relation line between two tables and double click
to bring up the Relation dialog box.
The changes you make here will determine how the TableAdapterManager behaves
when it send the changes in the related tables back to the database."(MSDN source)
5.7 Right-click Form1 and select View Code.
5.8 When dragging items from the Data Sources Window onto a form,
the code to fill the data table with data is automatically added to the Form_Load event handler.
Open your form in the code editor to see the exact syntax to fill your specific tables.

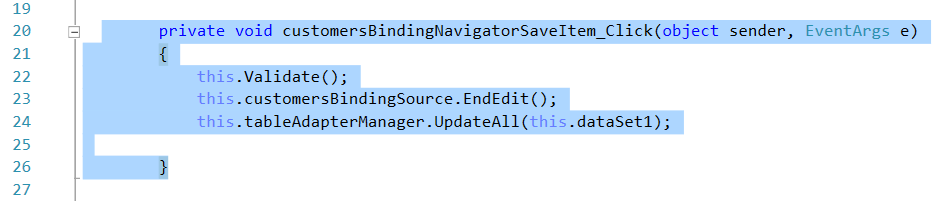
5.9 By default, an event handler for the BindingNavigator's Save button is added
to the form's code to send updates to the database.
6. Now we have UI design for fill Customers and Orders relational tables.
"After dataset is populated with data, you will typically perform some kind of manipulation
of the data before sending it back to the data source or to another process or application.
Since each record in a dataset is represented by a DataRow object,
changes to a dataset are accomplished by updating and deleting individual rows."(MSDN source)
6.1 On the Debug menu, click Start to run the project or F5.
6.1.1 Raise Form1_Load event handler. The TableAdapter's Fill method fills the dataset with data.
6.1.2 The dataset is an in-memory copy of datasource. And default it's empty.
6.2 Fill the first row Customers table (dataSet1) like this example
and click Save button customersBindingNavigator (save data dataSet1 into Database1.mdf).

6.3 Oops! An appear 'An unhandled exception of type 'System.Data.SqlClient.SqlException'
occurred in System.Data.dll'. An attempt to attach an auto-named Database1.mdf is fail.

Click Stop Debuggin.
6.3.1 In the Solution Explorer open App.Config file.
See on the string AttachDbFilename=|DataDirectory|\Database1.mdf;
This connection string syntax is supported by the SqlClient and OleDb managed providers.
"By default, the |DataDirectory| variable will be expanded as follow:
* – For applications placed in a directory on the user machine, this will be the app’s (.exe) folder.
* – For apps running under ClickOnce, this will be a special data folder created by ClickOnce
* – For Web apps, this will be the App_Data folder
6.4 We replace data file path to outside the project as hard AttachDbFilename=Myproject\Data.mdf;
This way, both the design-time and the run-time will be using the same data
file but the downside is that the path in the connection string will be hard coded
and therefore it’ll be harder to share the project and deploy the app.
Before deploying the app, just make sure to replace the full path in the settings with a relative path." (MSDN source)

6.5 Repeat 6.2. Fill the first row Customs table (dataSet1) and click Save button customersBindingNavigator.
Now, all right!
In the Server Explorer window right click Customers table and choose Show Table Data.
Click Refresh and note that Database1 and dataSet1 are updated.
Check that data Customers table is saved.

6.6 Fill the Customs and Orders tables like this example and click Save button customersBindingNavigator.

6.7 Select row CustomerID=3 Customers table
Relational FK_Orders_Customers table display two orders with CustomerID=3 only.

6.8 Select row CustomerID=4 Customers table.
The Orders table hasn't rows with CustomerID=4 than relational FK_Orders_Customers table is empty.

6.9 Similary, select row CustomerID=5 Customers table
Relational FK_Orders_Customers table display one order with CustomerID=5 only.

6.10 Try to change related data FK_Orders_Customers table.
Select new row and fill data like this.
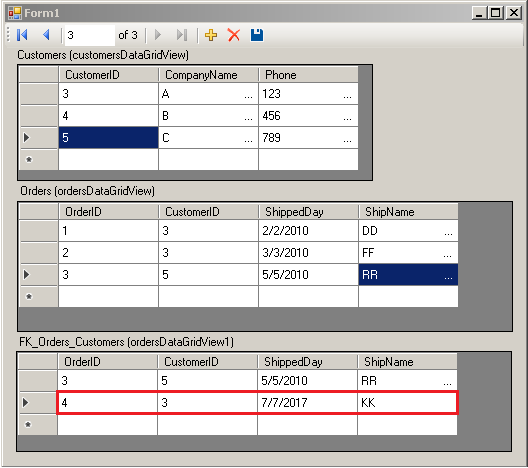
6.11 Click Enter keyboard button. New row passed to Orders table.
Relational FK_Orders_Customers table remained to display one order with CustomerID=5 only.

6.12 Select row CustomerID=3 and click Delete button customersBindingNavigator.
dataSet1 has upgraded. Click Save button customersBindingNavigator.

6.13 Oops! An appear 'SqlException was unhandled'. The Database1.mdf has not upgraded.

Click Stop Debuggin.
"You can delete rows in a database by removing the corresponding LINQ to SQL objects from their
table-related collection. LINQ to SQL translates your changes to the appropriate SQL DELETE commands.
LINQ to SQL does not support or recognize cascade-delete operations.
If you want to delete a row in a table that has constraints against it, you must complete either of the following tasks:
* - Set the ON DELETE CASCADE rule in the foreign-key constraint in the database.
* - Use your own code to first delete the child objects that prevent the parent object from being deleted.
Otherwise, an exception is thrown." (MSDN source)
6.14 We'll use the first rule.
In the Server Explorer refresh Database1.mdf and double click Orders table.
The dbo.Orders[Design] is opened.
Add referential action ON DELETE CASCADE into T-SQL script field.
And click Update button.

6.15 Retry 6.12, delete the row CustomerID=3 in the Customers table.
Click Delete button customersBindingNavigator.
The Customers and FK_Orders_Customers tables are updated.
It's show that dataSet1 has updated.
6.15.1 "As you make changes to records in a dataset by updating, inserting, and deleting records,
the dataset maintains original and current versions of the records.
In addition, each row's RowState property keeps track of whether the records are in their
original state or have been updated, inserted, or deleted.
As a result of this change, the value of the RowState property for that row changes
from Unchanged to Modified.
As changes are made in the dataset, the RowState property of changed rows is set." (MSDN source)
After click Save button customersBindingNavigator Database1.mdf has updated too.
But for display the last updates open Server Explorer, right click Customers or Orders node
and choose Show Table Date. Don't forget click Refresh button!

6.17 Insert new rows into Customers and Orders tables.
And new row will appear into FK_Orders_Customers table.

Click Save button for save all changes dataSet1 to Database1.mdf.
6.18 I and the MSDN gave you the base. Try to experiment with the tables yourself.
Have a cool code!
Sources
All comments were taken from sources below:
Dataset tools in Visual Studio
Walkthrough: Creating a Local Database File in Visual Studio
How to: Generate Change Scripts
Create and configure TableAdapters
Walkthrough: Creating a Relationship between Data Tables
How to: Edit a Connection String
How to: Create DataRelations with the Dataset Designer
Introduction to DataRelation Objects
Relation Dialog: Relation Only, or with Foreign Key Constraint?
How to: Fill a Dataset with Data
DataColumn.AutoIncrement Property
Save data back to the database
DataGridView.DataSource Property
Working with Datasets in Visual Studio
Walkthrough: Saving Data to a Database (Single Table)
Create a SQL database by using a designer
How to: Save Dataset Changes to a Database
How to: Delete Rows From the Database
13.1.17.5 Using FOREIGN KEY Constraints
Error and Transaction Handling in SQL Server
Previous releases of SQL Server Data Tools (SSDT and SSDT-BI)
History
* published March 15, 2017
* republished March 16, 2017
* update November 29, 2017