Hello World Angular 2+ Data Sample Using JavaScriptServices .Net Core and PrimeNG
5.00/5 (6 votes)
You can create database driven .Net Core applications using JavaScriptServices, and PrimeNG.

You can create database driven .Net Core applications using JavaScriptServices, and PrimeNg.
Live Example
You can see the application running live on Microsoft Azure at: http://helloworlddata.azurewebsites.net
YouTube Video
You can see the YouTube video that covers all the content of this Blog here: https://www.youtube.com/watch?v=i6ke21P-fgA
Prerequisites
If you do not already have them, install the following prerequisites:
- Visual Studio 2017
- Node.js (version 6 or later)
Create JavaScriptServices project

Create a folder on your Microsoft Windows computer (this tutorial was created using Windows 10).
Note: Do not have any special characters in the folder name. For example, and exclamation mark (!) will break the JavaScript code.

You can type CMD and press Enter to switch to the command line (and still be in that directory).

If you have not already installed JavaScriptServices, install them by entering (and pressing Enter):
dotnet --install Microsoft.AspNetCore.SpaTemplates::*

The screen will display indicating the templates now available.

Create the ASP.NET Core JavaScriptServices application by entering (and pressing Enter):
dotnet new angular

The application will be created.
Double-click on the *.csproj file to open it in Visual Studio 2017.

It will start restoring .Net dependencies and the node_modules (you can view the ../node_modules directory to see the items populated).
(Note: This can take 3-10 minutes or more)

Visual Studio will indicate when everything is complete.

Press Ctrl+F5 to Start Without Debugging.

The application will Build.

The application will show.
Close the web browser for now.
Add PrimeNG

We will now install the free open source PrimeNG Angular 2 components.
This will demonstrate how to integrate most Angular 2+ libraries with JavaScriptServices.

Open the package.json file and add:
"font-awesome": "^4.7.0",
"primeng": "^2.0.0"
Save the file.

Open the webpack.config.vendor.js file and add:
         'font-awesome/css/font-awesome.css',
         'primeng/primeng',
         'primeng/resources/themes/omega/theme.css',
         'primeng/resources/primeng.min.css',

Also, in rules/test, add:
|gif
Save the file.

At this time, PrimeNg does not support pre-rendering so in ..\Views\Home\Index.cshtml, change:
<app asp-prerender-module="ClientApp/dist/main-server">Loading...</app>
to:
<app>Loading...</app>
Save the file.

We altered the webpack.config.vendor.js file (to add PrimeNg and Font Awesome) but it is not updated by the normal build process. We have to run its configuration manually whenever we alter it.
In a command prompt, at the project root, run:
webpack --config webpack.config.vendor.js
(Note: If you don’t already have the webpack tool installed (for example you get an error when you run the code above), you’ll need to run: "npm install -g webpack" first)

Create a folder called prime in the components folder and add the following code to ..\ClientApp\app\components\prime\prime.component.html:
<H1>Counter</H1>
<p>This is a simple example of an Angular 2 component.</p>
<p>Current count: <strong>{{ currentCount }}</strong></p>
<p-growl [value]="msgs"></p-growl>
<button pButton
type="button"
(click)="incrementCounter()"
label="Increment"
icon="fa-check"
class="ui-button-info">
</button>

Create the file and add the following code to ..\ClientApp\app\components\prime\prime.component.ts:
import { Component } from '@angular/core';
import {
    ButtonModule,
    GrowlModule,
    Message
} from 'primeng/primeng';

@Component({
    selector: 'counter',
    templateUrl: './prime.component.html'
})
export class PrimeComponent {
    public currentCount = 0;
    public msgs: Message[] = [];

    public incrementCounter() {
        this.currentCount++;
        this.msgs.push(
            {
                severity: 'info',
                summary: 'Info Message',
                detail: this.currentCount.toString()
            });
    }
}

Alter the file at: ..\ClientApp\app\app.module.ts to add:
import { FormsModule } from '@angular/forms';
import { PrimeComponent } from './components/prime/prime.component';
import { ButtonModule, GrowlModule } from 'primeng/primeng';

@NgModule({
    declarations: [
        ...
        PrimeComponent
    ],
    imports: [
        RouterModule.forRoot([
            ...
            { path: 'prime', component: PrimeComponent },
            ...
        ]),
        FormsModule,
        ButtonModule,
        GrowlModule
    ]
})
...

Add the following code to ..\ClientApp\app\components\navmenu\navmenu.component.html:
 <li [routerLinkActive]="['link-active']">
	<a [routerLink]="['/prime']">
		<span class='glyphicon glyphicon-th-list'></span> Prime
	</a>
</li>

Press Ctrl+F5 to Start Without Debugging.

When you click on the Prime link in the menu you will see a page that is using PrimeNg components.
Add A Database

Right-click on the project node, select Add then New Scaffolded Item…

Select Full Dependencies then click Add.

The Scaffolding will run.

Close the ScaffoldingReadMe.txt file that opens.

Right-click on the project node and select Edit HelloWorldData.csproj.

Add:
<DotNetCliToolReference Include="Microsoft.VisualStudio.Web.CodeGeneration.Tools" Version="1.0.0" />
Save and close the file.

From the menu in Visual Studio, select Tools then Connect to Database…

- Ensure that Microsoft SQL Server Database File (SqlClient) is selected for Data source (use the Change button if not)
- Enter HelloData.mdf for the database name and indicate that it is in a folder called Data that is under your project root (the file does not exist, it will be created by Visual Studio)
- Click OK

Click Yes to create the database.

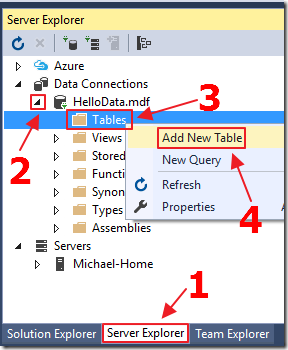
In the Server Explorer window in Visual Studio (you can get to it from the Visual Studio menu using View then Server Explorer), the database will show.
Expand it, right-click on the Tables node and select Add New Table.

Enter the following script and click the Update button:
	CREATE TABLE [dbo].[WeatherForecast] (
	    [Id]            INT           IDENTITY (1, 1) NOT NULL,
	    [DateFormatted] NVARCHAR (50) NOT NULL,
	    [TemperatureC]  INT           NOT NULL,
	    [TemperatureF] INT NOT NULL,
	    [Summary] NVARCHAR(50) NOT NULL,
	    PRIMARY KEY CLUSTERED ([Id] ASC)
	);

Click Update Database.

The Data Tools Operations window will indicate when the update is complete.

In the Server Explorer window, right-click on the database and select Refresh.

The WeatherForecast table will show.
Right-click on the table and select Show Table Data.

Enter sample data into the grid.

Always Close the database connection when done working with it to prevent locking.

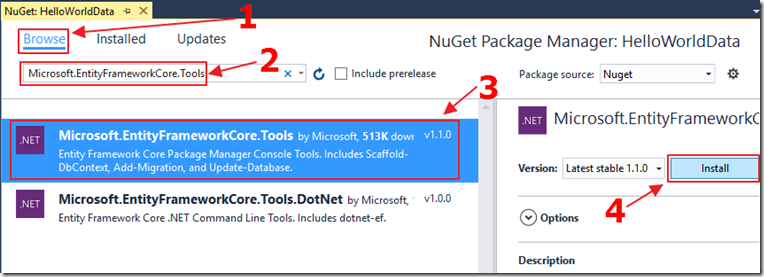
In the Solution Explorer, right-click on the project node and select Manage NuGet Packages.

Search for and install: Microsoft.EntityFrameworkCore.Tools.

Open the NuGet Package Manager Console.

Enter:
Scaffold-DbContext "Data Source=(LocalDB)\MSSQLLocalDB;AttachDbFilename=C:\TEMP\HelloWorldData\Data\HelloData.mdf;Integrated Security=True;" Microsoft.EntityFrameworkCore.SqlServer -OutputDir Models
and press Enter.
(update the connection string above to point to the location of the .mdf file in the project)

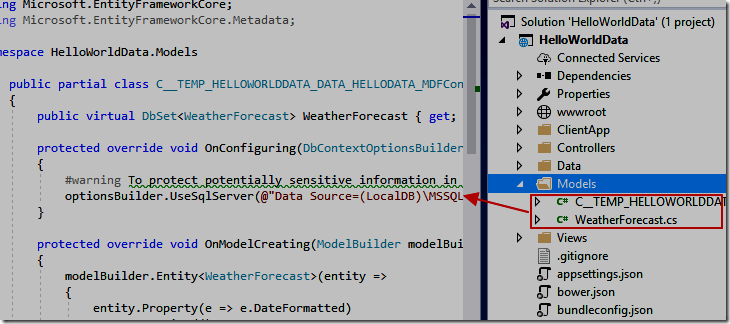
The scaffolded files will appear in the Models directory.
Note: If you get DBContext cannot be found errors (red squiggly lines in the Visual Studio text editor, simply close Visual Studio and re-open it.

Rename the DataContext file and the class to HelloDataContext.

Next, we follow the directions at this link: ASP.NET Core - Existing Database.
We remove the OnConfiguring method.
We add the following constructor to the class:
public HelloDataContext(DbContextOptions<HelloDataContext> options) : base(options) { }

We add the following using statements to Startup.cs:
	using HelloWorldData.Models;
	using Microsoft.EntityFrameworkCore;

We add the following code to the ConfigureServices section:
 services.AddDbContext<HelloDataContext>(options => options.UseSqlServer(
Configuration.GetConnectionString("HelloWorldDataDatabase")));

Add the following setting to the appsettings.json file:
"ConnectionStrings": {
   "HelloWorldDataDatabase": "Data Source=(LocalDB)\\MSSQLLocalDB;AttachDbFilename=
   C:\\TEMP\\HelloWorldData\\Data\\HelloData.mdf;Integrated Security=True;"
},
(Note: The HelloWorldDataDatabase value needs to be on a single line – see the source code for the exact seting)

Right-click on the Controllers folder and select Add then New Scaffolded Item…

Select API, then API Controller with actions, using Entity Framework, then click Add.

Select the options above and click Add.

An API controller that will retrieve data from the database will be created.

We will now point the Angular page to the new API controller.
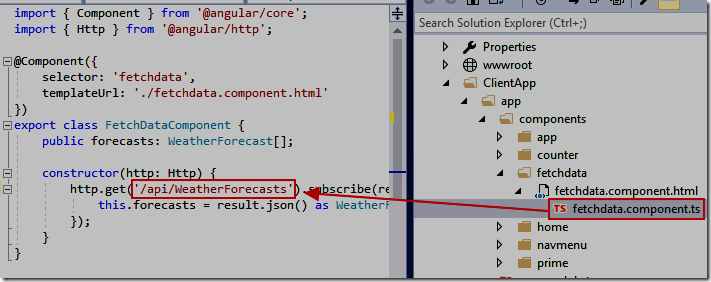
Open the ..\ClientApp\app\components\fetchdata\fetchdata.component.ts file and alter the .get address to:
'/api/WeatherForecasts'

When we run the application, and click on the Fetch data link, the data will now be retrieved from the database.
Links LightSwitchHelpWebsite
Hello World! in Angular 2 using Visual Studio 2015 and ASP.NET 4
Implement ASP.NET 4 MVC Application Security in Angular 2 Using OData 4
Tutorial: Creating An Angular 2 CRUD Application Using MVC 5 and OData 4
Tutorial: An End-To-End Angular 2 Application Using MVC 5 and OData 4
An Angular 2+ Web Application Configuration Wizard
An Angular 2 Tree With CRUD Functionality
Links Other
Building Single Page Applications on ASP.NET Core with JavaScriptServices/a>
EntityFramework Reverse POCO Generator
ASP.NET Core - Existing Database
Publishing and Running ASP.NET Core Applications with IIS
Download
The source file is too big to attach to the article, so the project is available at http://lightswitchhelpwebsite.com/Downloads.aspx
You must have Visual Studio 2017 (or higher) installed to run the code.
You will need to alter the appsettings.json file to point to the exact location of the .mdf file on your computer depending on where you unzip the project to.

