
Continuous Delivery to Azure App Services with VSTS
5.00/5 (1 vote)
In this article, I provide an overview of using Visual Studio Team Services to automatically deploy the ASP.NET Core web application to Azure App Services.
Introduction and Background
It has been quite a while since I last published anything about Microsoft Azure, so here is my next post about Microsoft Azure. The subject itself could’ve been for the last post in the DevOps category, however this seems to be one of the initials in the category. So, what I want to cover in this post is that… Most of the times, Continuous Delivery comes handy when you really want to make things a bit automated. However, CD is not that much simple to consider. Most of the times, there is authentication required on the machines where your application is going to be delivered etc. Continuous Integration on the simpler hand, is just the process to trigger build for every change in the system.
Continuous Delivery gives the most hard time to any DevOps practitioners. The reason behind that is that CD requires not just the release information, but instead it also needs where to deploy the application, most systems require authentication/authorization in order to deploy or update the applications. That is why, this topic is the toughest in DevOps, I believe.
To keep things simple, I will just create a simple ASP.NET Core application, and then I will deploy that application to Visual Studio Team Services environment, where it will be:
- Built using ASP.NET Core build system
- Deployed to Azure App Service “Deployment Slot“
- Swapped to the default web app slot
These are the steps that we are going to take in this post, to learn how we can solve the CD problem with VSTS for Azure and ASP.NET Core web applications.
Note: If any of the images are blur, or harder to read. Right-click the image, and open the image in a new tab. Finally, remove the query string (for example, “?w=625&h=113“) and then reload the image. That query string filters and requests a smaller image. You can download the image in full resolution.
Deploying a simple web app
So, open up the terminals and type the following commands,
$ cd your_preferred_directory
$ dotnet new -t web
$ dotnet restore
What this will do — if you don’t know — is that it will create a new project, and setup the development environment for you locally. After this step, — I recommend using Visual Studio Code — you should open up the IDE and start programming in it.
$ code .
I will initially upload the default web application, and then later I will shift the content to the slots and deploy the latest changes to the production.
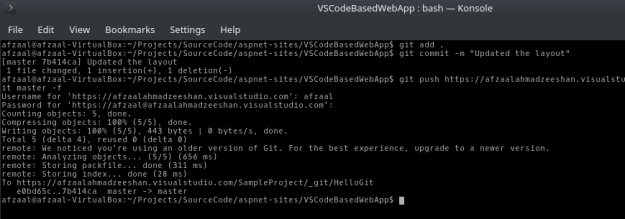
So, let us just go ahead and create a git repository inside the same directory. Later on we will publish the project to a remote repository of our VSTS account’s project. You would require the execute the following commands for that,
$ git add .
$ git commit -m "Committing the changes to repository".
$ git push https://git.yourserver.com/repository_path.git
The above commands, are hypothetical and you should fill in with your own repository information here. But they will work exactly the same.
I did the same, and targeted my VSTS project repository to publish the code. Once the code was published, the build system was triggered automatically.
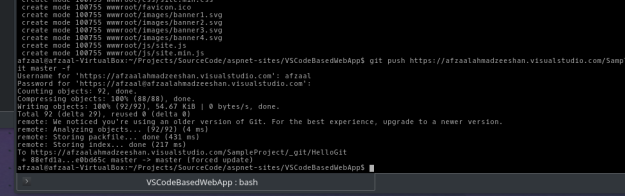
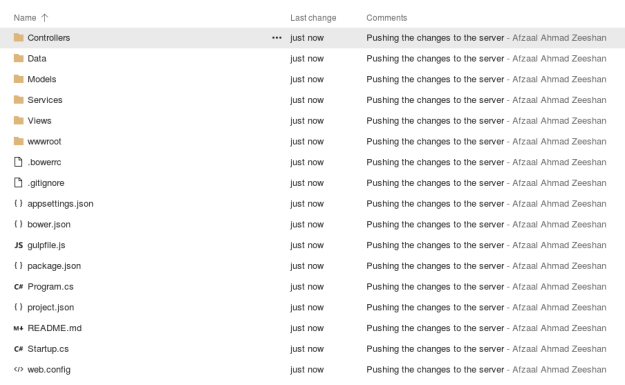
That content gets uploaded to the VSTS repository,
Now, since our code has been modified, the continuous integration system triggers and starts to build the project since there were changes.
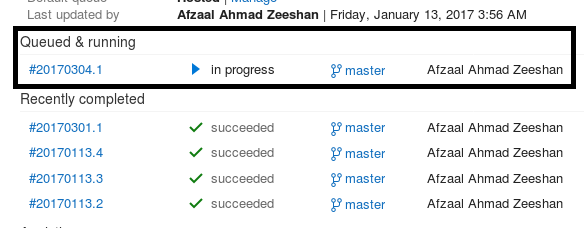
That is currently the build that our change triggered and queued. Now, the build system is for the ASP.NET Core provided by Microsoft in the VSTS. We can use other build systems, or create our own build systems based on the frameworks, or languages that you are using. However, since ASP.NET Core was the default here, I used that.

After a few steps that are required in the build system, it would finally publish the built executables and other resources, to an artifact folder from where other processes can copy the content easily.
Now since we are using the CD system, the trigger of a successful build would also trigger the deployment, to a location where we have told it to.
Using Deployment Slots
The reason why you should prefer using Deployment Slots is that, they are wonderful! Only Azure supports Deployment Slots, whereas on the other vendors you require to have two separate machines, and then you connect them across. Whereas on Azure, things are different.
- Deployment Slots are submachines in your own machine — or service.
- They provide an identical environment and configurations for your application to work.
- Deployment Slots mimic the production environment, so, it is as if you were testing the application on the production environment.
- The swapping process takes zero downtime! Load balancers allow Azure to switch the IP address mapping to the virtual machines or services internally.
- No requests are dropped in the swapping process.
Thus, I also used the deployment slots in Azure, as they allow a lot of stuff to be managed easily. And it my own recommendation, to never deploy the applications directly to the production environment, as there needs to be some testing system that confirms that everything runs perfectly on the production environment as well, and not just on the testing environment.
So, that is what I did. I created a deployment slot in the testing App Service for this post.

Then, once that was done I went onwards to modify the release system and ensure that the release was performed to deploy the application to the deployment slot, instead of the production slot.

The “Deploy to slot” option configures whether to deploy to a slot, or to the production slot. So, now that our release is also managed the next step in the toolchain was to deploy it, and since our build was successful the VSTS automatically triggered to deploy the application to the Azure Deployment Slot.

Pay close attention to the picture above,
- It got triggered automatically (see the Description column).
- The build that was used to fetch the artifacts is also shown.
- Time and the author is also shown etc.
After this, the application gets deployed to the server.
Preview of the application
The first preview of the application is the following one,
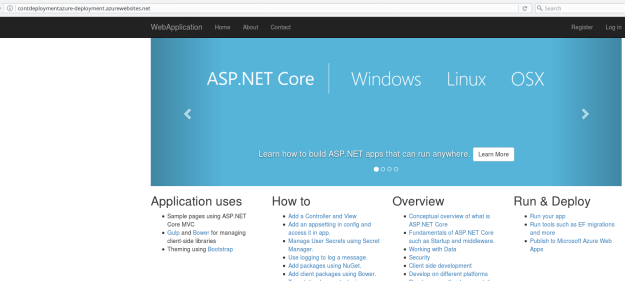
This is the preview of the application under deployment slots. If you look at the URL, you will notice “-deployment” appended to the URL, which means that this is the preview of our slot, and not the application itself.
Benefits? Quite a few…
- We can run all sort of tests to check whether the latest build work properly or not.
- All of the dependencies get loaded up before serving any user. “Warms up the slots”
- Users don’t feel that the website was updated, instead they just see what’s improved!
- To update the production slot, all we need to do is, click a button.
- In case of any problem, we can roll back the latest build… Even from a production slot!
These are a few of the benefits that I have found in using Deployment Slots and which is why I personally recommend using Deployment Slots instead of the production slot, each time. Secondly, you can provide multiple slots to different teams and every team will work separately on their own environment testing their own stuff.
Updating the application
Now that our application is running, let us see how quickly can we update the application after a change. So, what I would be doing is I will be updating the navigation header for the site.
<div class="container">
    <div class="navbar-header">
        <span class="sr-only">Toggle navigation</span>
        <span class="icon-bar"></span>
        <span class="icon-bar"></span>
        <span class="icon-bar"></span>
        <a class="navbar-brand">Updated!</a>
    </div>
    <div class="navbar-collapse collapse">
        <ul class="nav navbar-nav">
            <li><a>Home</a></li>
            <li><a>About</a></li>
            <li><a>Contact</a></li>
        </ul>
        @await Html.PartialAsync("_LoginPartial")
    </div>
</div
You might have noticed, what I changed? (Look for “Updated!” in the middle of the code above).

This would update the local repository and then we can update the remote repository, to reflect the changes in our project’s repository. That step was similar to what did previously, just publish the changes to the remove repository.
So, that change was pushed to the server and that change then triggered our toolchain for build, release and deployment for the ASP.NET Core web application. What this did was, that it
- Updated the remote repository.
- Triggered the build automatically — Continuous Integration.
- Triggered the release automatically, if the build succeeds — Continuous Deployment.
- Finally, publishes the application where it has to go live.
So, the rest of the stuff was similar to what we had previously. Same build procedures, same release cycles and then finally everything goes to the Deployment Slots.
Swapping: Deployment Slots to Production Slots
At this moment, our application is properly running in the deployment slot! However, we need to swap the slots and then our users would be able to see the live updates. First of all, let us see how the updates changed our website then we will move onwards to update the website itself.

That is the deployment slot, and now we can move onwards to apply the changes to the production slot. For that, we can select the Swap option from the Deployment Slots blade, that option lets us choose which slot goes where.
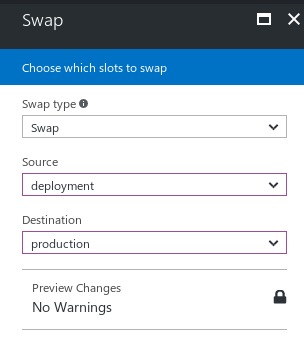
This order matters a lot, the Source should be, where your recent updates are, and the Destination should be where they should go! Now remember, although internally there is just a traffic shift from one source to another, but in real if the order gets messed up… The results are undefined. I have myself tried to play around with it and it gets messed up really very much. So, do remember, that order is everything! 
Finally, when we go back to our application website, you will see that the changes are now living there…

And the Deployment Slot gets the content of this application itself — the default Azure App Service page.
Summary and Final words
So, in this post we solved a few things out. First of all, we saw how CD gets to be the toughest IT part in DevOps (IT because there are some other tasks, such as user management where you get to face a headache of customer requirements and error management etc. :D). Then we moved onwards to manage the Visual Studio Team Services in order to apply the automation across the steps and stages of App Life Cycle.
Then, we saw how Azure Deployment Slots can help us get the most out of the testing systems and make sure that everything, I repeat, everything is working properly.
What’s next?
Here is the assignment, notice that I mentioned that you can swap the Deployment Slots? There is a way to automate that as well, how? Using Powershell! You can easily use Azure PowerShell on Visual Studio Team Services to automate the swapping process as well. That way, you can run some tests on the production environment and then let the cmdlets do the rest of the job for you as well.
Azure PowerShell also would let you migrate the website back if you feel that the website is not performing well.