
Adding Splash screen (Part 2)
Adding Splash screen
- Let’s create a project, shall we? – Part 1
- Adding splash screen – Part 2 (This post)
- Create main screen, Master-Detail Page
The splash screen is very important to any mobile application it gets users' attention from first sight.
What is Splash screen?
A splash screen is a graphical control element consisting of a window containing an image, a logo and the current version of the software. A splash screen usually appears while a game or program is launching.
Since Xamarin.Forms doesn’t support adding splash screen from one place like it does for pages, you need to go to each platform project – in our case iOS and Android – and add splash screen for each one.
iOS
In our solution, you go to PuzzlersJordan.iOS project and follow these simple steps:
- In the Solution Explorer, double-click
LaunchScreen.storyboardto open it for editing. - Ensure that the Size Class is set to any:any and the View As is Generic.

- Set the background colour of the main View by opening the properties panel – widget tab, then background property.

- Drag an Image View from the Toolbox into the design surface and set it at the centre of the screen.
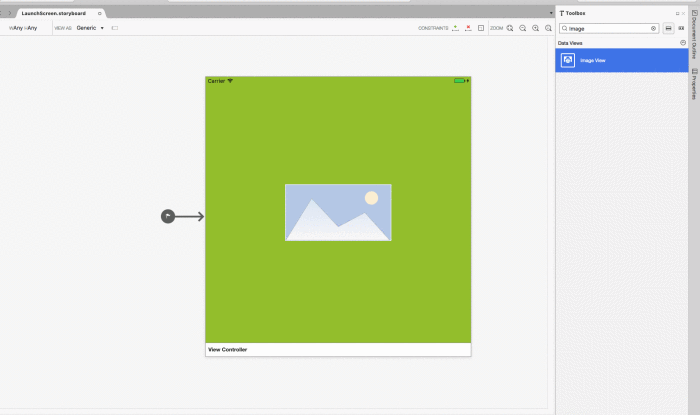
- Set the source of the Image (as an Image added to the project as an Asset Catalog) in the Property Explorer and reposition and size the image as required.
- Add the required constraints in order to keep image placed at the centre of the screen, constraints are:
- Vertical Alignment
- Horizontal Alignment

- Save the changes to the Storyboard.
I am using this method because I have only the logo (not the whole images). In case you have a whole image, you can follow these instructions provided by xamarinhelp.com:
- Create a splash screen image in the following sizes:
- 320—480
- 640—960
- 640—1136
- Go to Properties > iOS Application > iPhone Launch Images and import the images. It will automatically add them to the Resources folder in your iOS Project.

- Move down the properties page to add an image for iPad apps.
- If you are having issues with your images still displaying, there are a few possible causes. The
LaunchScreen.storyboardcould be the issue. You can open it and correct it, or even try deleting it. Once you have done this, rebuild your application and reset your iOS Simulator or delete from your iPhone as iOS has a tendency to cache extensively in this area.
Android
For Android, things are different. there are different ways to implement a splash screen. I have come across one of the easiest and quickest ways to do so.
All we need to do is to create a custom theme and apply it to an Activity that exhibits the splash screen. When the Activity is rendered, it loads the theme and applies the drawable resource (referenced by the theme) to the background of the activity. This approach avoids the need for creating a layout file.
Once the app has bootstrapped, the splash screen Activity starts the main Activity and removes itself from the application back-stack.
Follow along to make a fabulous splash screen for Android:
- Create a drawable resource for the splash screen to cater to the below resolutions (personally, I ask the designer to do so), this drawable is just the logo that we want to show in the center of the screen, name it ‘
splash_logo’ since we’re going to refer to it later on:drawable-hdpidrawable-ldpidrawable-mdpidrawable-xhdpidrawable-xxhdpidrawable-xxxhdpi
Note: It is necessary to use a bitmapped image (such as a PNG or JPG) for the image to display.
- In this step, we create two files:
- In order to reference colours in the following step, we need to create a new resource XML file inside values folder called colors.xml
<?xml version=“1.0“ encoding=“utf–8“?>
	<resources>
	  <color name=“splash_background“>#A7CD38</color>
	</resources>
- To centre the splash screen image in the application, I’ll use a Layer List. The following snippet is an example of a
drawableresource using alayer-list:<?xml version=“1.0“ encoding=“utf–8“?> <layer-list xmlns:android=“http://schemas.android.com/apk/res/android“> <item> <color android:color=“@color/splash_background“/> </item> <item> <bitmap android:src=“@drawable/splash_logo“ android:tileMode=“disabled“ android:gravity=“center“/> </item> </layer–list>
This
layer-listwill centre the splash screen image splash_logo.png on a background specified by the@color/splash_backgroundresource as we created in step a. - In order to reference colours in the following step, we need to create a new resource XML file inside values folder called colors.xml
- Create a custom theme for the splash screen Activity, edit (or add) the file values/styles.xml and create a new style element for the splash screen. A sample values/style.xml file is shown below with a style named
splashscreen:<?xml version=“1.0“ encoding=“UTF–8“?> <resources> <style name=“splashscreen“ parent=“MyTheme.Base“> <item name=“android:windowBackground“>@drawable/splash_screen</item> <item name=“android:windowNoTitle“>true</item> <item name=“android:windowIsTranslucent“>false</item> <item name=“android:windowIsFloating“>false</item> <item name=“android:backgroundDimEnabled“>true</item> <item name=“android:colorPrimaryDark“>#85A42C</item> </style> … </resources>
- We need a new Activity called
SplashActivityto launch that has our splash image and performs any startup tasks. The following code is an example of a complete splash screen implementation:using Android.App; using Android.OS; using Android.Support.V7.App; namespace PuzzlersJordan.Droid { [Activity(Label = “Puzzlers Jordan“, Icon = “@drawable/icon“, Theme = “@style/splashscreen“, MainLauncher = true, NoHistory = true)] public class SplashActivity : AppCompatActivity { protected override void OnCreate(Bundle savedInstanceState) { base.OnCreate(savedInstanceState); this.StartActivity(typeof(MainActivity)); } } }As noticed from the above implementation, we’re assigning
splashscreentheme created previously to this activity and make sure to set this activity as the Main Launcher so when the app get launched, it should trigger this activity at first.Also, note that we attributed this activity to have
NoHistoryset totrueso it means that the activity will not leave a historical trace. It will not remain in the activity stack for the task so the user will not be able to return to it.Note: You most remove the
MainLauncherattribute fromMainActivity.
- Let’s create a project, shall we? – Part 1
- Adding splash screen – Part 2 (This post)
- Create main screen, Master-Detail Page