
How Visual Studio Code Snippets Can Speed up Tests’ Writing
4.71/5 (3 votes)
Learn how to create Visual Studio code snippets. Create element properties trough short keys. Free download a complete suite of test automation snippets.
In this article from the Design & Architecture Series, I am going to present to you how to speed up the tests' writing process through the usage of Visual Studio code snippets.
What is a Code Snippet?
Code snippets are small blocks of reusable code that can be inserted in a code file using a context menu command or a combination of hotkeys. They typically contain commonly-used code blocks such as try-finally or if-else blocks, but they can be used to insert entire classes or methods.
Types of Code Snippets
In Visual Studio there are two kinds of code snippet: expansion snippets, which are added at a specified insertion point and may replace a snippet shortcut, and surround-with snippets, which are added around a selected block of code.
For the test automation purposes we are going to use the first type- expansion ones.
Simple Code Snippets Examples
If you type for and then press Tab- a new for statement will be created.
for (int i = 0; i < length; i++)
{

}
If you type prop and then press Tab- a new property will be generated.
public int MyProperty { get; set; }
What Do We Want to Automate?
One of the most tedious jobs for me personally is the creation of element maps. I refer to the elements' properties.
public partial class BingMainPage
{
    public ISearch SearchBox
    {
        get
        {
            return this.ElementFinder.Find<ISearch>(By.Id("sb_form_q"));
        }

    }

    public IInputSubmit GoButton
    {
        get
        {
            return this.ElementFinder.Find<IInputSubmit>(By.Id("sb_form_go"));
        }
    }

    public IDiv ResultsCountDiv
    {
        get
        {
            return this.ElementFinder.Find<IDiv>(By.Id("b_tween"));
        }
    }
}
You need to change the type, the name, the localisation strategy and the locator. Also, this property doesn't have a setter, so you need to delete the default one. So I wanted to be able to generate these through a snippet for the different type of elements. For example, type ebutton, press Tab and generate automatically the button property for me so that I can change only the name and the locators.
Steps to Create Test Automation Visual Studio Code Snippets
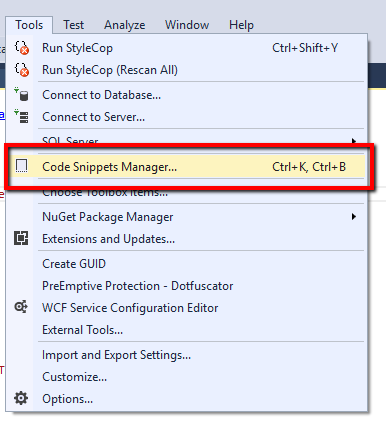
1. Open Code Snippets Manager from Tools -> Code Snippets Manager or use Ctrl + K, Ctrl + B
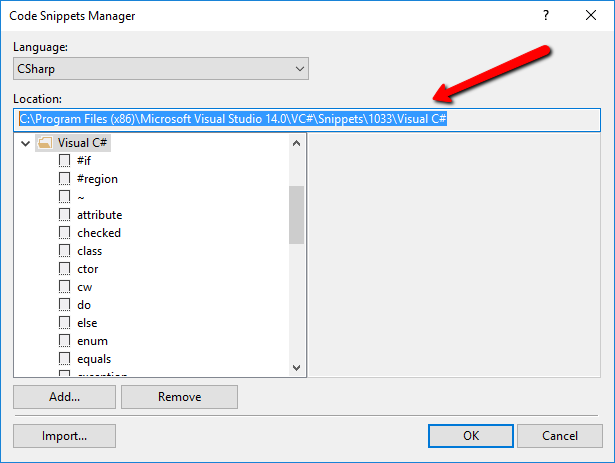
2. Copy Code Snippets location
3. Copy one of the snippets to a separate folder and change its name to anchorElement.snippet
Anchor Element Code Snippet
<?xml version="1.0" encoding="utf-8" ?>
<CodeSnippets  xmlns="http://schemas.microsoft.com/VisualStudio/2005/CodeSnippet">
	<CodeSnippet Format="1.0.0">
		<Header>
			<Title>anchor</Title>
			<Shortcut>eanchor</Shortcut>
			<Description>Code snippet for 'anchor' element</Description>
			<Author>Automate The Planet Ltd.</Author>
			<SnippetTypes>
				<SnippetType>Expansion</SnippetType>
			</SnippetTypes>
		</Header>
		<Snippet>
			<Declarations>
				<Literal>
					<ID>name</ID>
					<Default>MyAnchor</Default>
					<ToolTip>The name of the anchor element</ToolTip>
				</Literal>
				<Literal>
					<ID>locatorType</ID>
					<Default>Id</Default>
					<ToolTip>The type of the element locator</ToolTip>
				</Literal>
        <Literal>
          <ID>locator</ID>
          <Default>myUniqueId</Default>
          <ToolTip>The actual locator for the element</ToolTip>
        </Literal>
			</Declarations>
			<Code Language="csharp">
        <![CDATA[public IAnchor $name$
        {
            get
            {
                return this.ElementFinder.Find<IAnchor>(By.$locatorType$("$locator$"));
            }
        }]]>
			</Code>
		</Snippet>
	</CodeSnippet>
</CodeSnippets>
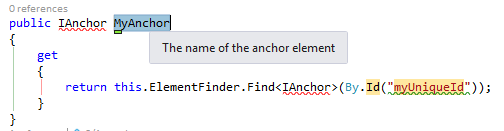
Above you can find the full code for the anchor element code snippet. In the shortcut XML element place the desired short key for this code, in this case, it is eanchor. This means that once you type eanchor and press Tab, the following code will be generated.
public IAnchor MyAnchor
{
    get
    {
        return this.ElementFinder.Find<IAnchor>(By.Id("myUniqueId"));
    }
}
The first placeholder that will be selected is the name of the property. Once you change it, you can press Tab. Then, the second placeholder will be chosen- the By locator's type, by default, it is set to Id, press again Tab and change the actual locator.
If you take a closer look at the snippet's XML, the code should be placed under the Code element, wrapped in the <![CDATA[ yourCodeGoesHere ]]>. As I told you, this is an expansion snippet so for SnippetType you set Expansion. You can set a description that will be displayed in the Code Snippet Manager and the Visual Studio code editor.
Create Replaceable Placeholders
As I told you, we have three placeholders for this snippet- the name, the locator's method and the locator's string. You need to create Declarations section under the Snippet node. Then you need to create a literal for each placeholder. Each literal consists of three parts- id (the value that you use in the snippet's code), the default value (once the code is generated) and a tool tip that will be visible in Visual Studio on hover.
<Declarations>
	<Literal>
		<ID>name</ID>
		<Default>MyAnchor</Default>
		<ToolTip>The name of the anchor element</ToolTip>
	</Literal>
	<Literal>
		<ID>locatorType</ID>
		<Default>Id</Default>
		<ToolTip>The type of the element locator</ToolTip>
	</Literal>
	<Literal>
		<ID>locator</ID>
		<Default>myUniqueId</Default>
		<ToolTip>The actual locator for the element</ToolTip>
	</Literal>
</Declarations>
As you can see in the example, I declared three literals- name, locatorType and locator. After that, you can use them in the actual code of the snippet, wrapping the name in $ signs. For example $name$ will be replaced with the name literal's default value on code generation.
<Code Language="csharp">
  <![CDATA[public IAnchor $name$
  {
      get
      {
          return this.ElementFinder.Find<IAnchor>(By.$locatorType$("$locator$"));
      }
  }]]>
</Code>
Add Code Snippet
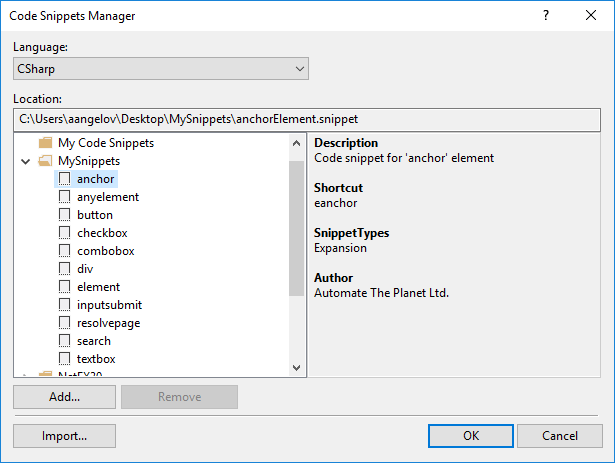
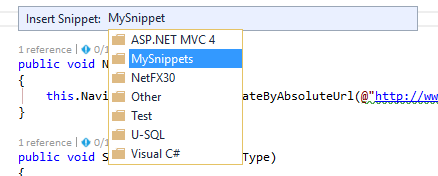
Open again the Code Snippets Manager and click Add button. Select the folder where your snippets are located.

Once the snippets are added, you can find them under the MySnippets folder and read their metadata.
Ways to Insert Visual Studio Code Snippets
Context Menu
Right-click on the code and choose Insert Code Snippet menu item.
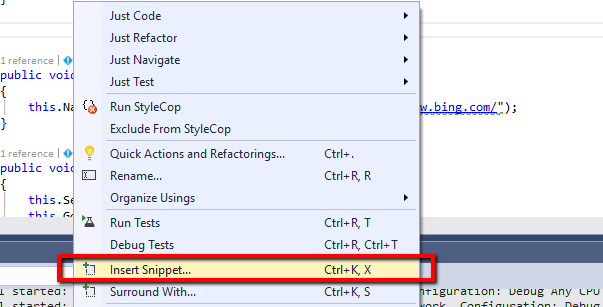
Shortcut Ctrl + K, X
Shortcut + Tab
If the shortcut you specified is for example eanchor and you type it. Then press Tab, the code will be generated.
Non-specific Element Snippet Template
I showed you how to create an element specific property but what if you want to point the type of the element yourself? It is simple I added a new literal for that.
<?xml version="1.0" encoding="utf-8" ?>
<CodeSnippets  xmlns="http://schemas.microsoft.com/VisualStudio/2005/CodeSnippet">
	<CodeSnippet Format="1.0.0">
		<Header>
			<Title>anyelement</Title>
			<Shortcut>anyelement</Shortcut>
			<Description>Code snippet for any element</Description>
			<Author>Automate The Planet Ltd.</Author>
			<SnippetTypes>
				<SnippetType>Expansion</SnippetType>
			</SnippetTypes>
		</Header>
		<Snippet>
			<Declarations>
        <Literal>
          <ID>elementType</ID>
          <Default>IElement</Default>
          <ToolTip>The type of the element</ToolTip>
        </Literal>
				<Literal>
					<ID>name</ID>
					<Default>MyElement</Default>
					<ToolTip>The name of the element</ToolTip>
				</Literal>
				<Literal>
					<ID>locatorType</ID>
					<Default>Id</Default>
					<ToolTip>The type of the element locator</ToolTip>
				</Literal>
        <Literal>
          <ID>locator</ID>
          <Default>myUniqueId</Default>
          <ToolTip>The actual locator for the element</ToolTip>
        </Literal>
			</Declarations>
			<Code Language="csharp">
        <![CDATA[public $elementType$ $name$
        {
            get
            {
                return this.ElementFinder.Find<$elementType$>(By.$locatorType$("$locator$"));
            }
        }]]>
			</Code>
		</Snippet>
	</CodeSnippet>
</CodeSnippets>
Below you can find the code that will be generated through the shortcut anyelement + Tab.
public IElement MyElement
{
    get
    {
        return this.ElementFinder.Find<IElement>(By.Id("myUniqueId"));
    }
}
The element's type is now placeholder too.
Resolve Page Snippet
Another thing that we need to do often is to resolve (create pages) so we can create a snippet for this job too.
var myPage = this.Container.Resolve<MyPage>();
Here is the snippet for the generation of the above code.
<?xml version="1.0" encoding="utf-8" ?>
<CodeSnippets  xmlns="http://schemas.microsoft.com/VisualStudio/2005/CodeSnippet">
	<CodeSnippet Format="1.0.0">
		<Header>
			<Title>resolvepage</Title>
			<Shortcut>rpage</Shortcut>
			<Description>Code snippet for resolving page</Description>
			<Author>Automate The Planet Ltd.</Author>
			<SnippetTypes>
				<SnippetType>Expansion</SnippetType>
			</SnippetTypes>
		</Header>
		<Snippet>
			<Declarations>
        <Literal>
          <ID>pageName</ID>
          <Default>myPage</Default>
          <ToolTip>The name of the resolved page.</ToolTip>
        </Literal>
				<Literal>
					<ID>pageType</ID>
					<Default>MyPage</Default>
					<ToolTip>The type of the resolved page.</ToolTip>
				</Literal>
			</Declarations>
			<Code Language="csharp">
        <![CDATA[var $pageName$ = this.Container.Resolve<$pageType$>();]]>
			</Code>
		</Snippet>
	</CodeSnippet>
</CodeSnippets>
Type rpage and press Tab.
Download Complete Set of Snippets
I created snippets for all of the elements present in the current version of the Hybrid test framework. You can download all of them from the below form.
|
Automation Tools
- CodeProject Statistics Calculator Using WebDriver
- How Visual Studio Code Snippets Can Speed up Tests’ Writing
- Test URL Redirects with WebDriver and HttpWebRequest
- MSTest Rerun Failed Tests Through MSTest.exe Wrapper Application
The post How Visual Studio Code Snippets Can Speed up Tests’ Writing appeared first on Automate The Planet.
All images are purchased from DepositPhotos.com and cannot be downloaded and used for free.
License Agreement