
Intercommunication Between the FlowSharp Canvas and a FlowSharpCode Application
5.00/5 (16 votes)
Illustrating both HTTP and WebSockets Intercommunication

Contents
- Where's the Code?
- Introduction
- What's The Buzz, Tell Me What's Happening
- A Semantic HTTP Server
- A Semantic WebSocket Server
- All About Workflows
- The WebServerPacket
- Starting the Web Socket Server
- The OnMessage Handler
- Step 1: Is it a Text Message?
- Step 2: Parse the Message
- Step 3: Create the Semantic Message
- Step 4: Populate the Semantic Message with Parameter Values
- Step 5: Publish the Message on the Semantic Bus
- What Gets Generated For You?
- Semantic Message Handling
- Putting it Together - Initialization
- Putting it Together - The UI
- Running The Demo
- Behind the Scenes
- Conclusion
Where's the Code?
The code can be obtained from GitHub, and I've tagged the current code for this article with the tag "FlowSharpCodeComm." Stars are welcome!
Introduction
FlowSharpCode is a proof of concept of something I've always dreamed of doing -- writing applications as a graphical schematic. In this article, I've put together a simple demonstration of communicating between UI elements on the FlowSharp canvas and an application built with the FlowSharpCode services. The goal here is to introduce the reader to a completely different approach to application development. Think of code as a schematic, complete with annotations, workflows, data pathways, etc. Remember, this is a prototype to inspire the imagination!
As You Read This Article...
In all the articles I've written in the past, I've always had to resort to some diagramming tool (usually Visio) to create a picture of what is going on in the code. No more! Using FlowSharpCode, the diagram is the code. And the UI. Keep that in mind when you read this--that what you are seeing are screenshots of shapes and connectors of code-behind that tell you how the application is wired up.
What's The Buzz, Tell Me What's Happening

(from Jesus Christ Superstar)
Shapes
First off, you have FlowSharp, which is a diagramming tool. On the diagram, you can drop shapes, for example a box with some text:

Shape Code-Behind
These shapes can be have code-behind, for example:

Code-Behind Compilation and Execution
The code-behind, using the FlowSharpCode services, gets compiled to (in this case) a console application using Build Compile and Run menu:

And because I write perfect code the first time, all the time, the result is:

Congratulations, you've just written your first FlowSharpCode app!
Changing Shape Properties Remotely
Using the FlowSharp HTTP and WebSocket services, you can control shape properties on the canvas with your FlowSharpCode application (or any other application.) Here, we use HTTP and this URL:
http://localhost:8001/flowsharp?cmd=CmdUpdateProperty&Name=box1&PropertyName=Text&Value=Say+Goodbye!
to change the shape's text:

Creating a UI on the Canvas
You can also drop UI elements with one of the FlowSharpCode plug-in shapes:

Very few controls are supported at the moment, but I'm adding more as I go along.
Receiving UI Events from FlowSharp
Again using the FlowSharp HTTP or WebSocket services, you can send event messages from the canvas' UI elements to your FlowSharpCode application (or any application, whether it's written with FlowSharpCode or not.) To do this, we need either (or both) a simple HTTP server or WebSocket server, which I'll describe next.
A Semantic HTTP Server

One of the goals of FlowSharpCode is to ensure that you are, as much as possible, not constrained to code in a particular style. This server was something I wrote in FlowSharpCode before I had implemented workflows (more on this later) and is a sort of ugly implementation. I am also leveraging the semantic publisher/subscriber that I wrote about in The Clifton Method - Part IV : The Semantic Publisher / Subscriber.
The code is written in FlowSharpCode since the server has to run as a the FlowSharpCode application. We have the various things you'd expect. These are screenshots, as this is FlowSharpCode and the code is code-behind for the various shapes. In particular, note how partial classes are leveraged to separate the various code fragments.
Starting the Server

Starting the Listener

Silly Method to Construct the Server Address

Waiting for a Connection

A Route Class for Managing Routes

Executing a Route

Defining Routes
Just one in this case:

Processing a Request

Publishing the Request as a Semantic Message
This is particularly not ideal because typically one would create three separate shapes for this, as well as turn it into a workflow. You'll see this done next for the WebSocket Server! But it does illustrate my point of not being constrained.

A Semantic WebSocket Server

This implementation a more "modern" approach, mainly because it uses FlowSharpCode's workflow feature. Here is where you, the developer, are slightly constrained.
All About Workflows
Workflows are linear execution of methods, with optional conditions to redirect the execution path. In the above screenshot, there is no "False" execution path, only a "True" one.
Workflows are Packet Oriented

All methods in the workflow operate on a packet. The packet contains all the fields that each method in the workflow needs, as well as updates.
Constraints are:
- The workflow name must be
[PacketName]Workflow - A non-branching workflow always has the signature:
public partial class [PacketName]Workflow
{
  protected void [ShapeText]([PacketName] p)
  {
     ... operate on packet p ...
  }
}
- A branching workflow always has the signature:
public partial class [PacketName]Workflow
{
  protected bool [ShapeText]([PacketName] p)
  {
     ... return true or false based on some state of packet p ...
  }
}
The WebServerPacket
OK, I really should have renamed this to WebServerSocketPacket. Oh well.
Given the above (and the fact that we're using the semantic publisher / subscriber), the web socket server packet is defined like this:

This defines all the fields (as properties) that the workflow requires to handle web socket messages.
Starting the Web Socket Server

The OnMessage Handler
When a message is received, the handler fires off the workflow:

So, what does the workflow do?
Step 1: Is it a Text Message?
This is the first step in the workflow. Notice how it complies with the constraints of a workflow step signature, in this case for a decision point:

Step 2: Parse the Message
Here we parse the message, which is in the same format as the parameter portion of an HTTP GET:

Step 3: Create the Semantic Message

Step 4: Populate the Semantic Message with Parameter Values
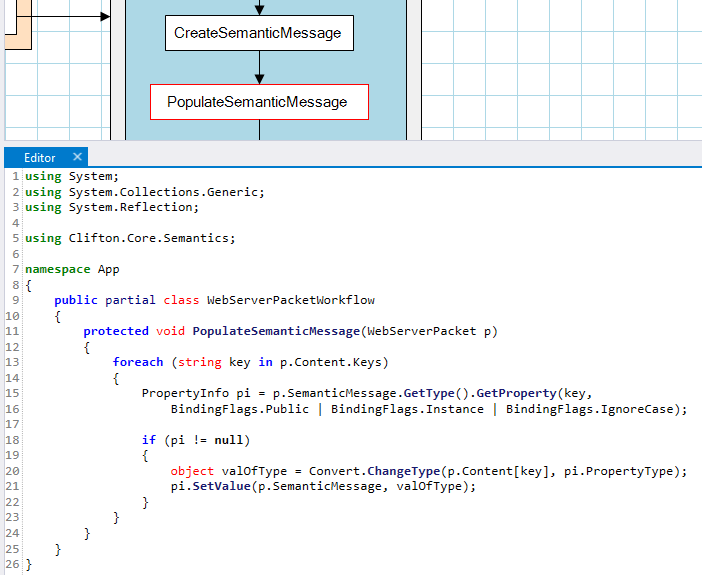
Step 5: Publish the Message on the Semantic Bus

What Gets Generated For You?
The FlowSharpCode service creates this code for you, given your workflow:

Now isn't that just totally cool?
Semantic Message Handling
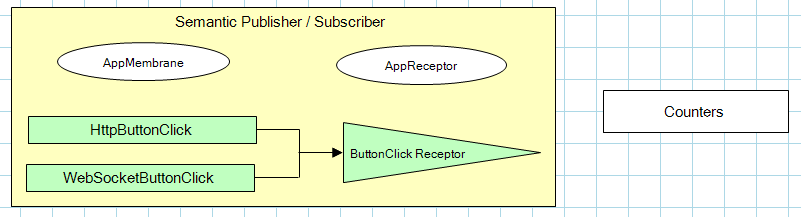
Channels and Receptors
As I described in my article on the semantic publisher / subscriber, there are communication channels (which I call membranes, named after Membrane Computing) and receptors, which is based on my work on Higher Order Programming and Eric Harris-Braun / Arthur Brock's work on Semtrex and Ceptr.
Membranes (or channels, if you prefer) tend to be simple type containers:

The receptor in this case is also simply a placeholder:

The HttpButtonClick Message
The semantic publisher / subscriber invokes handlers for message types. Read more about the concept of semantic types in my article and Matt Perdeck's article. So we need a semantic type for the HTTP and WebSocket messages.

The WebSocketButtonClickMessage

The Message Receptor
We also need a class that has been registered (more on this later) with the semantic publisher/subscriber that receives these messages:

As the code illustrates, the message is emitted to the console window, and a UI element on the canvas is updated. More on this shortly.
The Counter Class
How many times you've clicked (which I haven't shown you yet) on the "send via HTTP" or "send via WebSocket" button is counted in this class.

Putting it Together - Initialization
Now we'll add the final pieces.
Main
Let's glue it all together now. First, there's Main(), which does the startup work:
- Bootstraps the runtime semantic processor module.
- Initializes the servers.
- Registers the receptor.
This could be implemented as a workflow, but again, the programmer is not constrained to code in a particular style, so I decided to just leave this all here in one method:

Helper Stuff

There are some helper pieces, including the bootstrapper which I wrote about in The Clifton Method - Part III: Bootstrapping with the Module Manager and the Service Manager.
HttpGet
This is a simple class to issue an HTTP request back to FlowSharp.

HttpHelpers and WebSocketHelpers
These two classes put together the data packet that is sent over HTTP or the web socket. They are very similar and could be refactored.

Putting it Together - The UI

Now here's another really fun part. We put a couple button shapes onto the FlowSharp surface, as well as some plain vanilla text shapes. The button shapes define the semantics and parameters for when they are clicked:

Notice the event name is ButtonClick - this matches the route name!
routes[new Route() {Verb = "GET", Path = "buttonclick"}] =
     CreateSemanticObject<AppMembrane, HttpButtonClick>;
Also notice that the send protocol is selected to be "HTTP"
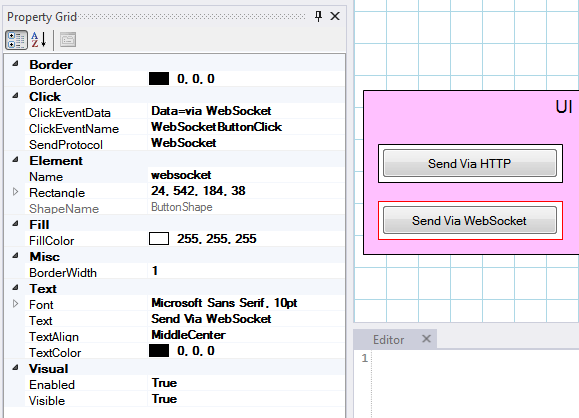
Here notice that the send protocol is "WebSocket." Also notice that the event name is WebSocketButtonClick - this matches directly the semantic type that is instantiated to process this message:
We also have to box shapes, named "cntHttp" and "cntWebSocket":

It should now be clear what this code is doing:
Running The Demo
When we run the demo, we get a console app. Clicking on the buttons on the canvas issues HTTP / WebSocket calls to the console application, which in turn issues HTTP/WebSocket calls back to the FlowSharp to update the counter shapes:

Behind the Scenes
If you want to learn more about FlowSharp, please visit FlowSharp article, and particularly the update on the Service Oriented Architecture. For an early prototype of the code compiler services in FlowSharpCode, please visit the FlowSharpCode article.
The WinForm controls are implemented as shapes, for example:
using System.Drawing;
using System.Windows.Forms;

using FlowSharpLib;

namespace FlowSharpWindowsControlShapes
{
  public class ButtonShape : ControlShape
  {
    public ButtonShape(Canvas canvas) : base(canvas)
    {
      control = new Button();
      canvas.Controls.Add(control);
      control.Click += OnClick;
    }

    private void OnClick(object sender, System.EventArgs e)
    {
      Send(ClickEventName);
    }

    public override void Draw(Graphics gr)
    {
      control.Visible = Visible;

      if (Visible)
      {
        base.Draw(gr);
        Rectangle r = DisplayRectangle.Grow(-4);
        control.Location = r.Location;
        control.Size = r.Size;
        control.Text = Text;
        control.Enabled = Enabled;
      }
    }
  }
}
The Send method, in the base class, posts the actual HTTP or WebSocket message (hardcoded endpoints!!!):
protected void Send(string cmd)
{
  // This allows the user to configure, for each control, whether it sends a web socket or HTTP message.
  // We also assume for now that it is best to send these messages synchronously, so that order is preserved.
  switch (SendProtocol)
  {
    case SendProtocol.Http:
    {
      string url = "http://localhost:8002/" + cmd;
      string data = "ShapeName=" + Name;
      data = AppendData(data);
      ServiceManager.Instance.Get<ISemanticProcessor>().ProcessInstance<FlowSharpMembrane, HttpSend>(d =>
      {
        d.Url = url;
        d.Data = data;
      }, true);
      break;
    }
    case SendProtocol.WebSocket:
    {
      string data = "cmd=" + cmd + "&ShapeName=" + Name;
      data = AppendData(data);
      ServiceManager.Instance.Get<ISemanticProcessor>().ProcessInstance<FlowSharpMembrane, WebSocketSend>(d =>
      {
        d.Data = data;
      }, true);
      break;
    }
  }
}
On the receiver side (here's where the WebSocket messages are processed) we again use the semantic publisher/subscriber to process the message for both HTTP and WebSocket messages:
public class CommandProcessor : IReceptor
{
  public void Process(ISemanticProcessor proc, IMembrane membrane, CmdUpdateProperty cmd)
  {
    BaseController controller = proc.ServiceManager.Get<IFlowSharpCanvasService>().ActiveController;
    var els = controller.Elements.Where(e => e.Name == cmd.Name);

    els.ForEach(el =>
    {
      PropertyInfo pi = el.GetType().GetProperty(cmd.PropertyName);
      object cval = Converter.Convert(cmd.Value, pi.PropertyType);

      el?.Canvas.Invoke(() =>
      {
        pi.SetValue(el, cval);
        controller.Redraw(el);
      });
    });
  }
}
Conclusion

(from Jesus Christ Superstar)
OK, frankly, I think this stuff is the cat's meow. I wish I had tools like this years ago, and I intend to continue developing this concept into a multi-language, multi-platform implementation. But I can't do it without the help of others!