
Hello B4J: Creating the Bible.Show WebApp with ABMaterial
4.67/5 (4 votes)
Create Google Material based HTML5 apps using B4J ABMaterial
Introduction
This article is a continuation of my article named Hello B4J: Develop Complete Java Apps using Visual Basic Syntax. The ABMaterial Framework is the brainchild of one smart guy called Alain Bailleul aka 'alwaysbusy'. The ABMaterial Framework combines a tuned Materialize CSS with the free programming tool B4J (Basic4Java). It allows creating WebApps that not only look great thanks to Googles Material Design, but can be programmed with the powerful free tool from Anywhere Software. You can learn more about Google's Material Design from here.
I started my journey into this framework some two months ago. The framework has some various components that you can create with it using B4J and the output is a complete HTML5, JavaScript, CSS3 app that uses websockets, all of this based on the Jetty webserver from Java. You don't need to type in any HTML5 code yourself, you use the same VB like syntax and just develop your app like that.
The content of this Bible.Show WebApp has been compiled directly from source code that has been written in an object oriented way. From their Demo App, ABMaterial WebApps are Desktop, Tablet and Phone aware. Depending on the size of the screen, your app can appear different. For example when you resize your site on a desktop, a SideBar on the left can be programmed to disappear showing a 'hamburger' button will appear in the TopBar.
To understand the ABMaterial Framework, one needs to think of Grids / Components and Themes. Grids / Components define the structure of your WebApp and Components that can be placed within your pages. Themes can be used to define the look of the components in your app as this uses color coding and intensities, zdepths of those components.
I will first take you through the process of creating a WebApp using the ABMaterial Framework.
Background
I am assuming that you have gone through my previous article Hello B4J. Developing these WebApps will be based on that tool. To be able to develop ABMaterial webapps, you however need to get a copy of the framework. A free version exist from this link. You can also view a live demo of this framework from think link. It is such an impressive tool and Bible.Show here has been developed using it.
Every ABMaterial webapp is based on 7 files, these are
1. The .b4j project file for your B4J project
2. ABMApplication.bas - the main application file for your project
3. ABMCacheScavenger.bas - this is a version 2 onwards module to cache your web pages
4. ABMPageTemplate.bas - this is a module to base all of your pages from
5. ABMSessionCreator.bas- this module is for your web session management
6. ABMShared.bas - this module can hold source code that you can use in all other modules
7. ABMUploadHandler.bas - this module is for managing file uploads to your site, mandatory for apps with upload functionality.
It is very crucial however that anyone wanting to master this framework to please review the demo thoroughly. For now let's use the demo instructions to create a simple app.
First things first
1. Setup
After you download the ABMaterial Framework, you'll find some folders: Library and some Demo Projects. First, copy all library files (like ABMaterial.jar and ABMaterial.xml) from the Library folder to your B4J libraries folder.
Next, make a copy of the Templates folder and rename it to the name of your new app, let's say HelloABM. Go into the folder and rename both Template.b4j and Template.b4j.meta to your apps name. e.g. Template.b4j -> HelloABM.b4j and Template.b4j.meta -> HelloABM.b4j.meta. Now you are ready to write your ABMaterial Web App!
You can also open the Template.b4j project and run it to see what will happen as your first experiment. Let's take a look at the AppStart method of the Template.b4j file.
Sub AppStart (Args() As String)
 ' the user needs to login
 'ABMShared.NeedsAuthorization = True
 ' Build the Theme
 ABMShared.BuildTheme("mytheme")
 ' create the app
 Dim myApp As ABMApplication
 myApp.Initialize
 ' create the pages
 Dim myPage As ABMPageTemplate
 myPage.Initialize
 ' add the pages to the app
 myApp.AddPage(myPage.Page)
 ' start the server
 myApp.StartServer(srvr, "srvr", 51042)
 ABMShared.RedirectOutput(File.DirApp, "logs.txt")
 StartMessageLoop
End Sub
When your app is compiled (press run in B4J) or outside b4j, the resulting output will be in your Objects folder, there will be a www folder, an <AppName>.jar file and a copymewithjar.needs file. These are the required components to run your app in your VPS.
1. You start compiled .jar file on your server (e.g. java -jar MyApp.jar). This is the same as clicking Run in the b4j IDE.
2. A user loads the app in his browser (e.g. http://localhost:51042/MyApp). You can change the port name to be whatever port you want. Also ensure that the FireWall has opened this port for connections. In development mode using B4J, this should work fine.
3. The WebApp redirects the user to InitialPage defined in ABMApplication.
4. If no session exists for this user, it enters the ABMSessionCreator class.
5. A new instance of your page class is created (Initialize is called, we call the BuildPage() method containing the GRID structure of our page).
6. WebSocket_Connected is called when the DOM of the page in the browser is fully loaded:
If it is a new session, we initialize the page object, call ConnectPage() and save everything in the cache.
If it is an existing session, the page and all global variables are restored from the cache.
7. Everything is send to the Browser. We finish this method by doing a page.Refresh and tell the browser we’re done by calling page.FinishedLoading.
8. When the user leaves the page, a beforeunload event is raised.
9. WebSocket_Disconnected is called.
10. If no reconnection happens after some time, the session is destroyed by the server. The cache scavenger will do some cleanup.
If a user comes back to the app while the page is still in cache, it will continue with the cached page. If the cached page is gone, the user is redirected to the entry point of the app. Note that while the user is still connected with the internet, the browser will periodically send a ‘heartbeat’ to the server to keep the session ‘Alive’.
2. You are now ready to write your first ABMaterial WebApp
There are a couple of things that are needed to personalize your app (Mx i.e. mandatory), and some optional (Ox).
(M1): In B4J, Go to Project -> Build Configurations and change the package name to the name of your app e.g. com.b4j.HelloABM
(M2): In ABMApplication module change the variables Title and Description to describe your app. They are the ones that will be shown in the browsers tab.
(M3): Change the variable AppName to the name of your app (this is case sensitive!). Go into the ABMPageTemplate class and set the AppName variable to EXACTLY the same name, e.g. HelloABM
(M4): Create a new class: Project -> Add New Module -> Class Module -> Server WebSocket and name it (e.g. 'MyFirstPage'). Copy all the code from ABMTemplatePage into your newly created class and change the Name variable to the name you gave the new class. In our example 'MyFirstPage' (case sensitive!).
(M5): Go back to ABMApplication and change the variable InitialPage to your newly created page. In our example 'MyFirstPage'.
(M6): So all we have to do now is adding the new page to the App. In the Main module, create an instance of your new page, initialize it and add it to the app. (you can remove the example code lines talking about ABMPageTemplate).
(O2): It is best to run the program now for the first time. All needed folders will be created for you in the www folder. E.g. the images folder where you can put all your images needed in your pages. Open up your file explorer and check the folder structure and files it created to get familiar with how ABMaterial apps are build. Note there is a file called donotdelete.conn. Well, do not delete this file. It's an empty file that is used to check your connection from the browser to your server. If there is no connection (it cannot download this file), then the app can react in a more user friendly way.
That is it. You can start creating ABMaterial WebApps! For every new page you want to make, just repeat steps (M4) through (M6).
3. The components of an ABMaterial WebApp
In the Introduction, I spoke about Grid/Components and Themes. ABMaterial makes use of 'Themes' to set properties like backcolors, text colors, Zdepths and more to ABMComponents. In most cases, all these can be created inside the ABMShared module for all themes that will be applicable to the pages in your app. One can set in each page the themes specifically needed for that page. As an example, this is part code in ABMShared for a page theme.
Public Sub BuildTheme(themeName As String)
    MyTheme.Initialize(themeName)
    ' the page theme
    MyTheme.Page.BackColor = ABM.COLOR_WHITE
    MyTheme.Page.BackColorIntensity = ABM.INTENSITY_NORMAL
    MyTheme.Page.ConnectedIndicatorColor = ABM.COLOR_GREEN
    MyTheme.Page.ConnectedIndicatorColorIntensity = ABM.INTENSITY_NORMAL
    MyTheme.Page.DisconnectedIndicatorColor = ABM.COLOR_RED
    MyTheme.Page.DisconnectedIndicatorColorIntensity = ABM.INTENSITY_NORMAL
    MyTheme.Page.PlaceHolderColor = ABM.COLOR_GREY
    MyTheme.Page.PlaceHolderColorIntensity = ABM.INTENSITY_NORMAL
From above, when this theme is applied to a page, the backcolor of the page will be white with a normal intensity, the connected indicator green, the disconnected indicator red and placeholder for input components grey. This is the same approach that will be followed for all other components. Each components has its own theme properties and you only change the properties that you want to be changed as there are some default properties. I have written a detailed Theme quick reference for the ABMaterial components here.
Creating a theme is done using the Theme.AddxxxxxxTheme("Name") methods. The name you give the theme can then be used later in the ThemeName parameter of the ABMComponent. Next you use the Theme.xxxxxx("name") methods to set properties like backcolors, zdepths, alignments and more. For example, if we wanted to have a dark red button, we would define its theme like this inside ABMShared.
// darkred button
theme.AddButtonTheme("darkred")
theme.Button("darkred").BackColor = ABM.COLOR_RED
theme.Button("darkred").BackColorIntensity = ABM.INTENSITY_DARKEN1
Then we will can create our button in our page like this.
Dim btn1 As ABMButton
btn1.InitializeRaised(page, "btn1", "", "", "BUTTON", "darkred")
page.Cell(2,1).AddComponent(btn1)
In this button definition, the darkred parameter was passed as a theme name which will make the button have a dark red color. As you might have noticed, the last part of the code above starts with page.Cell(2,1), this tells the ABMaterial compiler to put that button in R2C1 i.e. row 2 column 1. This brings us then to the Grid.
Before one can place any ABMComponents to a page, one needs to design the page grid. In the introduction I mentioned that ABMaterial is based on a tuned version of the Material CSS. In essence, this is more like the BootStrap grid, but adopted for ABMaterial.
3.1 Grid
A grid in ABMaterial is made up of rows and columns. Each row must have 12 columns of equal size. This helps in designing a responsive layout of the page. One can define the columns for S-mall, M-edium and L-arge devices.
At first you need to add rows and columns to a page that will host your components. There are two methods to do this.
AddRows(numberOfRows, centerInRow, themeName)
You specify the number of Rows, whether the rows should be centered on the page and pass a theme to use. The default margins for Top and Bottom are set to be 20px, however AddRows sets your TopMargin to 0 and BottomMargin to 20px. The second method is AddRowsM
AddRowsM(numberOfRows,centerInPage,marginTopPx,marginBottomPx,themeName)
As the name applies, with this method, you need to specify the top and bottom margins for the row. If for example you wanted to add 10 rows to the page, you would pass 10 as numberOfRows.
The next part then will be to add Columns to your rows. There are four methods to add columns to each row, AddCells12, AddCellsOSMP, AddCellsOS, AddCells12MP. The controlling method or the method that is the base for all other methods is AddCellsOSMP.
O - stands for Offsets (OS,OM,OL)
S - stands for Size (SS,SM,SL)
M - stands for Top and Bottom Margins and
P - stands for Left and Right padding.
When passing the offsets and sizes, they follow a sequence of Small,Medium and Large for small devices, medium devices and large devices.
AddCellsOSMP(numberOfCells,offsetSmall,offsetMedium,offsetLarge,sizeSmall,sizeMedium,sizeLarge,marginTopPx,marginBottomPx,paddingLeftPx, paddingRightPx,themeName)
Let's see on the Figure 1 below what each column adding method does with passed variables.
Figure 1: Grid Methods

From above when we run AddCells12, for small, medium and large devices, the numberofcells spanning 12 columns will be added. For AddCellOS, one will have to specify the offsets and the sizes and for AddCells12MP, cells spanning 12 columns each will be added and the user will have to specify the margins and the padding.
The example below will add 1 row with 2 cells that span 6 columns each for all devices, small, medium and large.
page.AddRowsM(1,True,0,0, "").AddCellsOS(2,0,0,0,6,6,6,"")
Figure 2: 1 Row, 2 Cells Spanning 6 columns

I have written an in depth article about this here. My own take about the ABMaterial grid.
As an example, lets take one of the Bible.Show WebApp, pages, the scriptures page. I have defined my grid like this.
page.AddRows(2, True, "").AddCells12(1, "")
page.AddRows(10, True, "").AddCellsOS(2, 0, 0, 0, 6, 3, 3, "").AddCellsOS(2, 0, 0, 0, 6, 3, 3, "")
page.AddRows(1, True, "").AddCells12(1, "")
page.AddRows(10, True, "").AddCellsOS(2, 0, 0, 0, 6, 3, 3, "").AddCellsOS(2, 0, 0, 0, 6, 3, 3, "")
This has about 23 rows in total. I wanted the Old Testament and New Testament to be shown too. On small devices, this will look more or less like this on Figure 3
Figure 3: Scriptures on Small devices

Figure 4: Scripture on Medium and Large Devices

From the grid definition above, we added 10 rows with 2 cells that span 6 columns for small devices, this ensures that for small devices, 2 columns are used as the total equals 12 spaces each. The second column for small devices will be wrapped to the following row. For medium and large devices we have 2 columns taking 3 spaces, 2 x 3 = 6 plus the other 6, making it 12.
Whilst creating your app, you can also turn on the grid by using this call.
page.ShowGridInfo = True
This has an effect of drawing your page like Figure 5 below.
Figure 5: ShowGrid

So when adding your components, you will refer to the with page.Cell(6,2), page.Cell(4,4) etc.
From the above example, in each of the 10 rows added, we only used 4 columns, on small devices, only two columns are shown as each columns is 6 spaces wide and the next column is wrapped below the previous one. For medium and large devices, as you will see, four columns are shown each taking 3 spaces each. 4 x 3 = 12.
Nicely enough, version 2.20 of the ABMaterial comes up with a grid designer that you can use for defining your grids. This generates source code that you can insert in your page before the BuildGrid method.
There is also a Page.DebugPrintGrid method that logs your grid in the debugger. Just to recap, let's take a look various grid building methods and what they can do in Figure 6 below.
Figure 6: Various Grid Methods

3.2 Components
In Building up the Bible.Show WebApp, I used the same approach explained in article 2 of the First things first above. This web app has about 19 pages doing various things. All the content in the WebApp is being read from a SQLite database that is embedded within the app itself. This database has various information that I used to display the contents to meet the requirements of the app. Thus there is no user input.
3.2.1 Welcome Page
As soon as the app is started, it opens up the welcome page. This is the page that has been set up as the InitialPage of the app in the ABMApplication class module.
Private InitialPage As String = "welcome/welcome.html" '<-------- First page to load
The welcome page has some labels and an imageslider to show the various images of the app. You will note the logo at top left of each of the pages. I created that logo with a transparency and saved it in the images folder of the generated app. For simple logos, its best to use 236 by 49 for width and height. I also created icons for the app with sizes 152px, 144px and 32px and also put them in my images folder. These were defined in the Initialize method of the ABMApplication module
ABM.AddAppleTouchIcon("152.png", "152x152")
ABM.AddMSTileIcon("144.png", "144x144")
ABM.AddFavorityIcon("32.png", "32x32")
In the welcome page, I changed the name of the page to welcome and on BuildPage, the htmlname to welcome.html. Each page within the app has a navigation bar. As each page gets generated to be dynamic html at runtime, there should be a method then to create each page structure during runtime. As the pages are cached, there is not much speed impediments. Looking at each BuildPage method of each page, we have the following.
public Sub BuildPage()
    ' initialize the theme
    BuildTheme
    ' initialize this page using our theme
    page.InitializeWithTheme(Name, "/ws/" & ABMShared.AppName & "/" & Name, False, ABMShared.SessionMaxInactiveIntervalSeconds, theme)
    page.ShowLoader=True
    page.ShowLoaderType=ABM.LOADER_TYPE_MANUAL
    page.PageHTMLName = "welcome.html"
    page.PageTitle = "Bible.Show"
    page.PageDescription = ""
    page.PageKeywords = ""
    page.PageSiteMapPriority = "0.5"
    page.PageSiteMapFrequency = ABM.SITEMAP_FREQ_MONTHLY
    'page.UseFontAwesome = False
    page.DisableBackButton = False
    page.UseGoogleAnalytics(ABMShared.TrackingID, Null) ' IMPORTANT Change this to your own TrackingID !!!!!!!
    page.GoogleMapsAPIExtras = ABMShared.GoogleMapsAPIExtras
    page.IsFixedFooter = True
    page.DisablePageReloadOnSwipeDown = True
    page.PageLanguage = "en"
    page.SetFontStack("arial,sans-serif")
    page.PaddingBottom = 200
    page.AlwaysShowVerticalScrollBar = False
    ' adding a navigation bar
    Dim sbtopimg As ABMImage
    sbtopimg.Initialize(page, "sbtopimg", "../images/logo.png", 1)
    sbtopimg.SetFixedSize(236, 49)
    page.NavigationBar.Initialize(page, "navBar", ABM.SIDEBAR_MANUAL_HIDEMEDIUMSMALL, "Wamkelekile", True, True, 330, 49, sbtopimg, ABM.COLLAPSE_ACCORDION, "theblood")
    page.NavigationBar.ActiveSideReturnName = "welcome"
    page.NavigationBar.SideBarLogoHeight = 49
    page.NavigationBar.TopBarDropDownConstrainWidth = True
    ' you must add at least ONE dummy item if you want to add items to the topbar in ConnectNaviagationBar
    page.NavigationBar.AddTopItem("DUMMY", "DUMMY", "", "", False)
    ' you must add at least ONE dummy item if you want to add items to the sidebar
    page.NavigationBar.AddSideBarItem("DUMMY", "DUMMY", "", "")
    page.ShowGridInfo = False
    ' create the page grid
    page.AddRows(3, True, "").AddCells12(1, "")
    page.BuildGrid 'IMPORTANT once you loaded the complete grid AND before you start adding components
    ABMShared.BuildFooterFixed(page, 200, ABM.VISIBILITY_ALL)
    ABMShared.ConnectFooter(page, "Conceptualized, designed and developed by Mashy{BR}Powered by ABMaterial", "MashCreationz Copyright @2014-2016{BR}Email: <a href="mailto:anele@mbangas.com">anele@mbangas.com</a>")
    ' add a error box template if the name is not entered
    page.AddModalSheetTemplate(ABMShared.BuildWrongInputModalSheet(page))
    ' add a modal sheet template for a yes no msgbox
    page.AddModalSheetTemplate(ABMShared.BuildMsgBoxYesNo(page))
    ' add a modal sheet template for a  msgbox
    page.AddModalSheetTemplate(ABMShared.BuildMsgBox(page))
End Sub
The ShowLoader says let's show a spinner on the page and as we are creating components manually, the mode for the spinner will be manual and that we will hide it through code. Your app can also be linked to google tracking for statistics purposes so you can get your TrackingID and use it here. This can also include a google maps tracking id if you have it.
The navigation bar is added with some dummy items which are cleared during runtime. 3 rows are added to the grid of the page so that we can put components. A footer is also added to this page.
When the page is being connected, some components are added to the page. Remember, the page components are dynamic, thus one is able to change their properties during runtime.
Public Sub ConnectPage()
    'connect navigation bar
    ConnectNavigationBar
    'add components for the page
    page.Cell(2,1).AddComponent(ABMShared.BuildHeader(page, "par151", "Wamkelekile (Welcome) to the Bible.Show WebApp"))
    Dim imgsld153 As ABMImageSlider
    imgsld153.Initialize(page, "imgsld153", "myslider")
    page.Cell(3,1).AddComponent(imgsld153)
    Dim lbl152 As ABMLabel
    lbl152.Initialize(page, "lbl152", "Bible.Show is the brainchild of Anele 'Mashy' Mbanga. This was the first concept app I decided on when I started developing Android Apps and was then released on the store. With the advent of the ABMaterial Framework, a possibility availed itself for me to start there too as a first step for everything in putting God first. I hope you enjoy using this app as much as I enjoyed creating it. Should you need an app developed, please dont hestitate to contact me on email <a href="mailto:anele@mbangas.com">anele@mbangas.com</a>. Be blessed.", ABM.SIZE_PARAGRAPH, False, "")
    page.Cell(2,1).AddComponent(lbl152)
    RefreshOnLoad_imgsld153
    AdminAccess
    page.Refresh ' IMPORTANT
    ' NEW, because we use ShowLoaderType=ABM.LOADER_TYPE_MANUAL
    page.FinishedLoading 'IMPORTANT
    page.RestoreNavigationBarPosition
End Sub
With this method, the ConnectNavigationBar method is called that creates all the elements on the left SideBar of the page. A header component is added, an image slider with also an additional label to introduce Bible.Show. The contents of the imageslider are then loaded.
Public Sub ConnectNavigationBar()
    ' Clear the dummies we created in BuildNavigationBar
    page.NavigationBar.Clear
    'connect the items in the navigation bar
    page.NavigationBar.AddSideBarDivider("")
    page.NavigationBar.AddSideBarComponent("pagewelcome", ABMShared.BuildSideBarComponent(page, "welcome", "../images/reading.png", "Wamkelekile", "Welcome to Bible.Show"),"../welcome/welcome.html")
    page.NavigationBar.AddSideBarDivider("")
    page.NavigationBar.AddSideBarComponent("pagescripture", ABMShared.BuildSideBarComponent(page, "scripture", "../images/openbook80.png", "Scripture", "Select book, chapter to read"),"../scripture/scripture.html")
    page.NavigationBar.AddSideBarDivider("")
    page.NavigationBar.AddSideBarComponent("pagebiblepromises", ABMShared.BuildSideBarComponent(page, "biblepromises", "../images/promises.png", "Bible Promises", "Topic based verses"),"../biblepromises/biblepromises.html")
    page.NavigationBar.AddSideBarDivider("")
    page.NavigationBar.AddSideBarComponent("pageparables", ABMShared.BuildSideBarComponent(page, "parables", "../images/parables.png", "Parables", "Parables of Jesus Christ"),"../parables/parables.html")
    page.NavigationBar.AddSideBarDivider("")
    page.NavigationBar.AddSideBarComponent("pagemiracles", ABMShared.BuildSideBarComponent(page, "miracles", "../images/miracles.png", "Miracles", "Miracles of Jesus Christ"),"../miracles/miracles.html")
    page.NavigationBar.AddSideBarDivider("")
    page.NavigationBar.AddSideBarComponent("pagelife", ABMShared.BuildSideBarComponent(page, "life", "../images/life.png", "Life", "Living life scriptures"),"../life/life.html")
    page.NavigationBar.AddSideBarDivider("")
    page.NavigationBar.AddSideBarComponent("pagegreatchapters", ABMShared.BuildSideBarComponent(page, "greatchapters", "../images/flagwhite.png", "Great Chapters", "Great chapters of the bible"),"../greatchapters/greatchapters.html")
    page.NavigationBar.AddSideBarDivider("")
    page.NavigationBar.AddSideBarComponent("pagegreatstories", ABMShared.BuildSideBarComponent(page, "greatstories", "../images/greatstories.png", "Great Stories", "Great stories of the bible"),"../greatstories/greatstories.html")
    page.NavigationBar.AddSideBarDivider("")
    page.NavigationBar.AddSideBarComponent("pagegreatverses", ABMShared.BuildSideBarComponent(page, "greatverses", "../images/greatverses.png", "Great Verses", "Great verses of the bible"),"../greatverses/greatverses.html")
    page.NavigationBar.AddSideBarDivider("")
    page.NavigationBar.AddSideBarComponent("pagequalities", ABMShared.BuildSideBarComponent(page, "qualities", "../images/positive.png", "Qualities", "Positive & Negative Qualities"),"../qualities/qualities.html")
    page.NavigationBar.AddSideBarSubItem("qualities", "pmq", "Bible.Show", "mdi-action-thumb-up", "../pmq/pmq.html")
    page.NavigationBar.AddSideBarDivider("")
    page.NavigationBar.AddSideBarComponent("pagebibleinpictures", ABMShared.BuildSideBarComponent(page, "bibleinpictures", "../images/picture.png", "Bible in Pictures", "See the bible in pictures"),"../bibleinpictures/bibleinpictures.html")
    'refresh the navigation bar
    page.NavigationBar.Refresh ' IMPORTANT
End Sub
The side navigation items are linked to each of the pages in the app. Each time an item is selected, the app will navigate to that page. You will note that within the app a lot of methods are being referenced from ABMShared. As earlier indicated, we use ABMShared to host universal code in the app. Please note, you can define the ConnectNavigatioBar method in ABMShared and just call it from your pages passing the page As ABMPage parameter to it. This also goes for the NavigationBar creation code in BuildPage.
As you might have noted, each component has an Initialize method to create it. There are some components that have more that 1 initilialize method to initialize them though. That is for another day. All it takes is to know how each component should be initialize and what properties to set on it to make it work.
As the ImageSlider is loaded during run time, calling it will add images from the folder all this information based on table content. Each image of the slider has a title, a subtitle and an image link and also the type of slide it will be. Our refresh method for this slider reads these contents from the database and then update the ABMImageSlider.
'Refresh the contents of the ABMImageSlider during runtime.
Private Sub RefreshOnLoad_imgsld153()
    'Get access to the component in the page.
    Dim imgsld153 As ABMImageSlider = page.Component("imgsld153")
    'Define list details to load to the imageslider
    Dim results As List
    Dim resCnt As Int
    Dim resTot As Int
    Dim resMap As Map
    'The parent folder for the images
    Dim folderPath As String = "../images/"
    'The default extension for each image file
    Dim extension As String = ".png"
    Dim imgFile As StringBuilder
    Dim img As String
    'variable to hold the image field
    Dim imgField As String = ""
    'variable to hold the TitleField
    Dim titleField As String = ""
    'variable to hold the SubTitleField
    Dim subTitleField As String = ""
    'Add a spinner to the page
    page.Pause
    'Get connection from current pool if MySQL/MSSQL or SQLite
    Dim jSQL As SQL = ABMShared.SQLGet
    'Get the records as a list of maps from the db
    results = ABMShared.SQLExecuteMaps(jSQL,"select * from intro", Null)
    'Close the connection to the database
    ABMShared.SQLClose(jSQL)
    'Loop throught each record read and process it
    resTot = results.size - 1
    For resCnt = 0 To resTot
        'Get the record map
        resMap = results.get(resCnt)
        imgField = resMap.getdefault("image","")
        titleField = resMap.getdefault("title","")
        subTitleField = resMap.getdefault("subtitle","")
        'Build the image path
        imgFile.Initialize
        imgFile.Append(folderPath)
        imgFile.Append(imgField)
        img = imgFile.ToString
        img = ABMShared.FixImage(img,extension)
        imgsld153.AddSlideImage(img,titleField,subTitleField,ABM.IMAGESLIDER_RIGHT)
    Next
    page.Resume
End Sub
The imageslider in BuildPage was created with Initialize and defined with a variable name imgsld153, so with this method, we need to get access to the component with...
Dim imgsld153 As ABMImageSlider = page.Component("imgsld153")
Then run AddSlideImage in this control to add an image. During the execution of the application, a connection to the SQLite database was made in AppStart with this call.
ABMShared.InitializeSQLite(File.DirApp, "bibleshow.db", True)
Thus when distributing the application, also include the bibleshow.db file in the Objects folder. The method above gets an open connection to the database, executes an sql query against the database and returns a list of records that are in Map format. A map works the same as the Dictionary object in VB with keys and values. All fields names returned by ExecuteMaps are always in lowercase. GetDefault is used so that when a record field contains NULL, a blank string is returned.
As you will see, most methods in the app as indicated read contents from the database and display it. This is the methodoloty applied here. When the page runs, it displays just like in Figure 7.
Figure 7: Welcome

The default theme for ABMaterial WebApps is light blue, so to make the dard red colors for the footer and navigation bar, I created a theme for each.
MyTheme.AddNavigationBarTheme("theblood")
MyTheme.NavigationBar("theblood").topbarbackcolorintensity = ABM.INTENSITY_DARKEN4
MyTheme.NavigationBar("theblood").sidebarwavescircle = True
MyTheme.NavigationBar("theblood").topbarbackcolor = ABM.COLOR_RED
MyTheme.NavigationBar("theblood").topbarwavescircle = True
You can explore the attached ABMShared class module to see how this was done.
3.2.2 Books and Chapters
Figure 8: Books

Figure 9: Chapters

The books and chapters pages follow the same approach. One accesses the books when they select the Scripture link in the SideBar. The App reads the relevant books depending on what Testament is selected and displays them as Chips. I have already explained the grid in relation to this page above. Let's take a look at how the ABMChips are loaded.
'Create new ABMChips during runtime.
Private Sub RefreshOnLoad_chpOldTestament()
    'Define list details to load to the chips
    Dim results As List
    Dim resCnt As Int
    Dim lsKey As String
    Dim resTot As Int
    Dim resMap As Map
    Dim resJSON As String
    Dim irow As Int = 3
    Dim icell As Int = 1
    'variable to hold the idfield
    Dim idField As String
    'variable to hold the textfield
    Dim textField As String
    'Read arguments from LocalStorage (if any)
    'Add a spinner to the page
    page.Pause
    'Get connection from current pool if MySQL/MSSQL or SQLite
    Dim jSQL As SQL = ABMShared.SQLGet
    'Get the records as a list of maps from the db
    results = ABMShared.SQLExecuteMaps(jSQL,"select * from books where BookID <= 39 order by BookID", Null)
    'Close the connection to the database
    ABMShared.SQLClose(jSQL)
    'Loop throught each record read and process it
    resTot = results.size - 1
    For resCnt = 0 To resTot
        'Get the record map
        resMap = results.get(resCnt)
        'convert map to json
        resJSON = ABMShared.Map2Json(resMap)
        idField = resMap.getdefault("bookid","")
        textField = resMap.getdefault("bookname","")
        'Save record to LocalStorage
        lsKey = "Books" & idField
        ABMShared.LocalStorageSave(page, lsKey, textField)
        Dim chpOldTestament As ABMChip
        textField = textField.Replace(" ", "{NBSP}")
        chpOldTestament.Initialize(page, idField, textField, False, "bloodred")
        chpOldTestament.Image = "../images/openbook80.png"
        chpOldTestament.Tag = resJSON
        page.Cell(irow,icell).AddArrayComponent(chpOldTestament, "chpOldTestament")
        icell = icell + 1
        If icell = 5 Then
            irow = irow + 1
            icell = 1
        End If
    Next
    page.Resume
End Sub
From above, we start loading each chip at row 3 and cell 1, when we are at the 4th cell of adding chips, we add the next chip in the next row. A database connection is made with the Books table and records with BookID <= 39 loaded. The book id and bookname are read and an ABMChip item is added using the openbook80.png image from the images folder. Also note the theme passed to each chip component. Each Chip component when added saves the record details in a tag as we want to access that when a chip is selected.
Now, when each chip is selected, it's processed like this.
'An ABMChip has been clicked
Public Sub chpOldTestament_Clicked(Target As String)
    Dim chip As ABMChip = page.Component(Target)
    'Read the chip tag property
    Dim Tag As String = chip.Tag
    'Convert the tag to a map
    Dim chipMap As Map = ABMShared.Json2Map(Tag)
    'Read the id and text fields
    Dim idField As String = chipMap.GetDefault("bookid", "")
    Dim textField As String = chipMap.GetDefault("bookname", "")
    'Save to LocalStorage
    ABMShared.LocalStorageSave(page, "BookID", idField)
    ABMShared.LocalStorageSave(page, "BookName", textField)
    ABMShared.NavigateToPage(ws, ABMPageId, "../chapters/chapters.html")
End Sub
In the code of ConnectPage above, each of the labels and imageslider were added using AddComponent method. The chips in this care are created using AddArrayComponent method. This is because we are creating multiple chips that we want to have the same event, thus using AddArrayComponent.
When each Chip is selected, we read the tag property that has the bookid and bookname of which book we have selected. These are then saved to LocalStorage of the device being used for later retrieval. When that is done, the app goes and shows the chapters page. For example above, we selected Genesis, as soon as that happens, the chapters in the book of Genesis are loaded.
The ConnectPage of the chapters module has been defined like this.
Public Sub ConnectPage()
    'connect navigation bar
    ConnectNavigationBar
    Dim sbTitle As StringBuilder
    sbTitle.Initialize
    Dim BookName As String
    BookName = ABMShared.LocalStorageRead(page, "BookName")
    sbTitle.Append(BookName)
    sbTitle.Append(" ")
    page.NavigationBar.Title = sbTitle.ToString.Trim
    'add components for the page
    RefreshOnLoad_chapters
    AdminAccess
    page.Refresh ' IMPORTANT
    ' NEW, because we use ShowLoaderType=ABM.LOADER_TYPE_MANUAL
    page.FinishedLoading 'IMPORTANT
    page.RestoreNavigationBarPosition
End Sub
The previously saved details are read from LocalStorage and then the NavigationBar title is update with the BookName selected, then the RefreshOnLoad_chapters method is called. That method reads records from the Book table using the previously selected BookID from the scriptures page and then creates chips. Then when a chapter chip is selected, the contents are read and the verses page is displayed.
'An ABMChip has been clicked
Public Sub chapters_Clicked(Target As String)
    Dim chip As ABMChip = page.Component(Target)
    'Read the chip tag property
    Dim Tag As String = chip.Tag
    'Convert the tag to a map
    Dim chipMap As Map = ABMShared.Json2Map(Tag)
    'Read the id and text fields
    Dim idField As String = chipMap.GetDefault("chapter", "")
    Dim textField As String = chipMap.GetDefault("chapter", "")
    'Save to LocalStorage
    ABMShared.LocalStorageSave(page, "Chapter", idField)
    ABMShared.LocalStorageSave(page, "Chapter", textField)
    ABMShared.NavigateToPage(ws, ABMPageId, "../verses/verses.html")
End Sub
3.2.3 Verses
As might have guessed, the bookid, bookname, chapter selected are read from the chips already processed. The navigation bar is updated and then the contents of the verses applicable to this chapter are loaded to a label control.
Public Sub ConnectPage()
    'connect navigation bar
    ConnectNavigationBar
    Dim sbTitle As StringBuilder
    sbTitle.Initialize
    Dim BookName As String
    BookName = ABMShared.LocalStorageRead(page, "BookName")
    sbTitle.Append(BookName)
    sbTitle.Append(" ")
    Dim Chapter As String
    Chapter = ABMShared.LocalStorageRead(page, "Chapter")
    sbTitle.Append(Chapter)
    sbTitle.Append(" ")
    page.NavigationBar.Title = sbTitle.ToString.Trim
    'add components for the page
    Dim lblverse As ABMLabel
    lblverse.Initialize(page, "lblverse", "", ABM.SIZE_PARAGRAPH, False, "")
    page.Cell(2,1).AddComponent(lblverse)
    RefreshOnLoad_lblverse
    AdminAccess
    page.Refresh ' IMPORTANT
    ' NEW, because we use ShowLoaderType=ABM.LOADER_TYPE_MANUAL
    page.FinishedLoading 'IMPORTANT
    page.RestoreNavigationBarPosition
End Sub
The label to display the verses is added at row 2 column 1. I have discovered that starting to add components at row1 at times does not make a nice looking app.
and to display the verses...
Private Sub RefreshOnLoad_lblverse()
    'Define list details to load to the content
    Dim results As List
    Dim resCnt As Int
    Dim lsKey As String
    Dim resTot As Int
    Dim resMap As Map
    Dim sbLine As StringBuilder
    Dim strValue As String
    'Read arguments from LocalStorage (if any)
    Dim BookID As String = ABMShared.LocalStorageRead(page, "BookID")
    Dim Chapter As String = ABMShared.LocalStorageRead(page, "Chapter")
    'Add a spinner to the page
    page.Pause
    'Get connection from current pool if MySQL/MSSQL or SQLite
    Dim jSQL As SQL = ABMShared.SQLGet
    'Get the records as a list of maps from the db
    results = ABMShared.SQLExecuteMaps(jSQL,"select verse, scripture from Bible where Book = ? and Chapter = ? order by verse", Array As String(BookID,Chapter))
    'Close the connection to the database
    ABMShared.SQLClose(jSQL)
    'Initialize the content holder
    sbLine.Initialize
    'Loop throught each record read and process it
    resTot = results.size - 1
    For resCnt = 0 To resTot
        'Get the record map
        resMap = results.get(resCnt)
        'Build each line
        Dim eachLine As StringBuilder
        eachLine.Initialize
        For Each strField As String In resMap.Keys
            strValue = resMap.getdefault(strField, "")
            eachLine.Append(strValue)
            eachLine.Append(" ")
        Next
        Dim strOutPut As String = eachLine.ToString.Trim
        'RunMethods referenced pasted in MyMethods of the page for eachLine
        strOutPut = ColorScripture(strOutPut)
        strOutPut = ColorScripture1(strOutPut)
        strOutPut = ItalicScripture(strOutPut)
        strOutPut = BoldScripture(strOutPut)
        strOutPut = ItalicScripture1(strOutPut)
        sbLine.Append(strOutPut)
        sbLine.Append("{BR}")
    Next
    'Get the label and update it
    Dim lblverse As ABMLabel = page.Component("lblverse")
    lblverse.Text = sbLine.ToString.Trim
    lblverse.Refresh
    page.Resume
End Sub
This in essence results in Figure 10, depending on what chapter you have selected.
Figure 10: Verse Reading

3.2.4 Other Pages
Figure 11: ABMCard Components
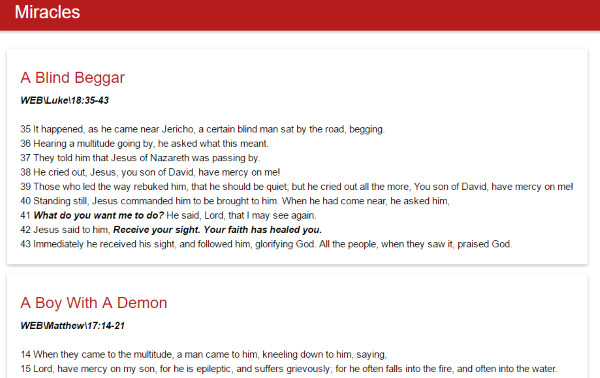
The rest of the other pages with the exception of Bible in Pictures and Qualities use dynamic ABMCard components to display the content. Just like the previous pages, the records of these cards are read from the respective database table and then a card is created and updated at runtime. All this happening in the ConnectPage of each of the pages added. Let's just take one of the examples.
Private Sub RefreshOnLoad_miraclecard()
    'Define list details to load to the cards
    Dim results As List
    Dim resCnt As Int
    Dim lsKey As String
    Dim resTot As Int
    Dim resMap As Map
    Dim resJSON As String
    Dim irow As Int = 2
    Dim icell As Int = 1
    'variable to hold the id field
    Dim IdField As String
    'variable to hold the title
    Dim TitleField As String
    'variable to hold the content
    Dim ContentField As String
    'Read arguments from LocalStorage (if any)
    'Add a spinner to the page
    page.Pause
    'Get connection from current pool if MySQL/MSSQL or SQLite
    Dim jSQL As SQL = ABMShared.SQLGet
    'Get the records as a list of maps from the db
    results = ABMShared.SQLExecuteMaps(jSQL,"select * from Miracles", Null)
    'Close the connection to the database
    ABMShared.SQLClose(jSQL)
    'Loop throught each record read and process it
    resTot = results.size - 1
    For resCnt = 0 To resTot
        'Get the record map
        resMap = results.get(resCnt)
        IdField = resMap.getdefault("id","")
        ContentField = resMap.getdefault("verses","")
        TitleField = resMap.getdefault("lessontitle","")
        Dim miraclecard As ABMCard
        miraclecard.InitializeAsCard(page, IdField, TitleField, ContentField, ABM.CARD_NOTSPECIFIED, "bloodred")
        miraclecard.IsReveal = True
        page.Cell(irow,icell).AddArrayComponent(miraclecard, "miracle")
    Next
    page.Resume
End Sub
There is no code executed within the cards though a card can be created to trap the click event of each ActionButton added to it.
3.2.5 Bible in Pictures
The Bible in Pictures page used the ABMFlexWall component to display the pictures. This component is created within the ConnectPage method of the page.
Public Sub ConnectPage()
    'connect navigation bar
    ConnectNavigationBar
    'add components for the page
    Dim flex51 As ABMFlexWall
    flex51.Initialize(page, "flex51", 350)
    page.Cell(3,1).AddComponent(flex51)
    RefreshOnLoad_flex51
    AdminAccess
    page.Refresh ' IMPORTANT
    ' NEW, because we use ShowLoaderType=ABM.LOADER_TYPE_MANUAL
    page.FinishedLoading 'IMPORTANT
    page.RestoreNavigationBarPosition
End Sub
Then the images in the flexwall are read from a database table and links created to images stored in the images folder of the server.
'Refresh the contents of the ABMFlexWall during runtime from a table.
Private Sub RefreshOnLoad_flex51()
    'Get access to the component in the page.
    'Get the flexwall component to process
    Dim flex51 As ABMFlexWall
    flex51 = page.Component("flex51")
    'Define list details to load to the flexwall
    Dim results As List
    Dim resCnt As Int
    Dim resTot As Int
    Dim resMap As Map
    Dim photoCnt As Int = 0
    Dim photoID As String
    'The parent folder for the images
    Dim folderPath As String = "images"
    'The default extension for each image file
    Dim extension As String = ".jpg"
    Dim simg As String
    Dim strPhoto As String
    'variable to hold the image field
    Dim imgField As String = ""
    'variable to hold the TitleField
    Dim titleField As String = ""
    Dim fStructure As String = "www" & "/" & ABMShared.AppName & "/"
    If folderPath.Length > 0 Then
        fStructure = fStructure & folderPath & "/"
    End If
    'we want a format that will meet ../images
    Dim pStructure As String = fStructure
    pStructure = pStructure.Replace("www/" & ABMShared.AppName, "..")
    fStructure = File.Combine(File.DirApp, fStructure)
    Dim imgSize As String
    'The image width and size if images are sized to be the same size
    Dim imgWidth As String = "350"
    Dim imgHeight As String = "350"
    'Add a spinner to the page
    page.Pause
    'Get connection from current pool if MySQL/MSSQL or SQLite
    Dim jSQL As SQL = ABMShared.SQLGet
    'Get the records as a list of maps from the db
    results = ABMShared.SQLExecuteMaps(jSQL,"select * from pictures order by key", Null)
    'Close the connection to the database
    ABMShared.SQLClose(jSQL)
    'Loop throught each record read and process it
    resTot = results.size - 1
    For resCnt = 0 To resTot
        'Get the record map
        resMap = results.get(resCnt)
        imgField = resMap.getdefault("tag","")
        titleField = resMap.getdefault("text","")
        'Build the image path
        simg = ABMShared.FixImage(imgField,extension)
        'We will get image sizes from the images themselves, hold the photo actual path
        photoCnt = photoCnt + 1
        photoID = "photo" & photoCnt
        strPhoto = pStructure & simg
        'Get the image dimensions
        imgSize = ABM.Util.GetImageDimensions(fStructure,simg)
        If imgSize <> "" Then
            imgWidth = ABMShared.MvField(imgSize,1,"x")
            imgHeight = ABMShared.MvField(imgSize,2,"x")
        End If
        'Add ABMImage component in the FlexWall
        Dim img As ABMImage
        img.Initialize(page, photoID, strPhoto, 1)
        img.IsResponsive = True
        img.Caption = titleField
        img.IsCircular = False
        img.IsClickable = False
        img.IsMaterialBoxed = True
        flex51.AddArrayImage(img,imgWidth,imgHeight,"flex51Images")
    Next
    page.Resume
End Sub
When each image is selected, it opens up in a material box.
Figure 12: Bible in Pictures

When an image is selected, it becomes the active image and hides all others. This is due to the IsMaterialBoxed = True for each image added.
Figure 13: Selected Image

3.2.6 The ListView aka ABMList component
The Qualities (Positive and Negative) section of the app used the ABMList component. A list displays a list of options that a user can select from. The Bible.Show list items are defined in such a way to have an icon and an item. A list item can also have other images that can be referenced from the images folder.
Figure 14: ABMList component with Static Items

Public Sub ConnectPage()
    'connect navigation bar
    ConnectNavigationBar
    'add components for the page
    Dim lst90 As ABMList
    lst90.Initialize(page, "lst90", ABM.COLLAPSE_EXPANDABLE, "")
    lst90.AddItem("item91", ABMShared.ListItemIconTitle(page, "item91", "mdi-action-thumb-up", "Positive Mental Qualities", ""))
    lst90.AddItem("item92", ABMShared.ListItemIconTitle(page, "item92", "mdi-action-thumb-down", "Negative Mental Qualities", ""))
    lst90.AddItem("item93", ABMShared.ListItemIconTitle(page, "item93", "mdi-action-thumb-up", "Positive Physical Qualities", ""))
    lst90.AddItem("item94", ABMShared.ListItemIconTitle(page, "item94", "mdi-action-thumb-down", "Negative Physical Qualities", ""))
    lst90.AddItem("item95", ABMShared.ListItemIconTitle(page, "item95", "mdi-action-thumb-up", "Positive Spiritual Qualities", ""))
    lst90.AddItem("item96", ABMShared.ListItemIconTitle(page, "item96", "mdi-action-thumb-down", "Negative Spiritual Qualities", ""))
    lst90.SubItemLeftPadding = 5
    page.Cell(2,1).AddComponent(lst90)
    AdminAccess
    page.Refresh ' IMPORTANT
    ' NEW, because we use ShowLoaderType=ABM.LOADER_TYPE_MANUAL
    page.FinishedLoading 'IMPORTANT
    page.RestoreNavigationBarPosition
End Sub
This ABMList component used a single line approach but you can create your item using an ABMContainer in whatever way you like. When each of the list items is selected, the respective event is fired to take the user to the selected coded page.
'An ABMList item has been clicked
Public Sub lst90_Clicked(ItemId As String)
    Select Case ItemId
    Case "item91"
        ABMShared.NavigateToPage(ws, ABMPageId, "../pmq/pmq.html")
    Case "item92"
        ABMShared.NavigateToPage(ws, ABMPageId, "../nmq/nmq.html")
    Case "item93"
        ABMShared.NavigateToPage(ws, ABMPageId, "../ppq/ppq.html")
    Case "item94"
        ABMShared.NavigateToPage(ws, ABMPageId, "../npq/npq.html")
    Case "item95"
        ABMShared.NavigateToPage(ws, ABMPageId, "../psq/psq.html")
    Case "item96"
        ABMShared.NavigateToPage(ws, ABMPageId, "../nsq/nsq.html")
    End Select
End Sub
The referenced pages in these Qualities use ABMCard components to load content as explained above.
Figure 15: Positive Spiritual Qualities

4. Deploying the App
To deploy this app, I started up my vps and copied the www folder, the jar files and bibleshow.db to my server. A live version of this Bible.Show WebApp is available here just for play.
Points of Interest
The ABMaterial Framework is quiet a marvel to work with. The other advantages of it is that you can develop responsive apps for desktop, tablet and devices. This then makes your WebApps very adoptive to whatever device that you are using. This framework is growing as also in it you can use google icons and font awesome icons to mention a few. Applications developed with the framwork should be deployed in a VPS and uses websockets which makes the whole experience smooth. I have enjoyed the page cache methodology they are using as it makes your developed apps very fast. Whilst my approach here is using a SQLite database, without much ado by just changing the connection call, the same app can work with MySQL and SQL Server database, same code nothing else to change. This then makes it very scalable.
There are a lot of other components as explained in the Demo and that also provides a lot of information and functionality that you can add to your apps. One just need to understand how each component works and how it fits in the whole spectrum of things.