
Access the Azure Resource Manager Virtual Machine Resources using ARM APIs and the New Azure Portal
4.50/5 (4 votes)
How Resources in Azure can be accessed programmatically using Azure Resource Manager (ARM) APIs
In this post, I'll explain how Resources in Azure can be accessed programmatically using Azure Resource Manager (ARM) APIs. To explain this, we'll walkthrough a few steps where we'll try to access details of Virtual Machines hosted in Azure using Native applications registered with Azure Active Directory (AAD).
For the sake of this walkthrough, I have created a new VM as part of my Azure subscription.

Next, we’ll create a native application in the Azure Active Directory.
Step 1: Create Native Application in AAD
In the Azure portal, navigate to Azure Active Directory and click on the App Registrations section.
Next click on the Add option at the top.

This will open up a new blade towards the right.
As shown in the screenshot below, provide a Name for the application, select the Native application option in the Application Type dropdown and provide a Redirect URI in the third input option. This URL need not be an actual endpoint, it just needs to be a valid URI.
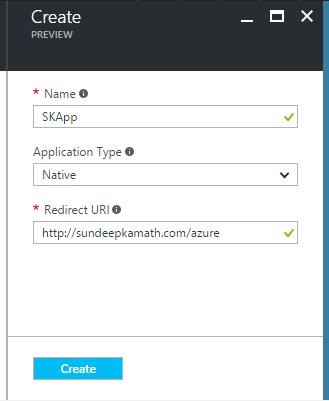
Click on the Create button at the bottom and with this, the new native application would be created.

Next, we’ll delegate permission to this application to access the Windows Azure Service Management APIs. This will help us access the ARM APIs later on.
Step 2: Delegate Permission to the Native Application to Access Azure Service Management APIs
Click on the newly created application, in this case SKApp, and click on the Settings option.
This will open up a blade on the right. Click on Required permissions option and then the Add option at the top.

Now for the Select an API option, select the option Windows Azure Service Management API on the right.

Once selected, grant delegation rights to the application to access this API as follows:

Once permission is granted, the assigned permission list would look like…

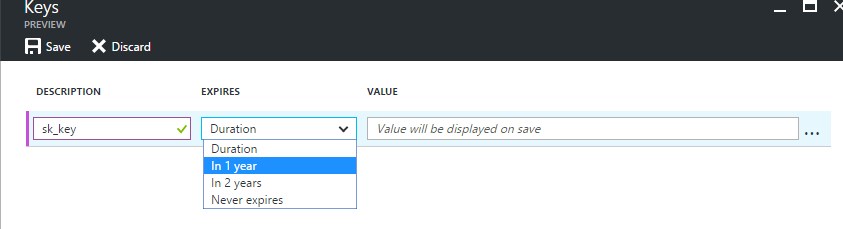
Step 3: Create a Secret Key for this Native Application
We’ll now create a secret key and associate it with this application.
Click on the Keys section in Settings blade.

Add a key description and select an expiry as per your requirement.
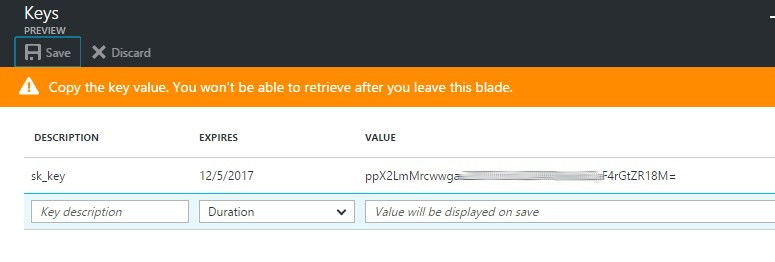
Now click on the Save option at the top and a key would be generated.
Store this key safely and securely with you, as this would be required later on when we try to access the ARM APIs.
Step 4: Save the Application ID and Directory ID
Now that we have generated a secret key and saved it, we need to also save the Application ID of our Native application and Directory ID of the Active Directory instance.
You’ll find the Application ID in the Native application details blade.

The Directory ID also known as the Tenant ID, is the unique id for the AAD instance.
You will find it at the following location:

In addition to these, we’ll also require the following additional parameters:
Service resource id
The value of this id is https://management.core.windows.net/.
OAuth endpoint
This url is used for authorization and its value is https://login.microsoftonline.com/<Directory ID>/oauth2/authorize.
As shown above, the authorization url requires the Directory ID.
With this, we now have all the details to go ahead and implement a REST client to consume ARM APIs.
However, before we do that, we need to carry out an additional step of granting rights to our native application on the subscription.
Note: These rights can be granted at the Subscription, Resource Group or at the Resource level (in this case virtual machine level).
Granting rights at Subscription or Resource Group level would get inherited by all resources under them.
Step 5: Grant Permission to the Native Application at the Subscription Level
To grant rights, drill down to the relevant subscription on which we wish to assign the rights to the application.

Click on the Add option as shown above, and select the Reader role option.

Once done, select the native application we created earlier by typing its name in the Add Users input box.
Select the application once it shows up and click on the Select button below:

That's it!! We are done.
Now we can proceed towards consuming the ARM Rest APIs using a REST Client.
Step 6: Consume the ARM API using the REST Client and Dependent Parameters
Let's create a simple C#.NET Console application to implement this.
You’ll need to install the NuGet package for Microsoft.IdentityModel.Clients.ActiveDirectory. At the time of this post, I used v3.13.8.
We’ll create a class AzureAD.cs to authenticate our user and get an access token which can later be used to call the ARM based REST APIs.
using Microsoft.IdentityModel.Clients.ActiveDirectory;
using System;

namespace AzureNewPortalResourceVMIntegration
{
    public class AzureAD
    {
        internal static string Authenticate(string authority,
            string serviceResourceId, string clientId, string secretKey)
        {
            AuthenticationContext authContext = new AuthenticationContext(authority, true);
            AuthenticationResult authResult = null;

            try
            {
                authResult = authContext
                    .AcquireTokenAsync(serviceResourceId,
                                new ClientCredential(clientId, secretKey)).Result;

                if (authResult != null)
                    Console.WriteLine("Auth Token: {0}", authResult.AccessToken);
                else
                    throw new Exception("Azure AD authentication failed.");

            }
            catch (AdalException adEx)
            {
                Console.WriteLine("Exception: {0}", adEx);
            }

            return authResult.AccessToken;
        }
    }
}
We’ll also need a class to place REST API calls using this access token. We’ll create a class AzureRestClient.cs for this.
using System.Net.Http;
using System.Net.Http.Headers;
using System.Threading.Tasks;

namespace AzureNewPortalResourceVMIntegration
{
    internal class AzureRestClient
    {
        internal static async Task<string> ExecuteRequest(string accessToken, string url)
        {
            string serviceBaseAddress = url;
            string responseMessage = null;

            HttpClient httpClient = new HttpClient();

            httpClient.DefaultRequestHeaders.Authorization =
                new AuthenticationHeaderValue("Bearer", accessToken);

            HttpResponseMessage response =
                await httpClient.GetAsync(serviceBaseAddress);

            if (response.IsSuccessStatusCode)
            {
                responseMessage = await response.Content.ReadAsStringAsync();
                return responseMessage;
            }
            else
            {
                responseMessage = await response.Content.ReadAsStringAsync();

                if (response.StatusCode == System.Net.HttpStatusCode.Unauthorized)
                {
                    return "Access denied.";
                }
                return responseMessage;
            }
        }
    }
}
With this, we can now fetch details of our VM SK-Lin-1 as follows:
using System;

namespace AzureNewPortalResourceVMIntegration
{
    class Program
    {
        static void Main(string[] args)
        {
            string tenantId = "<Enter Directory Id>";
            string clientId = "<Enter Application Id>";
            string secretKey = "<Enter Secret Key>";
            string subscriptionId = "<Enter Subscription Id>";
            string resourceGroupName = "<Enter Resource group name>";
            string virtualMachineName = "<Enter Virtual Machine name>";

            string oauthUrl = "https://login.microsoftonline.com/{0}/oauth2/authorize";
            string serviceResourceId = "https://management.core.windows.net/";

            string authority = string.Format(oauthUrl, tenantId);

            string vmDetailsURL =
            $"https://management.azure.com/subscriptions/{subscriptionId}/resourceGroups/
            {resourceGroupName}/providers/Microsoft.Compute/virtualMachines/{virtualMachineName}?
            api-version=2015-06-15";

            string accessToken = AzureAD.Authenticate
                    (authority, serviceResourceId, clientId, secretKey);

            if (accessToken != null)
            {
                AzureRestClient.ExecuteRequest(accessToken, vmDetailsURL)
                     .ContinueWith((task) =>
                     {
                         Console.WriteLine(task.Result);
                     });

            }
            Console.ReadLine();
        }
    }
}
For more details on the REST API used to fetch VM details, refer to the Azure reference guide.
Once you get the response, you can parse the JSON result and extract the relevant data from it.
You may also download the source code for this from my github repository.
Do explore the Azure Reference documentation which lists a number of other APIs that can be used. In all cases, the code remains the same, only the REST API URL and its dependent parameters would change.
Hope this was useful!
Reference
The post Access the Azure Resource Manager Virtual Machine resources using ARM APIs and the new Azure Portal appeared first on Sundeep Kamath's blog.