
Getting Started with Intel® IoT Gateways - JavaScript
This article was written for JavaScript. To get started using Python, see Getting Started with Intel® IoT Gateways - Python.
Get access to the new Intel® IoT Developer Kit, a complete hardware and software solution that allows developers to create exciting new solutions with the Intel® Galileo and Intel® Edison boards. Visit the Intel® Developer Zone for IoT.
This article was written for JavaScript*. To get started using Python*, see Getting Started with Intel® IoT Gateways - Python.
Introduction
The Internet of Things (IoT) market is booming. Gartner forecasts that in 2016, 6.4 billion connected things will be in use worldwide, and support total services spending of $235 billion. They went on to predict that the number of connected things will reach 20.8 billion by 2020. The International Data Corporation (IDC) estimates the IoT market will reach $1.7 trillion in 2020. When it comes to connecting new and legacy systems to the Internet, there has never been a better time.
Internet of Things (IoT) solutions have a number of moving parts. At the heart of all these solutions sits the IoT gateway, providing connectivity, scalability, security, and management. This getting started guide will help you understand:
- What an IoT gateway is.
- How it can be used as the hub of commercial and residential IoT solutions.
- How to choose the right gateway for you.
- What software development tools are available.
- How to write a "Hello World" application that will run on your gateway.
Let’s get started!
What is an IoT Gateway?
What is a Gateway For?
An IoT gateway is the heart of an IoT solution that ties all of the pieces together. On one side we have all the "things", which can include sensors, smart devices, vehicles, industrial equipment, or anything that can be made to be "smart", and produce data. On the other side we have network and data infrastructure, which stores and processes all the data the things produce. Gateways are the connection between the things and the network and data infrastructure; they are the glue that holds it all together.

However, gateways are so much more than just the glue; they are a solution to the connectivity challenge that all developers face. The connectivity challenge has two major needs:
- Robust and secure access to the Internet or Wide Area Network (WAN).
- Ability to support access to a multitude of devices, many of which have limited to no processing capability.
Connecting a single sensor to the Internet can get complicated and expensive. What happens when you have varying types of sensors, each with a different type of interface, and want to aggregate the data into a single dashboard?
Gateways help overcome these challenge by providing:
- Communications and connectivity
- Scalability
- Security
- Manageability
Communications and Connectivity
Wired and wireless connectivity are standard on many devices. Protocols you’ll find in use include Cellular 2G/3G/4G, Bluetooth*, Serial, USB, Virtual Private Network (VPN), Wi-Fi Access Point, MQ Telemetry Transport (MQTT) messaging protocol, and ZigBee*. These enable you to connect to sensors and systems using a variety of methods. With such a wide range of available protocols, you’ll be hard pressed to find a sensor or device you can’t connect to.
Scalability
Much like network routers, IoT gateways can be connected together to form even larger solutions. Whether you’re creating a home automation system with a single gateway, or have a multiacre industrial facility with new and legacy systems that need connecting, you can connect everything together into a single system.
Security
Data encryption and software lockdown are a couple of the security features you’ll find on IoT gateways. Additionally, many devices offer whitelisting, change control, secure storage, and secure boot, as well as a wide array of protocols, services, and malware protection. All of these features combine to ensure that your systems and data are kept secure at all times (a critical aspect, as the IoT continues to expand at exponential rates, becoming an even greater target for hackers and thieves).
Manageability
Manageability refers to the deployment, maintenance and management of your solutions. With the potential of complexity, simplicity in management is key. To help you’ll find web-based interfaces you can securely access to maintain the gateway itself, manage the connected sensors, and control how data flows through it. Many gateways use some form of embedded Linux*, so the admin tools you know and love like ssh and scp are available.
Usage Scenarios
Commercial
In a commercial setting, a gateway can connect a series of sensors (light, temperature, smoke, energy, RFID) and systems (HVAC, vending, security, transportation) to control and monitoring devices such as data stores and servers to be retrieved by laptops, tablets and smart watches.

Specific examples include:
- Commercial trucking companies collecting GPS and loading information from their fleets. Each truck has an Internet-connected gateway which filters and relays data from the truck’s systems.
- Construction companies monitoring the noise levels on their sites in order to comply with local noise regulations. Each site has noise and vibration sensors connected to one or more gateways which send the data to the onsite supervisors.
Residential
The most common residential application of IoT is home automation. In this scenario, a gateway helps provide a single point of control by intelligently connecting your security system, thermostat, lighting controls, smoke detector, and more. Typically, a web interface accessed from within your home or securely over the Internet provides a unified view of all these systems.
Smart meters are another example in common use today; they detect energy consumption information and send it back to the electric company as frequently as every hour, sometimes in even shorter intervals. These meters also allow for two-way communication between the meter and the electric company.
Which Gateway is Right for Me?
With many options available on the market, which is right for you? Ultimately that depends mainly on two factors:
- The type of Internet connectivity available (wired, wireless, cellular).
- The types of sensors you’ll be using and the types of interfaces they have (USB, serial, Bluetooth*).
Intel has a large ecosystem of manufacturing partners which provide a variety of options. On the IoT section of the Intel® Developer Zone you’ll find two useful tools: the Solutions Directory and the Gateway Comparison Tool. Using both of these tools you’ll find solutions with the following features:
Processors
- Single-core Intel® Quark™ SoC X1000 400 MHz processors
- Single, dual, and quad-core Intel® Atom™ processors
- Single, dual, and quad-core Intel® Core™ processors
Networking and Communications
- Wi-Fi (single and multiple-radio)
- Dual LAN
- Bluetooth*
- CAN bus
- ZigBee*
- 6LoWPAN
- GPRS
- 2G/3G/LTE
- Analog and digital I/O
- RS-232
Operating Systems
- Wind River* Linux* 7
- Snappy Ubuntu* Core
- Microsoft Windows® 10 IoT
This guide was written using the Advantech* UTX-3115 gateway with an OMEGA* RH USB sensor which measures temperature and relative humidity.
Industry Verticals Applying IoT Technology
We’ve seen a number of applications of IoT gateway technology in both the commercial and residential sectors, however where specifically can this technology be applied?
Here’s a partial breakdown of industries and the verticals where IoT technology is being applied:
| Industry | Verticals | Example Use Cases |
|---|---|---|
| Public Sector | Cities | City Wi-Fi, parking, traffic |
| Public Safety | Schools, border, law enforcement | |
| Manufacturing | Factories | Energy management, security, automation |
| Energy and Minerals | Utilities | Mobile workforce, substation and distribution automation |
| Oil and Gas | Pipeline monitoring, refinery systems, secure operations | |
| Mining | Asset visibility and monitoring, predictive maintenance | |
| Transportation | Transportation | Roadways, trains, stations |
| Business to Consumer (B2C) | Retail | Remote expert / mobile adviser, digital media store experience |
| Sports and Entertainment | Stadium, stadium Wi-Fi, stadium vision | |
| SP & Machine-to-Machine (M2M) | Remote tower management, fleet/asset management | |
| Healthcare | Virtual patient observation, patient wayfinding | |
| Financial Services Industry | In-branch customer experience, energy management |
Software Overview
Wind River* Linux* in the Context of Python*
The operating system of the Intel® IoT Gateway is Wind River* Linux*, a commercial embedded Linux distribution. Because it’s Linux, you can run just about anything on it, including Python*. In fact, the latest version of the Intel® IoT Gateway comes with Python 2.7.3 preinstalled. In addition, you can download updated Python version packages and other applications from the Intel Open Source Technology Center, or using the built-in IoT Gateway Developer Hub that’s running on the gateway.
MRAA / UPM
MRAA (pronounced em-rah) is a low-level library written in C. The purpose of MRAA is to abstract the details associated with accessing and manipulating the basic I/O capabilities of a platforms, into a single, concise API. MRAA serves as a translation layer on top of the Linux General Purpose Input/Outputs (GPIO) facilities. Although Linux provides a fairly rich infrastructure for manipulating GPIOs, and its generic instructions for handling GPIOs are fairly standard, it can be difficult to use. Having said that, you can use MRAA to communicate with both analog and digital devices. Be sure to check out the MRAA API Documentation.
To install MRAA on your gateway, download the latest version from the Intel Open Source Technology Center using curl, and then use the rpm command to install. As an example, if you’re running the current system version - 7.0.0.13 - the commands would be as follows:
>> curl -O https://download.01.org/iotgateway/rcpl13/x86_64/libmraa0-0.8.0-r0.0.corei7_64.rpm

	>> rpm -ivh libmraa0-0.8.0-r0.0.corei7_64.rpm
IDE(s)
There are a number of IDE options available to developers - the Intel® XDK IoT Edition, Node-RED*, Wind River* Helix* App Cloud and Eclipse*. In addition, you can always ssh directly into your gateway and use vi to write your application, or scp to securely transfer your project to the gateway. If you’re just getting started, I recommend using either Node-RED or the Wind River Helix App Cloud.
Intel® XDK IoT Edition

Use the Intel® XDK IoT Edition with Node.js* to create web interfaces, add sensors to your project, and work with the cloud. In addition to working with your gateway, you can also program your Intel® Edison and Galileo boards.
Node-RED*
The official pitch for Node-RED* is that it’s a tool for "wiring together hardware devices, APIs and online services in new and interesting ways." What it provides is browser-based flow editing built on top of Node.js*.
Wind River* Helix* App Cloud

Once you register your gateway on the Wind River* Helix* App Cloud, Cloud9* – a web-based IDE – becomes available. The great thing about the Helix App Cloud is that you can develop your application from anywhere, and once it’s ready you can instantly run it on your device.
Development Environment
There are very rich development environments built around the Intel® IoT Gateways. These include both desktop and web-based tools. In this section of the guide you’ll learn how to flash the gateway’s operating system, and then program and debug a ‘Hello World’ application using the Intel® XDK IoT Edition (desktop) and the Wind River Helix App Cloud (web-based).
These instructions will work on both Windows and Mac.
What You Need to Get Going
In order to begin developing on your gateway you’ll need:
- An IoT gateway (for this guide we used the Advantech UTX-3115).
- A USB sensor that measures temperature and relative humidity (for this guide we used the OMEGA Temperature and Humidity USB Sensor).
- Power
- An Ethernet cable to plug into your router (this is how the gateway will reach the Internet).
In order to connect to the gateway itself you’ll need network connectivity. This guide assumes that the gateway is sitting on the same network as your development computer. If network connectivity is unavailable for some reason, you can connect to the gateway via a serial terminal.
Figure 6 shows the setup used in writing this guide:

Getting Started / Hello World
Flashing the OS
In order to upgrade to the lastest system version, you’ll need to flash the OS. To do that, use these steps:
- Obtain a USB drive that is at least 4GB in size.
- Download the latest Gateway OS image.
- Unzip the image to a location of your choice on a Linux host system.
- Open a terminal window.
- Use the df command to verify the device on which the usb drive is mounted. The df command shows the amount of available disk space being used by file systems.
- Use the following command to copy the OS image to the USB drive:
sudo dd if= <path to recovery image file> of=/dev/sdb bs=4M; sync - Unplug the USB drive from the host machine and boot the gateway from the USB drive.
- Log in to the gateway (root/root) and execute the following command:
# /sbin/deploytool –d /dev/sda --reset-media -F - Power off the gateway and then power it back on.
When the gateway comes back up, log in and verify that you are now running the latest version of the OS by logging in to the gateway and viewing the system version number on the dashboard.
First Time Setup
Now that you can log into the gateway, set it up by following the steps below:
XXXX is the last four digits of the MAC address of the gateway’s wireless network adapter (br-lan). You can find this MAC address by booting the gateway, and once it’s up, log in as root and type ‘ifconfig’. Get the last 4 digits from the br-lan adapter.
- Unpack the gateway.
- Plug the Ethernet cable from your router into the necessary Ethernet port. For the Advantech, use the right side (eth0) Ethernet port.
- Connect a VGA or HDMI monitor.
- Optional – connect a mouse and keyboard. (The example in this guide uses a USB hub to plug both into the Advantech. The mouse is completely optional, though a keyboard is recommended).
- Connect the USB Sensor to the gateway.
- Connect the gateway to power and press the power button.
- Once the gateway boots, use your development computer’s wireless network adapter to connect to the gateway’s built-in Wi-Fi using the SSID and password.
- SSID: IDPDK-XXXX
- Password: windriveridp
- Open a browser on your PC – Google Chrome is recommended – and go to http://192.168.1.1. This will open the login page of the Intel® IoT Gateway Developer Hub, a web-based interface to manage sensors and prototype with visual programming tools.
- Log in using the following credentials:
- Username: gwuser
- Password: gwuser
That’s it! You’re ready to develop.
Programming Hello World with the XDK
In this section we’ll create a JavaScript* "Hello World" application using the Intel® XDK IoT Edition.
After installing and signing in to the XDK, click the Start a New Project button on the bottom left of the IDE. Under the Internet of Things Embedded Application section, click the Templates link, and then select Blank Template.

After that, click the Continue button on the bottom right. Add a project name in the popup that opens, and then click the Create button to create your project.

Once your project is open, select your gateway from IoT Device dropdown in the bottom left of the XDK. In this example, the gateway has been given an IP address of 192.168.1.9.

Note: In order for the XDK to automatically find your gateway, your development computer must be on the same subnet. If you have connected to the gateway using its built-in wireless router (as we did above), then you are on the same subnet as the gateway. If your computer is not on the same subnet, but you can ping the IP address of the gateway - for example, if your gateway is plugged in to your network using a network cable - you can use the Add Manual Connection option from the dropdown to manually connect to your device.
Next, in the editor, type the following code on line 5:
console.log("Hello World! This is the Intel XDK"); Your editor window should look like this:

Save your changes by selecting File > Save.
With your application created, you need to upload the project to the gateway. To do so, click the Upload button, which is a downward facing arrow.

Now that your application is on the gateway, you can run it. To do so, clicking the Run button. The run button has a green circle with a white arrow in it. This will run your application.

When the application runs you will see the output on the console.

Programming Hello World Using Wind River® Helix™ App Cloud
In this section we’ll create a JavaScript "Hello World" application using the Wind River Helix App Cloud.
The first thing you need to do is create an account on App Cloud and register your device. To do that, login to your gateway, click the Administration image just under the dashboard, and under the Quick Tools section, click the Launch button underneath the App Cloud image. Follow the directions there to register your gateway.
Note: The unique ID the gateway creates expires after 20 minutes, so you’ll want to verify your email address and log back in within that time period. If you miss your window, you can generate a new code and register at that point.
Once logged into the App Cloud, click the Create new project button under the Application Projects section. On the popup that appears, enter a project name and select the JavaScript Hello World template.

Hit the OK button to create your project. Once created, click the Open button to open it in the Cloud9 editor. Once the editor opens, click the hello.js file in the workspace tab.
If you want, change the text that will show up on the console. I updated the text to say, "Hello World. This is the Cloud9 IDE!". Save your changes by going clicking File > Save. Your project is now ready to run! To do so, click the green Run button. The application is downloaded to your gateway and run by Node.js. We can see in the console on the bottom part of the editor that our project did indeed run on the gateway.
To deploy this application to your gateway:
- In the Cloud9 editor, download the project by selecting File -> Download Project
- Scp the compressed file to your gateway. In my case the command was:
scp ~/Downloads/HelloWorldTestOne.tar.gz root@192.168.1.4:/users/robertonrails - Use the tar command to uncompress the project.
tar -zxvf HelloWorldTestOne.tar - Use node to run hello.js without the debugger.
node --nodead_code_elimination --nolazy --nocrankshaft ./HelloWorldTestOne/hello.js
Coding Basics
Intel provides a number of how-to articles and videos on using the IoT Gateway on the IoT section of the Intel Developer Zone. The following videos and articles will help you get started:
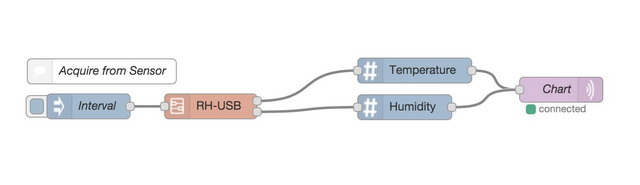
- Intel® IoT Gateway Developer Hub: Setup a Sensor in Node-RED – Learn how to connect a sensor to an IoT Gateway using the Node-RED visual programming tool. Once connected, the gateway can collect and process data from the sensor.
- Intel® IoT Gateway Developer Hub: Connect Sensor Output to the Cloud in Node-RED – Learn how to use the Node-RED visual programming tool to take local sensor data from your IoT Gateway and send it to a Cloud database.
- Intel® IoT Gateway Developer Hub: Save and Deploy an OS Image – Once IoT Gateway software development is complete, learn how to save a copy of the gateway’s OS and software and deploy it to other gateways.
Additionally, the following guides contain useful information and instructions:
- Intel® IoT Gateway Technology: Security Best Practices – Learn how to access and manage the security features on your gateway.
- Intel® IoT Gateway Technology: Gateway Installation Guide – Learn how to connect your gateway hardware, connect it to a network, update the evaluation OS, and access the Intel® IoT Gateway Developer Hub.
Debugging Hello World with the XDK
To debug your application using the XDK, first open up the Hello World application you created in a previous step. Re-upload the application to the gateway and run it to ensure that everything is working well.
To debug the application, click the Debug button. The debug button is an image of a bug with a green arrow on it.

After you click the button, the debugger window will open.

You can use this window to see the current state of the application including all local variables and the call stack.
To create a breakpoint, select the desired line. You will then see the breakpoint you’ve created in the Breakpoints section on the left of the debugger window.

When you run the debugger the application will stop at this point and you can debug your application.
Debugging Hello World with the Wind River Helix App Cloud
Let’s debug our Hello World application.
To do so, the first thing we need to do is open our Hello World application. Next, open hello.js. After that, click the space to the left of our one line of code. This should add a red dot beside line 25. To debug the app, click the green Run button. The application will automatically stop and the debug panel will open on the right hand side of the editor.

In the image above the debugger area is expanded so we can see more of what’s going on. From here we can browse the current state of our application at the breakpoint we specified, including all local variables and the call stack. If we wanted to, we could also enter watch expressions.
To resume the running of our application, either click the green arrow at the top of the debug window or hit F8 on your keyboard. The program will then resume and we’ll see our familiar message printed to the console.
Where to Go From Here
In this guide you’ve accomplished quite a bit:
- Learned how to select the gateway that’s appropriate for your application.
- Discovered a number of IDE and text editor options.
- Learned how to flash the gateway and upgrade it to the latest system version.
- Set up your gateway for development.
- Written a simple hello world application in JavaScript, deployed it to the gateway, ran it and debugged it.
As a next step, read and implement the lessons in the papers listed in the Coding Basics section . These papers will show you how to connect sensor output to cloud databases, as well as saving a copy of the gateway’s operating system and deploying it to additional gateways.