
Intel Edison® to Microsoft Azure Part 1
The following use case will provide you with an example of how to implement an IoT solution so that value can be gained through an IoT deployment, using the power of interconnectivity between the board, the gateway and the cloud.
Get access to the new Intel® IoT Developer Kit, a complete hardware and software solution that allows developers to create exciting new solutions with the Intel® Galileo and Intel® Edison boards. Visit the Intel® Developer Zone for IoT.
Once you've moved past prototype development stage, you might find yourself in the position to deploy an actual IoT solution for your business product.
Let’s say you own a transportation of goods company, that has to deliver food and other temperature sensitive products to shops throughout the country. Storage and transportation conditions such as temperature and moisture contribute greatly to the loss of food, as it provides favorable conditions for pests or mold multiplications. One very efficient solution to this problem is to use IoT devices such as the Intel® Edison board to capture the temperatures in these storage devices, the gateway to gather the information and route it appropriately, and Microsoft Azure* to store the information and analyze it so you can get valuable feedback.
The following use case will provide you with an example of how to implement an IoT solution so that value can be gained through an IoT deployment, using the power of interconnectivity between the board, the gateway and the cloud. We will dive into detailing the implementation process of the prototype of our solution, with this use case in mind.
Using Microsoft Azure*, the Intel® Edison board, and Intel® IoT Gateway Technology
To create a high value solution for the temperature problem described, we need to setup the board, the gateway and Azure*. The following sections address setup for Intel® Edison boards, Microsoft Azure, and Wyse* 3000 Series x86-Embedded Desktop Thin Client.
Intel® Edison board
The Intel® Edison board runs a simple Yocto* linux distribution and can be programmed using Node.js*, Python*, Arduino*, C, or C++. For this use case we used the Intel® Edison board and Arduino breakout board, a Seeed* Studio Grove* Starter Kit Plus (Gen 2), a base shield, and many sensors to get started with.

The first time you use your Intel® Edison board you have to configure it, flash it to the latest firmware, and test it. In order to do so you can access this simple Getting Started Guide.
Working with the IDE and Wi-Fi
Now that you have set up your Intel® Edison board, you can start programming it. You can choose the programming language and IDE that you want and you have to load up one of the blink examples in order to test if everything is set:
- For Arduino: Arduino
- For C/C++: Eclipse for C/C++
- For Javascript: Intel® XDK IoT Edition
- For Java: Eclipse for Java
In order to finish the setup you need to follow a few more steps:
- Open the device manager again and find out on which COM port is the Intel® Edison Virtual COM Port and set the port in the IDE.
- Load up the blink example and if everything went well so far, the on-board LED should start blinking.
- To connect with Wi-Fi, open Putty, and once you login, type configure_edison --wifi.
- Work through the setup process and use the guide to connect to your Wi-Fi network (See Get Started with Intel® Edison on Windows).
Microsoft Azure
Setting up an Azure Event Hub
For this setup, the free trial version will be used.
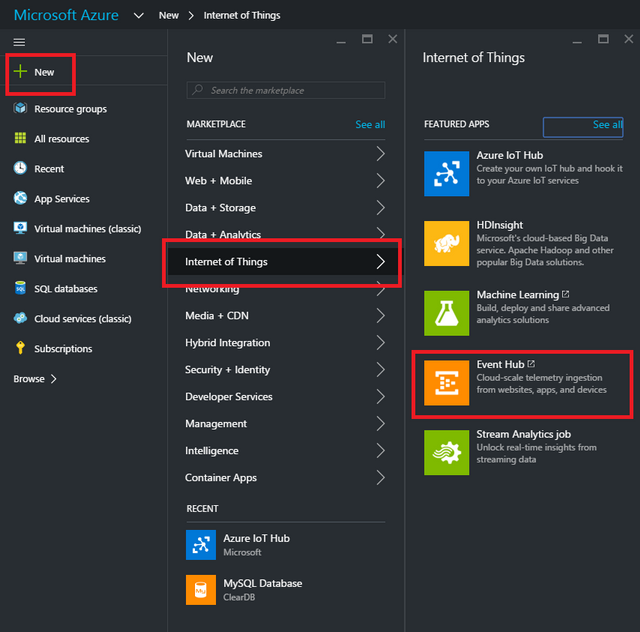
- You need to sign in with a Microsoft account. After signing in, click on Sign up for a free trial. In the next tab, you have to fill in information about yourself, including credit card data. Do not worry, you will not be charged if you do not specifically say so. After clicking the Sign up button at the bottom of the page, the Azure Portal Homepage will appear. Click on New in the top left corner - Internet of Things – Event Hub.
- First you need to create a namespace, click on Service Bus on the left and then CREATE at the bottom

- Fill in the required information and then click the check sign

- Now our namespace was created. Next, we need to create the Event Hub. Make sure you have selected the Service Bus tab on the left and then click on New on the bottom-left

- Next, select App Services – Service Bus – Event Hub

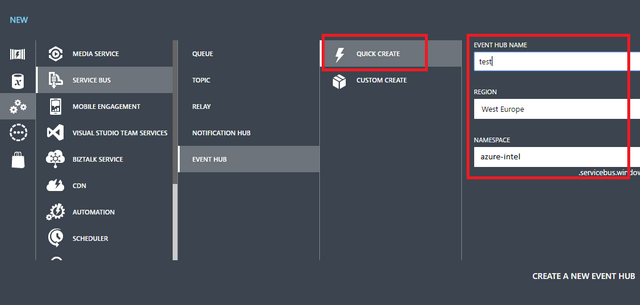
- Next, click on Quick create and fill in the required information
- Now you should be able to see on your screen something like this in your portal, under the Service Bus tab :

- You will need to further configure your Event Hub. Click on your namespace, and you’ll be prompted with the following window:

- Click on Event Hubs tab, you will see on your screen your Event Hub:

- Click on the event hub and then click on Configure

- You will now need to create a new shared access policy for your Hub, make sure you select Manage from the permissions tab

- Now you will have to create a consumer group. At your created Hub, click on the Consumer Groups tab and then click on Create.

- Name your group and click the checkmark

- Your namespace must also have a key defined, return to the namespace (the Service bus tab on the left), click on Configure and then, under Shared access policies type in a key name and make sure you check Manage

- Click on the Service bus tab again, then click on Connection information at the bottom (make sure you have selected your namespace)

- Here you can see your namespaces and their keys:

- If you return to your Event Hub’s dashboard after you begin sending messages to it from the gateway, you will see something like this:

The event hub dashboard is just a way to check if the data was received correctly, see the bandwidth of those messages and check if you are getting errors. To work with the data you will need to read it from the event hub through an application using the many different SDKs that Microsoft offers (for an example see the section below on How to use features of Azure services - Notifications). Also, a full explanation of how to read data from Intel® Edison board and sending it to the just created Event Hub using an IoT Gateway can be found in the How to take the developed solution from the board to the gateway and to the cloud section.
SDKs for Microsoft Azure IoT
The most popular language to develop apps for Azure is C# but if you want to use other languages and platforms visit GitHub.
Setting up the gateway
Wyse* 3000 Series x86-Embedded Desktop Thin Client
Regulatory model number: N03D
The gateway connects legacy and new systems, and enables seamless and secure data flow between edge devices and the cloud. We take data from the Intel® Edison board and send it to the gateway, and the gateway sends the data to the cloud as an event.
In the next section we detail the setup process for the gateway.
The new Wyse* 3000 Series x86-embedded thin client has a powerful performance at an entry-level price. It has a dual-core Intel processor with 1.6GHz, an integrated graphics engine, and multiple connectivity choices. Its various configuration options support a wide variety of peripherals and interfaces, along with unified communications platforms such as Lync 2010, Lync 2013 and the Skype for Business client for Lync 2015 (UI mode) plus high-fidelity protocols such as RemoteFX and Citrix* HDX.

In order to get started, see the quick start guide. To get your thin client up and running, you must do the following:
- Make sure that the thin client and the monitor are turned off and disconnected from AC power. Place the thin client on the desk after you attach feet for vertical or horizontal position. Assemble the VESA mount with user-supplied screws, and insert the thin client; try to put the cables facing down or to the side.
- Make all desired connections. In order to connect to a network, you can use a Base-T Ethernet network cable. If your device is equipped with a SFP slot, use a SFP module, or use an optional Wi-Fi network adapter for wireless networks.
- Connect the power adapter to the thin client power input before connecting to a 100-240V AC. You must wait until the power button light turns off, and then, for turning on the thin client, you need to press the power button. After the initialization sequence is complete, the activity light changes to green.
This article is continued in Industrial Use Case Part 2.
Additional Links
From Intel® Edison to Microsoft Azure*
Getting Started with Microsoft Azure*