
Automating deployment of ASP.NET Core to Azure App Service from Linux
5.00/5 (1 vote)
In this post, I will show you how to create a small script to automate the deployment of your ASP.NET Core applications to Microsoft Azure using local git deployment.
Introduction and Background
On operating systems such as Microsoft Windows, and using great tools like Visual Studio, it is greatly easy to upload and publish your web application projects to Microsoft Azure but what about other platforms such as Linux? Microsoft has recently released PowerShell as open source project and that is a great tool to be used in the cases where you have developers who understand and can use PowerShell but if you don’t happen to have any, then you would require to use traditional tools and sometimes they will require you to manually perform these changes. In this post, I am going to cover the teams who are using Git repositories for their projects and I am going to cover how they can basically automate the publishing of their projects after each successful build. On Linux, we can basically create small scripts that run on the background just like PowerShell or the Windows command prompt terminal’s batch files. Git programs are required for this to run, actually what I am going to show in this is to execute the same commands but in a manner that most of the repository’s information is already built, the commit message is updated and the content is published to the Azure app service. The purpose of this guide is to make the entire process as easy to be understood, as A, B and C. I will be using a real world application to show you how to do what and where instead of talking generally about many things at the same time.
Before moving onward, a very little knowledge of how Git system works is required from you because some things might get a bit technical in the post below and thus you must have the know-how of how Git systems work in order to control the versioning of files.

Secondly, you are required to know how you can use “dotnet” script to create, build and run the .NET Core applications. If you don’t know .NET Core, I will reference to a few of my own articles that are beginner-friendly which you can read to learn more on this.
Finally, you are required to have an active Azure account with a working subscription. If you don’t happen to have on, you can get a free account with $200 credits to try out all of Azure! Once these are met, you can continue to actually using the article for something useful.
Creating the application — entire part
This part has been shared and taught many times, on many occasions. I wrote an article on the same concept, a few days ago and I would like to refer that article to you to learn how you can create a new application with web template in .NET Core. Creating and hosting ASP.NET Core application on Linux — Nothing Third-Party, read this article for a complete overview and a walkthough for the concept of building and running the applications on Linux environment. I will move onward from this step, because you must be aware of the ways of creating your own applications.
Deployment of web application to Azure
Now comes the main part, this article entirely focusses on the deployment of applications to Microsoft Azure instead of developing an application. There would be some parts, where I will be modifying the parts, but that is just to tell you how easy it would be to redeploy the application using the automation by executing a simple command. Although it is not required but you are required to have a very basic introduction to automation tools. You can get a good tutorial about these toolings easily from any software engineering guide.
Using git for deployment
Microsoft Azure uses many methods and ways to deploy the applications on the cloud, such as using Visual Studio to deploy the applications and leave the configurations to the tool itself. However, since Linux environments don’t have Visual Studio, most of the tasks are left with source control tools (Visual Studio Code also uses the same git programs to upload the code to repositories). I will show you, how you can create a minimal script or a program, that manages all of these tasks for you — automation program.
On Linux, mostly and typically, git comes pre installed in most of the Linux-distributions, such as Ubuntu, etc. However, if that is not available you get easily install it using
$ sudo apt-get install git
Or using a similar command, such as using yum etc. This would install and setup git for your environment. Once you have git installed, you need to set a few things up. Git requires the name, email address for notifying who made a change to the system. So for that we would require to execute the following commands,
$ git config --global user.name "Eminem"
$ git config --global user.email "email@domain.com"
You should pass the name and address values that you hold — I used Eminem and a random email address. And to check if your personal configurations are done correctly, you can execute the following command to test that,
$ git config --list
These are the required configurations that you must do before you can use git for any purpose at all.
Note: You also need to create a new web application service (Azure App Service) on Microsoft Azure so that you can deploy the application somewhere. Since I do not want to go deep into the development and starting of this session, I would like you guys to go and watch this video of mine, providing an overview of Microsoft Azure App Service (you may have to put the volume a bit higher).
Once you have that, you can continue onwards and actually set up repositories to deploy the application. I used the following information while creating a new service, so that if I use a name, you should know where did that come from.


Upon creating, you can visit the web service from your browser using the link provided and on the first visit without any update, the following page is shown.

It shows that you can deploy your web applications, from many sources, using many services such as FTP, Git etc. I will show you, how to do this using Git… There are a few other things that I would like to show you here,
- I will show you how to do this, using git.
- I will also show you, how to test the build integrity — whether build succeeds or not.
- I will also show you, whether git considers to commit and push the changes to the server or not.
So these are a few of the tests that I have prepared for the automation tool that will be helpful for us in this case. These things are not provided on the tutorials that are available online, they are just simple straight-forward ones that only show you how to do it, not whether it is helpful to do it at all.
Setting up the local repository
On the machine side, the first thing to do is to set up a local repository for git deployments, even if you have created a project, you can still create a repository for that project and then use it as the source for your application’s content. So, for that, the following commands would work,
# If you have created a project, remove these lines.
$ dotnet new -t web
$ dotnet restore

# The following creates a local repository
$ git init
This would create the project, set up the repository for us under .git directory. On my machine, the following was the result of this,
Not visible at the moment, however there is a special file called .gitignore, created by default and that contains really helpful ignore constraints for the git systems. However, we will look into them later as we progress.
Adding remote repositories
We can now set up a few remote repositories on own local machine so that once we need to publish the application, we don’t have to enter the URL of the repository every time. Instead, what we can do is, just call that alias of the repository and deploy the content there. This helps to notify the system of the locations where it needs to push the changes to. For that, first of all we need to setup our online repository to allow Local Git Deployments from Microsoft Azure and only then we can assure that we can send the code to the repository online. For that, head over to, Deployment options → Deployment source → Local git repository.

You can see that there are other options available too, select as required and wanted. I selected the third option so that we can publish the source code from our local machines to the servers in no time at all, without having to require any third-party vendors. You need to set up the credentials, so that when you are trying to publish the applications, only you are the one in charge of pushing the changes to the server and not anyone else.

Once these things are set up, we can then move onwards to set up our local git programs to allow it to deploy the source code from our local environment all the way up to the Microsoft Azure. Stay with me. To do so, we need to execute the following command,
$ git remote add repoinazure https://<user>@<servicename>.scm.azurewebsites.net:443/<servicename>.git
Note a few things in the previous command, the few things interesting here are that the repository always contains the name of your application service in the URL as well as in the resource file for your git processes. You need to update that, secondly, you need to update the username in the URL and as the one you used in the credentials (I used “afzaal” there). Once this is done, we can move onwards and actually push our first version of application to see, how Azure will behave.
The following commands take care of that,
$ git add .
$ git commit -m "Some random commit message here..."
$ git push repoinazure master
In the previous commands, the first one takes care of the addition of files to the local tracking of the repository, to track the files that needs to be. Second command simply commits the changes and finally a push is made to the “repoinazure”, of course that is the repository where we will publish the application to.

It asks for the password and then continues to simply compress the objects, to deploy them using git protocol.

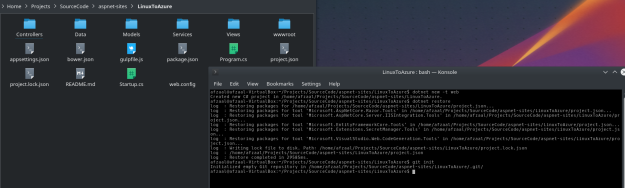
The following is a screenshot of a process going on, during the first deployment. Next times and onwards it doesn’t take this much time and is very much simpler.

However, we will also create a shell script that automates the deployment for us. Once it is done, the terminal will show the following results on the screen and we can know that Azure is set up for startup.

Let us navigate to the website and see if things are the way we are planning them to be.

Voila! We have finally deployed the application to the Azure. We now need to deploy the changes and so here is where I submit my recommendations, ideas and tips.
Development and redeployments
Let us add a simple controller to this web application, and then quickly deploy that using the script that we will create to do the trick for us. In this section, I will show you a simple ASP.NET Core Web API that will be used to basically see, how early an updates get published live on the server. So, I start with adding a new controller file to the web application’s source code and then modifying it to return a few objects with some data.
using System.Collections.Generic;
using Microsoft.AspNetCore.Mvc;

namespace WebApplication.Controllers {

    [RouteAttribute("api/people")]
    public class PersonApiController : Controller {
        private List<Person> _people { get; set; } = new List<Person> {
             new Person { ID = 1, Name = "Afzaal Ahmad Zeeshan" },
             new Person { ID = 2, Name = "Bruce Wayne" },
             new Person { ID = 3, Name = "Marshall Bruce Mathers III" }
        };
        public List<Person> GetPeople() {
            return _people;
        }

        // Rest of the stuff here...
    }

    public class Person {
        public int ID { get; set; }
        public string Name { get; set; }
    }
}
I just added a simple HTTP GET handler to show you how easy and simple it is to actually make the changes to your live application using git deployment from a local repository.
Now the magic trick for kids, the following script will manage most of our tasks and will take care of them before we proceed deploying the application.
if [ $# == 0 ]
    then
    echo "Usage: automate.sh <git-remote-repository>"
    exit 1
fi

# Variables
commit_message="Deployment commit on $(date "+%B %dth, %Y at %H:%M %p")."

# Run the test
dotnet build

if [ $? == 0 ]
    then
        # Successful attempt.
        # Update the git.
        git add -A

        echo "Using commit message, \"$commit_message\"."
        git commit -m "$commit_message"

        # Check if anything was commited, or whether there were no changes.
        if [ $? == 0 ]
            then
                # Files need to be updated
                # Update the azure's repository.
                echo "Connecting to server for git push..."
                git push $1 master
                exit 0
        else
            echo "No changes to be pushed to server. Terminating."
            exit 1
        fi
        exit
    else
        # There must have been an issue in the execution.
        echo "There were errors in building process, fix them and re-try."
        exit 1
fi
This would check if we are passing the remote repository or not, it will also build the project and then continue only if build succeeds. So, basically, this comes really handy when working with a terminal based environment especially Linux and using the git protocol for deployment. I recommend saving this as a file in your local repository, and then executing it from the terminal as a program. You can get the file from my GitHub repository too.

Once this is done, simply create it executable and then finally execute the script to deploy it. It will go through each step and it will finally deploy the application, it would require password. I did not create the script to accept the password.

So, let us run the system now. Once it is done, it will show you that you can now access the web application as it has been deployed successfully. Browser can confirm this,

To see more information on this, we can head over to Azure to see how does the deployment affect our current source code.

Clearly seen that now our most recent version of the deployment is being shown as the active deployment and the previous one is removed and set as Inactive. We can do deeper into them and change their status as needed but I won’t be doing that at all. Remember: Next time you want to publish the application, just use that script I provided.
Final words
Microsoft Azure provides very simple ways of deploying the applications, there are many other ways other than Git to deploy the applications to the server. OneDrive, GitHub and other cloud storage services can be used easily to deploy the applications.
However my major concern was to show how you can use the git, in a script-based environment to deploy the applications to Azure and also track when each commit gets pushed to the server. As you can see in this post, the commits are tracked on the cloud and you can change and select which commit you are interested in and set them as the active ones — such as in the case of a deletion of a file or so.
In the script, I left over the dotnet test command for you to add, most of the times I don't run testing on the modules and that is why I did not demonstrate that, but you can check that and add it to the script to run the tests before deploying the application. This will help you ensure that the application in production-ready state.