
Hello B4J: Develop Complete Java Apps using Visual Basic Syntax
4.88/5 (8 votes)
Hello Basic4Java (B4J), a simple Java app written in basic language.
Introduction
A year or so ago, I got introduced to Java. This wasn't pure Java. It was Java written using Visual Basic like syntax. I promised myself that once I am comfortable enough to develop something useful with it, I'll share. A result of that was my article called Software Developers are lazy but Smart, that's why we Rad. That article was about an app developed using Visual Basic like syntax, however it's a Java app.
This article seeks to take you one step back in terms of how one can develop a Java app with Visual Basic like syntax and then run it on their computer. If you are curious like me, welcome to the very interesting world of B4X.
B4X seeks to provide a gap between Android, IOS and Desktop apps that exist in very few places. You write your apps in Visual Basic Syntax, these become Android, iOS or Java apps that can be run in those platforms.
For this exercise, we will create a simple Hello Java app and nothing fancy. This will just be a step towards the many steps I will explain in this forum. Before I am ahead of myself, let's just start with the simple steps.
Some silly assumptions:
- You can write Visual Basic programs, even just simple ones. I believe however that anyone with basic programming experience can perform these tasks easily.
- You have an internet connection to download the free B4J IDE (Basic4Java Integrated Development Environment) and also the Java SDK.
- Unfortunately, you cannot perform these functions using a Mac and can only use a Windows computer for now.
- How to run a jar file, e.g.,
java -jar myfile.jar.
Background
What you will need to perform this simple exercise is a little determination to learn and a good computer. First things first, let's download the development IDE.
- Go here to download the IDE. This is a free development framework called B4J (Basic4Java).
- You will also need the Java SDK from here. Accept the license and download the applicable file applicable to your firmware. After downloading the file, install it.
- When completed with step 2 above, install the file you downloaded in step 1. Run B4J and you should see what we have in Figure 1.
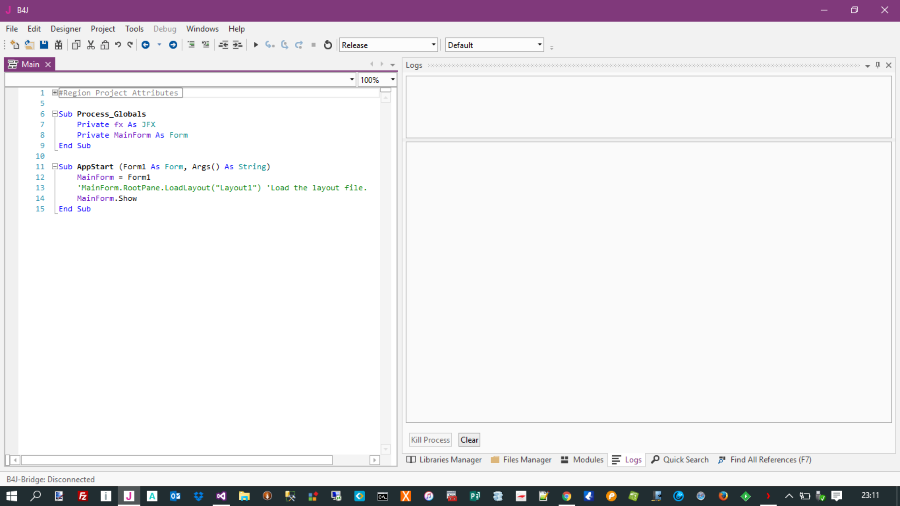 Figure 1: B4J IDE
 -
Now we need to link the Java JDK library to the IDE. This is a one off process. Goto Tools > Configure Paths, Figure 2 should appear.
 Figure 2: Tools > Configure Paths
Click on Browse to locate the javac.exe file. Check under program files\java, etc. The Additional Libraries folder is a folder where you will store additional libraries that will be used in developing more applications. This mostly will contain .jar and .xml files. We can discuss that later.
The Shared Modules folder will contain additional modules. All modules in B4J will have a .bas extension. We will also look into that later. Click OK when done. Now you are ready to start developing your first Java app using B4J.
Using the Code
Before you can start developing and adding any code to your app, first save it.
Goto File > Save > New Folder, you can name it B4J Projects. Select the newly created folder and perhaps save your project as HelloB4J.
This will create a file with an extension named .b4j after you click Save.
You can test if everything is fine by clicking the Run button on the toolbar. Let's try it.

This should result in a blank screen appearing after the compilation.

![]()
Congratulations, you are one step closer to creating the first HelloJava project. If you are in this screen, it means everything has been set up properly for development. You are not there yet :(.
As you can see, the screen is blank, no TextBoxes, no Labels, no Buttons and No MessageBoxes. Don't be alarmed, we are almost there. Let's now add a Label control and button control to the screen we are having. Let's call the screen a form.
If you look at your code right now, you will see a commented line with...
'MainForm.RootPane.LoadLayout("Layout1") 'Load the layout file.
This line is the entry point for our form components. To access what VB had as a toolbox, we have what is called a Designer with B4J. In Visual Basic, you created a form and was able to drag and drop controls in the form directly. With B4J, you drag and drop controls to a Layout and then load that layout to a form with the LoadLayout method. This means you can create a number of layouts that you can place on the same form at different locations.
I will not dive into the deep details now, it's just a start here, so we will create a simple project and run it for demonstration purposes. Let's enjoy the trip. Now, let's create a layout for our controls and then load that layout to the form.
Goto Designer > Open Internal Designer from the menu in the IDE. The designer is used to create your layouts.

Controls in B4J are called Views. In MVC terminology, this will be the "View" part. Here too, all your views are separate from the models and controllers if you want to think it like that. There are a variety of controls/views that you can place on a layout. Go on, click the Add View menu, a list like in Figure 7 should appear.

For our exercise, we want a Button and a Label on our screen. Click Label on the dropdown Add View menu, a label control will be placed in the Abstract Designer.
Click on Add View again and select Button, this too will be added to the Abstract Designer. You can select each control in the designer and drag and drop it at some other location. I have done that with these too as per Figure 8. You will note that when you select each component, you get it showing handles, you can drag these handles to resize your controls.

Select the Label1 control, a propertybag will appear on the left. Change the name to be lblNote, scroll down and find the text property and change that to Hello B4J. By doing that, we are giving the label an identity with lblNote so that our "controller" code can access it.
Also, select the Button1 control, change the name to cmdHello and its Text property to Click Me.


You have just now finished designing the look and feel of your app. You need to save the layout and give it a name.
Click on File > Save, Figure 11 should appear.
Type in a name for the layout, I have given it a name like "frmHello", click Ok.

Goto File > Close Window or just click the Close button of the designer. You can however select WYSIWYG Designer from the menu and click Connect. Something like in Figure 12 should appear.

Ok, now our screen has a label and a button. How do we then link a click event of the button, and also how do we show this form/layout in our app. If you run the app now, still the blank screen just like in Figure 5 will appear.
For us to show our form/layout, let's tell the IDE that we need it to be shown.
Our AppStart method is the method that starts our app. In it, there is a line to load a layout. Uncomment this line and replace "Layout1" with "frmHello", that being the name of your layout. Remember a layout name is caseSensiTive. You should use the exact name you saved it with.
MainForm.RootPane.LoadLayout("frmHello") 'Load the layout file.
If you run the app after making these changes, you should see something like this following figure.

Notice that in execution mode, the screen does not have the "Connected" at the bottom just like in Figure 12. If you click the Click Me button, nothing happens, so our app is like dead. Don't panic. I will show you just now how we will link the screen controls to events.
Let's look at some methods.
'show an hourglass
Sub ShowHourGlass(frm As Form)
 frm.RootPane.MouseCursor = fx.Cursors.wait
End Sub
' hide the hour glass
Sub HideHourGlass(frm As Form)
 frm.RootPane.MouseCursor = fx.Cursors.DEFAULT
End Sub
As you might have noticed, there was a method that was added by default to our project.
Sub Process_Globals
 Private fx As JFX
 Private MainForm As Form
End Sub
Process globals are declared once when the app starts and will be available in other modules if they are declared as Public. For the Java app to work, it needs the JFX library and jCore libraries. On the right of your screen, there are some tabs at the bottom to access various IDE sections. I will not deal with that here, but if you click Libraries, these will list available libraries and those checked are the ones loaded and will be used by the app.

As indicated earlier, libraries are other .jar and .xml files that are developed to work with the B4J framework. There are a variety of those available.
In terms of Wikipedia, JFX or JavaFX is a software platform for developing RIAs and desktop apps. You can read more from there about it.
Now for the events...
Goto Designer > File > frmHello, the layout should appear or you will be prompted to switch to that Designer, select OK to do so.
The process of linking the View to the Controller here is called "Generate Members". For each view that will be accessible from code, you will need to generate its members, whether its click (action), etc.
In the Designer, select Tools > Generate Members.

We want to process the cmdHello events and access that control in code, check it and also check the Action. Click events are called Action in B4J. Also select lblNote and then click Generate Members. Close the designer.
You should notice that in your code, you should see under Process_Globals.
Private cmdHello As Button
Private lblNote As Label
And:
Sub cmdHello_Action
End Sub
Update the cmdHello_Action code to be...
Sub cmdHello_Action
 ' update the label text
 lblNote.Text = "Welcome to the world of B4J Programming."
End Sub
It is always important to comment your code. Run the App again, click the Click Me button. You should see this.

That's it. We have just created our first B4J app. You can run your app in Debug mode and in Release mode. Debug mode is when you are debugging and wanting to catch errors. In Release mode, the IDE creates a .jar file for you using the project name. You can find this in the Objects folder of your project folder. That's the file you can distribute to run on Linux, Mac, Windows, Rasberry PI, etc.
Points of Interest
This article as a first just touches the base on creating a first Basic4Java app using the B4J Free IDE. For me, this was such a nice find because I would be able to create Java apps using my well known Visual Basic experience. Whilst the syntax is almost identical to Visual Basic, there are some new methods, constants and other definitions that one can learn along the way. It's a very interesting rabbit hole anyway for anyone interested in doing things Java. The other nice thing is there is a support forum for anything B4J.
Enjoy!
History
- 3rd November, 2016: Initial version