
Enterprise Grade Authentication and Access Control on IoT (Part 1)
4.33/5 (4 votes)
Implement LDAP and Kerberos on an embedded Linux IoT to provide enterprise grade authentication for IoTs (Part 1)
Introduction
IoT devices are increasingly proliferating across all industries. But secure and enterprise grade authentication and access control remain key challenges for IoTs. They are undergoing the same evolution and improving their security as desktop computers in distributed computing environments underwent.
Due to increased processing power and a large variety of communication options, most of these devices are capable of running Linux on their firmware. Others like Raspberry Pi and BeagleBone make it as easy to install Linux and customize GNU tools as one would customize traditional desktops. This makes it possible to deploy the huge collection of tools and services already available for Linux including open-source versions of enterprise grade authentication services. Authentication frameworks such as MIT Kerberos and directory services such as OpenLDAP are two such services which have stood the test of time and today support identity and authentication services across large and small enterprises. They provide an established and robust solution to the authentication challenges faced by IoT environments today.
This article describes planning, configuring and deploying the Kerberos authentication infrastructure on a Raspberry Pi 2 IoT to securely identify and authenticate users accessing other IoT devices across the network.
The uniqueness of this solution is that it uses another IoT as the Kerberos and LDAP server. Hence, it does not require extensive space/power/investment that a traditional server would need to run these authentication services, and this fits naturally in any IoT environment with such constraints. Since the solution is based on open source software projects with a large user community; it is well supported for troubleshooting and upgrades.

We'll need to complete the following tasks to configure and deploy this solution on a Raspberry pi IoT:
- Plan and design our Directory structure to meet requirements of the solution.
- Install the OpenLDAP server and associated tools
- Populate the directory and prepare it for use by Kerberos
- Install Kerberos services
- Configure and deploy the Kerberos KDC
- Setup user principals and IoT device principals on Kerberos
- Configure and check Kerberos authentication on all devices
Tasks 1 to 3 are covered in the first part of this article and tasks 4 to 7 are covered in the second part of this article published here.
Background
Let us first understand the high-level architecture of this authentication infrastructure and where they fit in the IoT context.
An environment with multiple users logging into multiple IoT devices is subjected to the following challenges:
- Each user's password (or SSH key) has to be set on every device.
- Passwords/keys needs to be disabled or changed when a user transfers out from their function or quits the firm.
- If passwords are used, they need to be changed frequently to protect credentials, this imposes a further burden of resetting and synchronizing the same password on multiple devices.
- Strong authentication mechanisms and policies need to be setup on all devices consistently; e.g.. use of stronger hash functions to store passwords/keys, and enforcement of password complexity rules, etc.
- Detecting intrusions and anomalous behavior is much harder if every device authenticates users by itself and log events are recorded locally; it makes correlating related authentication events more difficult when these events happen over multiple devices on the network.
A centralized authentication infrastructure solves all these problems and provides additional benefits of lower cost of administration. Refer to the diagram below:
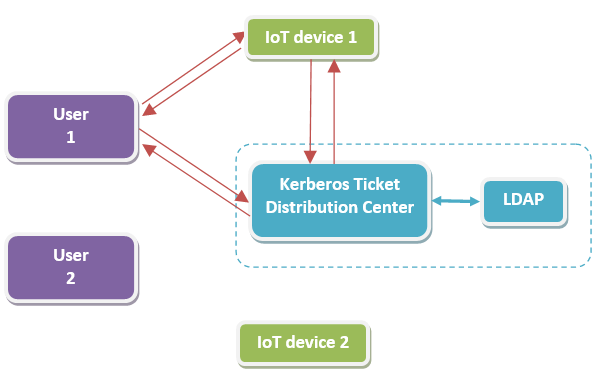
The main components of this setup are:
- Users who need to access the IoT devices.
- IoT devices which run services that need to be protected from unauthorized access
- Kerberos Services - Authentication Service & Ticket Granting Service
- LDAP - it functions both as a persistent storage used by Kerberos as well as provides enterprise wide directory services cataloging users, devices, roles, services, etc.
Kerberos provides a centralized service to authenticate users as well as IoT devices and coordinates these messages in a very secure protocol. At a high level, it provides the following benefits:
- It provides a reliable identification and authentication mechanism for all users and IoT devices.
- It enables centralized user administration and management which lowers operational costs.
- Use of standard protocols ensure easy and extensive interoperability with other services due to the long history and prevalence of Kerberos and LDAP.
- Reliably authenticates servers to users so they know they are accessing a genuine IoT device (registered and hence trusted by the Kerberos KDC) and not a rouge one intercepting traffic to steal information.
- Operation of the entire infrastructure is highly configurable with options and settings easily modifiable to suit the environment and any specific needs.
A high level functional overview and detailed installation of Kerberos has been described in part 2 of this article here.
Installation
We begin by installing the LDAP server slapd and its supporting libraries and tools. First, update all the repositories and any obsolete packages, then install slapd - the LDAP daemon:
sudo apt-get update
 ...
 Fetched 9,281 kB in 1min 30s (102 kB/s)
 Reading package lists... Done

sudo apt-get upgrade
 Reading package lists... Done
 Building dependency tree
 Reading state information... Done
 Calculating upgrade... Done
 ...

sudo apt-get install slapd ldap-utils
 Enter the ldap administrator password: Long9and8difficult7password!
The installation will prompt for an administrator's password, enter it during installation, make sure you choose a long and complex password and remember it or store it in a password vault.
Install kerberos and other utility packages which we will use later:
sudo apt-get install krb5-kdc-ldap krb5-kdc krb5-admin-server
sudo apt-get install pwgen sharutils ldapscripts
Planning the Directory Structure
The LDAP directory is composed in a hierarchical manner representing a tree structure where the root entry (LDAP base) is the domain component. For example, the root of a directory tree for codeproject.com would be "dc=codeproject,dc=com". All nodes under the tree are either leaf nodes called attributes or objects which contain more attributes. The concept of an attribute is similar to a RDBMS database field, it can hold data of many different types - strings, numbers, dates, timestamps, ldap names, etc.
In case you need to change the LDAP base to a name different from your domain, first edit /etc/hosts to add this name and set the hostname to the required base suffix; e.g. on a machine called abcd.net I'm going to install a LDAP base examplefirm.com so I've added this entry into the /etc/hosts file to simplify installation:
127.0.2.1 iot01.examplefirm.com iot01
We will create an OpenLDAP directory with the following structure under the root:
- ou=People : This object contains the individual users uniquely identified by their user ID. Each user object will further contain attributes such as firstname, lastname, etc. This object is based on the schema defined by inetOrgPerson but is modified by our custom supporting schema iotOrgPerson.
- ou=Groups : this object represents collection of users intended to function as roles used for role based access control, this object is based on groupOfNames schema but has been modified by our custom schema orgGroupOfPeople
- ou=Computers : This object contains the individual IoT devices, each of these device objects contain attributes such as ip-address, services hosted, owner, serial number, description, etc. this object is based on ieee802Device schema but has been modified by our custom schema iotEquipment.
Our custom schema with object types (classes) and attributes is listed as follows, save the following to a file iot.schema, enter these commands very carefully taking care you don't change or omit upper/lower case characters, newlines and brackets:
#$Id: iot.schema,v 1.3 2016/09/05 23:01:00 ark-sf Exp $
# OID prefix: 1.3.6.1.4.1.92300.
# Attributes: 1.3.6.1.4.1.92300.1.1 to 1.3.6.1.4.1.92300.1.21
#
attributetype (1.3.6.1.4.1.92300.1.1 NAME 'accountActive'
        DESC 'A boolean telling whether an account is active or not'
        EQUALITY booleanMatch
        SYNTAX 1.3.6.1.4.1.1466.115.121.1.7 SINGLE-VALUE )

attributetype ( 1.3.6.1.4.1.92300.1.2 NAME 'lastPasswordChange'
        DESC 'Time in unix time of last password change'
        SYNTAX 1.3.6.1.4.1.1466.115.121.1.27 SINGLE-VALUE )

attributetype ( 1.3.6.1.4.1.92300.1.3 NAME 'quotaBytes'
        DESC 'A string that represents the quota in bytes available for a mailbox'
        EQUALITY caseExactIA5Match
        SYNTAX 1.3.6.1.4.1.1466.115.121.1.26 SINGLE-VALUE )

attributetype ( 1.3.6.1.4.1.92300.1.4 NAME 'mailbox'
        DESC 'The absolute path to the mailbox for a mail account in a non-default location'
        EQUALITY caseExactIA5Match
        SYNTAX 1.3.6.1.4.1.1466.115.121.1.26 SINGLE-VALUE )

attributetype ( 1.3.6.1.4.1.92300.1.5 NAME 'lastChange'
        DESC 'Time in unix time of last change'
        SYNTAX 1.3.6.1.4.1.1466.115.121.1.27 SINGLE-VALUE )

attributetype ( 1.3.6.1.4.1.92300.1.6 NAME 'maildrop'
        DESC 'RFC822 Mailbox - mail alias'
        EQUALITY caseIgnoreIA5Match SUBSTR caseIgnoreIA5SubstringsMatch
        SYNTAX 1.3.6.1.4.1.1466.115.121.1.26{256} )

attributetype ( 1.3.6.1.4.1.92300.1.22 NAME 'modifiedBy'
        DESC 'DN of modifier'
        EQUALITY distinguishedNameMatch
        SYNTAX 1.3.6.1.4.1.1466.115.121.1.12 )

attributetype ( 1.3.6.1.4.1.92300.1.8 NAME 'actualJoiningDate'
        DESC 'Time in unix time of actual joining date'
        SYNTAX 1.3.6.1.4.1.1466.115.121.1.27 SINGLE-VALUE )

attributetype ( 1.3.6.1.4.1.92300.1.9 NAME 'leavingDate'
        DESC 'Time in unix time of leaving date'
        SYNTAX 1.3.6.1.4.1.1466.115.121.1.27 SINGLE-VALUE )

attributetype ( 1.3.6.1.4.1.92300.1.10 NAME 'homeEmail'
        DESC 'RFC822 Mailbox - mail alias'
        EQUALITY caseIgnoreIA5Match SUBSTR caseIgnoreIA5SubstringsMatch
        SYNTAX 1.3.6.1.4.1.1466.115.121.1.26{256} )

attributetype ( 1.3.6.1.4.1.92300.1.11 NAME 'assistantEmail'
        DESC 'RFC822 Mailbox - mail alias'
        EQUALITY caseIgnoreIA5Match SUBSTR caseIgnoreIA5SubstringsMatch
        SYNTAX 1.3.6.1.4.1.1466.115.121.1.26{256} )

attributetype ( 1.3.6.1.4.1.92300.1.12 NAME 'assistantPhone'
        DESC 'RFC1274: assistants telephone number'
        EQUALITY telephoneNumberMatch
        SUBSTR telephoneNumberSubstringsMatch
        SYNTAX 1.3.6.1.4.1.1466.115.121.1.50 )

attributetype ( 1.3.6.1.4.1.92300.1.15 NAME 'emergencyPhone'
        DESC 'RFC1274: home telephone number'
        EQUALITY telephoneNumberMatch
        SUBSTR telephoneNumberSubstringsMatch
        SYNTAX 1.3.6.1.4.1.1466.115.121.1.50 )

attributetype ( 1.3.6.1.4.1.92300.1.16 NAME 'emergencyContactPerson'
        DESC 'Person to contact in case of emergency'
        EQUALITY caseIgnoreMatch
        SUBSTR caseIgnoreSubstringsMatch
        SYNTAX 1.3.6.1.4.1.1466.115.121.1.15{256} )

attributetype (1.3.6.1.4.1.92300.1.17 NAME 'accountAuthorized'
        DESC 'A boolean telling whether an accounts changes are authorized or not'
        EQUALITY booleanMatch
        SYNTAX 1.3.6.1.4.1.1466.115.121.1.7 SINGLE-VALUE )

attributetype ( 1.3.6.1.4.1.92300.1.18 NAME 'authorizedBy'
        DESC 'DN of authorizor'
        EQUALITY distinguishedNameMatch
        SYNTAX 1.3.6.1.4.1.1466.115.121.1.12 )

objectclass ( 1.3.6.1.4.1.92300.4 NAME 'iotOrgPerson'
        DESC 'Defines entries representing people in the organization.'
        SUP 'inetOrgPerson' STRUCTURAL
        MAY ( homeDirectory $ loginShell $ accountActive $ lastPasswordChange $ uidNumber $ gidNumber $ info $ manager $ emergencyPhone $ personalTitle $ emergencyContactPerson $ homePostalAddress $ accountAuthorized $ actualJoiningDate $ leavingDate $ homeEmail $ assistantEmail $ assistantPhone $ quotaBytes $ mail $ authorizedBy $ modifiedBy $ lastChange) )

objectclass (1.3.6.1.4.1.92300.2 NAME 'iotEquipment'
        DESC 'An IoT device which belongs to the firm, extends ieee802Device.'
        SUP ieee802Device AUXILIARY
        MAY ( cn $ serialNumber $ description $ owner $ ipHostNumber $ macAddress $ associatedDomain $ authorizedBy $ modifiedBy $ lastChange $ lastPasswordChange) )

objectclass ( 1.3.6.1.4.1.92300.3 NAME 'orgGroupOfPeople'
        DESC 'Extends attributes of entries representing groups in the organization.'
        SUP groupOfNames STRUCTURAL
        MAY ( mail $ displayName $ description $ gidNumber $ authorizedBy $ modifiedBy $ lastChange $ accountActive) )
Save this file in the folder /etc/ldap/schema.
LDAP Configuration
We're now ready to deploy this schema and then populate the directory tree.
Installing the Custom Schema
View the list of schemas currently installed by listing files under /etc/ldap/slapd.d/cn=config/cn=schema . The following schemas should already be loaded by default in ldif format:
sudo ls -al /etc/ldap/slapd.d/cn=config/cn=schema

 total 48
 drwxr-x--- 2 openldap openldap  4096 Sep  7 23:09 .
 drwxr-x--- 3 openldap openldap  4096 Sep  7 23:09 ..
 -rw------- 1 openldap openldap 15596 Sep  7 23:09 cn={0}core.ldif
 -rw------- 1 openldap openldap 11381 Sep  7 23:09 cn={1}cosine.ldif
 -rw------- 1 openldap openldap  6513 Sep  7 23:09 cn={2}nis.ldif
 -rw------- 1 openldap openldap  2875 Sep  7 23:09 cn={3}inetorgperson.ldif
Since we need to add Kerberos related attributes to LDAP, copy the schema definition file kerberos.schema.gz into LDAP, we will use this later.
sudo gzip -d /usr/share/doc/krb5-kdc-ldap/kerberos.schema.gz
sudo cp -v /usr/share/doc/krb5-kdc-ldap/kerberos.schema /etc/ldap/schema/
Create a configuration file schema_convert.conf that refers to all the required schema files and their dependencies, we will use it to convert our schema into ldif format. Enter the following commands in it:
include /etc/ldap/schema/core.schema
include /etc/ldap/schema/collective.schema
include /etc/ldap/schema/corba.schema
include /etc/ldap/schema/cosine.schema
include /etc/ldap/schema/duaconf.schema
include /etc/ldap/schema/dyngroup.schema
include /etc/ldap/schema/inetorgperson.schema
include /etc/ldap/schema/java.schema
include /etc/ldap/schema/misc.schema
include /etc/ldap/schema/nis.schema
include /etc/ldap/schema/openldap.schema
include /etc/ldap/schema/ppolicy.schema
include /etc/ldap/schema/kerberos.schema
include /etc/ldap/schema/iot.schema
Create an output directory ldif_output and run the slapcat utility to convert these schemas into ldif files. Use grep to search for and identify the index:
sudo slapcat -f schema_convert.conf -F ldif_output -n 0 | grep iot,cn=schema
 dn: cn={13}iot,cn=schema,cn=config
Note the index number is 13. Now convert schema file and load this index schema into the cn name specified using the index noted earlier (i.e. 13) in the cn attribute:
sudo slapcat -f schema_convert.conf -F ldif_output -n0 -H ldap:///cn={13}iot,cn=schema,cn=config -l cn=iot.ldif
The converted schema is now in cn=iot.ldif ; edit file cn=iot.ldif to remove the index number and surrounding curly braces, the first few lines of the file should look like this:
dn: cn=iot,cn=schema,cn=config
...
cn: iot
You should also remove the following lines from the end of the file, actual values of attributes will be different on your system:
structuralObjectClass: olcSchemaConfig
entryUUID: 37997368-1d73-1036-8f90-7340b7d1064d
creatorsName: cn=config
createTimestamp: 20160903050850Z
entryCSN: 20160903050850.827754Z#000000#000#000000
modifiersName: cn=config
modifyTimestamp: 20160903050850Z
Finally, use ldapadd to add the new schema to the slapd-config DIT:
sudo ldapadd -Q -Y EXTERNAL -H ldapi:/// -f cn\=iot.ldif
 adding new entry "cn=iot,cn=schema,cn=config"
Confirm everything was configured correctly by viewing currently loaded schemas, us the following command:
sudo ldapsearch -Q -LLL -Y EXTERNAL -H ldapi:/// -b cn=config dn

dn: cn=config

dn: cn=module{0},cn=config

dn: cn=schema,cn=config

dn: cn={0}core,cn=schema,cn=config

dn: cn={1}cosine,cn=schema,cn=config

dn: cn={2}nis,cn=schema,cn=config

dn: cn={3}inetorgperson,cn=schema,cn=config

dn: cn={4}iot,cn=schema,cn=config

dn: olcBackend={0}mdb,cn=config

dn: olcDatabase={-1}frontend,cn=config

dn: olcDatabase={0}config,cn=config

dn: olcDatabase={1}mdb,cn=config
Use the following commands to view any particular schema’s details:
sudo ldapsearch -Q -LLL -Y EXTERNAL -H ldapi:/// -b cn={4}iot,cn=schema,cn=config olcObjectClasses
sudo ldapsearch -Q -LLL -Y EXTERNAL -H ldapi:/// -b cn={4}iot,cn=schema,cn=config olcAttributeTypes
Installing Kerberos Schema
Follow the same process as earlier (iot.schema) to convert the kerberos schema into ldif format, we'll reuse the schema_convert.conf file created earlier.
sudo slapcat -f schema_convert.conf -F ldif_output -n 0 | grep kerberos,cn=schema
 dn: cn={12}kerberos,cn=schema,cn=config
Note this schema's index number is 12. Now convert schema file and load this index schema into the cn attribute specified using the following command:
sudo slapcat -f schema_convert.conf -F ldif_output -n0 -H ldap:///cn={12}kerberos,cn=schema,cn=config -l cn=kerberos.ldif
The converted schema is now in file cn=kerberos.ldif ; edit this file to remove the index number in the cn and dn attributes alongwith its surrounding curly braces, the first few lines of the file should look like this:
dn: cn=kerberos,cn=schema,cn=config
objectClass: olcSchemaConfig
cn: kerberos
You should also remove the following lines from the end of the file, the actual values of attributes will be different on your system:
structuralObjectClass: olcSchemaConfig
entryUUID: 379925de-1d73-1036-8f8f-7340b7d1064d
creatorsName: cn=config
createTimestamp: 20160903050850Z
entryCSN: 20160903050850.827754Z#000000#000#000000
modifiersName: cn=config
modifyTimestamp: 20160903050850Z
Finally, use ldapadd to add this schema to the LDAP configuration:
sudo ldapadd -Q -Y EXTERNAL -H ldapi:/// -f cn\=kerberos.ldif
adding new entry "cn=kerberos,cn=schema,cn=config"
Confirm that everything was configured correctly by listing currently loaded schemas:
sudo ldapsearch -Q -LLL -Y EXTERNAL -H ldapi:/// -b cn=config dn

dn: cn=config

dn: cn=module{0},cn=config

dn: cn=schema,cn=config

dn: cn={0}core,cn=schema,cn=config

dn: cn={1}cosine,cn=schema,cn=config

dn: cn={2}nis,cn=schema,cn=config

dn: cn={3}inetorgperson,cn=schema,cn=config

dn: cn={4}iot,cn=schema,cn=config

dn: cn={5}kerberos,cn=schema,cn=config

dn: olcBackend={0}mdb,cn=config

dn: olcDatabase={-1}frontend,cn=config

dn: olcDatabase={0}config,cn=config

dn: olcDatabase={1}mdb,cn=config
You can view the schema objects and attributes for the kerberos schema using these commands:
sudo ldapsearch -Q -LLL -Y EXTERNAL -H ldapi:/// -b cn={5}kerberos,cn=schema,cn=config olcObjectClasses
sudo ldapsearch -Q -LLL -Y EXTERNAL -H ldapi:/// -b cn={5}kerberos,cn=schema,cn=config olcAttributeTypes
Check and Update the LDAP Base
Sometimes the install scripts don't create the LDAP base (root dn), in that case you would need to add this into the configuration on your own. Use the following commands:
sudo ldapmodify -Q -Y EXTERNAL -H ldapi:///

dn: olcDatabase={1}mdb,cn=config
replace: olcRootDN
olcRootDN: cn=admin,dc=examplefirm,dc=com

dn: olcDatabase={1}mdb,cn=config
replace: olcSuffix
olcSuffix: dc=examplefirm,dc=com

 [Ctrl-D]
Its preferable to restart the slapd service to ensure the changes have taken effect:
sudo service slapd restart
You may also need to populate the root dn in the directory information tree, use these commands:
sudo ldapadd -x -D cn=admin,dc=examplefirm,dc=com -W
Enter LDAP Password:
dn: dc=examplefirm,dc=com
objectClass: organization
objectClass: dcObject
objectClass: top
dc: examplefirm
o: examplefirm.com

 adding new entry "dc=examplefirm,dc=com"
 [Ctrl-D]
Adding content to the LDAP directory
Now that the schemas for the directory have been installed, we can begin populating the directory tree.
Enter the following commands to create the top-level objects under the LDAP base in a file add_base.ldif:
# file: add_base.ldif
dn: ou=People,dc=examplefirm,dc=com
objectClass: organizationalUnit
ou: People

dn: ou=Groups,dc=examplefirm,dc=com
objectClass: organizationalUnit
ou: Groups

dn: ou=Computers,dc=examplefirm,dc=com
objectClass: organizationalUnit
ou: Computers
Use ldapadd utility to run the commands in this file for adding objects, it will prompt for the LDAP admin password you had set earlier:
sudo ldapadd -x -D cn=admin,dc=examplefirm,dc=com -W -f add_base.ldif
 Enter LDAP Password:
 adding new entry "ou=People,dc=examplefirm,dc=com"

 adding new entry "ou=Groups,dc=examplefirm,dc=com"

 adding new entry "ou=Computers,dc=examplefirm,dc=com"
Next, populate some users to the People ou (ou implies organization unit). Enter the following commands in LDIF format into a file add_users.ldif:
# file: add_users.ldif
dn: uid=user01,ou=People,dc=examplefirm,dc=com
objectClass: iotOrgPerson
uid: user01
sn: lastnameone
givenName: firstnameone
cn: user01
displayName: firstnameone
uidNumber: 10001
gidNumber: 10001
employeeNumber: 1
employeeType: Employee
homeDirectory: /home/user01
loginShell: /bin/bash
title: user01
mail: user01@examplefirm.com
userPassword:
o: Example Firm
mobile: 1234567890
accountActive: TRUE
street: ABC Road
l: Mumbai
st: Maharashtra

dn: uid=user02,ou=People,dc=examplefirm,dc=com
objectClass: iotOrgPerson
uid: user02
sn: lastnametwo
givenName: firstnametwo
cn: user02
displayName: firstnametwo
uidNumber: 10002
gidNumber: 10002
employeeNumber: 2
employeeType: Employee
homeDirectory: /home/user02
loginShell: /bin/bash
title: user02
mail: user02@examplefirm.com
userPassword:
o: Example Firm
mobile: 1234567890
accountActive: TRUE
street: ABC Road
l: Mumbai
st: Maharashtra
Add these into the directory using this command:
sudo ldapadd -x -D cn=admin,dc=examplefirm,dc=com -W -f add_users.ldif
 Enter LDAP Password:
 adding new entry "uid=user01,ou=People,dc=examplefirm,dc=com"

 adding new entry "uid=user02,ou=People,dc=examplefirm,dc=com"
Next, add some devices (hosts/servers/computers/etc.) into the Computers ou. Enter the following ldif commands in a file add_computers.ldif :
dn: cn=iot01.examplefirm.com,ou=Computers,dc=examplefirm,dc=com
objectClass: ipHost
objectClass: bootableDevice
objectClass: ieee802Device
objectClass: iotEquipment
objectClass: device
objectClass: top
cn: iot01
ipHostNumber:  10.10.1.1
associatedDomain: examplefirm.com
description: Raspberry Pi based Kerberos and LDAP server
macAddress:  A1:B2:C3:00:11:22
o: Example Firm Pvt. Ltd.
manager: uid=user01,ou=People,dc=examplefirm,dc=com
serialNumber: ABCD010101Z

dn: cn=host,cn=iot01.examplefirm.com,ou=Computers,dc=examplefirm,dc=com
objectClass: top
objectClass: ipService
cn: host
ipServicePort: 22
ipServiceProtocol: ssh

dn: cn=HTTP,cn=iot01.examplefirm.com,ou=Computers,dc=examplefirm,dc=com
objectClass: top
objectClass: ipService
cn: HTTP
ipServicePort: 80
ipServiceProtocol: http

dn: cn=iot02.examplefirm.com,ou=Computers,dc=examplefirm,dc=com
objectClass: ipHost
objectClass: bootableDevice
objectClass: ieee802Device
objectClass: iotEquipment
objectClass: device
objectClass: top
cn: iot02
ipHostNumber: 10.10.1.2
associatedDomain: examplefirm.com
description: Raspberry Pi based iot for weather monitoring
macAddress: A1:B2:C3:00:11:23
o: Example Firm Pvt. Ltd.
manager: uid=user02,ou=People,dc=examplefirm,dc=com
serialNumber: ABCD010102Y

dn: cn=host,cn=iot02.examplefirm.com,ou=Computers,dc=examplefirm,dc=com
objectClass: top
objectClass: ipService
cn: host
ipServicePort: 22
ipServiceProtocol: ssh

dn: cn=iot03.examplefirm.com,ou=Computers,dc=examplefirm,dc=com
objectClass: ipHost
objectClass: bootableDevice
objectClass: ieee802Device
objectClass: iotEquipment
objectClass: device
objectClass: top
cn: iot03
ipHostNumber: 10.10.1.3
associatedDomain: examplefirm.com
description: Beaglebone based iot for physical intrusion detection
macAddress: A1:B2:C3:00:11:24
o: Example Firm Pvt. Ltd.
manager: uid=user03,ou=People,dc=examplefirm,dc=com
serialNumber: ABCD010103X

dn: cn=host,cn=iot03.examplefirm.com,ou=Computers,dc=examplefirm,dc=com
objectClass: top
objectClass: ipService
cn: host
ipServicePort: 22
ipServiceProtocol: ssh
Next, add these to the ldap server using the command:
sudo ldapadd -x -D cn=admin,dc=examplefirm,dc=com -W -f add_computers.ldif
 Enter LDAP Password:
 adding new entry "cn=iot01.examplefirm.com,ou=Computers,dc=examplefirm,dc=com"

 adding new entry "cn=host,cn=iot01.examplefirm.com,ou=Computers,dc=examplefirm,dc=com"

 adding new entry "cn=HTTP,cn=iot01.examplefirm.com,ou=Computers,dc=examplefirm,dc=com"

 adding new entry "cn=iot02.examplefirm.com,ou=Computers,dc=examplefirm,dc=com"

 adding new entry "cn=host,cn=iot02.examplefirm.com,ou=Computers,dc=examplefirm,dc=com"

 adding new entry "cn=iot03.examplefirm.com,ou=Computers,dc=examplefirm,dc=com"

 adding new entry "cn=host,cn=iot03.examplefirm.com,ou=Computers,dc=examplefirm,dc=com"
This completes our LDAP setup, and the directory part of the infrastructure is now ready for supporting Kerberos as well as an enterprise directory for user and device management.
Although I've used command-line versions of ldap utilities in these examples, you may also use GUI based LDAP managers such as Jxplorer or Apache DS. They simplify LDAP administration with their point-and-click interface.

The remaining part of the configuration tasks optimizes the LDAP server and serves as a reference for useful commands required for administering the server.
Create Indexes for the LDAP Database
To speed up LDAP queries and prevent full scans of the directory tree, its a good idea to create indexes for the attributes that would be frequently accessed by the ldap database, e.g. accountActive, krbPrincipalName, and accountAuthorized:
sudo ldapmodify -Q -Y EXTERNAL -H ldapi:/// -W -c
Enter LDAP Password:

dn: olcDatabase={1}mdb,cn=config
add: olcDbIndex
olcDbIndex: accountActive eq

modifying entry "olcDatabase={1}mdb,cn=config"

dn: olcDatabase={1}mdb,cn=config
add: olcDbIndex
olcDbIndex: accountAuthorized eq,pres

modifying entry "olcDatabase={1}mdb,cn=config"

dn: olcDatabase={1}mdb,cn=config
add: olcDbIndex
olcDbIndex: krbPrincipalName eq,sub

modifying entry "olcDatabase={1}mdb,cn=config"

[ctrl+D]
Verify that these indexes were configured correctly by querying all currently setup indexes:
sudo ldapsearch -Q -LLL -Y EXTERNAL -H ldapi:/// -b olcDatabase={1}mdb,cn=config olcDbIndex
dn: olcDatabase={1}mdb,cn=config
olcDbIndex: objectClass eq
olcDbIndex: cn,uid eq
olcDbIndex: uidNumber,gidNumber eq
olcDbIndex: member,memberUid eq
olcDbIndex: accountActive eq
olcDbIndex: accountAuthorized eq,pres
olcDbIndex: krbPrincipalName eq,sub
Access control
OpenLDAP uses special ACL entries to verify a user's permission on an object before it is accessed for reading or writing. To view the ACL of the database backend, use the following command:
sudo ldapsearch -Q -LLL -Y EXTERNAL -H ldapi:/// -b cn=config '(olcDatabase={1}mdb)' olcAccess
dn: olcDatabase={1}mdb,cn=config
olcAccess: {0}to attrs=userPassword,shadowLastChange by self write by anonymous auth by * none
olcAccess: {1}to dn.base="" by * read
olcAccess: {2}to * by * read
View the frontend ACL using this command:
sudo ldapsearch -Q -LLL -Y EXTERNAL -H ldapi:/// -b cn=config '(olcDatabase={-1}frontend)' olcAccess
dn: olcDatabase={-1}frontend,cn=config
olcAccess: {0}to * by dn.exact=gidNumber=0+uidNumber=0,cn=peercred,cn=external
 ,cn=auth manage by * break
olcAccess: {1}to dn.exact="" by * read
olcAccess: {2}to dn.base="cn=Subschema" by * read
To implement more restricted access than the default values, you may edit the ACL dynamically using the same syntax as for dynamic configuration. Refer to the commands described in part 2 of this article where the ACL is modified to protect Kerberos related attributes. When modifying ACLs, make sure the administrator has full access always, otherwise you may end up locking the admin out of the database.
Finally, restart OpenLDAP service to ensure all changes are committed and used by the server:
sudo service slapd restart
Check the server's system logs to verify if the server has started properly.
Conclusion
The next part of this article will describe installing and configuring the Kerberos KDC and admin server to complete the authentication infrastructure; and use it for authenticating a Raspberry IoT device.
Appendix 1 - Schema Maintenance
Useful commands for modifying schema attributes are listed in this section as a reference:
sudo ldapadd -Q -Y EXTERNAL -H ldapi:///

dn: cn={4}examplefirm,cn=schema,cn=config
add: olcAttributeTypes
olcAttributeTypes: {13}(1.3.6.1.4.1.42300.4.13 NAME 'mailAliasAddress' DESC 'RFC822 alias email address of this recipient' EQUALITY caseIgnoreIA5Match SYNTAX 1.3.6.1.4.1.1466.115.121.1.26{256} )

modifying entry "cn={4}examplefirm,cn=schema,cn=config"
[press Ctrl-D to exit]
Use the following commands to add schema attributes:
sudo ldapmodify -Q -Y EXTERNAL -H ldapi:///

dn: cn={6}examplefirmext,cn=schema,cn=config
changetype: modify
delete: olcObjectClasses
olcObjectClasses: {0}

modifying entry "cn={6}examplefirmext,cn=schema,cn=config"

changetype: add
add: olcObjectClasses
olcObjectClasses: {1}( 1.3.6.1.4.1.42300.6 NAME 'examplefirmOrgPersonExt' DESC 'Extends attributes of entries representing people in example organization.'
  SUP top AUXILIARY MAY ( info $ manager $ emergencyPhone $ persona
 lTitle $ emergencyContactPerson $ homePostalAddress $ tentativeJoiningDate $
 accountAuthorized $ actualJoiningDate $ leavingDate $ homeEmail $ assistantEm
 ail $ assistantPhone ) )

modifying entry "cn={6}examplefirmext,cn=schema,cn=config"
 [press Ctrl-D to exit]
Commands for deleting all existing attributes from a schema:
sudo ldapmodify -Q -Y EXTERNAL -H ldapi:///

dn: cn={4}iot,cn=schema,cn=config
changetype: modify
delete: olcAttributeTypes
olcAttributeTypes: {0}
-
delete: olcAttributeTypes
olcAttributeTypes: {0}
-
delete: olcAttributeTypes
olcAttributeTypes: {0}
-
delete: olcAttributeTypes
olcAttributeTypes: {0}
-
delete: olcAttributeTypes
olcAttributeTypes: {0}
-
delete: olcAttributeTypes
olcAttributeTypes: {0}
-
delete: olcAttributeTypes
olcAttributeTypes: {0}
-
delete: olcAttributeTypes
olcAttributeTypes: {0}
Commands to add new attributes to schema iot:
sudo ldapmodify -Q -Y EXTERNAL -H ldapi:///

dn: cn={4}iot,cn=schema,cn=config
changetype: modify
add: olcAttributeTypes
olcAttributeTypes: {3}( 1.3.6.1.4.1.92300.1.26 NAME 'emergencyContactPerson' DESC 'Person to contact in case of emergency' EQUALITY caseIgnoreMatch SUBSTR caseIgnoreSubstringsMatch SYNTAX 1.3.6.1.4.1.1466.115.121.1.15{256} )
olcAttributeTypes: {4}( 1.3.6.1.4.1.92300.1.27 NAME 'tentativeJoiningDate' DESC 'Time in unix time of tentative joining date' SYNTAX 1.3.6.1.4.1.1466.115.121.1.27 SINGLE-VALUE )
olcAttributeTypes: {5}( 1.3.6.1.4.1.92300.1.28 NAME 'accountAuthorized' DESC 'A boolean telling whether an accounts changes are authorized or not' EQUALITY  booleanMatch SYNTAX 1.3.6.1.4.1.1466.115.121.1.7 SINGLE-VALUE )
olcAttributeTypes: {6}( 1.3.6.1.4.1.92300.1.29 NAME 'actualJoiningDate' DESC 'Actual joining date' EQUALITY generalizedTimeMatch SYNTAX 1.3.6.1.4.1.1466.115.121.1.24 SINGLE-VALUE )
olcAttributeTypes: {7}( 1.3.6.1.4.1.92300.1.30 NAME 'leavingDate' DESC 'Employee leaving date' EQUALITY generalizedTimeMatch SYNTAX 1.3.6.1.4.1.1466.115.121.1.24 SINGLE-VALUE )
olcAttributeTypes: {8}( 1.3.6.1.4.1.92300.1.31 NAME 'homeEmail' DESC 'RFC822 Mailbox - mail alias' EQUALITY caseIgnoreIA5Match SUBSTR caseIgnoreIA5SubstringsMatch SYNTAX 1.3.6.1.4.1.1466.115.121.1.26{256} )
olcAttributeTypes: {9}( 1.3.6.1.4.1.92300.1.32 NAME 'assistantEmail' DESC 'RFC822 Mailbox - mail alias' EQUALITY caseIgnoreIA5Match SUBSTR caseIgnoreIA5SubstringsMatch SYNTAX 1.3.6.1.4.1.1466.115.121.1.26{256} )
olcAttributeTypes: {10}( 1.3.6.1.4.1.92300.1.33 NAME 'assistantPhone' DESC 'RFC1274: assistants telephone number' EQUALITY telephoneNumberMatch SUBSTR telephoneNumberSubstringsMatch SYNTAX 1.3.6.1.4.1.1466.115.121.1.50 )
Command to modify a class object:
sudo ldapmodify -Q -Y EXTERNAL -H ldapi:///

dn: cn={4}iot,cn=schema,cn=config
changetype: modify
delete: olcObjectClasses
olcObjectClasses: {0}
-
add: olcObjectClasses
olcObjectClasses: ( 1.3.6.1.4.1.92300.1 NAME 'iotOrgPerson' DESC 'Defines entries representing people in example organization.' SUP inetOrgPerson STRUCTURAL MAY ( homeDirectory $ loginShell $ accountActive $ uidNumber $ gidNumber $ jPEGPhoto $ info $ manager $ personalTitle $ emergencyContactPerson $ homePostalAddress $ tentativeJoiningDate $accountAuthorized $ actualJoiningDate $ leavingDate $ homeEmail $ assistantEmail $ assistantPhone ) )

modifying entry "cn={4}iot,cn=schema,cn=config"
[Press Ctrl+D to exit]
Please note that there is no delete support in OpenLDAP version 2.4 for dynamic configuration of schemas. So if a schema needs to be deleted, one workaround is to empty out all objectclasses and attributetypes from the schema to render it ineffective. In case a schema has to be modified, existing entries can be changed or new ones added with the desired schema definitions.
Appendix 2 - Changing the Admin Password
In case you have forgetten the admin password or have to change it for the LDAP server, you can reset it with the following steps (assuming you have sudo privileges).
First obtain the SSHA hash of the password by runing this command to get the SSHA hash, for example if our password is goodpassword:
slappasswd -s goodpassword
{SSHA}HnZrrqQ4jjMdqsOGpOrnM010S2LvBEGa
Next, run ldapmodify on the config database and add this hashed value to the olcRootPW attribute in the mdb config object:
sudo ldapmodify -Q -Y EXTERNAL -H ldapi:///

dn: olcDatabase={1}mdb,cn=config
replace: olcRootPW
olcRootPW: {SSHA}HnZrrqQ4jjMdqsOGpOrnM010S2LvBEGa

modifying entry "olcDatabase={1}mdb,cn=config"
[Ctrl-D]
Appendix 3 - Commands for updating & maintaining content
For regular maintenance activities such as modification or deletion of entries, use the following commands:
Deleting entries from ldap:
sudo ldapdelete -x -D cn=admin,dc=examplefirm,dc=com -W 'uid=user01,ou=People,dc=examplefirm,dc=com'
Modifying an ldap object by adding a new attribute:
sudo ldapmodify -x -D cn=admin,dc=examplefirm,dc=com -W -v -c

dn: uid=user01,ou=People,dc=examplefirm,dc=com
add: quotaBytes
quotaBytes: 500000000

[press Ctrl-D to exit interactive entry in stdin]
Modify and replace an attribute in an object:
sudo ldapmodify -x -D cn=admin,dc=examplefirm,dc=com -W -v

dn: uid=user01,ou=People,dc=examplefirm,dc=com
changetype: modify
replace: userPassword
userPassword: mypassword

replace userPassword:
        mypassword
modifying entry "uid=user01,ou=People,dc=examplefirm,dc=com"
modify complete

[press Ctrl-D to exit interactive entry in stdin]
Query the list of objects with a given objectClasses and attributes:
ldapsearch -x –LLL -s base -b "cn=subschema" objectclasses
Another example of a query with search filters, multiple filters can be combined in a lisp like pattern such as (&(condition1)(condition2)) , etc.
ldapsearch -x -LLL -b ou=People,dc=examplefirm,dc=com '(objectClass=iotOrgPerson)' displayName uid mail EmployeeType

dn: uid=user01,ou=People,dc=examplefirm,dc=com
uid: user01
displayName: firstnameone
employeeType: Employee
mail: user01@examplefirm.com

dn: uid=user02,ou=People,dc=examplefirm,dc=com
uid: user02
displayName: firstnametwo
employeeType: Employee
mail: user02@examplefirm.com
Appendix 4 - Customizing event logging for LDAP
OpenLDAP supports multiple levels of logging in increasing detail. When configuring the system, you could set it into detailed logging mode such as "stats", change this to "parse" once configuration has been completed.
Here is the list of log levels with their meanings (excerpt from the slapd-config man page) - log levels are additive, and available levels are:
- 1 (0x1 trace) trace function calls
- 2 (0x2 packets) debug packet handling
- 4 (0x4 args) heavy trace debugging (function args)
- 8 (0x8 conns) connection management
- 16 (0x10 BER) print out packets sent and received
- 32 (0x20 filter) search filter processing
- 64 (0x40 config) configuration file processing
- 128 (0x80 ACL) access control list processing
- 256 (0x100 stats) stats log connections/operations/results
- 512 (0x200 stats2) stats log entries sent
- 1024 (0x400 shell) print communication with shell backends
- 2048 (0x800 parse) entry parsing
- 16384 (0x4000 sync) LDAPSync replication
- 32768 (0x8000 none) only messages that get logged whatever log level is set (the most critical events which cannot be suppressed)
For example, use this config file logging.ldif to set the logging level to stats which logs events in much more detail:
dn: cn=config
changetype: modify
add: olcLogLevel
olcLogLevel: stats
Implement the change by executing the commands in this file:
sudo ldapmodify -Q -Y EXTERNAL -H ldapi:/// -f logging.ldif
 modifying entry "cn=config"
Points of Interest
During the deployment, I came across the concept of OID curves which is used as a kind of namespace for directory services. This is new information and has almost been forgotten by most administrators. By requesting IANA, a private organization can get a Private Enterprise Number (PEN) for their own OID curves registered for their use. Here is the online form to register for a PEN for use as a custom identifier in your LDAP DIT - http://pen.iana.org/pen/PenApplication.page . We've used a randomly selected number 1.3.6.1.4.1.92300 throughout the example configuration in this article. Unless the directory is hosted publicly and as long as it does not conflict an established PEN (which will create problems when reusing schemas created by others), it shouldn't matter which PEN id is used for your internal directory services.
Another interesting discovery was that OpenLDAP schemas are difficult to modify once you've create them. So you need to be very sure about the schema definitions and attribute types before deploying it into a production system. Its preferable to experiment on a test/development server before deploying changes on a production system.
History
- Original version (29-Sep-2016)
- Updated to correct spelling mistakes and syntax errors (3-Oct-2016)
- Updated to add screenshot and more description of commands (4-Oct-2016)