
5 Tips to Reduce Docker Image Size
5.00/5 (4 votes)
5 tips to reduce Docker image size Docker images can quickly weight 1 or more GB. Although the gigabyte price is decreasing, keeping your Docker images light will bring some benefits. This post will give you 5 tips to help reduce your Docker images size and why focusing on it is important.
Docker images can quickly weight 1 or more GB. Although the gigabyte price is decreasing, keeping your Docker images light will bring some benefits. This post will give you 5 tips to help reduce your Docker images size and why focusing on it is important.
Why is the image size so important?
Reducing Docker final image size will eventually lead to:
- Reduced build time
- Reduced disk usage
- Reduced download time
- Better security due to smaller footprint
- Faster deployments
What is a layer?
To reduce an image size, it’s important to understand what a layer is. Every Docker image is composed of multiple intermediate images (layers) which form the final image. This layers stack allows Docker to reuse images when a similar instruction is found.
Each Dockerfile instruction creates a layer at build time:
FROM ubuntu                  # This base image is already composed of X layers (4 at the time of writing)
MAINTAINER Florian Lopes     # One layer
RUN mkdir -p /some/dir       # One layer
RUN apt-get install -y curl  # One layer
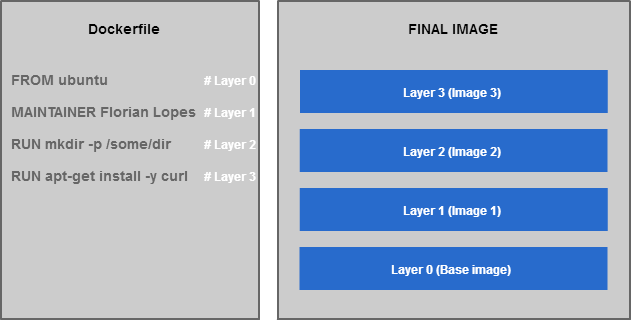
Overview of image layers
Let’s build this image:
$ docker build -t curl .
[...]

$ docker images curl
REPOSITORY            TAG            IMAGE ID            CREATED            VIRTUAL SIZE
test                  latest         732afd2af5a9        About an hour ago  199.3 MB
To see the intermediate layers of an image, type the following command:
$ docker history curl
IMAGE               CREATED             CREATED BY                                      SIZE
732afd2af5a9        About an hour ago   /bin/sh -c apt-get install -y curl              11.32 MB
912b76f3dd8e        About an hour ago   /bin/sh -c mkdir -p /some/dir                   0 B
525804109d88        About an hour ago   /bin/sh -c #(nop) MAINTAINER Florian Lopes      0 B
c88b54fedc4f        9 days ago          /bin/sh -c #(nop) CMD ["/bin/bash"]             0 B
44802199e669        9 days ago          /bin/sh -c sed -i 's/^#\s*\(deb.*universe\)$/   1.895 kB
74a2c71e6050        9 days ago          /bin/sh -c set -xe                                                  && echo '#!/bin/sh' > /u   194.5 kB
140d9fb3c81c        9 days ago          /bin/sh -c #(nop) ADD file:ed7184ebed5263e677   187.8 MB
You can see below that each layer have a size and a command associated to create it. The final image built from this Dockerfile contains 3 layers plus all Ubuntu image layers.
Although this can be somehow difficult to understand, this structure is very important as it allows Docker to cache layers to make the builds much faster. When building an image, the Docker daemon will check if the intermediate image (layer created by the instruction) already exists in its cache to reuse it. If the intermediate layer is not found or has changed, the Docker daemon will pull or rebuild it.
How to reduce image size
As we just saw, the layers play an important role in the final image size. To reduce the final size, we have to focus on the intermediate layers. Although some of them cannot be reduced (especially the one you start from), we can use a few tips to help reduce the final image size.
Group commands in ONE instruction when possible (do not perform multiple installs in multiple RUN instructions)
Installing packages
Separate instructions
To illustrate this statement, let’s build an image with two separate RUN instructions which install curl and mysql-client packages:
FROM ubuntu:16.04

MAINTAINER Florian Lopes

RUN apt-get update
RUN apt-get install -y curl
RUN apt-get install -y mysql-client
$ docker build  -t tip1 .
[...]
$ docker images tip1
 REPOSITORY          TAG                 IMAGE ID            CREATED             VIRTUAL SIZE
 tip1                latest              7e9105c27586        3 minutes ago       248.4 MB
Single instruction
Now, let’s gather the two instructions in only one:
FROM ubuntu:16.04

MAINTAINER Florian Lopes
RUN apt-get update && apt-get install -y curl mysql-client
Let’s build our image again:
$ docker build  -t tip1 .
[...]
$ docker images tip1
REPOSITORY          TAG                 IMAGE ID            CREATED             VIRTUAL SIZE
tip1                latest              2886d17dc7f4        9 seconds ago       248 MB
Although the size difference is not so significant, you can expect better results when installing multiple packages.
Removing packages
Separate instructions
Let’s see another interesting example in which we remove a temporary package in a separate instruction:
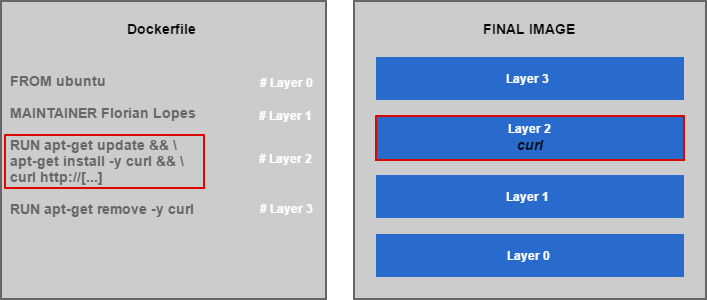
FROM ubuntu:16.04
MAINTAINER Florian Lopes
RUN apt-get update && apt-get install -y curl && curl http://[...]
RUN apt-get remove -y curl
You can see here that the curl package is immediately removed after being installed, in a separate instruction. Let’s see the final image size:
$ docker build -t tip2 .
[...]
$ docker images tip2
REPOSITORY          TAG                 IMAGE ID            CREATED             VIRTUAL SIZE
tip1                latest              632f4bf8667c        8 seconds ago       182.7 MB
Single instruction
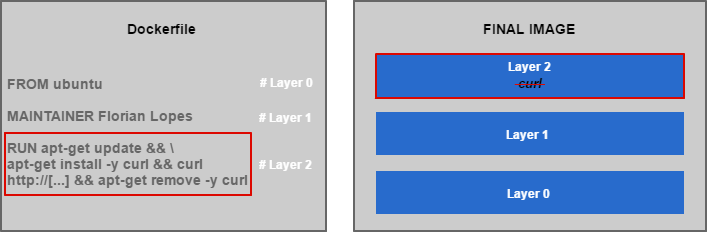
This time, let’s combine these instructions into one line:
FROM ubuntu:16.04
MAINTAINER Florian Lopes
RUN apt-get update && apt-get install -y curl && curl http://[...] && apt-get remove -y curl
$ docker build -t tip3 .
[...]
$ docker images tip3
REPOSITORY          TAG                 IMAGE ID            CREATED             VIRTUAL SIZE
tip1                latest              bfea5f186684        11 seconds ago      182.1 MB
You can see that the size of the image has slighltly reduced. Again, the difference is not very significant here because we only remove one package.
Why is there a difference?
As we saw earlier, the Docker daemon creates an image for each instruction to execute the associated command. In the separates instructions example, the superposition of all these images creates the final one. Because of this strategy, the mysql-client package is still part of the final image (in the third layer actually) although being removed further.
Removing packages in separate instructions
Removing packages in a single instruction
Do not install packages recommendations (-–no-install-recommends) when installing packages
RUN apt-get update apt-get install -y --no-install-recommends curl
Remove no longer needed packages or files, in the SAME instruction if possible
Packages Example
RUN apt-get update && \
apt-get install -y --no-install-recommends curl && \
curl http://download.app.com/install.sh && \
.install.sh && apt-get remove -y curl
In this example, the package curl is only needed to retrieve an install file. Since it is not needed anymore, it can be removed (in the SAME instruction).
Files Example
<code>RUN wget ${APP_URL} -o /tmp/app/install.sh && \
./tmp/app/install.sh && \ rm -rf /tmp/app/ && \
rm -rf /var/lib/apt/lists/*
Start with a smaller base image
Do you need every Ubuntu (or other base images) packages? If not, you should consider starting with a smaller base image like Alpine () which will likely become the base image for all official Docker images (Jenkins, Maven). This base image weights around 5MB whereas Ubuntu one is about 188MB. You can see a great comparison of Docker base images here: https://www.brianchristner.io/docker-image-base-os-size-comparison/.
Inspecting images from DockerHub
To easily inspect a DockerHub image, you can use the MicroBadger service:https://microbadger.com/
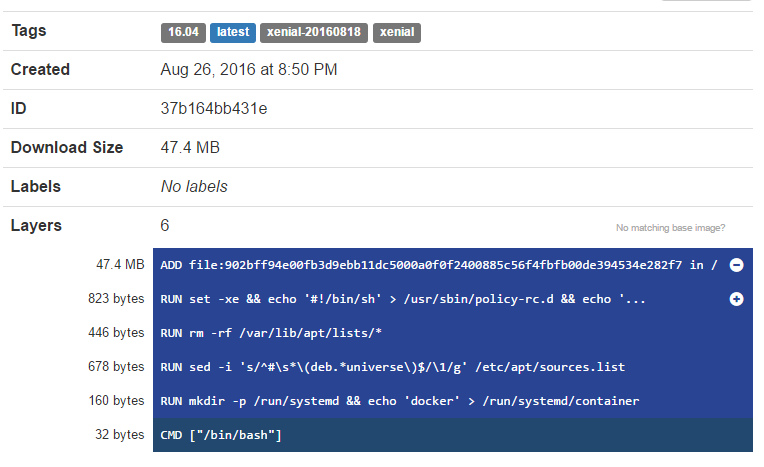
MicroBadger – Ubuntu layers
TL;DR
- Group commands in ONE instruction when possible
- Do not install packages recommendations (–no-install-recommends)
- Remove no longer needed packages or files, in the SAME instruction
- Clean apt-cache after packages installs
- Start with a smaller base image: Alpine
If you are too busy (or lazy) to focus on reducing your image size, here is a tool you could consider: https://github.com/jwilder/docker-squash.
The post 5 tips to reduce Docker image size appeared first on Florian Lopes's blog.