
A Quick Startup using .NET Core on Linux
5.00/5 (6 votes)
A comprehensive guide to .NET Core for beginners
I know you may be thinking… This post is another rhetoric post by this guy, yes it is. .NET Core is another product that I like, the first one being, .NET Framework itself. It was last year when .NET Core got started and Microsoft said they are going to release the source code as a part of their open source environment and love. By following the open source project environment and ethics, Microsoft has been working very hard in bringing global developers toward their environments, platforms and services. For example, .NET Framework works on Windows, C# language is used to build Windows Store applications, C# is also the primary language in Microsoft’s web application development framework, ASP.NET and much more. The online cloud service of Microsoft is also programmed in C#; primarily. These things are interrelated to each other. Thus, when Microsoft brings all of this as an open source project, things start to get a lot better!
Everyone knows about the background of .NET Core, if you don’t know, I recommend that you read the blog post on Microsoft, Introducing .NET Core. The(ir) basic idea was to provide a framework that would work with any platform, any application type and any framework to be targeted.
Introduction and Background
In this quick post, I will walk you through getting started with .NET Core, installing it on a Linux machine and I will also give my views as to why you need to install .NET Core on a Linux machine instead of Windows machine. I will then walk you through different steps of .NET Core programming and how you can use terminal based environment to perform multiple tasks. But first things first.
I am sure you have heard of .NET Core and other cool stuff that Microsoft has been releasing these years, From all of these services, the ones that I like are:
- C# 6
- In my own opinion, I think the language looks cleaner now. These sugar-coated features make the language easier to write too. If you haven’t yet read, please read my previous blog post, Experimenting with C# 6’s new features.
- .NET Core
- Of course, who wouldn’t love to use .NET on other platforms.
- Xamarin acquisition
- I’m going to try this one out tonight. Fingers crossed.
- Rest are all just “usual” stuff around.
In this post, I am going to talk about .NET Core on Linux because I have already talked about the C# stuff.

Why Linux for .NET Core?
Before I dive any deeper, as I had said, I will give you a few of my considerations for using .NET Core on Linux and not on Windows (yet!) and they are as follows. You don’t have to take them seriously or always consider them, they are just my views and my opinions, you are free to have your own.
1. .NET Core Is Not Yet Complete
It would take a while before .NET gets released as a public stable version. Until then, using this bleeding edge technology on your own machines won’t be a good idea and someday sooner, you will consider removing the binaries. In such cases, it is always better to use it in the virtual machine somewhere. I have set up a few Linux (Ubuntu-based) virtual machines for my development purposes, and I recommend that you do the same.
- Install VirtualBox (or any other virtualization software that you prefer; I like VirtualBox for its simplicity).
- Set up an Ubuntu environment.
- Remember to use Ubuntu 14.04. Later ones are not yet supported yet.
- Install the .NET Core on that machine.
If something goes wrong, you can easily revert back where you want to. If the code plays dirty, you don’t have to worry about your data, or your machine at all.
2. Everything Is Command-Line
Windows OS is not your OS if you like command-line interfaces. I am waiting for the BASH language to be introduced in Windows as in Ubuntu, until then, I am not going to use anything that requires a command-line interface to be used on my Windows environment. In Linux, however, almost everything has a command-line interface and since the .NET Core is a command-based program by Microsoft, I have enjoyed using it on Linux as compared to Windows.
Besides, on command-line interface, creating, building and running a .NET Core project is as simple as 1… 2… 3. You’ll see how, in the sections below.
3. I Don’t Use Mac
Besides these points, the only valid point left is then why shouldn’t we use Mac OS for .NET Core. That's because I don’t use it. You are free to use Mac OS for .NET Core development too. .NET Core does support it, it's just that I don’t support that development environment.
Installation of .NET Core
Although it is intended that soon, the command would be as simple as:
$ sudo apt-get install dotnet
Same command is used on Mac OS X and other operating systems other than Ubuntu and Debian derivatives. But until the .NET Core is in the development process, that is not going to happen. Until then, there are other steps that you can perform to install the .NET Core on your own machine. I’d like to skip this part and let Microsoft give you the steps to install the framework.
After this step, do remember to make sure that the platform has been installed successfully. In almost any environment, you can run the following command to get the success message.
> dotnet --help
If .NET is installed, it would simply show the version and other help material on the screen. Otherwise, you may want to make sure that that procedure did not incur any problems during the installation of the packages. Before I get started, I want to show you the help material provided with “dotnet” command,
afzaal@afzaal-VirtualBox:~/Projects/Sample$ dotnet --help
.NET Command Line Tools (1.0.0-preview1-002702)
Usage: dotnet [common-options] [command] [arguments]

Arguments:
 [command]      The command to execute
 [arguments]    Arguments to pass to the command

Common Options (passed before the command):
 -v|--verbose   Enable verbose output
 --version      Display .NET CLI Version Number
 --info         Display .NET CLI Info

Common Commands:
 new           Initialize a basic .NET project
 restore       Restore dependencies specified in the .NET project
 build         Builds a .NET project
 publish       Publishes a .NET project for deployment (including the runtime)
 run           Compiles and immediately executes a .NET project
 test          Runs unit tests using the test runner specified in the project
 pack          Creates a NuGet package
So, you get the point that we are going to look deeper into the commands that dotnet provides us with:
- Creating a package
- Restoring the package
- Running the package
- Build and Run both work, run would execute, build would just build the project. That was easy.
- Packaging the package
I will slice the stuff down to make it even more clearer and simpler to understand. One thing that you may have figured out is that the option to compile the project natively is not provided as an explicit command in this set of options. As far as I can think, this support has been removed until further notice. Until then, you need to pass a framework type to compile and build against.
Using .NET Core on Linux
Although the procedure on both of the environments is similar and alike, I am going to show you the procedure in Ubuntu. Plus, I will be explaining the purpose of these commands and multiple options that .NET provides you with. I don’t want you to feel lonely here, because most of the paragraphs here would be for Microsoft team working on .NET project, so I would be providing a few suggestions for the team too. But, don’t worry, I’ll make sure the content remains on-topic.
1. Creating a New Project
I agree that the framework development is not yet near releasing and so I think I should consider passing on my own suggestions for the project too. At the moment, .NET Core supports creating a new project in the directory and uses the name of the directory as the default name (if at all required). Beginners in .NET Core are only aware of the commands that come right after the “dotnet”. However, there are other parameters that collect a few more parameters and optional values such as:
- Type of project
- Executable
- At the moment, .NET only generates DLL files as output. Console is the default.
- Dynamic-link library
- Executable
- Language to be used for programming
To create a new project, at the moment, you just have to execute the following command:
$ dotnet new
In my own opinion, if you are just learning, this is enough for you. However, if you execute the following command, you will get an idea of how you can modify the way project is being created and how it can be used to modify the project itself, including the programming language being used.
$ dotnet new --help
.NET Initializer

Usage: dotnet new [options]

Options:
 -h|--help Show help information
 -l|--lang <LANGUAGE> Language of project [C#|F#]
 -t|--type <TYPE> Type of project
Options are optional. However, you can pass those values if you want to create a project with a different programming language such as F#. You can also change the type, currently however, Console applications are only supported.
I already had a directory set up for my sample testing,

So, I just created the project here. I didn’t mess around with anything at all, you can see that the .NET itself creates the files.
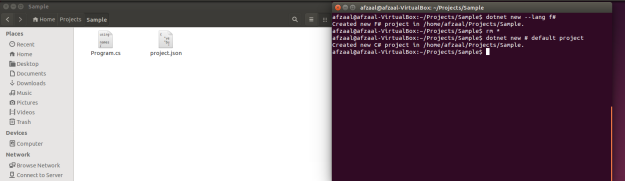
Excuse the fact that I created an F# project. I did that so that I can show that I can pass the language to be used in the project too. I removed that, and instead created a C# program-based project. This is a minimal Console application.
In .NET Core applications, every project contains:
- A program’s source code
- If you were to create an F# project. Then the program would be written in F# language and in case of default settings. The program is a C# language program.
- A project.json file
- This file contains the settings for the project and dependencies that are to be maintained in the project for building the project.
However, once you are going to run, you need to build the project and that is what we are going to do in the next steps.
2. Restoring the Project
We didn’t delete the project. This simply means that the project needs to be restored and the dependencies need to be resolved before we can actually build to run the project. This can be done using the following command:
$ dotnet restore
Note: Make sure you are in the working directory where the project was created.
This command does the job of restoring the packages. If you try to build the project before restoring the dependencies, you are going to get the error message of:
Project {name} does not have a lock file.
.NET Framework uses the lock file to look for the dependencies that a project requires and then starts the building and compilation process. Which means, this file is required before your project can be executed to ensure “it can execute”.
After this command gets executed, you will get another file in the project directory.

And so finally, you can continue to build the project and run it on your own machine with the default settings and setup.
3. Building the Project
As I have already mentioned above, the native compilation support has been removed from the toolchain and I think Ubuntu developers may have to wait for a while and this may only be supported on Windows environment until then. However, we can somehow still execute the project as we would and we can perform other options too, such as publishing and NuGet package creation.
You can build a project using the following command:
$ dotnet build
Remember that you need to have restored the project once. Build command would do the following things for you:
- It would build the project for you.
- It would create the output directories.
- However, as I am going to talk about this later, you can change the directories where the outputs are saved.
- It would prompt if there are any errors while building the project.
We have seen the way previous commands worked, so let’s slice this one into bits too. This command, too, supports manipulation. It provides you with optional flags such as:
- Framework to target
- Directory to use for output binaries
- Runtime to use
- Configuration, etc
This way, you can automate the process of building by passing the parameters to the dotnet script.
4. Deploying the Project
Instead of using the term running the project, I think it would be better if I could say deploying the project. One way or the other, running project is also deployed on the machine before it can run. First of all, the project I would show to be running, later I will show how to create NuGet packages.
To run the project, once you have built the project or not, you can just execute the following command:
$ dotnet run
This command also builds the project if the project is not yet built. Now, if I execute that command on my directory where the project resides, the output is something like this on my Ubuntu:

As seen, the project works and displays the message of, “Hello World!” on screen in terminal. This is a console project and a simple project with a console output command in C# only. That is why the program works this way.
Creating NuGet Packages
Besides this, I would like to share how you can create the NuGet package from this project using the terminal. NuGet packages have been on the scene since a very long time and they were previously very easy to create in Visual Studio environment. Process is even simpler in this framework of programming. You just have to execute the following command:
$ dotnet pack
This command packs the project in a NuGet package. I would like to show you the output that it generates so that you can understand how it is doing everything.
afzaal@afzaal-VirtualBox:~/Projects/Sample$ dotnet pack
Project Sample (.NETCoreApp,Version=v1.0) was previously compiled.
Skipping compilation.
Producing nuget package "Sample.1.0.0" for Sample
Sample -> /home/afzaal/Projects/Sample/bin/Debug/Sample.1.0.0.nupkg
Producing nuget package "Sample.1.0.0.symbols" for Sample
Sample -> /home/afzaal/Projects/Sample/bin/Debug/Sample.1.0.0.symbols.nupkg
It builds the project first, if the project was built, then it skips that process. Once that has been done, it creates a new package and simply generates the file that can be published on the galleries. NuGet package management command allows you to perform some other functions too, such as updating the version number itself, it also allows you to specify framework, etc. For more, have a look at the help output for this command:
afzaal@afzaal-VirtualBox:~/Projects/Sample$ dotnet pack --help
.NET Packager

Usage: dotnet pack [arguments] [options]

Arguments:
 <PROJECT> The project to compile, defaults to the current directory.
 Can be a path to a project.json or a project directory

Options:
 -h|--help Show help information
 -o|--output <OUTPUT_DIR> Directory in which to place outputs
 --no-build Do not build project before packing
 -b|--build-base-path <OUTPUT_DIR> Directory in which to place temporary build outputs
 -c|--configuration <CONFIGURATION> Configuration under which to build
 --version-suffix <VERSION_SUFFIX> Defines what `*` should be replaced with in version
  field in project.json
See the final one, where it shows the version suffix. It can be used to update the version based on the build version and so on. There is also a setting, which allows you modify the way building process updates the version count. This is a widely used method for changing the version number based on the build that produced the binary outputs.
The NuGet package file was saved in the default output directory.

Rest is easy, you can just upload the package from here to the NuGet galleries.
Final Words
Finally, I was thinking I should publish a minimal ebook about this guide. The content was getting longer and longer and I was getting more and more tired, however since this gave me an idea about many things, I think I can write a comparison of .NET Core on Windows and Linux and I think I have enough time to do that.
Secondly, there are few suggestions for end users that I want to make:
- Do not use .NET Core for commercial software. It is going to change soon.
- .NET Core is a bleeding edge technology and well, since there is no documentation, you are going to waste a lot of time in learning and asking questions. That is why, if you are considering learning the .NET framework, then learn the .NET Framework and not .NET Core. .NET Framework has a great amount of good resources, articles, tips and tutorials.
- If you want cross-platform features and great support like .NET Framework, my recommendation is Mono Project over .NET Core maybe because it is yet not mature.
I have a few feedback words on the framework itself:
- It is going great. Period.
- Since this is a cross-platform framework, features must not be available Windows-only such as that “dotnet compile –native” one. They must be made available to every platform.
Finally, the framework is a great one to write programs for. I enjoyed programming for .NET Core because it doesn’t require much effort. Plus, the benefit of multiple programming languages is still there, Besides, Visual Studio Code is also a great IDE to be used and the C# extension makes it even better. I will be writing a lot about these features now since I am free from all of the academics stuff these days.
See you in the next post.