
Code Samples: Equipment Activity Monitor, (How-To Intel® IoT Technology Series)
This shop-floor equipment activity monitor application is part of a series of how-to Intel Internet of Things (IoT) code sample exercises using the Intel® IoT Developer Kit, Intel® Edison development platform, cloud platforms, APIs, and other technologies.
Get access to the new Intel® IoT Developer Kit, a complete hardware and software solution that allows developers to create exciting new solutions with the Intel® Galileo and Intel® Edison boards. Visit the Intel® Developer Zone for IoT.
Introduction
This shop-floor equipment activity monitor application is part of a series of how-to Intel Internet of Things (IoT) code sample exercises using the Intel® IoT Developer Kit, Intel® Edison development platform, cloud platforms, APIs, and other technologies.
From this exercise, developers will learn how to:
- Connect the Intel® Edison development platform, a computing platform designed for prototyping and producing IoT and wearable computing products.
- Interface with the Intel® Edison platform IO and sensor repository using MRAA and UPM from the Intel® IoT Developer Kit, a complete hardware and software solution to help developers explore the IoT and implement innovative projects.
- Run this code sample in Intel® XDK IoT Edition, an IDE for creating applications that interact with sensors and actuators, enabling a quick start for developing software for the Intel® Edison board or the Intel® Galileo board.
- Store equipment usage data using Azure* Redis Cache from Microsoft, cloud services for connecting IoT solutions including data analysis, machine learning, and a variety of productivity tools to simplify the process of connecting your sensors to the cloud and getting your IoT project up and running quickly.
What it is
Using an Intel® Edison board, this project lets you create a shop-floor equipment activity monitor that:
- Tracks equipment usage by monitoring sound and vibration sensors.
- Issues a visual notification whenever the equipment is in use.
- Logs equipment usage using cloud-based data storage.
How it works
This equipment activity monitor watches for sound and vibration.
If both exceed a defined threshold, it lights up the display to indicate the equipment is in use.
Once the equipment is no longer used, it clears the display.
Optionally, equipment usage start/stop events can also be stored using the Intel® IoT Examples Data store running in your own Microsoft Azure* account.
Hardware requirements
Grove* Starter Kit Plus containing:
- Intel® Edison board with an Arduino* breakout board
- Grove Sound Sensor
- Grove Piezo Vibration Sensor
- Grove RGB LCD
Software requirements
- Intel® XDK IoT Edition
- Microsoft Azure* account
How to set up
To begin, clone the How-To Intel IoT Code Samples repository onto your computer with Git* as follows:
$ git clone https://github.com/intel-iot-devkit/how-to-code-samples.git
To download a .zip file, in your web browser go to https://github.com/intel-iot-devkit/how-to-code-samples and click the Download ZIP button on the right-hand side. Once the .zip file is downloaded, uncompress it and use the files in the directory for this example.
Adding the program to Intel® XDK IoT Edition
In Intel® XDK IoT Edition, select Import Your Node.js Project:

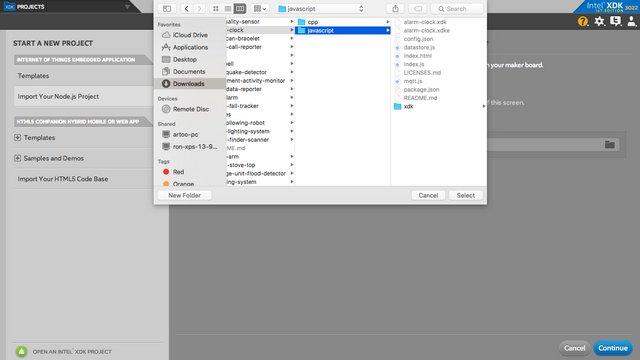
Then, navigate to the directory where the example project exists, and select it:
You need to connect to your Intel® Edison board from your computer to send code to it.

Click the IoT Device menu at the bottom left. If your Intel® Edison board is automatically recognized, select it.

Otherwise, select Add Manual Connection. In the Address field, type 192.168.2.15. In the Port field, type 58888. Click Connect to save your connection.
Installing the program manually on the Intel® Edison board
Alternatively, you can set up the code manually on the Intel® Edison board.
Clone the How-To Intel IoT Code Samples repository to your Intel® Edison board after you establish an SSH connection to it, as follows:
$ git clone https://github.com/intel-iot-devkit/how-to-code-samples.git
Then navigate to the directory with this example.
To install Git* on the Intel® Edison board if you don’t have it yet, establish an SSH connection to the board and run the following command:
$ opkg install git
Connecting the Grove* sensors

You need to have a Grove* Shield connected to an Arduino*-compatible breakout board to plug all the Grove devices into the Grove Shield. Make sure you have the tiny VCC switch on the Grove Shield set to 5V.
- Plug one end of a Grove cable into the Grove Sound Sensor, and then connect the other end to the A0 port on the Grove Shield.
- Plug one end of a Grove cable into the Grove Piezo Vibration Sensor, and then connect the other end to the A2 port on the Grove Shield.
- Plug one end of a Grove cable into the Grove RGB LCD, and then connect the other end to any of the I2C ports on the Grove Shield.
Manual Intel® Edison board setup
If you're running this code on your Intel® Edison board manually, you need to install some dependencies.
To obtain the Node.js* modules needed for this example to execute on the Intel® Edison board, run the following command:
npm install
Microsoft Azure* server setup
Optionally, you can store the data generated by this example program in a back-end database deployed using Microsoft Azure*, Node.js*, and a Redis* data store.
For information on how to set up your own cloud data server, go to:
https://github.com/intel-iot-devkit/intel-iot-examples-datastore
Configuring the example
To configure the example for the optional Microsoft Azure* data store, change the SERVER and AUTH_TOKEN keys in the config.json file as follows:
{
  "SERVER": "http://intel-examples.azurewebsites.net/logger/equipment-activity",
  "AUTH_TOKEN": "s3cr3t"
}
Running the program using Intel® XDK IoT Edition
When you're ready to run the example, make sure you saved all the files.

Click the Upload icon to upload the files to the Intel® Edison board.

Click the Run icon at the bottom of Intel® XDK IoT Edition. This runs the code on the Intel® Edison board.

If you made changes to the code, click Upload and Run. This runs the latest code with your changes on the Intel® Edison board.

You will see output similar to the above when the program is running.
Running the program manually
To run the example manually on the Intel® Edison board, establish an SSH connection to the board and execute the following command:
node index.js
Determining the Intel® Edison board's IP address
You can determine what IP address the Intel® Edison board is connected to by running the following command:
ip addr show | grep wlan
You will see output similar to the following:
3: wlan0: <BROADCAST,MULTICAST,UP,LOWER_UP> mtu 1500 qdisc pfifo_fast qlen 1000
    inet 192.168.1.13/24 brd 192.168.1.255 scope global wlan0
The IP address is shown next to inet. In the example above, the IP address is 192.168.1.13.
For a complete list of How-To Intel® IoT Code Samples, go to Intel® Developer Zone.
For more details about this code sample, go to GitHub*.