
Detecting Seismic Waves with Android and IOT
A R/D approach to detect earth seismic activities with IoT and make an android device self aware to save your life.
Topics to be covered
- Introduction
- What is IoT?
- History
- Applications
- Outcome of This Article
- Where’s the Bunny?
- Background
- Seismic waves
- Gathering Components
- Finalizing the Circuit
- Connecting with Android
- Remote Connection
- Making the Phone Aware
- Points of Interest
- Credit
- Article History
- References
Introduction
The Internet of Things (IoT) has been an internet buzzword in recent past times, apart from its rackety meaning to the mass people, the thing is promoting the colossus extension of data shuffling across machines to networks. To be honest, IoT is the next frontier in future technology.
This article presents a general concept over IoT and its application in our real world, we will also discuss on building a functional IoT application on later part of this article. If you are a tech enthusiast, then you are ready to go with this article.
What is IoT?
Well, the term is self-explanatory: a thing that connects to the internet. This single line can be explained in a number of ways. But a simple explanation could be- adding internet connectivity to a network of devices, enabling them to communicate with users and other devices. In general, IoT promotes a high level awareness about our real world and a platform to monitor the reactions of the awareness exposes to us. The network of devices may contain their own IP addresses and can connect to each other to automate the defined tasks. In 2014, worldwide IoT markets’s revenue had reached $655.8 billion. In 2020, it is expected to grow upto $ 8.9 trillion market!

IoT & Real World (Source: LinkedIn)
History
In 1982, Carnegie Mellon University made a modified coke machine which was said as the first internet-connected appliance. Kevin Ashton, co-founder of MIT’s Auto-ID Center coined the term “Internet of Things” in 1999. After along a decade, IoT has gained its global acceptance and in 2008-09 it borns as a major technological advancement.
Applications
IoT can be applied in our real world in numerous ways. Think of a world where your front door opens up when you comes up infront of it but locks up when a stranger arrives on the front step. The lights auto turns on detecting your presence in the room but turns off when you left the room. The coffee starts brewing when you voice command it to make one for you. The handwatch prepares a health sheet for your grandpa and send an alert voice to your phone if any serious problem found when you are out of your home and so on. So obviously the possibilities and application fields are limiteless. You already starts to dream, aren’t you?
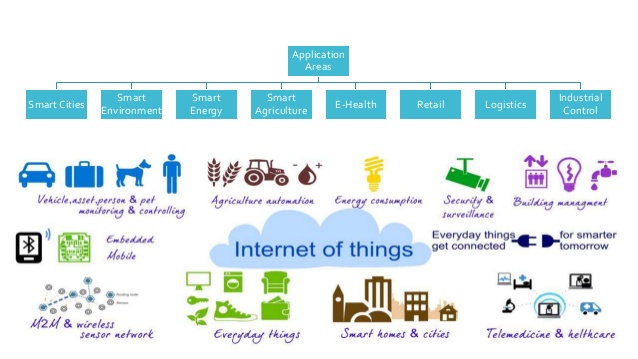
IoT Applications (Source: SlideShare)
Outcome of This Article
In this article we will build an IoT project that mainly targets on people safety things. Either you are a beginner or professional, the article will teach how to transform your idea into an awesome IoT object. We will discuss the co-ordination of the ‘Things’ and implementation of them in step by step throughout the article. Let’s go!
Where’s the Bunny?
Lets talk about the idea we are going to kick off in this article. As we all know earthquakes are one of the most exterminatory natural force that human beings has ever been able to minify its ruinous effect . As there are no ways to be informed before its arrival, the loss of lives and property often cross the catastrophic level.
In this article we will demonastrate an approximate way to detect sisemic waves by an IoT system and also make yourself aware about the upcmong shockwave thorugh your mobile device. We will use Android as the testing mobile platform. So we found the bunny out there, right? Let’s catch it!
Background
I live in Bangladesh, a country which has a long history of earthquakes since the year 1548 as the record says. The country is surrounded by the regions of high seismicity which include the Himalayan Arc and Shillong Plateau in the north the Burmese Arc, Arakan Yoma anticlinorium in the east and complex Naga-Disang-Jaflong thrust zones in the northeast.
From statistical survey it was found that, the indian plate where the mentioned area places has collided with asia about 50 million years ago. Since then the plate continued to push north into asia, under-thrusting the Himalayas and pushing the mountains up.
In recent times, a number of major earthquakes occur near the corresponding region. Probably many of us heard about the colossal damage of Nepal and India earthquakes which kills thousands of people and damages serveral billion dollars property. On both cases, my country has also faced major seismic events along with several loss of life and property.
Acccording to a(many by other trusted sources ex. CNN) report of National Gepgraphic, the country may face a tragic fate of experiencing a megathrust quake which can raise the magnitude upto 9.0, as per assumption in near future. Even before the assumption about its impact its not much difficult to plot the catastrophic level of loss the quake would hatch to one of the world’s most densely populated region.
The tentative assumption leads me to find a way to be aware about the seismic activities, if we can somehow measure the harmful ones and make people aware about their safe shelters during dead times, that may save their valuable lives to a great extent. But before that we need to learn some basic things about seismic waves.

Hidden Faults of Bangladesh-India-Myanmar Region (Source: CNN)
Seismic waves
Seismic waves are propagating vibrations that carry energy from the source of the shaking outward in all directions. These waves travel through the interior of the Earth and can be measured with sensitive detectors like seismographs. Scientists have seismographs set up all over the world to track movement of the Earth’s crust. (Analysis: Seismic Waves)
So it’s basically some sort of elastic wave that could be generated by an impulse like an earthquake or explosions or large landslides. An earthquake can generate three types of seismic wave: P (primary) waves, S (secondary) waves and Surface waves.
Also termed as compressional or longitudinal or primary waves. This is the fastest kind of seismic wave, which travel faster than other waves through the earth to arrive at seismograph stations firstly, hence the name "Primary". This wave can move through solid rock and fluids, like water or the liquid layers of the earth. It shakes the ground in the direction they are propagating and travels at 1.5-8 km/s in the Earth’s crust.
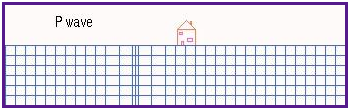
P-waves (Click to see animation, Source: Earthquakes)
Termed as shear or secondary waves which arrives later of p waves at seismic stations. Marginally 1.7 times slower than p waves. It shakes the ground perpendicular to the direction in which they are propagating. But S-wave isn’t able to propagate through a fluid or gas because fluids and gasses cannot transmit a shear stress and S-waves are waves that shear the material.
In general, earthquakes generate larger shear waves than compressional waves and much of the damage close to an earthquake is the result of strong shaking caused by shear waves.
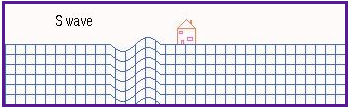
S-waves (Click to see animation, Source: Earthquakes)
Unlike above two this type of waves doesn’t penetrate into the earth’s interior deeply. Typically generates lower frequency than body waves, hence easily distinguished on a seismogram as a result. There are two types of surface waves: Love waves and Rayleigh waves. Though it arrives after body (P & S) waves, it is surface waves who are responsible for the damage and destruction associated with an earthquake.
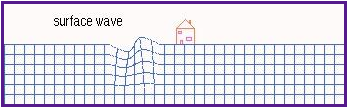
Surface-waves (Click to see animation, Source: Earthquakes)
To understand the full impact of these different types of seismic wave let’s view the animation of this image.
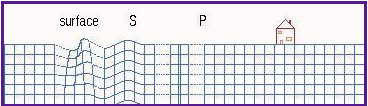
Seismic-waves of an earthquake (Click to see animation, Source: Earthquakes)
From above study, we have a clear picture about the events of an earthquake. Definitely all of us would support a call, primary or the P-waves travel more quickly through the Earth's crust and lucratively harmless in terms of other destructive waves. As it travels through in a flash, if we can gather enough data to detect it then advance warning of an upcoming terrible earthquake event is obviously possible.
Even by calculating the difference between the arrival time of P and S wave it is possible to do a rough estimation of the distance to the earthquake focus point. As a rule of thumb: Multiplying the time between the two waves by 5 will get the distance to the focus in miles (Source: UC Berkeley Seismological Lab).
Let’s have an assumption, an earthquake hits a seismic station and the corresponding seismogram records the P and S waves’ arrival time as 04:00:20 and 04:00:26.62. So here the time difference of the two waves is 6.62s. Applying the above theory the distance from the station to the earthquake focus will be approximately (6.62*5) = 33 miles.
So according to the rule of thumb,
Distance to the earthquake focus = ((arrival time of P wave) – (arrival time of S wave)) * 5
Let’s do some math.
CASE 1: Guess an earthquake has been generated which focus is 112 miles away from your position. As P-wave travels at roughly 6.0 km/s in the crust so the time requires hitting your position is- ((1.6 * 112) / 6) = 29.87 s.
S-wave is 1.7 times slower than P-wave, it travels approx. 3.5 km/s in the crust, so for hitting your position it requires- ((1.6 * 112) / 3.5) = 51.2 s.
The time difference between these 2 waves is = (51.2 – 29.87) = 21.33, the difference is an approximation as the travel speed may vary on a number of factors, but the actual result won’t vary too much (based on above mentioned recognized references).
CASE 2: Now guess a more nearest one which focus is 12 miles away from your position. Then P-wave will hit your position in- ((1.6 * 12) / 6) = 3.2 s.
S-wave will require- ((1.6 * 12) / 3.5) = 5.48 s.
So, the time difference in this case is = (5.48 – 3.2) = 2.28 s.
One point is clear to us from above 2 cases, time difference between P and S-waves increase when the earthquake focus point is far from you and decreases when it is closer.
Up to now according to our idea, we should work on the plan how we can record the P-wave and make people aware about the upcoming shockwaves.
Gathering Components
It’s time to gather major components that we will need for the work. For detecting the vibrations that a seismic activity can generate, we will use Piezo vibration sensor.
Grove - Piezo Vibration sensor
It is suitable for measurements of flexibility, vibration, impact and touch. A wide dynamic range (0.001Hz~1000MHz) guarantees an excellent measuring performance. And, we can adjust its sensitivity by adjusting the on-board potentiometer with a screw. (Source: Grove - Piezo Vibration Sensor)
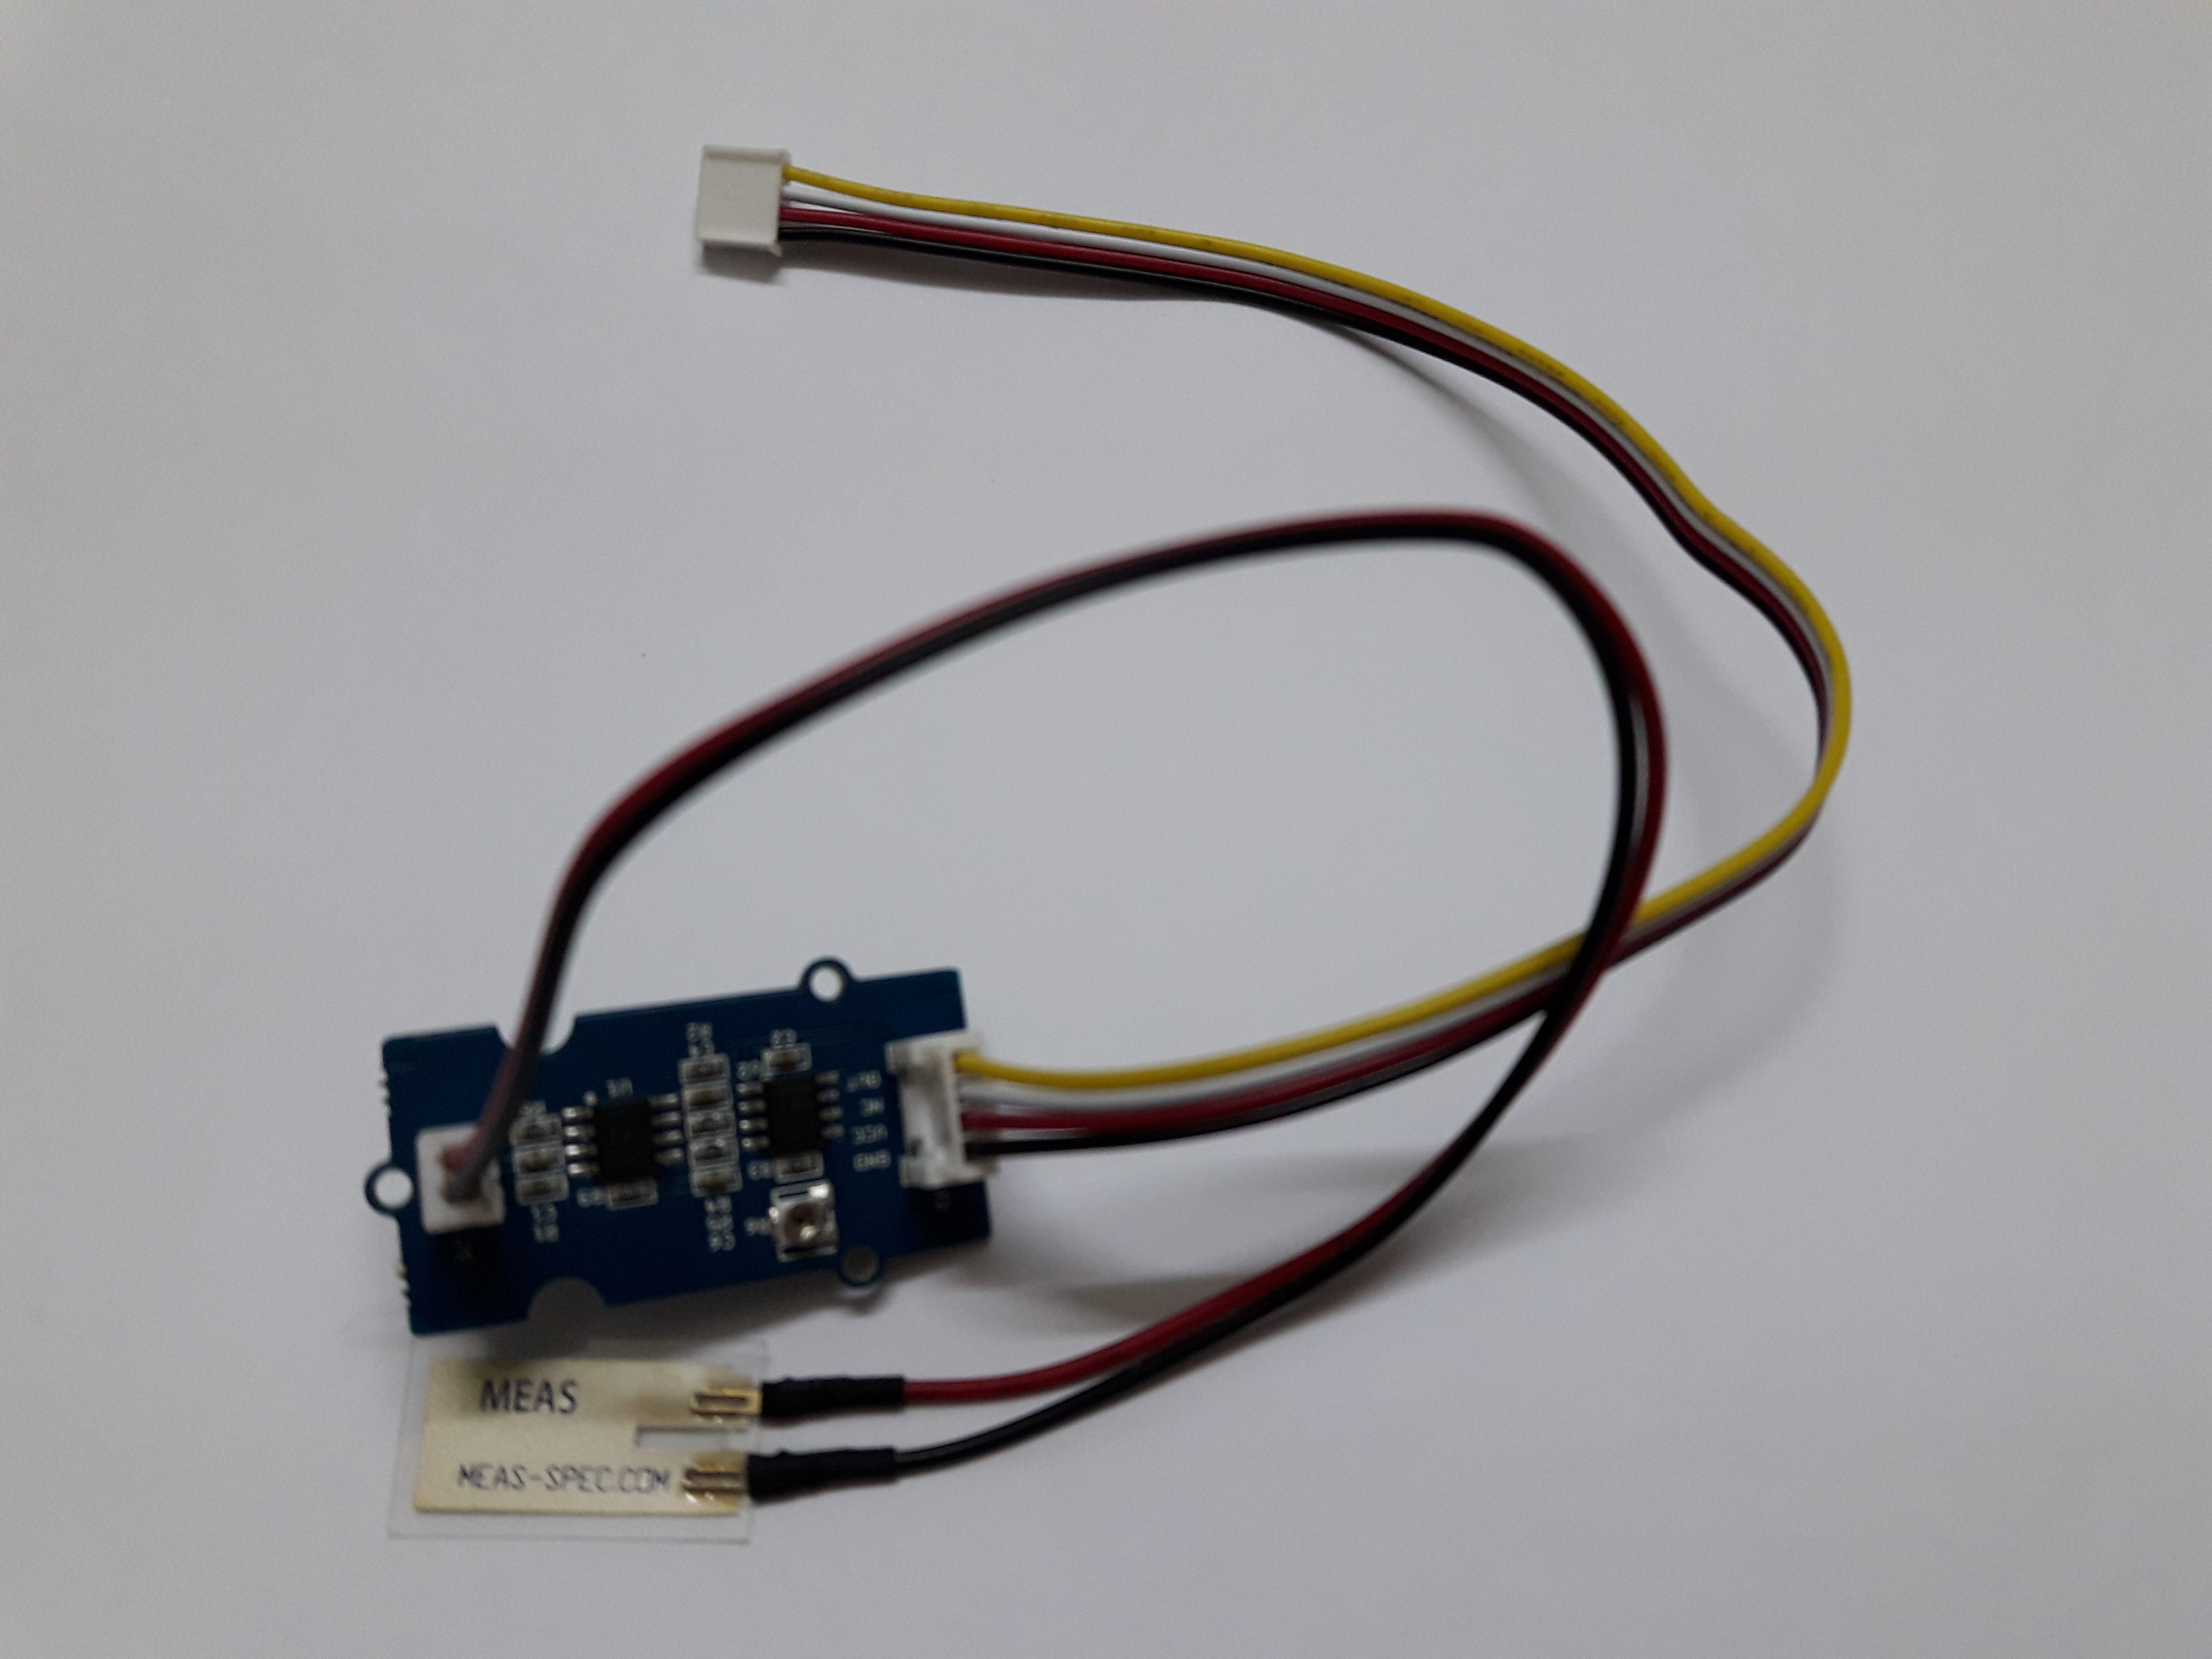
Grove - Piezo Vibration Sensor Board (Model: SEN04031P)
It provides a range of USB to serial converter cables which provide connectivity between USB and serial UART interfaces. A range of cables are available offering connectivity at 5V, 3.3V or user specified signal levels with various connector interfaces. (Source: USB to Serial Programmer)
You may need to install the driver for use casing the thing. Our development device contains Windows 7 64 bit OS, hence we have installed corresponding driver for this module.
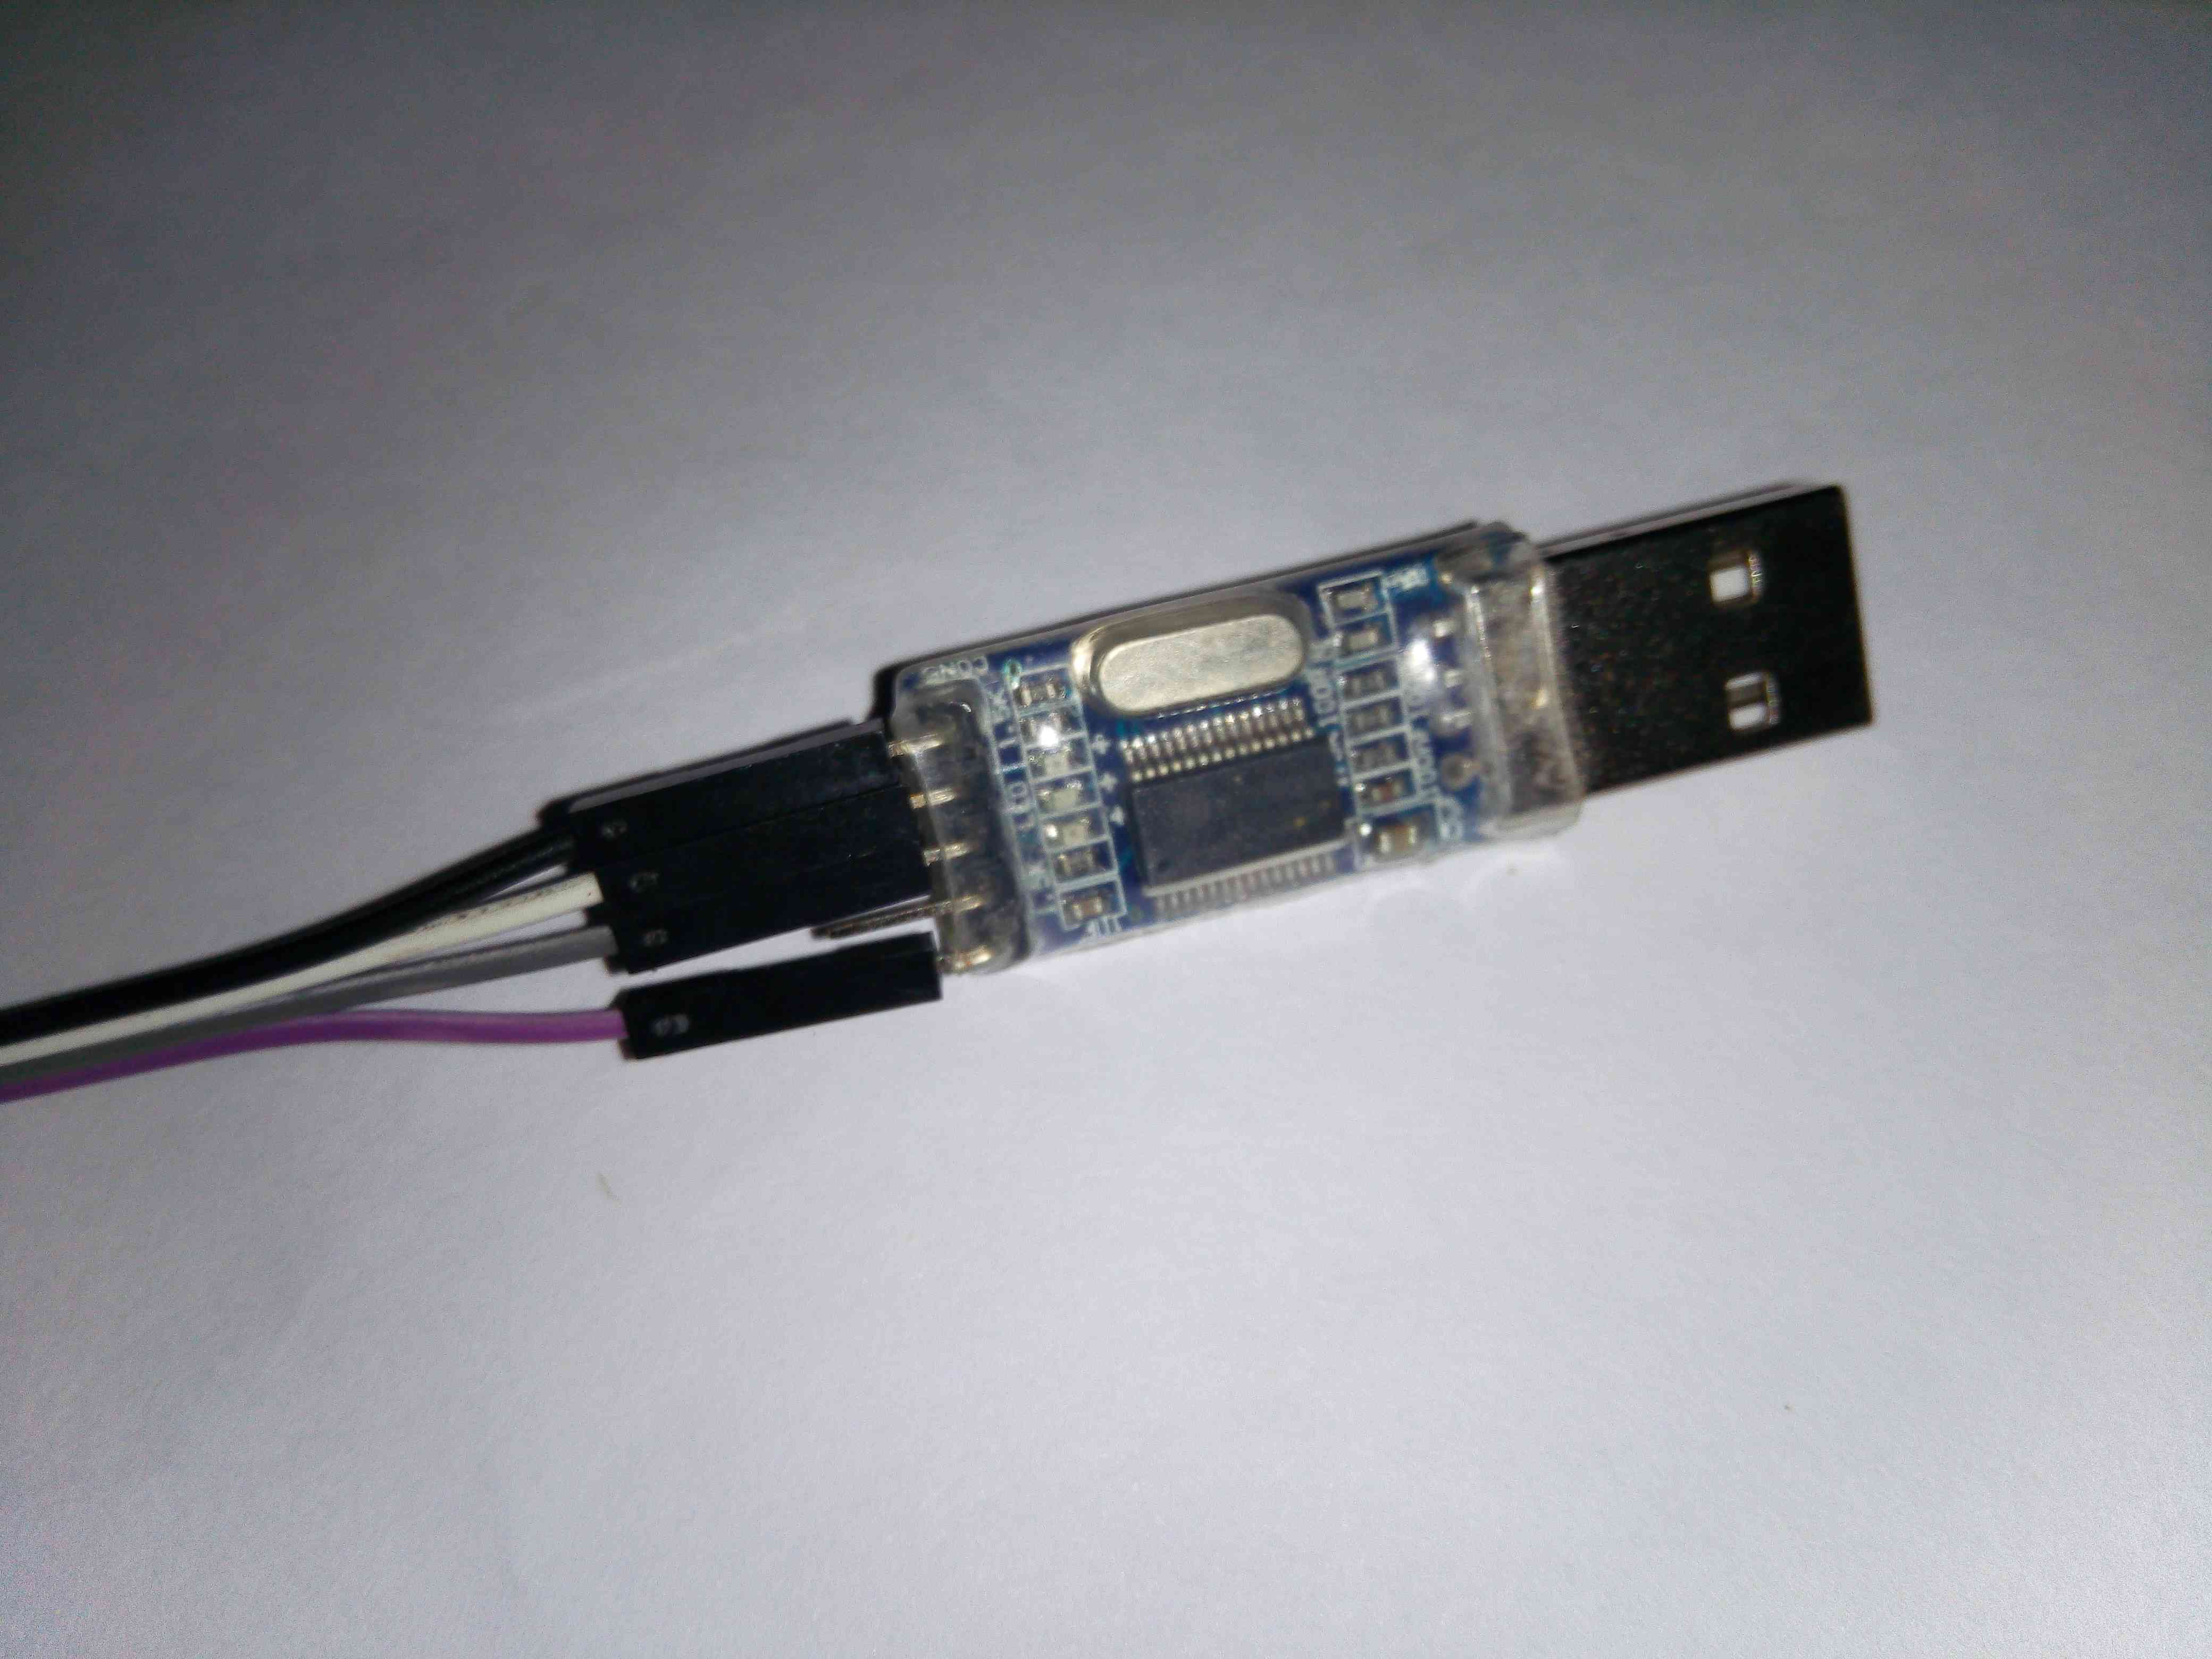
USB to Serial Programmer
For transmitting sensor data to a portable mobile device we will need a wifi module. We have used Wifi Module – ESP8266 in our case. It is a self contained SOC with integrated TCP/IP protocol stack that can give any microcontroller access to a WiFi network. It is capable of either hosting an application or offloading all Wi-Fi networking functions from another application processor. (Source - WIFI Module - ESP8266)
We need a bit of work to customize the module and make it programmable. We need to manage couple of things for the context-
- Veroboard (where the module will reside)
- Some male connectors
- Three 10K resistors for VC control
- Two external buttons for reboot and reset the module
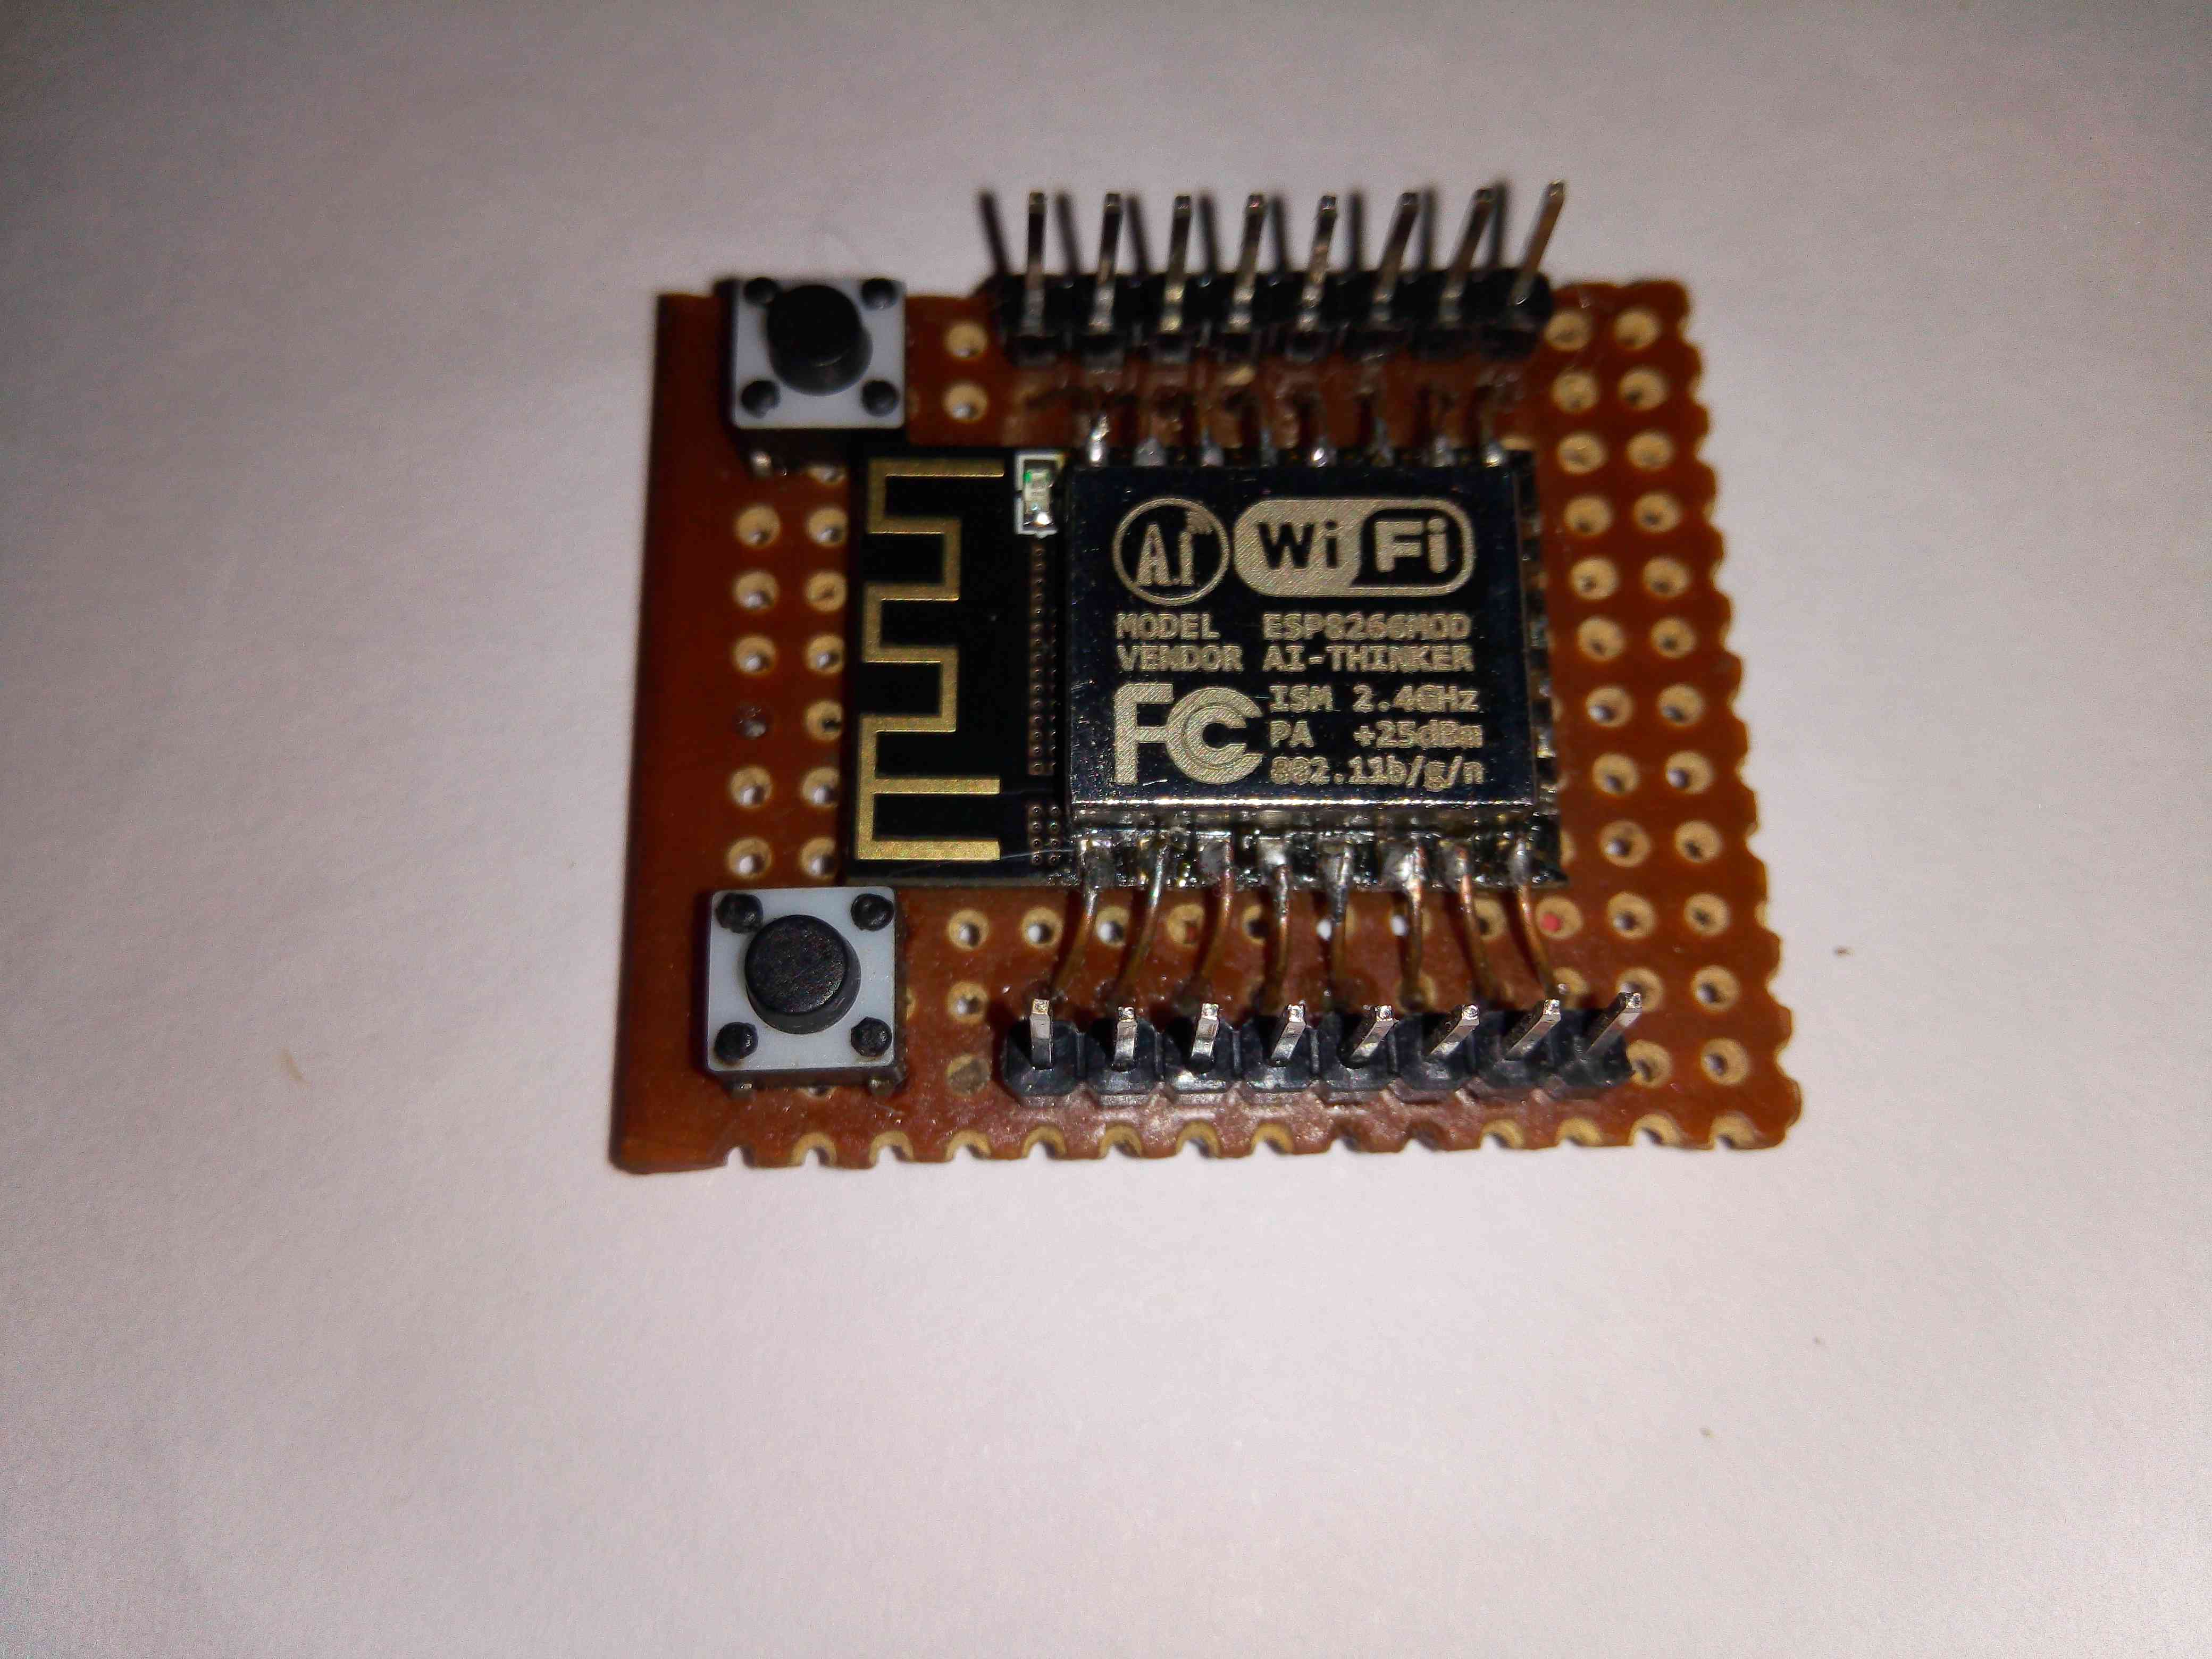
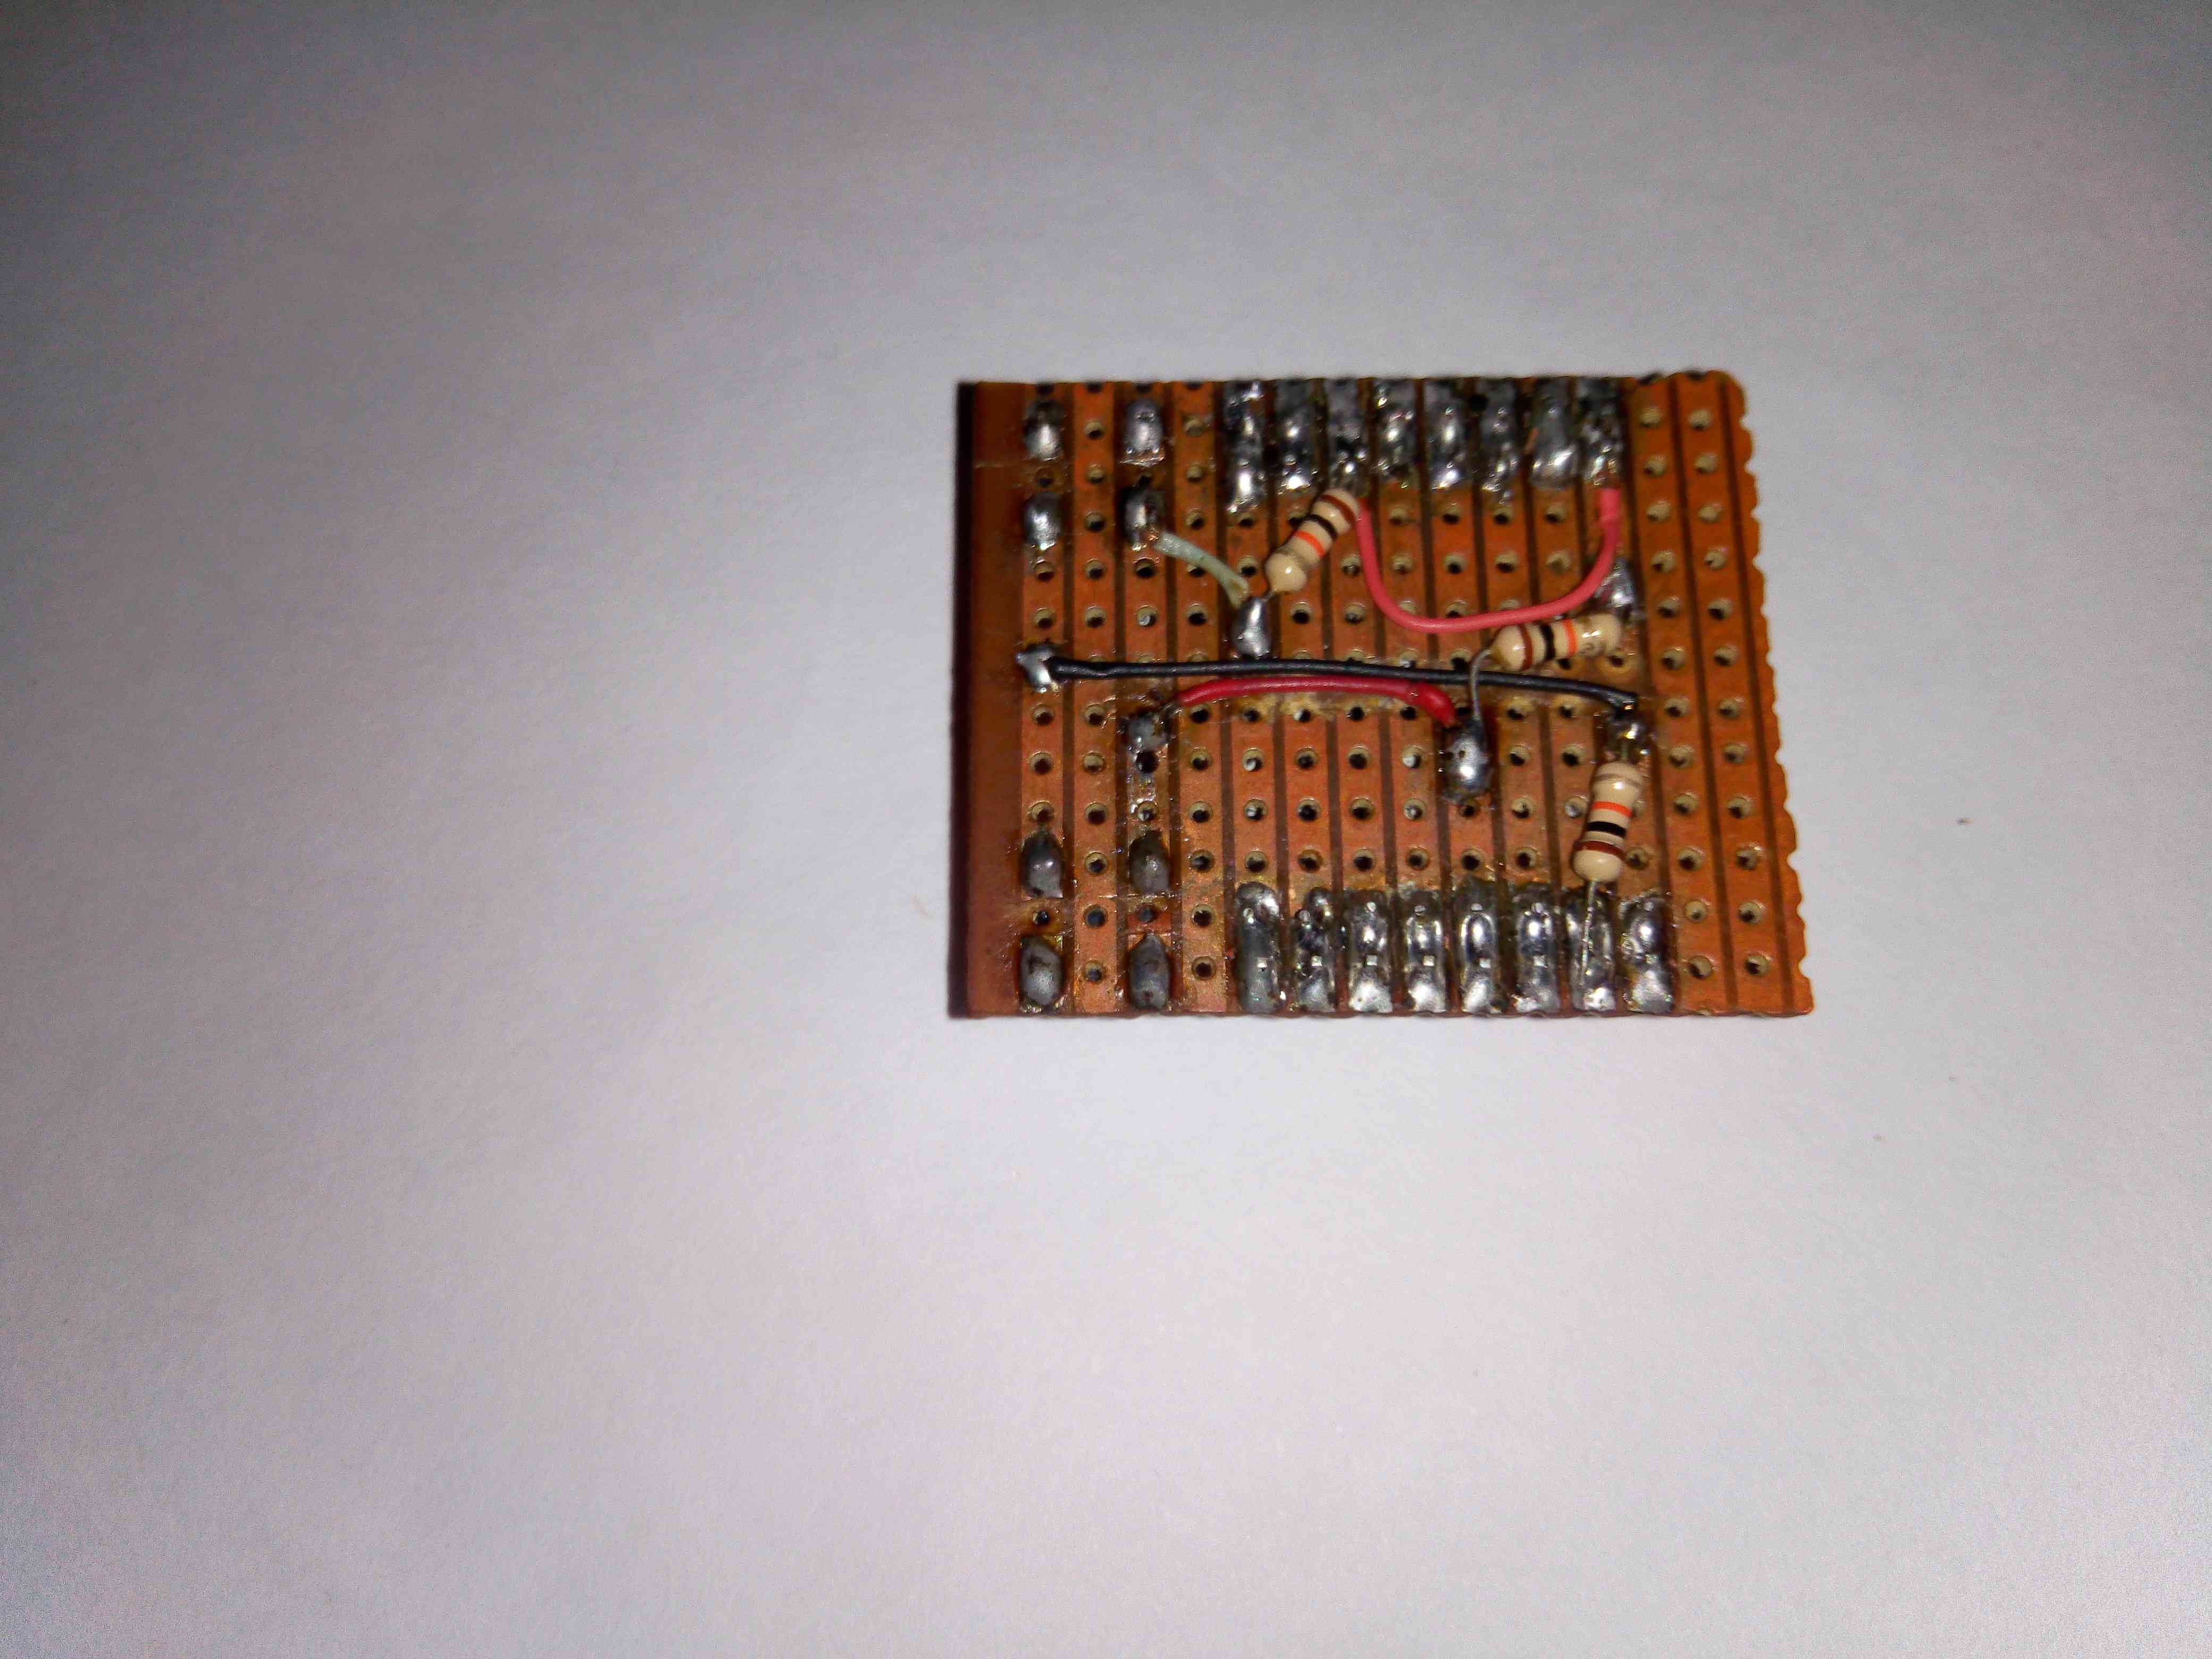
Re-modeled WIFI Module (Model- ESP8266)
Making the Wifi Module Programmable
A bit of hectic works are ahead of us in order to make this wifi module programmable. We want to connect this module with the familiar Arduino IDE for uploading the code to the board. Hence we need to look up the GITHUB project dedicated for the mentioned chip model ESP8266.
Download the Arduino IDE from the official site. After installation, go to File à Preference à Additional Boards Manager URLs and paste this link.
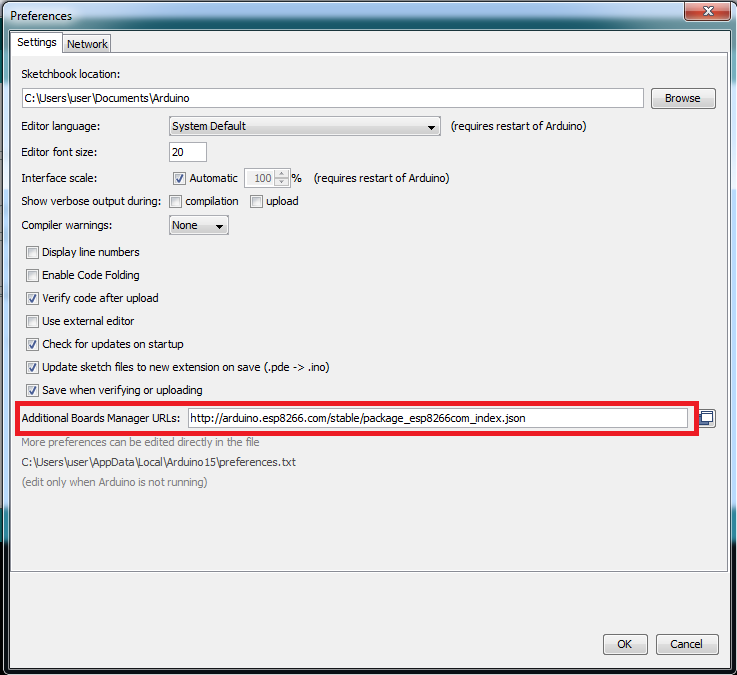
Fig 1.1: Configuring Arduino IDE for programming re-modeled WIFI Module
Now go back to the home of the IDE à Tools à Board à Boards Manager, scroll down and find the option of “esp8266 by ESP8266 community”, click on it and press install button. Have patience until it completes the installation.
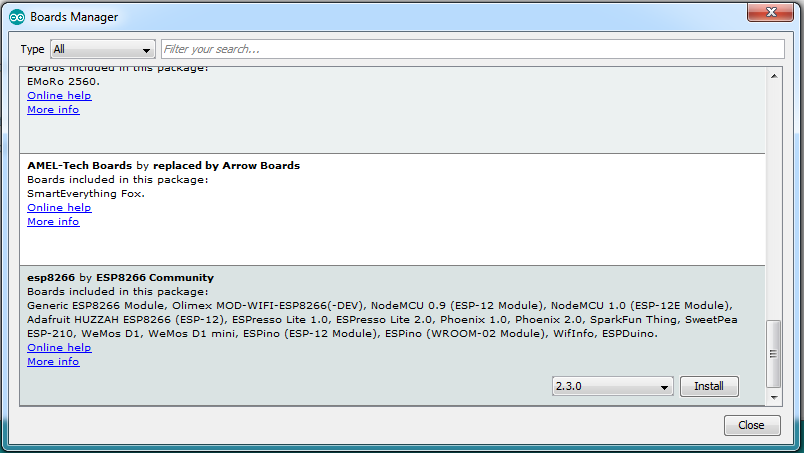
Fig 1.2: Configuring Arduino IDE for programming re-modeled WIFI Module
You can check available port of your corresponding developing device by right clicking on My Computer à Manage à Device Manager à Ports and double check with the IDE’s Tools à Port if they are same.
Go to Arduino IDE, Select Tools à Board à scroll down and select “Node MCU 1.0 (ESP-12E Module)”. Now the wifi module is ready to eat the code! Before that we need to make up our circuit.
Finalizing the Circuit
You need to have some basic knowledge about circuit diagram and stuffs like breadboard, male-female connectors etc to wire up the things, This is the circuit diagram that we will follow later.

Circuit diagram
According to the diagram we will now connect the things up, we will need a breadboard and some wires here.

Wiring things up to a Breadboard
A real “a ha” moment as things are ready to operate except the code (along with mobile device end) to upload the data from the sensor to my local IP using the wifi module!
It’s time to write the code for the wifi module, we create a local wifi network via a tool named connectify, you can use your wifi router too.
Move to the arduino IDE and write up the code below.
#include <ESP8266WiFi.h>

const char* ssid = "SweetHeart";    // username of your network
const char* password = "123456780";  // password of your network

// Generally, you should use "unsigned long" for variables that hold time
// The value will quickly become too large for an int to store
unsigned long previousMillis = 0;        // will store last time LED was updated

// constants won't change :
const long interval = 500;           // interval at which to blink (milliseconds)

int sensorValue = 0;

WiFiServer server(80);

void setup() {
  Serial.begin(115200);
  delay(10);

  // Connect to WiFi network
  Serial.println();
  Serial.println();
  Serial.print("Connecting to ");
  Serial.println(ssid);

  WiFi.begin(ssid, password);

  while (WiFi.status() != WL_CONNECTED) {
    delay(500);
    Serial.print(".");
  }
  Serial.println("");
  Serial.println("WiFi connected");

  //Start the server
  server.begin();
  Serial.println("Server started");

  //Print the IP address
  Serial.print("Use this URL to connect: ");
  Serial.print("http://");
  Serial.print(WiFi.localIP());
  Serial.println("/");

}

void loop() {
  // Check if a client has connected
  WiFiClient client = server.available();
  if (!client) {
    return;
  }

  // Wait unlil the client sends some data
  Serial.println("new client");
  while (!client.available()) {
    delay(1);
  }

  // Read the first line of the request
  String request = client.readStringUntil('\r');
  Serial.println(request);
  client.flush();

  unsigned long currentMillis = millis();

  if (currentMillis - previousMillis >= interval) {
    // save the last time you blinked the LED
    previousMillis = currentMillis;
    sensorValue = analogRead(A0);
  }

  // Return the response
  client.println("HTTP/1.1 200 OK");
  client.println("Content-Type: text/html");
  client.println("");  // do not forget this one
  client.println("<!DOCTYPE HTML>");
  client.println("<html>");

  String webpage = "<head><meta http-equiv=""refresh"" content=""1""></head>";
  webpage += "<body>";
  //webpage += "Value: ";
  webpage += String(sensorValue);
  webpage += "</body></html>";
  client.println(webpage);

  Serial.println("Client disconnected");
  Serial.println("");

}
If all things are done as like above steps the code will successfully load into the module (connect the circuit board to a power source, you can be sure about the program load by the blinking led of the wifi module), also make sure boot mode is activated in the module. Now open the serial monitor according to the port number and if the code runs successfully you will see your local IP address where the value has been uploaded (and continuing to update the value).
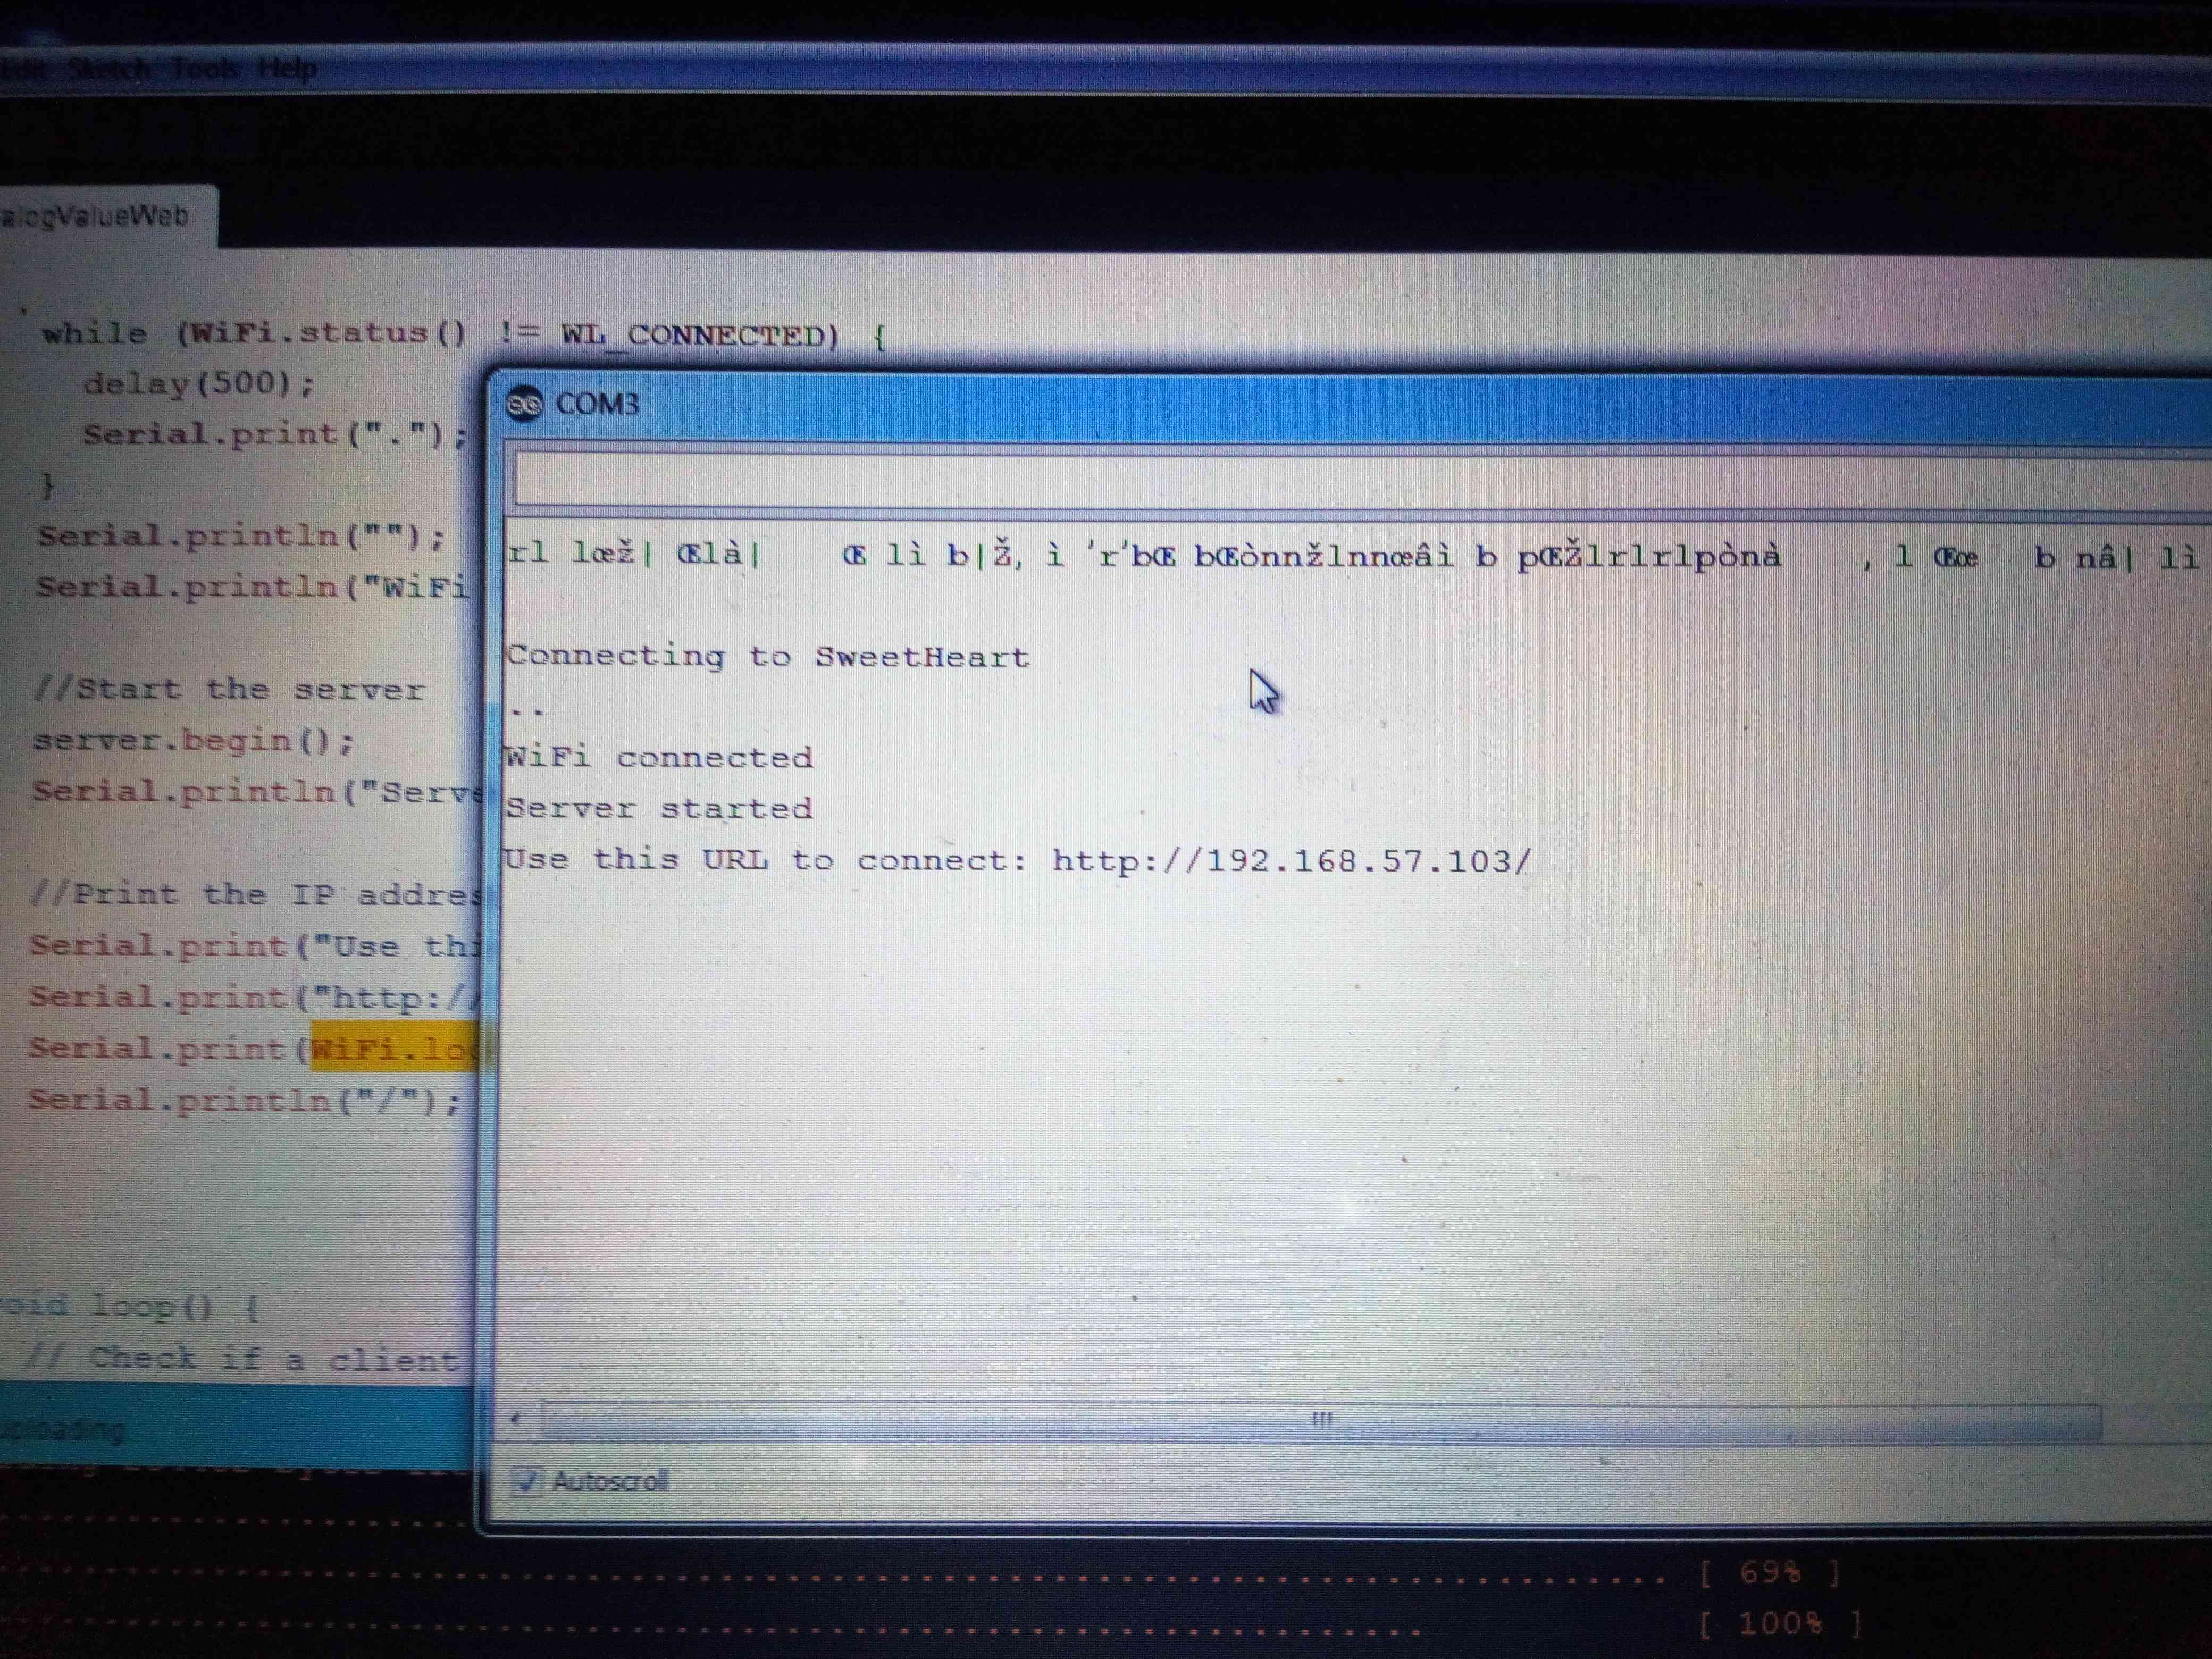
Getting local IP from programmed WIFI Module
Hit that IP address to your browser and will see the output if the things are behaving in the right way as described.

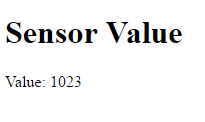
Value from Piezo sensor at local IP
Touch the piezo sensor and you will see a sudden change in the uploaded value, according to the code the value is updating (refreshing) at every 1s interval, it could be changed as per choice.
Connecting with Android
As we are getting our desired sensor value to our local ip address, so its time to broadcast the value to our mobile device. Hence we are using android as the mobile OS platform (the module can broadcast the value to any platform).
As we have already seen that, we are printing the sensor values as an http response so from client side (read android) we need to parse the values and that will be enough for us.
For parsing an http response we will use a library here written for android, named OkHTTP. Lets write up the code.
public class GetResponse {

    OkHttpClient client = new OkHttpClient();

    String run(String url) throws IOException {
        Request request = new Request.Builder()
                .url(url)
                .build();

        Response response = client.newCall(request).execute();
        return response.body().string();
    }
}
GetResponse example = new GetResponse();

try {
    String response = example.run("http://192.168.25.103");
    Toast.makeText(getApplicationContext(), response, Toast.LENGTH_LONG).show();

} catch (IOException e) {
}
The things are getting interesting here, isn’t it? We had successfully caught the sensor values due to some vibration and transmitted the value to an android device which runs in same WIFI network. But in case of an earthquake or seismic activities you may stay outside of your home, may be in your office or coffee-shop, and then? Things not gonna help you in that case, but now we will screw things up for the latter case.
Remote Connection
We need to transmit the value to a remote source from where our mobile client can parse the value. Hence we are using a brilliant tool called ngrok. You can their docs for implementation.
After downloading and installing the tool just bring the cmd window and navigate to the folder where it has been installed. Put this command:
ngrok http your_local_ip_address:8080
Execute the command and hit localhost in your browser along with the link “https://localhost:4040”. You will get 2 universal links from ngrok there and now you can use any of them inside the java code of android client as both of the links are universal now and can be accessed anywhere of the world. Fun, isn’t it?
Making the Phone Aware
All things are done as expected. Last part is parsing the corresponding html value that we will get form the universal link and make our mobile device aware what to do with the value. Let do the parsing.
We will get just the expected value from the html response now. We will now set a filter for the value, if the response value gets past the filter value at anytime our mobile device will generate an alarm tone.
For filter value we are using 512, generally piezo sensor gives value within the range of 0 -1024 based on its received vibration frequency. So we are setting a value that is exactly half of its range, anything over the value will create an alarm tone.
Our previous code will change a little bit here.
GetResponse example = new GetResponse();

try {
    String response = example.run("http://92832de0.ngrok.io");
    //Toast.makeText(getApplicationContext(), response, Toast.LENGTH_LONG).show();
    String htmlTextStr = Html.fromHtml(response).toString();

    if (Integer.valueOf(htmlTextStr) > 512) {
        Uri alert = RingtoneManager.getDefaultUri(RingtoneManager.TYPE_ALARM);

        if (alert == null) {
            alert = RingtoneManager.getDefaultUri(RingtoneManager.TYPE_RINGTONE);
        }

        Ringtone ring = RingtoneManager.getRingtone(getApplicationContext(), alert);
        ring.play();
    }

} catch (IOException e) {
}
We will customize the thing with a timer. From android client we will make request in every 5 seconds to correspoding universal adress. So we will need a timer approach to achieve that.
private int mInterval = 5000; // 5 seconds by default, can be changed later
private Handler mHandler;
@Override
protected void onCreate(Bundle savedInstanceState) {
    super.onCreate(savedInstanceState);
    setContentView(R.layout.activity_main);

    .....

    mHandler = new Handler();
    startRepeatingTask();
}
void startRepeatingTask() {
    mStatusChecker.run();
}
Runnable mStatusChecker = new Runnable() {
    @Override
    public void run() {
        try {
            //this function can change value of mInterval.
            GetResponse example = new GetResponse();

            try {
                String response = example.run("http://92832de0.ngrok.io");
                //Toast.makeText(getApplicationContext(), response, Toast.LENGTH_LONG).show();
                String htmlTextStr = Html.fromHtml(response).toString();

                if (Integer.valueOf(htmlTextStr) > 512) {
                    Uri alert = RingtoneManager.getDefaultUri(RingtoneManager.TYPE_ALARM);

                    if (alert == null) {
                        alert = RingtoneManager.getDefaultUri(RingtoneManager.TYPE_RINGTONE);
                    }

                    Ringtone ring = RingtoneManager.getRingtone(getApplicationContext(), alert);
                    ring.play();
                }

            } catch (IOException e) {
            }

        } finally {
            mHandler.postDelayed(mStatusChecker, mInterval);
        }
    }
};
Points of Interest
We have successfully made a prototype of detecting seismic activities from a mobile device and the future interest from here is countless. We have started this research work keeping in mind about a megathrust quake possibiliy in our region of near future. We want to extend this work on a large scale, will look for some funding so that we can continue this research work and the solution can really help people at duying time. The solution can play a vital role to save the lives of million in current context.
With some advance research (that we are continuing to model up) it is possible to get over 90% accurate results about the seismic vibration and hence some calculation may help the user to know the distance between him and the earthquake focus on the spot(read his/her mobile device). We will keep updating this article as soon as we get some great results. Your suggestion are welcome too to scale up our solution because this is for us, to save mankind.
Credit
For assembling the components and wiring them up we want to give the credit to one of our(Project[R] Lab, WizardApps) great contributor Mr. Chayan Mistry, EEE (3rd yr), NWU University, Khulna, Bangladesh.
Article History
10.08.2015 - Reference updated
08.08.2015 - Formatting issue solved
07.08.2015 - Main Article posted
References
- Interent of Things
- Importance of Internet of Things
- Earthquake
- Earthquake-Banglapedia
- Seismic Waves
- https://en.wikipedia.org/wiki/Seismic_wave
- http://sunshine.chpc.utah.edu/Labs/SeismicWaves/
- http://www.colorado.edu/physics/phys2900/homepages/Marianne.Hogan/waves.html
- http://www.geo.mtu.edu/UPSeis/waves.html
- http://www.sms-tsunami-warning.com/pages/seismic-waves#.V6ozAymKTIU
- http://earthquake.usgs.gov/learn/topics/seismology/keeping_track.php
- Seismic Waves and Earth's Interior
- Earthquake / Vibration Sensor
- Laboratory 8