
IoT-VR with Unity, Intel Edison
5.00/5 (4 votes)
Virtual Reality with Unity, Intel Edison and MQTT
Table of Contents
- Introduction
- Background
- What we intend to do
- The proposed pipeline
- Let's start with unity
- The unity asset store
- The Unity Animation controller
- Time for the MQTT client
- Animation control
- The MQTT thing in Unity
- Google cardboard integration
- Controlling the Puppet with hardware
- Controlling the Puppet with Gesture
- Controlling Puppet with Intel Edison IoT Device
- Why the Hololens Experiment Failed
- Conclusion
Introduction
In this tutorial, we will cover a different perspective on how we can use Unity and for virtual experience. We will work on an animation system to give complete life to our character and add a different dimension by bringing in the scope of MQTT adding Intel Edison to feel the magic. In between, we will also describe the animation system and controls on giving state transitions to our character while applying movement.
Background
This article is more of a research I was doing where I was wondering where I can fit in IoT in terms of VR. To start with, because of its easy learning curve, I chose Unity IDE. It fits in the best for creating the project more lively. For the integration part, research was made with communication medium for remote interaction with Unity and IoT device. After all details and feasibility, I found out the best way to do it was with MQTT. For adding a character, I had to go through lot of details about what kind of characters fit in best for the project. I tried Mixamo for details in animation for the character and certainly, I found it useful but for the purpose of the project, chose an easy way from Unity asset store a character and free custom animations associated with it. Here, I share my experience for the project that got created.
What We Intend to Do
Conceptually, it was just a dream that I could make things working out at place so it was a tough job to start with.
The Unity Part
- We needed characters that can be used freely for the purpose of our project and we had very less time. Creating a character in Blender would take time (I know very less Blender altogether!!). The obvious choice was something that was freely available in Unity.
- Unity Asset store to the rescue: I was working around which figures and characters were obvious for me so I thought a Doll like character will shape up and give the project good shape, hence we started searching and goodness gracious, really the store had great assets and then Unity Chan model as this model was well explained in Unity forum and it was very easy to tweak it.
- Adding animations: As we found this character had lots of animation state to use, the animation control came to the limelight. We studied lots of tutorials in implementing animations and then we were good to go.
The IoT Part
This was the trickiest part as we had to bring in a new dimension to interaction within Unity.
- Obvious thinking was how could I communicate between the Unity project and the IoT device, I studied a lot, then found out that mqtt was the best choice.
- Now the next thing was to integrate the mqtt within Unity, it was a tough job. I had to dig in deep then found out a Github library that came to my rescue.
- Next step was tweaking the code integrating it with our scene for further assistance for our project. I did it with getting to know the basics of it and delving in deep into the code.
- I tried the first communication with mymqtt app to try mapping the movements broken down into different mediums and commands that will work and yes, it was a success.
The Proposed Pipeline
The next figure shows the proposed pipeline for the project workflow. It was a tedious part on how I can manage the entire scenario at one place but as I gained knowledge, different ideas came into view, hence the flow.
Download the latest version of Unity to start with. Make sure you are targeting for which platform 32 bit or 64 bit. Then push for the download.
The workflow:

Let's Break the Workflow
- We design the game concept at Unity, the movement, we make a scene add capabilities for interactions. Then we set up animation control and get it going with keyboard keys (up, down, left and right). It came along very well.
- We started the process of how we can do the interactions with IoT levels, then we searched a lot of content and found mqtt the best fit. We integrated it.
- Next step was to see that if we were able to communicate with the unity scene directly. On an Android phone installed the mymqtt app and then subscribed to the channel we configured in the mqtt client. We did basic interactions with numbers to see if we were able to communicate and it worked out well. So the next thing.
- We used Android Studio to create an app where we integrated mqtt to interact with the Unity scene with forward, backward, left and right movements. It went along superbly.
- As it was Unity, we converted it to WIndows 10 UWP (We decided not to do it as MQTT was not working with it.)
Hence 5th changed to Google cardboard. - We integrated with RealSense.
Let's Start with Unity
- Firstly, we will have to download Unity for the setup. Firstly, you need to make sure that which platform you intend to install for 32 bit or 64 bit.
- Go straight to the website and download the executable.

Here, in this page, you will have an option for downloading the version of Unity, just start downloading.
In the next page, you will have a variety of options for downloading Unity. We have chosen the free version.

Choosing the free version allows us to test and build our app and also publish it.
In the next step, you will get an option for downloading the installer. After downloading the installer, we need to choose target platforms, the basic ones being PC, Android build and others.

After installation, it is now our turn to select and start the project.
For the first time when you login, it asks for your Unity ID (make sure you are registered, as with its help, you can now download the asset from asset store, otherwise you can also work offline.)

We open Unity and give a name to the project. Make sure 3D toggle option is selected. Then we click on Create project.
Before going further, now we need to know what unity asset store actually is.
The Unity Asset Store
Unity Asset store is a market place where you get project assets that you can easily use. Some of the great assets are free and some of them are paid.
Why Use Asset Store?
If we are a single developer, it's very difficult to find time to actually design the character, add animations and other logic to it. The learning curve is steep when we are trying to learn new 3d designing tools. To bring our logic into reality, we need animations, characters that are pre built. We can easily engage ourselves to C# code and use the language to our full potential to bring the entire gaming experience to reality. However, we have to figure out the animation control ourselves.
The Concept of Doll
Since my childhood, I had this special fascination for playing with dolls and keeping it myself when I used to get to bed, tell stories (yes, those golden days were so much fun... I wish I could go back). We get readily attached to baby dolls and weave in fairy tales. Hence, when I started this project, I wanted to go back and relive it so we started. We had in our mind that we will have to make a simple system where it can move back and forth and can be easily controllable through our IoT device.
The Search at Asset Store
We always wanted to give our application a classic fairy tale look and we found that one character and one low poly count model was very useful for us.
Unity Chan Model
This Japanese model was too cute for our liking hence we thought we could use it. There was also a tutorial on how to use it.
The flexibility was:
- Animations
- Cuteness of the character
- Easily configurable to our liking

Now for our environment setup, we had to choose a low poly environment that could give our scene a special feel. Indeed, I found one the "low poly count environment". It was classy and it was our type.

Mixing Them Both
The idea was to create a scene where we can bring in both characters together to start with, we took example from the already added asset. We opened up the demo scene to check the capabilities of the model. It was indeed cool.

Now, it was the part of importing the low polycount model and test the scene.

After opening the test scene, indeed we found it was worth working with.
The Experiment Time
We included the Unity chan model now it was for us to start the coding and configuration.

As the character was facing the other side of camera, we had to rotate it so used the rotating tool in Unity to change the view of the character.

Now it was our term to decide on the animation control system.
The Unity Animation Controller
The Unity animator controller organises your animation control in a state oriented manner. The speciality is you can drive in different sets of animations in one place. We can also have subsets of animation called blend state. Now first of all, we thought we try out with simple animation transitions.
Let's Start Again
In the Project tab, we have to right click, then we get options to create the animation controller.

We name it and then drag it to the Unity chan model animator controller.

Next, we double click the animation controller, we see the states.

Let's break the state machine system we have by default any state, entry state and exit state.

Make sure that apply root motion is unchecked.
Now let's bring in some animations we intend to work with. We drag the wait animations to the picture.

It's time to save the scene. Give it a name and save it.

Time for the MQTT Client
What is MQTT?
As per wiki, mqtt is a machine to machine "IoT" protocol. It's highly reliable and it is easy to transfer or transmit messages on fast and accurate manner.
We searched a lot on the internet but there was one github link that came in to the rescue.

We downloaded it and imported it our project. We opened the example scene in Unity.

It was able to send and receive MQTT message.
For our receiving.sending purpose, we thought of a trick. We used the mymqtt app from Google play store so that we could send/receive data to channel.
MYMQTT App

The easy way because it was very easy for us to communicate.
The app has:
Dashboard, Subscribe, Publish, Stored Messages and Settings
The settings is the most important section in our view.
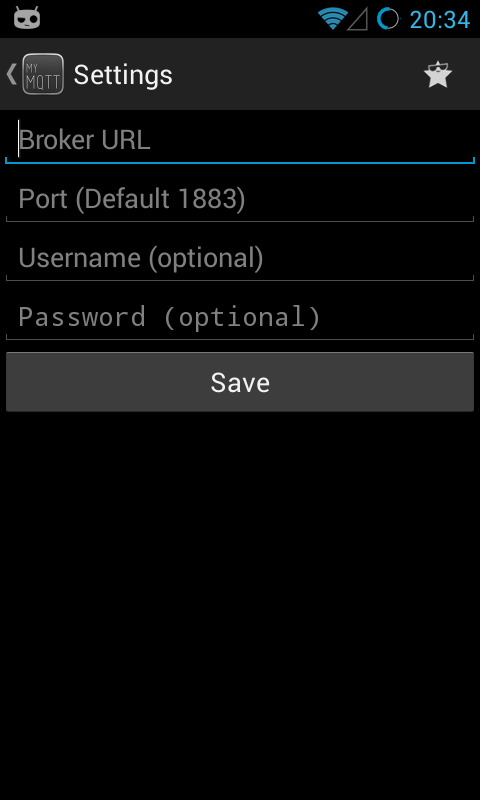
Here in the main broker url tab we give in: iot.eclipse.org and port is 1883.
Animation Control
Let's go back to animations again, we have handled the mqtt part, we will cover the code changes as we make the animation control going.
The structure looks like this after importing and adding the details in the scene.

Now as adding the wait animations, we see in the animation controller that in orange color one of the waiting states, it's the default state of animation.

We can just right click on any state and then make it to default state. From the other waiting states, we make a transition to the default state as shown in the figure above.
Now, we will start working on a C# script.
When we create the script, it is empty.

We go to Assets, then Create and then C# script.
This script will work as our point for controlling the animations. to start with, the script is empty.
//
// using UnityEngine;
using System.Collections;

public class Play : MonoBehaviour {

	 Use this for initialization
	void Start () {

	}

	// Update is called once per frame
	void Update () {

	}
}

//
In the script, first we need to assign animator, hence we declare it as:
public Animator Animd;
getting access to animator controller, we have get the component that drives the animation.
    Animd = GetComponent<animator>();
    //
for getting different keys for interactions, we declare it in update method, it allows us to check if we have pressed keys in keyboard, touch control or other inputs:
     if (Input.GetKeyDown("1"))
        {
            Animd.Play("WAIT01", -1, 0.5f);
        }
        if (Input.GetKeyDown("2"))
        {
            Animd.Play("WAIT02", -1, 0.5f);
        }
        if (Input.GetKeyDown("3"))
        {
            Animd.Play("WAIT03", -1, 0.5f);
        }
        if (Input.GetKeyDown("4"))
        {
            Animd.Play("WAIT04", -1, 0.5f);
        }
    //
where WAIT01 is the name of the animation -1 gives the layer of the animation control system. The animation control system can be broken down into sublayers when you create a transition system.
0f it shows from which point the animation starts playing on.
Now we will work on the movement horizontally and vertically, hence we need to declare the parameters. It will be a float format.

For horizontal and vertical, we had to declare two parameters.

Now we need to go back to the script and declare it.
private float inputH;

private float inputV;
Now we need to detect the horizontal and vertical axis.
inputH = Input.GetAxis("Horizontal");

 inputV = Input.GetAxis("Vertical");
Now we need to put the values of inputH and inputV.
Animd.SetFloat("inputH", inputH);
Animd.SetFloat("inputV", inputV);

It's time now to create a new blend tree so that we can add a sublayer to the animation control.
In this layer, we will be adding movement animations where we can portray movements in left, right, up and down direction.
We make the blend tree type 2D simple directional.
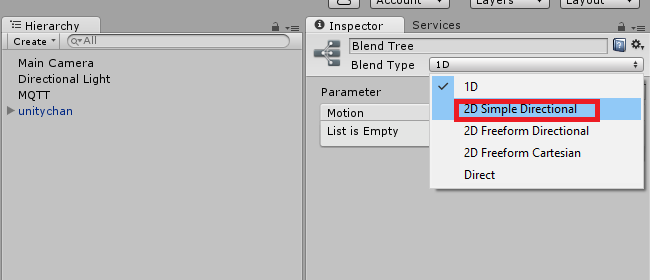
and the parameters as inputH and inputV.

In the motion list, we add different motion fields. We add four of them for adjustment.

We need to update the values:

As we have added the movement, now it's time to see how the sub layered blend tree look like. Add the Motion option we substitute with the appropriate movement on left, right, up and down.

The movement mapped to motions. Now the sublayer looks like this. Blue dots are our animations and red dot is how we blend close.

Now we make a transition from Base layer to sublayer (as we have done before left click to transition to the sublayer). Now we select the transition clicking on the arrow connecting WAIT00 and move.

We have to uncheck "has exit time" option as doing that will allows us to not wait for the animation and go to the next state.

Now we go to the conditions option. Where we setup inputV and inputH and go to particular condition when greater than 0.1.

Now we add another condition.

When inputV is less than -0.1, then we go to the previous transition. We used multiple Blend tree transition for proper reflections of movement.

Next step is add rigid body to Unity Chan model and make sure gravity is unchecked.

Now we add the movement to the rigidbody, we need to go back to the script.
Animd.SetFloat("inputH", inputH);
        Animd.SetFloat("inputV", inputV);
We add the movement based on the directions:
       float moveX = inputH * 20f * Time.deltaTime;
        float moveZ = inputV * 25f * Time.deltaTime;
Then we add those back to the rigid body component.
       rbody.velocity = new Vector3(moveX, 0f, moveZ);
The MQTT Thing in Unity
Let's take a look at mqtttest.cs file:
using UnityEngine;
using System.Collections;
using System.Net;
using uPLibrary.Networking.M2Mqtt;
using uPLibrary.Networking.M2Mqtt.Messages;
using uPLibrary.Networking.M2Mqtt.Utility;
using uPLibrary.Networking.M2Mqtt.Exceptions;

using System;

public class mqttTest : MonoBehaviour {
	private MqttClient client;
	// Use this for initialization
	void Start () {
		// create client instance
		client = new MqttClient(IPAddress.Parse("143.185.118.233"),8080 , false , null );

		// register to message received
		client.MqttMsgPublishReceived += client_MqttMsgPublishReceived;

		string clientId = Guid.NewGuid().ToString();
		client.Connect(clientId);

		// subscribe to the topic "/home/temperature" with QoS 2
		client.Subscribe(new string[] { "hello/world" },
                         new byte[] { MqttMsgBase.QOS_LEVEL_EXACTLY_ONCE });

	}
	void client_MqttMsgPublishReceived(object sender, MqttMsgPublishEventArgs e)
	{

		Debug.Log("Received: " + System.Text.Encoding.UTF8.GetString(e.Message)  );
	}

	void OnGUI(){
		if ( GUI.Button (new Rect (20,40,80,20), "Level 1")) {
			Debug.Log("sending...");
			client.Publish("hello/world",
            System.Text.Encoding.UTF8.GetBytes("Sending from Unity3D!!!"),
            MqttMsgBase.QOS_LEVEL_EXACTLY_ONCE, true);
			Debug.Log("sent");
		}
	}
	// Update is called once per frame
	void Update () {

	}
}
The point where we need to change the part in the code is here.
The client will be directed towards our channel:
client = new MqttClient("iot.eclipse.org", 1883, false, null);
Now we subscribe to the channel:
// subscribe to the topic "/home/temperature" with QoS 2
        client.Subscribe(new string[] { "rupam/data" },
        new byte[] { MqttMsgBase.QOS_LEVEL_EXACTLY_ONCE });
The updated mqttclient.cs file:
using UnityEngine;
using System.Collections;
using System.Net;
using uPLibrary.Networking.M2Mqtt;
using uPLibrary.Networking.M2Mqtt.Messages;
using uPLibrary.Networking.M2Mqtt.Utility;
using uPLibrary.Networking.M2Mqtt.Exceptions;

using System;

public class mqttTest : MonoBehaviour {
	private MqttClient client;
	// Use this for initialization
	void Start () {
        // create client instance
        client = new MqttClient("iot.eclipse.org", 1883, false, null);

        // register to message received
        client.MqttMsgPublishReceived += client_MqttMsgPublishReceived;

		string clientId = Guid.NewGuid().ToString();
		client.Connect(clientId);

        // subscribe to the topic "/home/temperature" with QoS 2
        client.Subscribe(new string[] { "rupam/ar" },
               new byte[] { MqttMsgBase.QOS_LEVEL_EXACTLY_ONCE });
    }
    string msg = "";
    public static int Num = -1;
    void client_MqttMsgPublishReceived(object sender, MqttMsgPublishEventArgs e)
	{
        try
        {
            msg = System.Text.Encoding.UTF8.GetString(e.Message).Trim();

            if (msg.Equals("STOP"))
            {
                //Num = 4;
                player.LR = -1;
                player.FR = -1;
            }
            if (msg.Equals("NO"))
            {
                player.LR = -1;
            }
            if (msg.Equals("FORWARD"))
            {
                player.FR=1;
            }
            if (msg.Equals("REVERSE"))
            {
                player.FR=0;
                Debug.Log("REVERSE");
            }
            if (msg.Equals("LEFT"))
            {
                player.LR = 3;
            }
            if (msg.Equals("RIGHT"))
            {
                player.LR = 2;
            }
            if (msg.Equals("JUMP"))
            {
                player.jump = true;
            }
            if (Num != -1)
             player.Num = Num;
        }
        catch
        {

        }

        Debug.Log("Received: " + msg+" Num="+Num  );
	}

	void OnGUI(){
		if ( GUI.Button (new Rect (20,40,80,20), "Level 1")) {
            Debug.Log("sending...");
            client.Publish("hello/world", System.Text.Encoding.UTF8.GetBytes
            ("Sending from Unity3D!!!"), MqttMsgBase.QOS_LEVEL_EXACTLY_ONCE, true);
            Debug.Log("sent");
        }
	}
	// Update is called once per frame
	void Update () {
        if (Num != -1)
            Debug.Log("Updating..." + Num);
    }
}
The key point of the updated code is:
msg = System.Text.Encoding.UTF8.GetString(e.Message).Trim();
where we encode the message and trim it. It helps to recognize the messages that are sent via mqtt in the faster manner. And the place where we have handled the movements is the crux for the project. Stress upon the mapping part of the code where we exchange the commands of mqtt.
Now let's look at the changes we made to the main player script.
For forward and Left values of the player, we have assigned a value of -1.
For multiple walk movements together, we have used inputH and inputV values respond to the mqtt commands.
using System.Collections;

public class player : MonoBehaviour {
    //internal static int Num;
    public Animator anim;
	public Rigidbody rbody;

	private float inputH;
	private float inputV;
	private bool run;
    public static int Num=-1;
    public static int FR = -1;
    public static int LR = -1;
    public static bool jump = false;
    // Use this for initialization
    void Start ()
	{
		anim = GetComponent<animator>();
		rbody = GetComponent<rigidbody>();
		run = false;
	}

	// Update is called once per frame
	void Update ()
	{
		if(Input.GetKeyDown("1"))
		{
			anim.Play("WAIT01",-1,0f);
		}
		if(Input.GetKeyDown("2"))
		{
			anim.Play("WAIT02",-1,0f);
		}
		if(Input.GetKeyDown("3"))
		{
			anim.Play("WAIT03",-1,0f);
		}
		if(Input.GetKeyDown("4"))
		{
			anim.Play("WAIT04",-1,0f);
		}

		if(Input.GetMouseButtonDown(0))
		{
			int n = Random.Range(0,2);

			if(n == 0)
			{
				anim.Play ("DAMAGED00",-1,0f);
			}
			else
			{
				anim.Play ("DAMAGED01",-1,0f);
			}
		}

		if(Input.GetKey(KeyCode.LeftShift))
		{
			run = true;
		}
		else
		{
			run = false;
		}

		if(Input.GetKey(KeyCode.Space))
		{
			anim.SetBool("jump",true);
		}
		else
		{
			anim.SetBool("jump", false);
		}

		inputH = Input.GetAxis ("Horizontal");
		inputV = Input.GetAxis ("Vertical");
        if (FR == 0)
        {
            inputV = -1f;

        }
        if( FR == 1)
        {
            inputV = 1f;

        }
        if (LR == 2)
        {
            inputH = -1;

        }
        if (LR == 3)
        {
            inputH = 1;

        }
        if (LR== -1)
        {
            //Num = -1;
           // mqttTest.Num = -1;
         //   inputH = 0;
        }
        if(FR==-1)
        {
            //inputV = 0;
            //mqttTest.Num = -1;
        }
        if(jump)
        {
            anim.SetBool("jump", true);
        }
        else
        {
            anim.SetBool("jump", false);
        }

        anim.SetFloat("inputH",inputH);
		anim.SetFloat("inputV",inputV);
		anim.SetBool ("run",run);

		float moveX = inputH*20f*Time.deltaTime;
		float moveZ = inputV*50f*Time.deltaTime;

		rbody.velocity = new Vector3(moveX,0f,moveZ);

        if (jump)
        {
            jump = false;
            Debug.Log("inputH=" + inputH + " inputV=" + inputV + " dt" +
            Time.deltaTime + "Num " + Num + " movZ:" + moveZ + "movX:" + moveX);
        }
    }
}</rigidbody></animator>
This part of the code allows us to connect to MQTT and use the service.
Google Cardboard Integration
Integration to Google Cardboard was the final thing as Microsoft Hololens didn't support the MQTT hence decided to settle down with Google Cardboard. At first, when we started, we were hoping where do we start but found the Unity starting point at Google Cardboard link.

Now we need to go to the Git repo to download it.

Save the download. Then extract it.

Now you need to import the Google cardboard package in Unity.

The scene that we used for our experimenting and integration purpose was the headset demo scene which had all the requirements fulfilled for our work.

The most important part for our scene was camera integration in terms of VR perspective. Then additional setup for the scene. Let's start with it. In our scene, the first thing that was to be copied was GVR reticle. The GVR reticle needs to be attached to the main camera. Next, we had to copy GVR View main, floor canvas, event system and overlay canvas.
After copying our scene, it looked like this while running.

Now we are good to go with Google cardboard. The scene is compatible now with Google cardboard.
We will now make the apk for the project. First of all, we need to change the build configuration for the project to Android.

Now when we work on the build, it starts compiling and building for Android.

After the compiling process is over, an apk file is created.

Controlling the Puppet with Hardware
Now that we have added Mqtt gateway into the project, it's time to control it. For an Android based control, all you have to do is generate Mqtt commands intuitively from the Android app.
We have shown how a simple Mqtt based remote control can be created in this article. Please refer to the article and download the app.
Controlling the Puppet with Gesture
You can also use custom gestures for controlling the puppet. Please refer to this section of YouCar.
You need to change the Mqtt channel. Keep the channel specific to your project or user so that when other users are using your app, their command doesn't interfere with the current user's command. We tried the gesture part (Intel Realsense) with both of us (me and Rupam far apart in different places in India one in eastern part and other in southern part we came up with pretty interesting results. We were able to control unity character (or puppet) still far apart and that's the power of mqtt.
The pictures as using exchange using teamviewer.


Controlling Puppet with Intel Edison IoT Device
This part was worked upon by our other co-author Moumita Das and she created the different gestures for using with Intel Edison. Finally, those gestures are mapped by mqtt to use as a wearable for our project.
Please refer to this article on Accelerometer based gesture recognition in Intel Edison by Moumita Das for understanding the circuit and the code for gesture recognition and integrating IoT device gesture into the context of the current app. That article elaborates UP, DOWN, LEFT and RIGHT gestures. You can easily integrate FORWARD and REVERSE gesture with the framework and use that in current context.
Why the Hololens Experiment Failed
We don't have a hololens device but we are extensively working on the hololens emulator (love to have one if somebody sponsors it :-) ) and have done lot of work regarding it. We are also working on a book for hololens. First, our idea was to get hold of the hololens Origami project. Each and every project I built was on top of it. Some recent experiment pictures.

When the project runs in emulator, it gives the same unity splash screen.

Lastly, we made a game with spatial mapping where we air tap(gesture) balls fall and we score points in free space where the holograms are placed.

Finally, we thought we will bring the same expertise to work but didn't work. The general case was the .NET Framework for unity(3.5) mqqt was not ready to be referenced and we were unable to add the mqtt framework to it. We searched a lot in internet but we were unable to find the right answers. Some of the fellows at unity forum suggested that we can add the framework if we had the IL2CPP backend. But that extension is not there in the hololens technical preview.

The il2cpp backend is not available till now and hence we couldn't do it. We keep on trying it and will of course, take different routes too. In the next block diagram, we show the entire workflow we tried for hololens and where it failed.

Conclusion
After the complete experiment, we made a complete framework for Unity which can be extended to other games easily (we will be doing it) and can be controlled by gestures, phones and other wearable devices anywhere the only connected medium required is internet. It was a fascinating experience.