
Using dhtmlxScheduler with MeteorJS
0/5 (0 vote)
Learn how to use JavaScript Event Calendar with MeteorJS Framework
Introduction
In this article, we’ll learn the basics of using the Meteor framework for creating web applications. Meteor is an open-source full-stack JavaScript framework that was written using Node.js. It was designed to simplify the web applications development process. The main feature of this framework is the possibility to transfer data changes in real-time.
To make our example more exciting, we won’t use a typical “Hello, World!” approach to learning how everything works. Instead, we’ll create an online scheduler using dhtmlxScheduler, feature-rich JavaScript event calendar.
All we need to create our applications are few easy steps. Well, let’s start.
Step 1. Installing Meteor and Creating a New Project
The way of how you install Meteor depends on the operating system you use. For Windows, you should get the installation package.
In case of OSX or LINUX, you can use the following command:
curl https://install.meteor.com/ | sh
Check the installation page for more details.
After a while, all the required files will be installed, and you’ll be ready to create a new project. Our will be named meteor_scheduler. To do so, type in your terminal:
meteor create meteor_scheduler
This command will create a new folder with the required files within it. Now, we can try if everything works. Open the newly created folder and run the meteor command:
cd meteor_scheduler
meteor
Here’s the typical output that you should get:
=> Started proxy.
=> Started MongoDB.
=> Started your app.

=> App running at: http://localhost:3000/
You can open http://localhost:3000 in your browser to check the result. You should see the click counter with the couple of links:

Doesn’t look so promising, but be patient.
Step 2. Add and Initialize the dhtmlxScheduler Package
There’s a special package that allows you to add dhtmlxScheduler to your Meteor project. There’s no need to download and unpack any files manually. To add the required package, use the command:
meteor add dhtmlx:scheduler
To learn more about this package, you can check this page.
Since we’re working on the client side of the application, we should edit the client/main.html file for our needs. Replace the existing code with the following:
<body>
<div id="scheduler_here" class="dhx_cal_container" style='width:100%; height:500px;'>
<div class="dhx_cal_navline">
<div class="dhx_cal_prev_button"> </div>
<div class="dhx_cal_next_button"> </div>
<div class="dhx_cal_today_button"></div>
<div class="dhx_cal_date"></div>
<div class="dhx_cal_tab" name="day_tab" style="right:332px;"></div>
<div class="dhx_cal_tab" name="week_tab" style="right:268px;"></div>
<div class="dhx_cal_tab" name="month_tab" style="right:204px;"></div>
<div class="dhx_cal_tab" name="year_tab" style="right:140px;"></div>
</div>
<div class="dhx_cal_header">
</div>
<div class="dhx_cal_data">
</div>
</div>
</body>
This code will create the navigation bar, buttons, etc. To initialize the scheduler, use the init() method. Place this code at the bottom of your <body></body> section:
<script type="text/javascript">
    scheduler.init("scheduler_here", new Date());
</script>
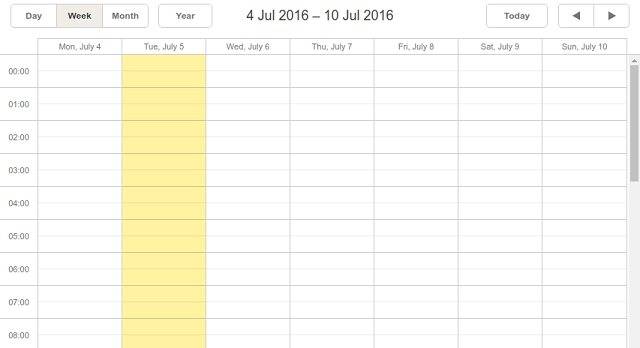
That’s it! We can already try our application. Run the meteor command if you have shut down the server and open http://localhost:3000 in your browser. The result is shown below:
You can double click the proper calendar area, and the new task will appear. Resize it to change its duration or drag it to any date you want:

Looks great but if you shut down the server and then run it again, all created tasks will disappear. The reason is that we have not provided the opportunity to save the data. Let’s fix it.
Step 3. Adding Meteor Data Adapter for dhtmlxScheduler
First, add the dhtmlxScheduler data adapter package to your application:
meteor add dhtmlx:scheduler-data
Now, you should define data collections. There are different available approaches for this task, but we’ll use the one that will make collections available for both client and server. We need to create a new folder named collections within the root folder of our project. After that, create a file named tasks.js within this folder and add the following code into it:
TasksCollection = new Mongo.Collection("tasks");
Now, we should change the way of the scheduler initialization. Replace the existing script within the client/main.html file with the following:
Meteor.startup(function() {
  //Init dhtmlxScheduler.
  scheduler.init("scheduler_here", new Date());

  //Init dhtmlxScheduler data adapter.
  scheduler.meteor(TasksCollection);
  //or
  scheduler.meteor(TasksCollection.find(/*[anything]*/), TasksCollection);
});
Done. Now you can refresh the page, restart the server and not have to worry about data safety.
Conclusions
The bast part about working with Meteor is the speed of development. As you saw, if tool developers are taken care of creating the proper Meteor packages, there’s even no need to download additional files manually. Meteor will take care of everything. With Meteor you can see changes in real-time. After you change a line of code, you can see the consequences immediately without server restarting.