Create local SSL website with self signed certificate
5.00/5 (2 votes)
In this post we will discuss a quickest way to create a secure website with self signed certificate.
Introduction
Many times in our projects we have to work with secure website. And most of the time, for development purpose it is not readily available before development start.
In this post we will discuss a quickest way to arrange for a secure website using self-signed certificate.
Let’s just start the process.
Create a locally signed certificate (IIS 7.5 is used here)
First of all, we need a certificate for creating a SSL website, and we know we don’t have any available SSL certificate. So we will also create a local system certificate and use that to create a SSL website later.
First select the root machine node and then select "Server Certificates" icon in the feature pane as highlighted below:

You will see a screen like below: All existing certificated (if any) will be visible here. Click on “Create Self-Signed Certificate…”, as highlighted in below screen.

You will be asked to give your certificate a name. For now give it a name “testSSL” and click on “OK”.

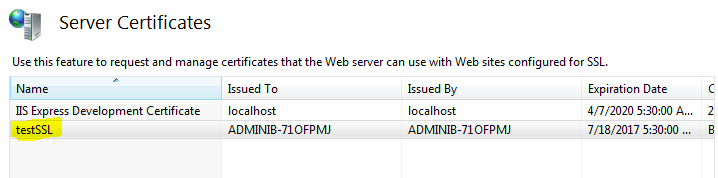
That’s it, you have a new certificate created and it will now be listed in certificate list, as shown below:
Create SSL site:
OK, so the certificate creation part is now completed, let’s now create a new SSL website using this certificate.
Open IIS, right click on Sites and select “Add Web Site…”.

On click on “Add website…”, you will get a form like below:
- Give your site a name, put “testSSL” for now.
- Provide a physical path where site content will be kept. In this example I have created a simple one line HTML and put that in root folder. (HTML code snippet is provided at the end).
- In binding section, select https and Port as 443.
- Click on dropdown below SSL certificate and you will found the certificate we have just created above, listed there. Select that certificate.
- Click “OK”

We are done. Although when you will run this newly created secured website, it will throw below exception.
This is because browser will identify that the certificate we are using is just self-signed. Click on “Add Exception…” and confirm a security exception by clicking “Confirm Security Exception” as highlighted in next screen.


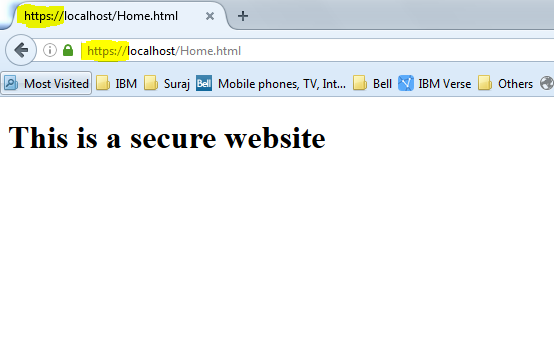
For testing purpose I have just added a small HTML file named Home.html, inside our root folder “C:\testSSL”.
Code for that html is as below:
<!DOCTYPE html>
<html>
<body>
<h1>This is a secure website</h1>
</body>
</html>
Now, when you will browse the secured website https://localhost/Home.html, you will get a screen like below. Here we have a secured website now which we can use well before actual SSL website with actual certificate is available for actual use.