
Firebase Android Tutorial Part 1 – Getting Started
5.00/5 (2 votes)
Firebase Android Tutorial : Adding Registration and Login Hello Developers, this is our android firebase tutorial. In this tutorial we will create an android firebase app that will use firebase android login functionality. This post will help you get you up and running with integrating Firebase to a
Hello Developers, this is our android firebase tutorial. In this tutorial we will create an android firebase app that will use firebase android login functionality. This post will help you get you up and running with integrating Firebase to android. In this tutorial we will discuss how to add firebase to your app, implement firebase user authentication and lot more. Before we start building the app, let discuss briefly about Firebase android API.
What is Firebase?
Firebase is a platform for mobile developers to develop awesome-quality apps, quickly grow a user base, and monetize apps. It includes a hell lot of features, that developers can use to fulfill their goals. Let’s discuss some of these features.
Firebase helps developers in development, growth and monetization of your mobile applications.
It provides the following features for the Development phase
- Integration with Cloud Messaging.
- Robust Authentication for added security.
- Realtime Database for realtime storage of app data.
- Storage support for files.
- Support for on the fly Remote Configuration.
- Test Lab to deliver high quality apps.
- Crash Reporting to keep your apps stable and free from bugs.
To help you acquire big user base and monetize the apps it allows the following :
- Notifications to engage users.
- App Indexing to boost your apps rank among other competitors.
- Support for Invites to grow quickly with the help of existing users.
- AdWords integration to quickly monetize apps and start earning.
Adding Firebase based Authentication
To add Authentication using Firebase follow the below steps :
- Go to Firebase Website firebase.google.com and create a firebase account to start with. Go to Firebase console and Create a New Project by clicking on the “Create New Project” Button as shown below.

- Give the Project name and country you are currently in, Once you are done click on “Create Project” button.

- In the next screen choose “Add Firebase to your Android app” and then add the package details and Debug signing certificate SHA-1 key( This is required if you want to enable certain features like Dynamic Links, Invites, and Google Sign-In etc. otherwise it is an optional field). If you are not sure how to generate SHA-1 fingerprint see the following tutorial Adding Google Login to Android Apps under the heading Generate SHA-1 fingerprint

This will download the google-services.json file. Download it to your computer. We will add it to our android app later.
- In the projects dashboard. Click on Auth Menu, then in the SIGN-IN METHOD click on Email/Password and enable it.

Once you are done with this, Let’s create the Android Application that will connect to Firebase for user authentication.
Pre-requisites
- Android Studio installed on your PC (Unix or Windows). For working with Firebase you should install Android Studio 1.5 or higher. Also download the latest Google Play services SDK from through Android SDK Manager.
- A real time android device (Smartphone or Tablet) configured with Android Studio. The device should be running Android 2.3 (Gingerbread) or newer, and Google Play services 9.2.0 or newer.
- Knowledge of working with Floating Label Edit Text
Creating a New Project
- Go to File → New → New Project and enter your Application Name.
- Enter company domain, this is used to uniquely identify your App’s package worldwide. Remember to use the same package name as used in the firebase console.
- Choose project location and minimum SDK and on the next screen choose Empty Activity, since we would be adding most of the code Ourselves. Then Click on Next.
- Choose an Activity Name. Make sure Generate Layout File check box is selected, Otherwise we have to generate it ourselves.Then click on Finish. We have used the Activity Name as SignupActivity since this be the default screen when the user opens the app for the first time.
Gradle will configure your project and resolve the dependencies, Once it is complete proceed for next steps.
Add Permissions and Dependencies
- After Gradle syncs the project, add the google-services.json file to your project’s app folder as shown below.

- Since we need to connect to the Network add the Internet permission in AndroidManifest.xml file.
AndroidManifest.xml
<uses-permission android:name="android.permission.INTERNET"/>
- Now open your project’s build.gradle from the project’s home directory and add the following dependency.
build.gradle
classpath 'com.google.gms:google-services:3.0.0'
- Next, open your app’s build.gradle from the and add the following at the end.
build.gradle
apply plugin: 'com.google.gms.google-services'
- Also add the following dependency in the dependency section.
compile 'com.google.android.gms:play-services:9.2.0'
Adding Functionality
Open activity_signup.xml and add the following code. We have two edit text to input email and password and one button to submit, We have another button to go to the login screen in case user already has an account.
<?xml version="1.0" encoding="utf-8"?>
<LinearLayout xmlns:android="http://schemas.android.com/apk/res/android"
    android:layout_width="fill_parent"
    android:layout_height="fill_parent"
    android:gravity="center"
    android:orientation="vertical"
    android:padding="10dp" >
        <android.support.design.widget.TextInputLayout
            android:id="@+id/signup_input_layout_email"
            android:layout_width="match_parent"
            android:layout_height="wrap_content"
            android:layout_centerHorizontal="true"
            android:layout_marginTop="10dp">
            <EditText
                android:id="@+id/signup_input_email"
                android:layout_width="match_parent"
                android:layout_height="wrap_content"
                android:ems="10"
                android:inputType="textEmailAddress"
                android:hint="Email" />
        </android.support.design.widget.TextInputLayout>
        <android.support.design.widget.TextInputLayout
            android:id="@+id/signup_input_layout_password"
            android:layout_width="match_parent"
            android:layout_height="wrap_content"
            android:layout_centerHorizontal="true"
            android:layout_marginTop="10dp">
            <EditText
                android:id="@+id/signup_input_password"
                android:layout_width="match_parent"
                android:layout_height="wrap_content"
                android:ems="10"
                android:inputType="textPassword"
                android:hint="@string/hint_password" />
        </android.support.design.widget.TextInputLayout>
        <Button android:id="@+id/btn_signup"
            android:layout_width="fill_parent"
            android:layout_height="wrap_content"
            android:text="@string/btn_sign_up"
            android:background="@color/colorPrimaryDark"
            android:layout_marginTop="40dp"
            android:textColor="@android:color/white"/>
        <Button android:id="@+id/btn_link_login"
            android:layout_width="fill_parent"
            android:layout_height="wrap_content"
            android:text="@string/btn_link_to_login"
            android:background="@android:color/transparent"
            android:layout_marginTop="10dp"
            android:textColor="@color/colorPrimaryDark"/>
    <ProgressBar
        android:layout_width="wrap_content"
        android:layout_height="wrap_content"
        android:id="@+id/progressBar"/>
</LinearLayout>
We need to add logic to validate the user input and create a user in Firebase in case of valid input. We will use Firebase create user method createUserWithEmailAndPassword() to create a new user with email and password. The password should be alteast 6 characters long.
First we have to get an instance of the object FirebaseAuth using method getInstance(). Then we can use this instance to call createUserWithEmailAndPassword() to create a new user.
Open SignupActivity.java and add the following in the onCreate() method.
SignupActivity.java
super.onCreate(savedInstanceState);
        setContentView(R.layout.activity_signup);
        auth = FirebaseAuth.getInstance();

        signupInputLayoutEmail = (TextInputLayout) findViewById(R.id.signup_input_layout_email);
        signupInputLayoutPassword = (TextInputLayout) findViewById(R.id.signup_input_layout_password);
        progressBar = (ProgressBar) findViewById(R.id.progressBar);

        signupInputEmail = (EditText) findViewById(R.id.signup_input_email);
        signupInputPassword = (EditText) findViewById(R.id.signup_input_password);

        btnSignUp = (Button) findViewById(R.id.btn_signup);
        btnLinkToLogIn = (Button) findViewById(R.id.btn_link_login);


        btnSignUp.setOnClickListener(new View.OnClickListener() {
            @Override
            public void onClick(View view) {
                submitForm();

            }
        });

        btnLinkToLogIn.setOnClickListener(new View.OnClickListener() {
            @Override
            public void onClick(View view) {
                Intent intent = new Intent(SignupActivity.this, LoginActivity.class);
                startActivity(intent);
            }
        });
Here we are just referencing the EditText and Buttons from the layout and then added the OnClickListener() for the SignUp Button and for the link to Login activity.
On clicking the SignUp submitForm() method is called, we will discuss the method shortly and on clicking the link to Login we will launch the LoginActivity. Don’t worry right now, we will create this activity shortly.
After the onCreate method add the following utility methods.
SignUpActivity
    private void submitForm() {

        String email = signupInputEmail.getText().toString().trim();
        String password = signupInputPassword.getText().toString().trim();

        if(!checkEmail()) {
            return;
        }
        if(!checkPassword()) {
            return;
        }
        signupInputLayoutEmail.setErrorEnabled(false);
        signupInputLayoutPassword.setErrorEnabled(false);

        progressBar.setVisibility(View.VISIBLE);
        //create user
        auth.createUserWithEmailAndPassword(email, password)
                .addOnCompleteListener(SignupActivity.this, new OnCompleteListener<AuthResult>() {
                    @Override
                    public void onComplete(@NonNull Task<AuthResult> task) {
                        Log.d(TAG,"createUserWithEmail:onComplete:" + task.isSuccessful());
                        progressBar.setVisibility(View.GONE);
                        // If sign in fails, Log the message to the LogCat. If sign in succeeds
                        // the auth state listener will be notified and logic to handle the
                        // signed in user can be handled in the listener.
                        if (!task.isSuccessful()) {
                            Log.d(TAG,"Authentication failed." + task.getException());

                        } else {
                            startActivity(new Intent(SignupActivity.this, UserActivity.class));
                            finish();
                        }
                    }
                });
        Toast.makeText(getApplicationContext(), "You are successfully Registered !!", Toast.LENGTH_SHORT).show();
    }

    private boolean checkEmail() {
        String email = signupInputEmail.getText().toString().trim();
        if (email.isEmpty() || !isEmailValid(email)) {

            signupInputLayoutEmail.setErrorEnabled(true);
            signupInputLayoutEmail.setError(getString(R.string.err_msg_email));
            signupInputEmail.setError(getString(R.string.err_msg_required));
            requestFocus(signupInputEmail);
            return false;
        }
        signupInputLayoutEmail.setErrorEnabled(false);
        return true;
    }

    private boolean checkPassword() {

        String password = signupInputPassword.getText().toString().trim();
        if (password.isEmpty() || !isPasswordValid(password)) {

            signupInputLayoutPassword.setError(getString(R.string.err_msg_password));
            signupInputPassword.setError(getString(R.string.err_msg_required));
            requestFocus(signupInputPassword);
            return false;
        }
        signupInputLayoutPassword.setErrorEnabled(false);
        return true;
    }

    private static boolean isEmailValid(String email) {
        return !TextUtils.isEmpty(email) && android.util.Patterns.EMAIL_ADDRESS.matcher(email).matches();
    }

    private static boolean isPasswordValid(String password){
        return (password.length() >= 6);
    }

    private void requestFocus(View view) {
        if (view.requestFocus()) {
            getWindow().setSoftInputMode(WindowManager.LayoutParams.SOFT_INPUT_STATE_ALWAYS_VISIBLE);
        }
    }

    @Override
    protected void onResume() {
        super.onResume();
        progressBar.setVisibility(View.GONE);
    }
}
submitForm() method will validate the input fields and on receving valid inputs from the user it will call ceateUserWithEmailAndPassword(email, password) method with the email and password arguments.
Firebase will internally perform a network request and will execute the code in onComplete() once the request is complete.
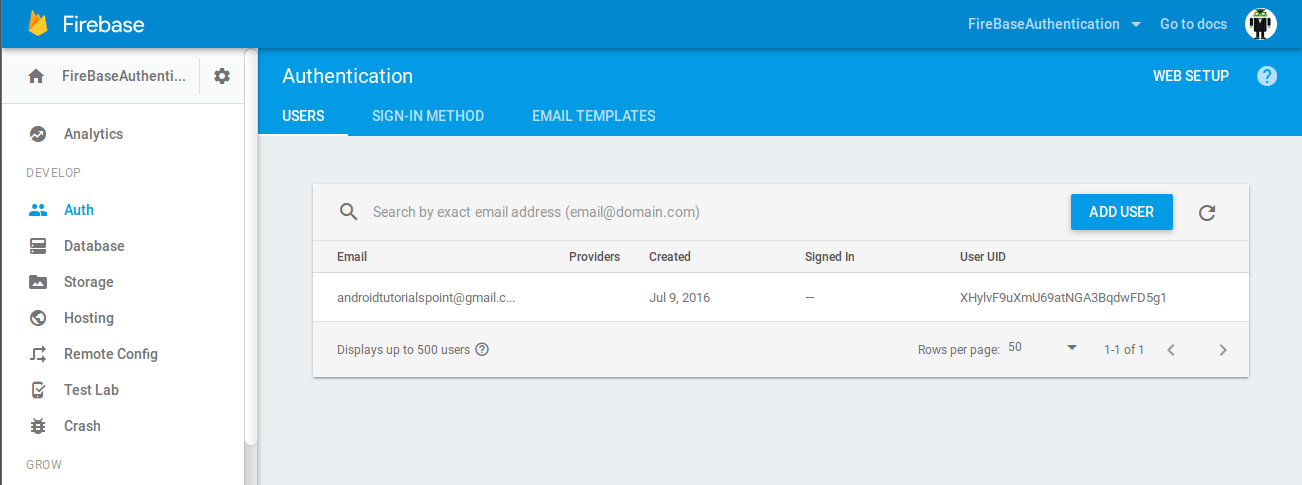
We are logging the exception to the LogCat in case of any error. On successful creation of the User, we call the UserActivity where we show user details.
On successful creation of the user, you can login into the Firebase console and see that the user has been created as shown below.
Next, we will create the LoginActivity.java where a pre-registered user can login to his account.
First, Create a new resource layout activity_login.xml and put the following code.
The layout is almost same as activity_signup.xml however we have updated the id’s and the text for the buttons.
activity_login.xml
<?xml version="1.0" encoding="utf-8"?>
<LinearLayout xmlns:android="http://schemas.android.com/apk/res/android"
    android:layout_width="fill_parent"
    android:layout_height="fill_parent"
    android:gravity="center"
    android:orientation="vertical"
    android:padding="10dp" >
    <android.support.design.widget.TextInputLayout
        android:id="@+id/login_input_layout_email"
        android:layout_width="match_parent"
        android:layout_height="wrap_content"
        android:layout_centerHorizontal="true"
        android:layout_marginTop="10dp">
        <EditText
            android:id="@+id/login_input_email"
            android:layout_width="match_parent"
            android:layout_height="wrap_content"
            android:ems="10"
            android:inputType="textEmailAddress"
            android:hint="Email" />
    </android.support.design.widget.TextInputLayout>
    <android.support.design.widget.TextInputLayout
        android:id="@+id/login_input_layout_password"
        android:layout_width="match_parent"
        android:layout_height="wrap_content"
        android:layout_centerHorizontal="true"
        android:layout_marginTop="10dp">
        <EditText
            android:id="@+id/login_input_password"
            android:layout_width="match_parent"
            android:layout_height="wrap_content"
            android:ems="10"
            android:inputType="textPassword"
            android:hint="@string/hint_password" />
    </android.support.design.widget.TextInputLayout>
    <Button android:id="@+id/btn_login"
        android:layout_width="fill_parent"
        android:layout_height="wrap_content"
        android:text="@string/btn_login"
        android:background="@color/colorPrimaryDark"
        android:layout_marginTop="40dp"
        android:textColor="@android:color/white"/>
    <Button android:id="@+id/btn_link_signup"
        android:layout_width="fill_parent"
        android:layout_height="wrap_content"
        android:text="@string/btn_link_to_signup"
        android:background="@android:color/transparent"
        android:layout_marginTop="10dp"
        android:textColor="@color/colorPrimaryDark"/>
    <ProgressBar
        android:layout_width="wrap_content"
        android:layout_height="wrap_content"
        android:id="@+id/progressBar"/>

</LinearLayout>
Now create a new java class LoginActivity.java and copy the following code there.
LoginActivity.java
package com.androidtutorialpoint.firebaseauthentication;

import android.content.Intent;
import android.os.Bundle;
import android.support.annotation.NonNull;
import android.support.design.widget.TextInputLayout;
import android.support.v7.app.AppCompatActivity;
import android.text.TextUtils;
import android.view.View;
import android.view.WindowManager;
import android.widget.Button;
import android.widget.EditText;
import android.widget.ProgressBar;
import android.widget.Toast;

import com.google.android.gms.tasks.OnCompleteListener;
import com.google.android.gms.tasks.Task;
import com.google.firebase.auth.AuthResult;
import com.google.firebase.auth.FirebaseAuth;

public class LoginActivity extends AppCompatActivity {


    private static final String TAG = "LoginActivity";
    private Button btnLogin, btnLinkToSignUp;
    private ProgressBar progressBar;
    private FirebaseAuth auth;
    private EditText loginInputEmail, loginInputPassword;
    private TextInputLayout loginInputLayoutEmail, loginInputLayoutPassword;


    @Override
    protected void onCreate(Bundle savedInstanceState) {
        super.onCreate(savedInstanceState);
        setContentView(R.layout.activity_login);
        auth = FirebaseAuth.getInstance();

        loginInputLayoutEmail = (TextInputLayout) findViewById(R.id.login_input_layout_email);
        loginInputLayoutPassword = (TextInputLayout) findViewById(R.id.login_input_layout_password);
        progressBar = (ProgressBar) findViewById(R.id.progressBar);

        loginInputEmail = (EditText) findViewById(R.id.login_input_email);
        loginInputPassword = (EditText) findViewById(R.id.login_input_password);

        btnLogin = (Button) findViewById(R.id.btn_login);
        btnLinkToSignUp = (Button) findViewById(R.id.btn_link_signup);

        btnLogin.setOnClickListener(new View.OnClickListener() {
            @Override
            public void onClick(View view) {
                submitForm();
            }
        });

        btnLinkToSignUp.setOnClickListener(new View.OnClickListener() {
            @Override
            public void onClick(View view) {
                Intent intent = new Intent(com.androidtutorialpoint.firebaseauthentication.LoginActivity.this, SignupActivity.class);
                startActivity(intent);
            }
        });
    }

    /**
     * Validating form
     */
    private void submitForm() {
        String email = loginInputEmail.getText().toString().trim();
        String password = loginInputPassword.getText().toString().trim();

        if(!checkEmail()) {
            return;
        }
        if(!checkPassword()) {
            return;
        }
        loginInputLayoutEmail.setErrorEnabled(false);
        loginInputLayoutPassword.setErrorEnabled(false);

        progressBar.setVisibility(View.VISIBLE);
        //authenticate user
        auth.signInWithEmailAndPassword(email, password)
                .addOnCompleteListener(LoginActivity.this, new OnCompleteListener<AuthResult>() {
                    @Override
                    public void onComplete(@NonNull Task<AuthResult> task) {
                        // If sign in fails, Log a message to the LogCat. If sign in succeeds
                        // the auth state listener will be notified and logic to handle the
                        // signed in user can be handled in the listener.
                        progressBar.setVisibility(View.GONE);
                        if (!task.isSuccessful()) {
                            // there was an error
                             Toast.makeText(LoginActivity.this, getString(R.string.auth_failed), Toast.LENGTH_LONG).show();

                        } else {
                            Intent intent = new Intent(LoginActivity.this, UserActivity.class);
                            startActivity(intent);
                            finish();
                        }
                    }
                });
    }

    private boolean checkEmail() {
        String email = loginInputEmail.getText().toString().trim();
        if (email.isEmpty() || !isEmailValid(email)) {

            loginInputLayoutEmail.setErrorEnabled(true);
            loginInputLayoutEmail.setError(getString(R.string.err_msg_email));
            loginInputEmail.setError(getString(R.string.err_msg_required));
            requestFocus(loginInputEmail);
            return false;
        }
        loginInputLayoutEmail.setErrorEnabled(false);
        return true;
    }

    private boolean checkPassword() {

        String password = loginInputPassword.getText().toString().trim();
        if (password.isEmpty() || !isPasswordValid(password)) {

            loginInputLayoutPassword.setError(getString(R.string.err_msg_password));
            loginInputPassword.setError(getString(R.string.err_msg_required));
            requestFocus(loginInputPassword);
            return false;
        }
        loginInputLayoutPassword.setErrorEnabled(false);
        return true;
    }

    private static boolean isEmailValid(String email) {
        return !TextUtils.isEmpty(email) && android.util.Patterns.EMAIL_ADDRESS.matcher(email).matches();
    }

    private static boolean isPasswordValid(String password){
        return (password.length() >= 6);
    }

    private void requestFocus(View view) {
        if (view.requestFocus()) {
            getWindow().setSoftInputMode(WindowManager.LayoutParams.SOFT_INPUT_STATE_ALWAYS_VISIBLE);
        }
    }

    @Override
    protected void onResume() {
        super.onResume();
        progressBar.setVisibility(View.GONE);
    }
}
The code is similar to SignupActivity.java . We will use Firebase function signInWithEmailAndPassword(email,password) and pass on the inputs provided by the user. If the login is successfull we launch the UserActivity.java to show user details, otherwise notify the user if the entered details are wrong.
Create a new java class UserActivity.java and add the following code.
UserActivity.java
package com.androidtutorialpoint.firebaseauthentication;


import android.content.Intent;
import android.os.Bundle;
import android.support.annotation.NonNull;
import android.support.v7.app.AppCompatActivity;
import android.view.View;
import android.widget.Button;
import android.widget.EditText;
import android.widget.ProgressBar;
import android.widget.TextView;

import com.google.firebase.auth.FirebaseAuth;
import com.google.firebase.auth.FirebaseUser;

public class UserActivity extends AppCompatActivity {

    private Button  signOutButton;
    private TextView helloUserText;
    private FirebaseAuth.AuthStateListener authListener;
    private FirebaseAuth auth;

    @Override
    protected void onCreate(Bundle savedInstanceState) {
        super.onCreate(savedInstanceState);
        setContentView(R.layout.activity_user);

        //get firebase auth instance
        auth = FirebaseAuth.getInstance();
        signOutButton = (Button) findViewById(R.id.sign_out);
        helloUserText = (TextView) findViewById(R.id.text_user);

        authListener = new FirebaseAuth.AuthStateListener() {
            @Override
            public void onAuthStateChanged(@NonNull FirebaseAuth firebaseAuth) {
                FirebaseUser user = firebaseAuth.getCurrentUser();
                if (user == null) {
                    // if user is null launch login activity
                    startActivity(new Intent(UserActivity.this, LoginActivity.class));
                    finish();
                }else{
                    helloUserText.setText("Hello  " + user.getEmail() +"");
                }
            }
        };

         signOutButton.setOnClickListener(new View.OnClickListener() {
            @Override
            public void onClick(View v) {
                signOutButton();
            }
        });

    }

    //sign out method
    public void signOutButton() {
        auth.signOut();
    }

    @Override
    protected void onResume() {
        super.onResume();
    }

    @Override
    public void onStart() {
        super.onStart();
        auth.addAuthStateListener(authListener);
    }

    @Override
    public void onStop() {
        super.onStop();
        if (authListener != null) {
            auth.removeAuthStateListener(authListener);
        }
    }
}
Here we have created an object of FirebaseAuth.AuthStateListener() that will keep the status of user. If the user is signed in it will display a message, otherwise it will launch the login activity for user to SignIn. There is a SignOut Button which uses Firebase signOut() method to signout the user. In the activity lifecycle method onStart() we have added the listener to check the status of the login.
Similarly in the onStop() method, we are removing the listener.
We have used the following string resources in our project. Open Strings.xml file and add these resources.
Strings.xml
<resources>
    <string name="app_name">Firebase Authentication</string>
    <string  name="minimum_password">Password too short, enter minimum 6 characters!</string>
    <string  name="auth_failed">Authentication error, Please enter a valid email and password or sign up</string>
    <string  name="hint_email">Email</string>
    <string  name="hint_password">Password</string>
    <string  name="btn_login">LOGIN</string>
    <string  name="btn_link_to_login">Already registered. Login !!</string>
    <string  name="btn_sign_out">Sign Out</string>
    <string name="btn_sign_up">Sign Up !!</string>
    <string name="err_msg_email">Enter a valid email.</string>
    <string name="err_msg_required">Required !!</string>
    <string name="err_msg_password">Enter a valid password with min 6 characters.</string>
    <string name="btn_link_to_signup">Don\'t have an account, Signup !!</string>
</resources>
That’s all folks, run your app in the emulator or an actual device. Create a new firebase user, then verfiy it gets reflected in the Firebase console. Now do a sign out and try to login again using the email and password you provided earlier.
What’s Next ??
After creating the Firebase android login app example, you can also use Firebase send email service to send password reset email to the users. One can also add Firebase remove user functionality in the app.
We hope you liked our Firebase Authentication example tutorial, please leave comments in the comment section below in case of any doubts.
Soon We will be covering articles on how to add Facebook and Google Sign-In using Firebase and how to integrate Firebase analytics to your app to get useful insights about user base. Interested developers can explore more about firebase hosting and firebase security.